Stratomaster E2 - EMS - MGL Avionics
Stratomaster E2 - EMS - MGL Avionics
Stratomaster E2 - EMS - MGL Avionics

Create successful ePaper yourself
Turn your PDF publications into a flip-book with our unique Google optimized e-Paper software.
<strong>Stratomaster</strong> <strong>E2</strong> - <strong>EMS</strong> Operator's ManualTable of ContentsAlarm Setup - Abnormal Readings ....................................................................................................30Disabling Individual Alarms ............................................................................................................31User Preferences - Personal Tastes..................................................................................................31Technical Setup .................................................................................................................................31Technical Specifications........................................................................................32<strong>MGL</strong> <strong>Avionics</strong>
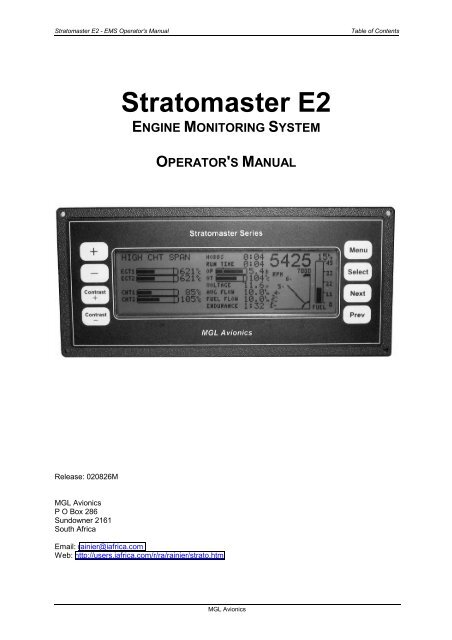
<strong>Stratomaster</strong> <strong>E2</strong> - <strong>EMS</strong> Operator's ManualIntroductionWHAT DOES IT DO?The <strong>Stratomaster</strong> <strong>E2</strong> continuously monitors and displays the following measurements on a large,graphic liquid-crystal display providing excellent viewing characteristics in direct sunlight or poorly litconditions:•= Up to four EGT/CHT thermocouple inputs•= Two NTC (Negative Temperature Coefficient) inputs (Eg: CHT or water temperature)•= Oil temperature and oil pressure inputs•= Engine revs•= Remaining fuel•= Fuel flow (burn rate)•= Endurance (if fuel flow option installed)•= Ambient temperature•= Power supply voltage•= Presetable Hobbs meter (total engine running time)•= Maintenance count-down timer•= Resetable fuel totalizer (with average fuel consumption)A comprehensive alarm system provides instant indication of any of the following alarm conditions:•= High engine revs (after presetable delay)•= High EGT and CHT•= High EGT and CHT differences between cylinders•= High water temperature•= High oil temperature•= Low oil pressure•= Low fuel•= Low estimated enduranceIn addition, the <strong>Stratomaster</strong> <strong>E2</strong> provides:•= Lean mode facility to provide for optimum fuel mixture adjustments•= Cruise mode facility to provide instant identification of changing EGT trends•= Simple, yet comprehensive configuration options via a menu system•= Flight log (black box recorder) of all engine readings allowing the last 15 to 60 minutes offlight data to be stored. Data can be uploaded to a PC for analysis via standard Air-Talk linkinterface (with optional cable and PC software). Recording time depends on activity and rateof change of monitored engine data.HOW IT WORKSThe <strong>Stratomaster</strong> <strong>E2</strong> is based around a fully integrated state-of-the-art microprocessor deviceproviding a powerful, high-speed computer capable of performing thousands of operations anddecisions in fractions of a second. This computer continuously monitors a host of engine parameters,displaying the results on a large, graphic, liquid-crystal display.The <strong>Stratomaster</strong> <strong>E2</strong> interfaces to your engine through a separate RDAC IV Remote Data AcquisitionComputer which is physically mounted right at the engine where your probes are connected. Thisensures that all wiring is kept to a minimum, greatly reducing installation time and providing excellentnoise immunity. The various measurement probes are connected to the relevant inputs of the RDACPage 3<strong>MGL</strong> <strong>Avionics</strong>
<strong>Stratomaster</strong> <strong>E2</strong> - <strong>EMS</strong> Operator's ManualInstallationINSTALLATIONThe following pages show the recommended connections for installation of your <strong>Stratomaster</strong> <strong>E2</strong>.Proceed with your installation according to your individual requirements.The <strong>Stratomaster</strong> <strong>E2</strong> display panel can be mounted in any suitable position in your cockpit panel.Although display viewing-angle is excellent both vertically and horizontally, for best results it isrecommended that the display be viewed as directly as possible. Vertical viewing angles aresomewhat better than horizontal.The <strong>Stratomaster</strong> <strong>E2</strong> shares its rear panel with similar instruments in the <strong>Stratomaster</strong> Series so notall connections or ports will be fitted (Eg: There is no pitot tube on the <strong>Stratomaster</strong> <strong>E2</strong>). Allconnections available on the <strong>Stratomaster</strong> <strong>E2</strong> will be described in this document.POWER SUPPLYThe <strong>Stratomaster</strong> <strong>E2</strong> requires a power supply voltage anywhere from 8V to 28V DC (typically a 12Vbattery fitted to your aircraft). Current consumption is very low at about 60-80 mA without displayIt is recommended that a power-switch and 1.5A slow-blow fuse be fitted in the supply line connectedas shown belowbacklighting and in the region of 280 mA with backlight. This current consumption includes the powerrequirements of the RDAC IV unit.Inline fuse, recommendedvalue is 1.5A slow blow.12V BatteryPower switch, often alsoused for other equipmentsuch as intercom and radioTo other equipmentGenerally it is not required to fit any form of power supply filters or surge suppressers as the<strong>Stratomaster</strong> <strong>E2</strong> includes the required protection devices. External power line filters or surgeprotectors should only be considered in very unusual conditions.Please note: If you set the display backlight mode to “auto”, the display backlight will be switched offautomatically after five minutes of no activity to conserve power. The display backlight will remainswitched on if engine revs are detected. You can select backlight modes under the User Preferencesmenu (see page 29).<strong>MGL</strong> <strong>Avionics</strong> Page 6
<strong>Stratomaster</strong> <strong>E2</strong> - <strong>EMS</strong> Operator's ManualInstallationEXTERNAL TEMPERATURE SENSORThe <strong>Stratomaster</strong> Flight includes a precision semiconductor temperature probe. It is recommendedthat you install it as shown above. The RED wire connects to the “Temperature sensor +” terminal.The remaining wire may be GREEN, BLUE or BLACK. This wire connects to the “Temperaturesensor –“ terminal.The probe head itself should be mounted using suitable means outside of the instrument pod oraircraft if a closed cockpit aircraft is used. The probe should be placed in the shadow of the pod oraircraft or in a place were sunlight cannot heat the probe. Also ensure that engine heat or exhaustgases cannot heat the probe at any time.The twisted cable can be extended should this be required. In this case please use a similar cabletype and continue the twist for the length of the cable.Should you choose not to use the probe, please disable the “Has External Temp” in the Device SetupMenu. In this case the unit will use the internal temperature probe of the RDAC unit. Due to selfheatingof the unit this may lead to incorrect ambient temperature readings. It is thereforerecommended that you install the external temperature probe.Should you require a suitable replacement probe, it can be obtained from <strong>MGL</strong> <strong>Avionics</strong> at reasonablecost or you can make up your own probe. In this case obtain a National Semiconductor TemperatureSensor type LM335 in a TO92 package.ALARM INDICATOR LAMPThe <strong>Stratomaster</strong> <strong>E2</strong> provides an uncommitted relay contact (i.e. not connected to anything) thatopens and closes once a second in the case of an active alarm. This can be used to switch anindicator panel lamp or a small buzzer.The contact is rated for a maximum current of 0.5 amperes (500 mA) at 50 V. Exceeding thisspecification could permanently damage the internal reed relay contact. We suggest using a12V / 1W indicator lamp such as can be found in many automotive parts supply shops. Theseindicators (called pilot lights) come in many colours, sizes and shapes.Please note that the <strong>Stratomaster</strong> <strong>E2</strong> will close the alarm contact briefly every time the unit isswitched on. This is intended to provide a means of checking that the alarm is functional during pretake-offchecks.Page 7<strong>MGL</strong> <strong>Avionics</strong>
<strong>Stratomaster</strong> <strong>E2</strong> - <strong>EMS</strong> Operator's ManualInstallation12V Battery12V indicator lamp,maximum wattagerating 24WPlease note:The drawing above leaves out the switch between the (+) terminal of the battery andthe <strong>Stratomaster</strong> <strong>E2</strong> unit for the sake of clarity.ALARM AUDIO OUTPUTIn addition to the alarm output contact described in the previous section, you can connect either aspeaker or an intercom system to the <strong>Stratomaster</strong> Extreme. In this case an alarm tone will soundonce a second for half a second whenever an alarm is active.In case you connect a speaker, you should set the audio level to “high” by bridging the relevant linkposition. Should you want to connect to an intercom system that has an external audio input, set theaudio level to “low”.Note: Please ensure that your intercom system will mute any external audio should radiotransmissions be received. It may be illegal in your country to use any other system.4 or 8 Ohm speakermounted in panel orsuitable locationIntercom system withexternal audio input(music input or similar)<strong>MGL</strong> <strong>Avionics</strong> Page 8
<strong>Stratomaster</strong> <strong>E2</strong> - <strong>EMS</strong> Operator's ManualInstallationAIRTALK LINKTwo RCA audio plugs provide for connection of the <strong>Stratomaster</strong> <strong>E2</strong> to an AirTalk local area network.The plugs are paralleled to allow for daisy-chaining the instrument to other AirTalk compatibledevices. The <strong>Stratomaster</strong> <strong>E2</strong> uses the AirTalk link for connection to a PC or laptop via a suitablecable and software (optional extra from <strong>MGL</strong> <strong>Avionics</strong>) to allow the flight recorder data to be retrievedfor analysis.CONNECTING THE RDAC UNITPlug lead from the RDAC unit into the socketmarket “RDAC”. Press connector firmly andall the way until it clicks into place. Securecable in such a way that it cannot come toany harm from sharp edges or engine heat.Ensure that vibrations will not cause wear oneither the connector or cable.RDAC THERMOCOUPLE INPUTSThe RDAC IV provides four thermocouple inputs for use with EGT and CHT probes. Both K as well asJ-type probes can be used. K-types are used for EGT probes and while most CHT probes are also K-types, some makes of CHT probes are J-type. The probe type selection is done in the Device SetupMenu (Sender Setup). Incorrect selection will lead to incorrect temperature display.The RDAC IV will accept both grounded and isolated thermocouple probes. Your only consideration incase of the more common grounded configurations is that you need to ensure that the thermocouplemounting position (Exhaust flange, etc) is at the same electrical potential as the negative supply lineof the <strong>Stratomaster</strong> <strong>E2</strong> (normally the – (minus) of the battery). The RDAC unit has an earth pointmarked “GROUND” that you should connect to the engine block via a short cable.Probe usage depends on your setup of the <strong>Stratomaster</strong> <strong>E2</strong>. Some typical common selections ofthermocouple probe usage include:•= 1xEGT, 2xCHT Rotax 447•= 2xEGT, 2xCHT Rotax 503, 582, VW•= 2xEGT Rotax 582, 912, 914•= 4xEGT Rotax 912, 914 (in addition to two NTC CHT channels)Page 9<strong>MGL</strong> <strong>Avionics</strong>
<strong>Stratomaster</strong> <strong>E2</strong> - <strong>EMS</strong> Operator's ManualInstallationThe thermocouple amplifier is a precision device providing full cold junction compensation and bowvoltage correction. In addition the amplifier measures and corrects for its own errors. This results invery accurate measurements providing you install high quality probes. Here are some guidelines:EGT Probes:CHT probes:Select probes that are made from 316 stainless steel and that use glass-fibreinsulated conductors. Teflon insulated conductors as found in many cheaper probesintroduce errors as the insulation melts moving the measuring point towards themounting bolt which transfers a lot of heat to the exhaust material. This results inunder reading probes. Stay away from probes that use simple plastic heat shrinksleeving – it does not last. Choose probes that use a generous amount of stainlesssteel spring as strain relief. The Bolt itself should be stainless as well or it will rustvery quickly.These are made from washers to fit spark-plug bases. Temperatures are considerablylower so most thermocouple cables will work without problems. The biggest area ofconcern should be the connection of the thermocouple cable to the washer. This oftenbreaks after the spark plug has been changed a few times. Choose a probe that issuitably reinforced at this point for a long and trouble free life.EGT and CHT probes supplied by <strong>MGL</strong> <strong>Avionics</strong> are of highest quality. We recommend that youconsider using our probes if at all possible.Warning:Four-stroke engines produce much hotter exhaust gases compared to two strokeengines. Do not use EGT probes made from lower grade stainless steel (for example310), these probes will not withstand the high temperatures and can fail as the metalgets very soft at 800 °C. Many four strokes (such as the Rotax 912) will produce exhaustgases of up to 850 °C.<strong>MGL</strong> <strong>Avionics</strong> Page 10
<strong>Stratomaster</strong> <strong>E2</strong> - <strong>EMS</strong> Operator's ManualInstallationFUEL-FLOW SENDER INSTALLATIONThe optional Fuel-Flow Sender is highly recommended for use with the <strong>Stratomaster</strong> <strong>E2</strong>. It providesinstantaneous readouts of hourly fuel usage, as well as estimated endurance with remaining fuel. Youcan also verify the performance of your fuel pump during the pre-takeoff engine run up – a veryvaluable check !It is possible to set up the <strong>Stratomaster</strong> <strong>E2</strong> to calculate remaining fuel by subtracting fuel actuallyused from a value entered when you filled your tank(s).Note: Direction of fuel flowIndicated by arrow on senderRED wire – Fuel Flow SenderSupplyBLUE wire – Fuel Flow SendersignalBraid – Fuel Flow SenderGroundBLUEBraidREDWarning:Incorrect wiring can damage both the RDAC unit as well as the flow sender.Please note that the installation of the Fuel-Flow sender should be done in such a fashion that dirt ordebris from the fuel tank cannot lodge inside the flow sender. These will not block you fuel flow butmay lead to the impeller inside the sender jamming. It is usually sufficient to mount the Flow senderafter the fuel filter but before the fuel pump. It is a good idea to provide a small reservoir such as aprimer bulb between the flow sender and the fuel pump.Primer bulb or small reservoirFuel filterFuel-FlowsenderFuel TankFuel pumpPage 11<strong>MGL</strong> <strong>Avionics</strong>
<strong>Stratomaster</strong> <strong>E2</strong> - <strong>EMS</strong> Operator's ManualInstallationPlease ensure that no fuel vapour can be trapped inside the sender housing in the form of bubbles.Due to the low fuel flow rates the bubbles will prevent the tiny impeller from turning freely, You canverify the turning of the impeller. You should notice three dark spots that are just visible in the insideof the fuel flow sender. These are small magnets that are attached to the impeller. With fuel flowingyou should see the magnets turning.The best defence against vapour bubbles is to install the flow sender in such a way that the bubblescan escape. The easiest way is to point the outlet upwards and the inlet (with the jet) downwards.Another possible problem is the fuel sender jet. When you install it, do not damage it. Use a drill bit ofsuitable diameter to push the jet all the way the opening of the jet must be just in front of the impeller.Using other makes of Flow SendersIt is quite possible to use Flow Senders other than the RS device. In this case ensure that the Senderoutputs a 5V TTL square wave or a similar signal. The <strong>Stratomaster</strong> interface electronics will adapt toa variety of different voltages and pulse shapes as it contains a Schmidt-trigger input stage. Thecalibration factor can be entered in a wide range making the unit particularly suited to other Flowsenders.The supply output terminal for the Sender provides a positive, regulated 5-volt output. This may beused to power the Flow Sender provided the Sender will not draw more than 40 mA of current.Should your sender require a higher voltage or more current, then you must supply the sender from adifferent power source. Exceeding the rating on the <strong>Stratomaster</strong> Flow sender supply terminal canaffect the operation on the unit negatively or even damage it.Settings for the calibration factor for other Flow senders can be estimated, using the followingformulae:Estimated calibration factor:1000 / (Number of pulses per 4 second period for 1 litre/hour flow)Recommended Calibration Factors for RS Flow Sender Part No. 256-225With jet installed = 208. Recommended with flow rates below 60 litres/hour maximum.Without jet installed = 750. Recommended with flow rates above 60 litres/hour.Please refer to the leaflet included with the Flow Sender for information on pressure drop vs. flow rate,wetted materials etc.DisclaimerIt is your responsibility to ensure that the flow sender used is compatible with the fuels you intendusing. We have found the RS sender to be very compatible with automotive fuels used in SouthAfrica, many of which contain methanol. 100LL AVGAS also appears not to harm the sender in anyway. We have exposed the RS sender continuously to our automotive fuels for two years without anynoticeable ill effect on the sender.Despite this however, <strong>MGL</strong> <strong>Avionics</strong> or its appointed agents cannot assume responsibility for anyincident or damage, even loss of life by whatsoever cause connected with the fuel flow sender or the<strong>Stratomaster</strong> Flight Instrument. Usage of this or other senders is your own sole responsibility. If youdo not agree with the above statement you must not use the fuel flow sender.Note to PilotsAlways have a visual indication of the fuel level available, either by means of a sight glass, direct tankobservation or a known, reliable secondary fuel level gauge. Fuel level indication by means ofPage 13<strong>MGL</strong> <strong>Avionics</strong>
<strong>Stratomaster</strong> <strong>E2</strong> - <strong>EMS</strong> Operator's ManualInstallationcalculated fuel burn is subject to errors both by entering incorrect starting fuel levels as well asmechanical problems causing the flow sender impeller to turn too slowly, resulting in under readingfuel burn and thus over reading remaining fuel.As pilot in command of an aircraft it is your responsibility to ensure that you have sufficient fuel toreach your intended destination. Always ensure that you have a generous amount of reserve fuel andnever use your reserve fuel except in an emergency if it is unavoidable.CONNECTING A FUEL-LEVEL SENDERSafety Hazard ! Please read this:Be careful when installing fuel level senders into fuel tanks. Ensure that the fuel tank is completelyempty when you proceed with the installation. Ensure that the fuel tank is well ventilated and does notcontain any fuel vapours – these are highly explosive when mixed with air.Ensure that at all times the ground connection (the connection of the fuel level sender mountingflange) is securely connected to the aircraft frame (in case of a metal frame) and to the negativeterminal of the battery. In addition the negative terminal of the battery must at all times be connectedto the Supply ground terminal of the RDAC.Please note – this wiring is critical and must never break in flight. It would be possible to createelectrical sparks in the fuel tank if your wiring is faulty or incorrect. The consequences of this can beimagined. This has nothing to do with the RDAC itself but is a general hazard for any automotive fuellevel sender installation.If you have no experience with electrical wiring, PLEASE delegate the task to a qualified automobileelectrician or electronics technician.If you need to remove the RDAC, first disconnect and secure the fuel level sender wire beforedisconnecting anything else.Typical floatbased levelsender.We recommendVDO dConnection to engineground (aircraft frame) andnegative terminal of battery<strong>MGL</strong> <strong>Avionics</strong> Page 14
<strong>Stratomaster</strong> <strong>E2</strong> - <strong>EMS</strong> Operator's ManualInstallationThe <strong>Stratomaster</strong> RDAC permits the connection of a standard automotive fuel level sender. Thesesenders can be obtained at automotive spares outlets at reasonable cost.When you choose a float level sender, ensure that you select a model that is sturdy and promisesreliable and long lifetime. In particular, select a model that does not have any metal parts that canrust.The RDAC can interface to a large variety of these fuel level senders. It does not matter if the senderresistance increases or decreases with the fuel level as long as it changes. The calibration proceduredescribed on page 29 of this manual describes the procedure to follow.In essence, the calibration procedure will measure the resistance of the fuel level sender at variousfuel levels and then work out the readings in between those known settings.Typical fuel level senders that can be used with the <strong>Stratomaster</strong> RDAC have resistance ranges in theregion of 100 ohms to 500 ohms.Tip:It is possible to wire two fuel level senders in series if you have two fuel tanks. In this case the readingwill be shown of the combined fuel level in both tanks.CONNECTING THE REV COUNTERThe rev counter input can be connected to a variety of different sources such as the low voltage sideof a ignition coil (at the points contact breaker) or to rev counter outputs of fuel injection computers.Note The RDAC package contains a 220 ohm resistor. Normally it is not required but we havefound a few Rotax engines that create a very noisy signal and it may help in this case. The problemmanifests itself by several rev band regions giving unstable rev readings. Should you be unluckyenough to have one of these systems, please connect the resistor between the rev counter input andthe ground input in parallel to your connection to the gray rev counter wire from the engine.Typical connection in case of a Rotax two stroke engine with Ducati dual ignition:Grey wire fromRotax DCDIignition systemGroundconnection toengineEngine with generator such asRotax 503, Rotax 582 etcPage 15<strong>MGL</strong> <strong>Avionics</strong>
<strong>Stratomaster</strong> <strong>E2</strong> - <strong>EMS</strong> Operator's ManualInstallationTYPICAL INSTALLATION EXAMPLESRotax 503EGTCHTExhaustFlangeEGTCHTREVSGreywireGroundBrown wireRotax 582Note: CHT is optional on the 582.EGTCHTEGTExhaustFlangeCHTWater tempREVSGreywireGroundBrown wire<strong>MGL</strong> <strong>Avionics</strong> Page 16
<strong>Stratomaster</strong> <strong>E2</strong> - <strong>EMS</strong> Operator's ManualInstallationRotax 912CHTCHTOIL tempOILpressureEGTEGTREVSGROUNDPage 17<strong>MGL</strong> <strong>Avionics</strong>
<strong>Stratomaster</strong> <strong>E2</strong> - <strong>EMS</strong> Operator's ManualUsing the SystemUSING THE SYSTEMUNDERSTANDING THE DISPLAYA typical configuration of the <strong>Stratomaster</strong> <strong>E2</strong> display is shown in the figure below. This is the displayshown during normal use whether the engine is running or not. Display layout may changedepending on your configuration setup but all readings are continuously displayed with displayupdates occurring every half second.Active alarmsshown hereAlarm levelindicatorOil Pressure &temperatureHobbs andtrip/maint timeEngine revsRemainingfuelEGT readingsCHT readingsWatertemperatureTemperaturebargraphsAbsolutetemperaturesAverage/Currfuel flowEstimatedenduranceRev counter(graphic)EGT ReadingsEGT (Exhaust Gas Temperature) bargraphs are always shown grouped together in the top left cornerof the display. Having all EGT readings grouped together allows relative differences betweenreadings to be instantly noted. Such differences would normally indicate a developing problem in onecylinder. Each graph is labelled on the left with the absolute temperature in the units of choice(Centigrade or Fahrenheit) shown on the right to one degree resolution.Full scale on the graph is specified in the Range setup menu with the low range being half the fullscalereading.Also shown on the graph is a line indicating the alarm level that has been set. In the example shown,EGT2 has exceeded the alarm level and this bargraph will thus be blinking. An audible and/orexternal alarm indicator will also be activated. The alarm may be acknowledged by pressing any keywhich then silences the external alarm but the display continues blinking until the alarm conditionclears. The message on the top left displays a scrolling list of all current alarm conditions - in thiscase, a high EGT reading.What EGT Can Tell YouEGT readings give a direct indication as to the efficiency of your fuel burn. Even small changes toany of fuel, air, compression, ignition or timing will all produce noticeable changes in EGT. This canbe used to identify a problem before it becomes an expensive disaster as well as allow you to adjustyour fuel mixture and cruise at maximum efficiency. The following table indicates some of theproblems that EGT readings may detect:<strong>MGL</strong> <strong>Avionics</strong> Page 18
<strong>Stratomaster</strong> <strong>E2</strong> - <strong>EMS</strong> Operator's ManualUsing the SystemConditionEGT rises by more than 50 °C (100 °F)EGT rises in one cylinder by 25-50 °C (50-100 °F)EGT increase in all cylindersEGT decrease in all cylindersEGT decrease in one cylinderTypical ProblemPre-ignitionFouled spark plugFaulty ignitionIntake manifold leakReduced fuel supply (Eg: partially plugged injector)Magneto failureOverly retarded ignition timingAir filter restrictionCarburettor iceOverly advanced ignition timingFaulty intake valveLow compressionLean ModeEGT information is also very useful for fuel mixture control. As the fuel mixture is leaned, so theexhaust gasses get hotter. This rise in temperature is a sign of increased combustion efficiency as theoptimum mixture setting is approached. If the leaning progresses past a certain point however, thetemperature will begin to drop. This temperature drop is the result of reduced energy output from thediminished fuel flow. The best operating mixture for aircraft engines is in the vicinity of this peak EGTreading. The <strong>Stratomaster</strong> <strong>E2</strong> has a special Leaning Mode, which easily identifies the peak EGTcondition allowing you to adjust your fuel mixture for best performance.Fuel mixture should be adjusted once you have decided on a suitable cruise power setting (typically70%). Press and hold + at the main display for 1 second to enable Leaning Mode. The displayshows "LEAN MODE..." and the <strong>E2</strong> begins a careful watch on each of the EGT readings. As the fuelmixture is slowly leaned past the point at which the temperature begins to drop (by more than 5 °C),the display will change to show the cylinder which first reached its peak and will show the EGTreading relative to this peak reading. At this point, the mixture should be enriched once more until thereading is about 25 °C (50 °F) below its peak. During Lean Mode the <strong>E2</strong> displays temperatures belowtheir peak as the difference between the actual and peak reading (Eg: -25 °C). All other EGTreadings will show the difference from their reading at the time the first cylinder reached its peak. Thismay or may not be its own specific peak value.Lean mode may be cancelled by pressing the - key. Pressing the + key after leaning has beencompleted will enter the Cruise mode allowing the current settings to be monitored.Cruise ModeOnce in the cruise, pressing the + key will immediately enable Cruise Mode. The display shows"CRUISE MODE..." and all EGT and CHT readings are immediately sampled as referencetemperatures for the cruise. The display then shows EGT and CHT values as a relative differencefrom this reference temperature. The <strong>E2</strong> continuously monitors each EGT and CHT reading andtriggers an alarm if any reading deviates by more than the specified Cruise amount above or belowthe reference. Cruise deviations are set under the Range Menu (see page 30).Pressing the + key will always immediately reset the reference temperatures to the currenttemperatures. Cruise mode may be cancelled by pressing the - key and may be resumed (with theoriginal reference temperatures) by pressing - again.CHT ReadingsBelow the EGT readings are CHT (Cylinder Head Temperature) readings. Like the EGT graphs,relative and absolute temperatures are both easily visible at a glance.Page 19<strong>MGL</strong> <strong>Avionics</strong>
<strong>Stratomaster</strong> <strong>E2</strong> - <strong>EMS</strong> Operator's ManualUsing the SystemWater TemperatureIf setup, water (coolant) temperature may be displayed on a bargraph like the EGT/CHT graphs. Fullscalereading and alarm levels are adjustable under setup menu options with lower limit beingapproximately half the full-scale reading.Oil Temperature / Pressure graphsIn the centre of the screen, assuming they have been setup for display, are oil pressure (OP) and oiltemperature (OT) bargraphs. Like EGT and CHT graphs, they show absolute readings in units ofchoice as well as the bargraph and alarm level indicator for a quick visual indication of status.Fuel Level DisplayOn the far right is a bargraph showing remaining fuel relative to tank capacity and as an absolutevalue in units of choice at the top of the graph. Fuel level is only displayed if a fuel level or fuel flowsender has been installed.Rev CounterThe rev counter is shown as an analogue style gauge for quick visual reference as well as aprominently displayed RPM value. The rev counter gauge has a logarithmic scale to provide betterresolution at high revs. The engine high rev alarm may be configured to only activate after the revshave been exceeded for longer than a specified time (Eg. 6 minutes). If the absolute maximum RPMvalue is exceeded, the alarm is immediately activated.Hobbs MeterThe Hobbs Meter displays a total engine running time in hours and minutes (selectable to displaydecimals of an hour). It automatically accumulates time whenever the engine revs exceed thespecified engine Hobbs revs. This value allows engine idle time to be ignored for Hobbs readingpurposes. Set the value to zero to record time whenever the engine runs. The Hobbs revs andHobbs meter reading may be preset under the User Preferences Menu (page 31).An associated Trip Time display (beneath the Hobbs meter) can be configured to automatically reseton engine startup and thus display the total engine running time for the current flight or it can bemanually reset in which case it records total running time since last reset. This can be useful for flightschools which charge students according to engine running time rather than lesson time. The timeralways starts running together with the Hobbs meter.Maintenance TimerAn engine maintenance timer may be preset at any time and the <strong>E2</strong> counts this time down to zerowhenever the engine is running. An alarm is generated once this reading reaches zero in order toindicate that scheduled maintenance on the engine is due (Eg: spark plug replacement). Themaintenance timer alternates with the previous flight's run time once the engine has stopped but isotherwise hidden while the engine is running (It may still be viewed/edited via the User PreferencesMenu).Ambient TemperatureWith external ambient temperature probe connected, the ambient air temperature can be displayed inunits of choice. This display alternates with input voltage reading if no space is available due todisplay of oil pressure and oil temperature graphs. If no external ambient temperature probe is fitted,the internal temperature of the RDAC unit will be used instead but this reading is likely to be higherthan ambient due to engine proximity and RDAC self heating.<strong>MGL</strong> <strong>Avionics</strong> Page 20
<strong>Stratomaster</strong> <strong>E2</strong> - <strong>EMS</strong> Operator's ManualUsing the SystemInput VoltageThis display indicates the voltage measured on the input to the <strong>Stratomaster</strong> <strong>E2</strong>. It may alternate withdisplay of ambient temperature if installed and no other space is available due to display of oilpressure and oil temperature graphs.Fuel Flow and Fuel TotalizerIf an optional fuel-flow sender is installed, both average and instantaneous fuel flow rate (in units ofchoice per hour) may be displayed. In addition, a fuel totalizer meter becomes available. This allowsa continuous tally to be kept of all fuel passing through the fuel-flow sender. The average fuel flowrate is calculated over this total amount. The fuel totalizer (and average flow rate) may be reset atany time via an option in the Main Menu.With a fuel-flow sender installed, fuel level may be measured by subtracting actual fuel used from aninitial known amount in order to predict remaining fuel in the tank. This method of fuel levelcalculation may be preferred if no fuel level sender is available or if motion of fuel in the tank causeserratic level indications. The initial amount may be manually set under the Main Menu and can beinitialised to the current fuel level as determined by a fuel level sender (press and hold + and - keyssimultaneously at the Set Level option).Estimated EnduranceIf the fuel-flow sender option is installed, knowing remaining fuel level allows an estimated enduranceon remaining fuel at current burn rate to be calculated and displayed. This gives a continuousestimate of endurance (in hours and minutes) at current flow rate allowing critical fuel managementdecisions to be made timeously as well as allowing a suitable cruise speed to be found to maximisefuel efficiency.THE MENU SYSTEMAll setup or user options made on the <strong>Stratomaster</strong> <strong>E2</strong> are performed via system menus. To bring upthe main menu, press the MENU key. Once the menu system is active, it can be cancelled by oncemore pressing MENU, which then returns to the previous menu or the main display.Incrementvalue/choiceDecrementvalue/choicePress to selecthighlighted itemSelect / cancelMain MenuThis is thecursorPress to decreasecontrastPress to increasecontrastPress to movecursor downPress to movecursor upA menu consists of a list of menu items with the currently selected item being highlighted by the socalledcursor. The cursor may be moved up and down through the list using the NEXT and PREVPage 21<strong>MGL</strong> <strong>Avionics</strong>
<strong>Stratomaster</strong> <strong>E2</strong> - <strong>EMS</strong> Operator's ManualUsing the Systemkeys. In some cases there may be more items than can be displayed on one screen. In this case,selecting NEXT (at the bottom) or PREV will scroll the entire display to reveal the hidden items. Toselect or activate the highlighted entry, press the SELECT key.Some items may allow a number of different options to be selected or a value to be specified. In thiscase, select between the available options or adjust the displayed value up or down using the + and -keys. These keys have an auto-repeat facility that allows you to simply hold the key down while itautomatically increases or decreases the displayed value. When the correct value is displayed,release the key and either close the menu (by pressing MENU) or move on to the next item (usingNEXT or PREV).All changes made to settings are permanently stored and need not be re-set every time the unit isswitched on.Resetting the Trip-TimerIf the Trip-Timer has been set to Manual Mode an option appears in the Main Menu to allow it to bereset. Selecting this option will then display a warning that the Trip-Timer is about to be reset. Pressthe + key to confirm this operation or any other key to cancel.Resetting the Fuel TotalizerIf a fuel-flow sender is installed, a Fuel Totalizer becomes available which continuously totals all fuelused. The total (and associated average fuel flow) may be manually reset by selecting this option. Awarning message is then displayed. Press the + key to confirm the operation or any other key tocancel.User PreferencesThe User Preferences Menu allows the selection of a number of options that relate to the way youwant your <strong>Stratomaster</strong> <strong>E2</strong> to work. (See page 31)ALARM CONDITIONSEach of the various readings has an associated alarm level at which point an alarm will be activatedto highlight the condition. The top left line of the display will continuously scroll through all alarmconditions indicating which have been triggered.When an alarm is triggered, the relevant display is set to blink once a second and an uncommittedrelay contact is also pulsed at the same rate. This may be connected to, for example, an alarm lampor buzzer in order to draw attention to the alarm condition. In addition, an audible alarm signal isgenerated by the <strong>E2</strong> which may be fed directly into your intercom system or to a panel mountspeaker.An alarm condition must be acknowledged by pressing any key which then disables the audio toneand the relay contacts but the offending display remains blinking until the condition is rectified. Analarm condition is only considered cleared once its level drops below the alarm trigger level by a smallamount (Eg: 5 degrees C)<strong>MGL</strong> <strong>Avionics</strong> Page 22
<strong>Stratomaster</strong> <strong>E2</strong> - <strong>EMS</strong> Operator's ManualSystem ConfigurationSYSTEM CONFIGURATIONThe <strong>Stratomaster</strong> <strong>E2</strong> has been designed to work with a variety of engines, temperature, pressure, fuellevel, and fuel flow senders. Specific configuration details are split into four separate menus:•=•=•=•=The Device Setup Menu is used to specify what should be measured and how (probe types)The Range Setup Menu specifies the maximum readings that will be displayed. This sets thelimits of the graphs that are displayed.The Alarm Setup Menu is used to set the operating limits of each measurement. When theseoperating limits are exceeded, an alarm condition is triggered and the offending measurementis flashed to attract your attention.The User Preferences Menu allows setting of personal preferences such as units of measure.DEVICE SETUP - WHAT SHALL WE MEASURE TODAY?All measurement probes connect to the system via the RDAC unit which has four thermocouple inputs(TC1 to TC4), three NTC inputs (labelled WT/CHT1, CHT2 and OILTEMP), an oil pressure input(OILPRESSURE) and Fuel Flow, Fuel Level and Rev Counter inputs. Select the Device Setup Menufrom the Main Menu to allows to specify which of these inputs are to be used with what probes.Engine Quick Select MenuA number of standard configurations are stored in the <strong>E2</strong>. By recalling the relevant setup, all therequired details will automatically be set, including probe configurations, bargraph display ranges andalarm levels. This is probably always a good way to start as most of the details will be correct,requiring perhaps only one or two modifications to suit your particular needs.<strong>MGL</strong> <strong>Avionics</strong> Page 24
<strong>Stratomaster</strong> <strong>E2</strong> - <strong>EMS</strong> Operator's ManualSystem ConfigurationThe following standard configurations are available under the Quick Select Menu:•= Rotax 447 1 x EGT (K-type) thermocouple on inputs TC12 x CHT (K-type) thermocouples on inputs TC3, TC4No water / oil temperatureNo oil pressureEGT Max Bargraph: 650 °C (1200 °F)CHT Max Bargraph: 300 °C (570 °F)EGT High Alarm: 620 °C (1150 °F)EGT Span Alarm: 25 °C (45 °F)CHT High Alarm: 260 °C (500 °F)Max Revs: 7000High Rev Alarm: 6800 RPM (no delay)Rev Counter Calibration: 60 pulses per 10 revs•= Rotax 503 2 x EGT (K-type) thermocouples on inputs TC1, TC22 x CHT (K-Type) thermocouples on inputs TC3, TC4No water / oil temperatureNo oil pressureEGT Max Bargraph: 650 °C (1200 °F)CHT Max Bargraph: 300 °C (570 °F)EGT High Alarm: 620 °C (1150 °F)EGT Span Alarm: 25 °C (45 °F)CHT High Alarm: 250 °C (480 °F)Max Revs: 7000High Rev Alarm: 6800 RPM (no delay)Rev Counter Calibration: 60 pulses per 10 revs•= Rotax 582 2 x EGT (K-type) thermocouples on inputs TC1, TC22 x CHT (K-Type) thermocouples on inputs TC3, TC41 x <strong>MGL</strong> NTC Water Temp sender on input WTNo oil temperature/pressureEGT Max Bargraph: 650 °C (1200 °F)CHT Max Bargraph: 150 °C (350 °F)EGT High Alarm: 620 °C (1150 °F)EGT Span Alarm: 25 °C (45 °F)CHT High Alarm: 130 °C (300 °F)Water Temp Max: 90 °C (190 °F)Water Temp Alarm: 80 °C (180 °F)Max Revs: 7000High Rev Alarm: 6800 RPM (no delay)Rev Counter Calibration: 60 pulses per 10 revs•= Rotax 912 2 x EGT (K-type) thermocouples on inputs TC1, TC22 x CHT (K-Type) thermocouples on inputs TC3,TC41 x ROTAX Oil Temp sender on input OILT1 x ROTAX Oil Pressure sender (200 ohms) on input OILPEGT Max Bargraph: 900 °C (1650 °F)Page 25<strong>MGL</strong> <strong>Avionics</strong>
<strong>Stratomaster</strong> <strong>E2</strong> - <strong>EMS</strong> Operator's ManualSystem ConfigurationCHT Max Bargraph: 180 °C (1560 °F)EGT High Alarm: 850 °C ( °F)EGT Span Alarm: 25 °C (45 °F)CHT High Alarm: 150 °C (300 °F)Water Temp Max: 90 °C (190 °F)Water Temp Alarm: 80 °C (180 °F)Max Oil Temp Bargraph: 160 °C (320 °F)Oil Temp High Alarm: 140 °C (280 °F)Max Oil Pressure Bargraph: 5 bar (70 PSI)Oil Pressure Low Alarm: 2 bar (30 PSI)Max Revs: 6000High Rev Alarm: 5800 RPM (after 2 minutes)Rev Counter Calibration: 10 pulses per 10 revs•= Rotax 914 4 x EGT (K-type) thermocouples on inputs TC1, TC2, TC3, TC42 x CHT (ROTAX NTC) on inputs CHT1, CHT21 x ROTAX Oil Temp sender on input OILT1 x ROTAX Oil Pressure sender (200 ohms) on input OILPEGT Max Bargraph: 900 °C (1650 °F)CHT Max Bargraph: 180 °C (1560 °F)EGT High Alarm: 850 °C ( °F)EGT Span Alarm: 25 °C (45 °F)CHT High Alarm: 150 °C (300 °F)Water Temp Max: 90 °C (190 °F)Water Temp Alarm: 80 °C (180 °F)Max Oil Temp Bargraph: 160 °C (320 °F)Oil Temp High Alarm: 140 °C (280 °F)Max Oil Pressure Bargraph: 5 bar (70 PSI)Oil Pressure Low Alarm: 2 bar (30 PSI)Max Revs: 7000High Rev Alarm: 6700 RPM (after 6 minutes)Rev Counter Calibration: 10 pulses per 10 revsAfter selecting the required engine, we must confirm the operation by pressing +. Pressing any otherkey cancels the operation.<strong>MGL</strong> <strong>Avionics</strong> Page 26
<strong>Stratomaster</strong> <strong>E2</strong> - <strong>EMS</strong> Operator's ManualSystem ConfigurationSender Setup MenuOnce the basic engine type has been specified you can use the Sender Setup Menu to adjust anyindividual sender requirements to suit actual sender requirements.Use the NEXT and PREV keys to select the item to change and + and - to change the item.Thermocouple Inputs (TC1 to TC4)Thermocouples may be used to measure both EGT and CHT readings. There are two types ofthermocouple probes that may be used on the RDAC which have different electrical characteristicsand the probe type must therefore be specified as either (J-TYPE) or (K-TYPE) devices. Mostthermocouples are K-type devices but some older CHT probes (particularly in the US) may be J-type.Select the type of probe connected to the input from the following list: (press + or -)•= NONE Input is not used•= EGT (J-TYPE) J-Type thermocouple used for EGT reading•= EGT (K-TYPE) K-Type thermocouple used for EGT reading•= CHT (J-TYPE) J-Type thermocouple used for CHT reading•= CHT (K-TYPE) K-Type thermocouple used for CHT readingNT1, NT2 and OILT InputsThese Negative Temperature Coefficient (NTC) inputs can be used to measure CHT, WATER, AUXor OIL temperature.•= NONE Input is not used•= CHT Input is used to measure CHT reading•= WT Input is used to measure Water temperature•= AUX Input is used to measure Auxiliary temperature•= OIL Input is used to measure Oil temperatureThe <strong>Stratomaster</strong> <strong>E2</strong> caters for three different types of probe on each of the above inputs:•= <strong>MGL</strong> CHT / Water temperature probe as supplied by <strong>MGL</strong> <strong>Avionics</strong>•= ROTAX CHT / Water temperature probe as supplied by Rotax•= SILICON Precision CHT / Water temperature probe made by <strong>MGL</strong> <strong>Avionics</strong>based on the LM335.Select the required combination of the above options using the + or - keys.Page 27<strong>MGL</strong> <strong>Avionics</strong>
<strong>Stratomaster</strong> <strong>E2</strong> - <strong>EMS</strong> Operator's ManualSystem ConfigurationOILP InputThis input caters for a resistive oil pressure sender with ranges from 50 to 1000 ohms. The standardRotax oil pressure sender is 200 ohms. Select the appropriate resistance (or NONE if no oil pressurewill be measured) using the + or - keys.REVS CalibrationThe <strong>Stratomaster</strong> <strong>E2</strong> includes a very flexible rev counter that can be adapted to a very wide variety ofengines. This is done in the Sender Setup Menu. Here you enter the number of pulses the revcounter pickup (whatever it may be) will generate for every ten revolutions. The instrument will usethis information to work out revs from the time it takes to complete ten revolutions of the engine. Thisway, high resolution of the rev counter is guaranteed even if only one pulse is generated for a singlerevolution as would be the case for the 912 engine.Pickups vary from those provided by the engine manufacturers in the form of magneto coil tapings(Rotax / Ducati) to anything from a few loops of wire coiled tightly around one of the ignition wires topickups from generator A/C outputs or the W output of a car type alternator. In fact, anything that isable to provide at least a 3-4 volt, reasonably stable signal at the rev counter input of the RDACsystem. Signals with a voltage as high as 100 volts can be used as well (as is the case with Ducatisystems if no ballast resistor is fitted).On unusual engines it is often a matter of experimenting with various pickup methods to find asatisfactory solution. Once a stable reading can be obtained, set the calibration of the rev counter sothat correct revs are indicated.A value of 60 is used for most two-stroke Rotax engines based on the Ducati DCDI system (6 pulsesper rev). Rotax 912/914 engines produce 1 pulse per rev so the correct setting would be 10.Select the value according to your engine's tach generator output for all other engines. For engineswithout a tach generator such as a VW, we suggest that you try a pickup using a wire looped tightlyabout 20 times around one of the spark plug leads. (See installation manual for further details on thismethod). A spark is generated every second revolution per cylinder on a four stroke engine so youshould enter a value of 5 in this case. You can also try pickups directly from the switched end of theignition coil (points). This may give you a better signal. In this case the factor to be entered willdepend on the number of cylinders. You should find two cylinders firing for every revolution in atypical four-cylinder, four-stroke engine so this would give you a factor of 20.Fuel Flow Sender CalibrationThe fuel-flow sender consists of a small impeller that rotates as fuel flows past it. This then creates aseries of pulses at a rate determined by the rate of fuel flow. The <strong>Stratomaster</strong> <strong>E2</strong> counts the numberof pulses received within a short time and then uses the calibration constant for the sender todetermine the actual fuel-flow rate per hour.The calibration constant can be adjusted up and down using the + or - keys and displays the currentvalue together with the corresponding number of pulses per litre (or your preferred unit of measure).The default fuel-flow calibration is set for use with the recommended RS device. This should give anaccuracy of ±3%. Should you use a different fuel-flow sender, the sender may be calibrated using theprocedure described on page 12.Ambient Temperature SenderIf an ambient temperature sender (supplied) has been installed, select "HAS AMBIENT TEMP" in theDevice Setup Menu. If not, select "NO AMBIENT TEMP". In this case, ambient temperature will betaken from the internal temperature sensor on the RDAC. This is a compromise since the RDACinternal temperature could be substantially higher than actual ambient temperature so use of thesupplied ambient temperature sensor is highly recommended.<strong>MGL</strong> <strong>Avionics</strong> Page 28
<strong>Stratomaster</strong> <strong>E2</strong> - <strong>EMS</strong> Operator's ManualSystem ConfigurationFuel Flow SenderIf a fuel-flow sender is installed, select "HAS FUEL FLOW SENDER" in the Device Setup Menu. If not,select "NO FUEL FLOW SENDER" to disable this option.Fuel Level SenderIf a fuel-level sender is installed, select "HAS FUEL LEVEL SENDER" in the Device Setup Menu. Ifnot, select "NO FUEL LEVEL SENDER" to disable this option. If this option is disabled but a fuel-flowsender is installed, fuel level will be calculated by subtracting all fuel flow measurements from aninitial fuel quantity setup under the Main Menu. This may be a preferred method of deriving remainingfuel, even if a fuel level sender is installed since it has the advantage of being totally immune to anymovement of fuel in the tanks which may cause incorrect readings from a float style level sender.With both a Fuel-Flow and Fuel-Level sender installed, an option becomes available in the User Menuto determine whether fuel levels should be measured directly or calculated from actual fuel flow. Itmay be desirable to calculate fuel level if you find the fuel level sender does not show stable readingsas fuel sloshes about in the tank. The <strong>Stratomaster</strong> <strong>E2</strong> averages out readings in order to eliminatesuch inaccuracies but if too severe, calculated levels should be used.Fuel Level Sender CalibrationIf no fuel level sender is available but a fuel-flow sender is installed, fuel level may be calculated fromflow and in this case, this option simply allows the tank capacity to be specified.If a fuel-level sender has been installed, selecting this option allows the fuel level sender readings tobe compensated for tank shape. Calibration involves filling the tank with known quantities of fuel andnoting the readings obtained from the fuel level sender. Accurate measurement of remaining fuel isthen obtained by reading the fuel level sender and interpolating an actual fuel level from thecalibration table.Total fuel tankcapacityThis is the level beingread from the sender.Press SELECT toadd it to the tableThese are readings atthe specified levelBegin the calibration procedure by emptying the tank and specifying its total capacity (in units ofchoice). This will then divide the tank into 5 equal levels, with these levels being displayed. Thecalibration procedure involves filling the tank to the five different levels specified and noting thereading obtained from the level sender. Care should be taken that the exact amount of fuel specifiedis added for each reading. Once the fuel level reading has stabilised, pressing SELECT at theappropriate level will enter the current sender reading into that location. The value may also bemanually corrected up and down using the + or - keys.Page 29<strong>MGL</strong> <strong>Avionics</strong>
<strong>Stratomaster</strong> <strong>E2</strong> - <strong>EMS</strong> Operator's ManualSystem ConfigurationRANGE SETUP - MAXIMUM LIMITSThe Range Setup Menu specifies the maximum readings that will be displayed on the various graphs.Since most temperature readings are normally within a small band, to increase resolution, thebargraphs only start showing temperatures from approximately half of the maximum reading. Alsoincluded under Range Setup are the cruise ranges (allowable change above and below cruise level)for Revs, EGT and CHT readings.ALARM SETUP - ABNORMAL READINGSThe <strong>Stratomaster</strong> <strong>E2</strong> has a comprehensive list of alarm limits, which are continuously monitored. Ifany of these levels is exceeded, the alarm is triggered with the appropriate message appearing on thedisplay and a flashing indicator to attract your attention.The engine Revs Delay option allows a delay to be set with the alarm only triggering after the over-revcondition has continued for this period. This allows use with engines such as the Rotax 914 withturbo-charger where over-revs are only considered a problem once they have been continued for sixminutes or more. If the over-rev condition, exceeds the Max Revs value specified under the RangeMenu, the delay is ignored and the alarm triggers instantly.EGT Span and CHT Span values are the maximum differences permitted between readings ondifferent cylinders. Such differences would indicate a potential problem.OP (oil pressure), Fuel level and Endurance levels are considered minimum levels and the alarm istriggered if any of these readings fall below the preset alarm level. All other alarms are triggered if thecondition exceeds the alarm level value.<strong>MGL</strong> <strong>Avionics</strong> Page 30
<strong>Stratomaster</strong> <strong>E2</strong> - <strong>EMS</strong> Operator's ManualSystem ConfigurationDisabling Individual AlarmsIndividual alarms may be disabled (and re-enabled) by pressing the SELECT key when the relevantalarm is highlighted. The alarm will show ---- to indicate that the alarm is disabled and no furtheractivations of that alarm condition will occur. Press SELECT on a disabled alarm to re-enable it.USER PREFERENCES - PERSONAL TASTESThe following items are available under the User Preferences Menu:•= Backlight mode (Off, On, Automatic)•= Temperature units of choice (°C / °F)•= Oil pressure units of choice (Bar / PSI)•= Fuel units of choice (Litres, US Gal, Imp Gal, kg, Lbs, %)•= Fuel Level method (MEASURED / CALCULATED)•= Decimal / Minutes option on duration displays (Hobbs / Trip / Maintenance / Endurance)•= Trip Timer reset mode (STARTUP / MANUAL)•= Hobbs meter minimum revs. Hobbs meters runs when revs exceed this value.•= Maintenance count-down timer preset (to warn of scheduled maintenance)•= Hobbs meter setting (allowing the engine hours counter to be preset)TECHNICAL SETUPA special Technical Menu option becomes available under the Main Menu if you press + and -simultaneously after switch-on (while the unit is displaying the <strong>Stratomaster</strong> <strong>E2</strong> logo. The TechnicalMenu provides various options that are useful during the factory testing and calibration of theinstrument.The items available under this menu may change between releases of the firmware and are notnormally used by the user of this instrument. Please do not alter any of the settings as this mayadversely affect the operation or accuracy of your instrument.Page 31<strong>MGL</strong> <strong>Avionics</strong>
<strong>Stratomaster</strong> <strong>E2</strong> - <strong>EMS</strong> Operator's ManualTechnical SpecificationsTECHNICAL SPECIFICATIONS•= Physical Size: 204x92 mm.•= Mounting depth: 75mm (including connectors and wiring).•= Panel cutout: 200x90 mm.•= Weight: 480 grams (Excluding external senders).•= Power supply: 12V DC nominal.Range 7.5V DC to 28V DC.Internally protected to 40 V DC.•= Current consumption: 80 mA without backlight, 280 mA with backlight. (includes currentconsumption of RDAC IV unit)•= Rev counter input: High impedance. Accepts signals up to 100V RMS. Maximumfrequency 10 Khz. Internally protected against over voltage.•= External temperature: Optimised for National Semiconductor LM335 temperature sender(supplied). Display resolution 1 °C or 1 °F. Accuracy 0.5 degreestypical. Range –50 to +99 °C (-58 °F to 210 °F).•= Thermocouple inputs: Four-channel thermocouple amplifier, high resolution, chopperstabilised system with full cold junction compensation and bowvoltage correction to laboratory standards. The inputs can accept K-type or J-type thermocouples (selectable during system setup)•= NTC inputs: Two-channel NTC measurement input for Rotax 912 standard CHTsenders. Oil or Water temperature input compatible with Rotax oiltemperature sender and <strong>MGL</strong> water temperature sender.Measurement accuracy +/- 2%, subject to accuracy of sender.Note: Senders are manufactured with a tolerance of up to +/- 20%.•= Oil pressure input: Accepts most commercial oil pressure senders including the VDO unitused by Rotax. Calibration via menu functions.•= Rev counter input: Universal input can be used on a wide variety of engines (2 or fourstroke) using a variety of interface methods (Eg: inductive pickup).Range: 0 to 9999 revs. Resolution is dependent on rev counter setupin instrument. Accuracy: +/- 0.0005% + resolution.•= Fuel flow input: Optimised for RS 256-225 flow sender (optional). Will accept othersenders providing a 5-volt TTL output and calibration via menufunctions. Accuracy of measurement is +/-0.05% subject to accuracyof fuel flow sender used. Example sender is RS 256-225: +/- 3%uncalibrated, typically less than 1% calibrated.•= Fuel level input: Optimised for standard automotive level senders from 100 to 500ohms resistance, any slope (increasing resistance with level ordecreasing resistance with level) with extensive calibration functionsprovided to allow direct readout of remaining fuel corrected for tankshape and sender tolerances. Measurement accuracy of input: +/-2%. Overall measurement accuracy of fuel level is subject to qualityand installation of chosen fuel level sender as well as complexity andform of tank shape. Using the prescribed calibration procedure wefind we can calibrate within 5% of actual level for most tank shapes.•= Alarm contacts: Uncommitted reed relay output. Recommended not to exceed 500mA DC current. Maximum voltage 50 volts. Please note: heavyinductive loads must be protected by means of a reverse polaritydiode in order to prevent sparks from destroying the reed relaycontacts.•= Air-Talk link: Two Air-Talk link connectors are provided for daisy-chaining to otherAir-Talk compatible instruments. The <strong>Stratomaster</strong> <strong>E2</strong> uses the Airtalklink to upload the flight data recorder to a remote PC.<strong>MGL</strong> <strong>Avionics</strong> Page 32