CS11 User Manual 10-2009.indb - Casco Antiguo Profesional
CS11 User Manual 10-2009.indb - Casco Antiguo Profesional
CS11 User Manual 10-2009.indb - Casco Antiguo Profesional
Create successful ePaper yourself
Turn your PDF publications into a flip-book with our unique Google optimized e-Paper software.
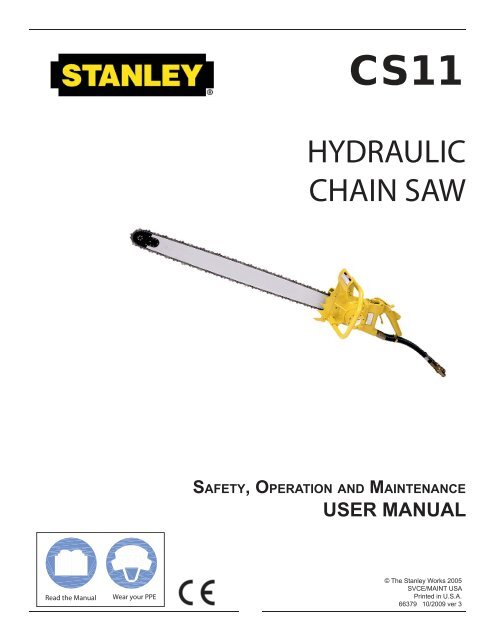
<strong>CS11</strong>HYDRAULICCHAIN SAWSAFETY, OPERATION AND MAINTENANCEUSER MANUALRead the <strong>Manual</strong>Wear your PPE1© The Stanley Works 2005SVCE/MAINT USAPrinted in U.S.A.66379 <strong>10</strong>/2009 ver 3
CERTIFICATE OF CONFORMITYÜBEREINSTIMMUNGS-ZERTIFIKATCERTIFICAT DE CONFORMITE CEECERTIFICADO DE CONFORMIDADCERTIFICATO DI CONFORMITAHydraulic Tools______________________________________________________________________I, the undersigned:Ich, der Unterzeichnende:Je soussigné:El abajo firmante:lo sottoscritto:Piert, CharlieSurname and First names/Familiennname und Vornamen/Nom et prénom/Nombre y apellido/Cognome e nomehereby certify that the construction plant or equipment specified hereunder:bestätige hiermit, daß das im folgenden genannten Werk oder Gerät:certifies par ceci que l’ usine ou l’ équipement de construction indiqué cidessous:por el presente certifico que la fabrica o el equipo especificado a continuacion:certifico che l’impianto o l’attrezzatura sotto specificata:1. Category: Chain SawsKategorie:Catégorie:Categoria:Categoria:2. Make/Ausführung/Marque/Marca/Marca Stanley3. Type/Typ/Type/Tipo/Tipo: <strong>CS11</strong>3NO0014. Serial number of equipment:Seriennummer des Geräts:Numéro de série de l’équipement:Numero de serie del equipo:Matricola dell´attrezzatura:All5. Year of manufacture/Baujahr/année de fabrication/Año de fabricacion/Anno di fabbricazione Beginning 1998Has been manufactured in conformity with - EEC Type examination as shown.Wurde hergestellt in Übereinstimmung mit - EEC Typ-Prüfung nach.Est fabriqué conformément - au(x) type(s) examiné(s) comme indiqué dans le tableau ci-après.Ha sido fabricado de acuerdo con - tipo examen EEC como dice.E’ stata costruita in conformitá con - le norme CEE come illustrato.DirectiveRichtlinieDirectives particulièresDirectrizDirettivaExamen CEE de typeNo.NrNuméroNon.DateDatumDateFechaDataApproved bodyPrüfung durchOrganisme agrééAprobadoCollaudatoDate of expiryAblaufdatumDate d´expirationFecha de caducidadData di scadenzaCertificateMachinery DirectiveISOISOISOISOISOISOBS EN0466/896/3298/37/EC37446534750579158334<strong>10</strong>72660825 June 199819981994199219861991198519921995AEA TechnologyAEA TechnologySelfSelfSelfSelfSelfSelfSelfN/AN/AN/AN/AN/AN/AN/AN/AN/A6. Special Provisions: NoneSpezielle Bestimmungen:Dispositions particulières:Provisiones especiales:Disposizioni speciali:7. Representative in the Union: Stanley Dubuis 17-19, rue Jules Berthonneau-BP 3406 4<strong>10</strong>34 Blois Cedex, France.Done at/Ort/Fait à/Dado en/Fatto a Stanley Hydraulic Tools, Milwaukie, Oregon USA Date/Datum/le/Fecha/Data 1998Signature/Unterschrift/Signature/Firma/Firma____________________________________________________________________________Position/Position/Fonction/Puesto/PosizioneChief EngineerRevised 8/17/054
SAFETY SYMBOLSSafety symbols and signal words, as shown below, are used to emphasize all operator, maintenance and repair actionswhich, if not strictly followed, could result in a life-threatening situation, bodily injury or damage to equipment.This is the safety alert symbol. It is used to alert you to potential personalinjury hazards. Obey all safety messages that follow this symbol to avoidpossible injury or death.DANGERThis safety alert and signal word indicate an imminently hazardous situationwhich, if not avoided, will result in death or serious injury.WARNINGCAUTIONThis safety alert and signal word indicate a potentially hazardous situationwhich, if not avoided, could result in death or serious injury.This safety alert and signal word indicate a potentially hazardous situationwhich, if not avoided, may result in minor or moderate injury.This signal word indicates a potentially hazardous situation which, if notavoided, may result in property damage.NOTICEThis signal word indicates a situation which, if not avoided, will result indamage to the equipment.IMPORTANTThis signal word indicates a situation which, if not avoided, may result indamage to the equipment.Always observe safety symbols. They are included for your safety and for the protection of the tool.LOCAL SAFETY REGULATIONSEnter any local safety regulations here. Keep these instructions in an area accessible to the operator and maintenancepersonnel.5
SAFETY PRECAUTIONSTool operators and maintenance personnel must always comply with the safetyprecautions given in this manual and on the stickers and tags attached to the tooland hose.These safety precautions are given for your safety. Review them carefully beforeoperating the tool and before performing general maintenance or repairs.Supervising personnel should develop additional precautions relating to the specifi cwork area and local safety regulations. If so, place the added precautions in thespace provided on page 5.The model <strong>CS11</strong> Hydraulic Chain Saw will provide safe and dependable service ifoperated in accordance with the instructions given in this manual. Read and understandthis manual and any stickers and tags attached to the tool and hose beforeoperation. Failure to do so could result in personal injury or equipment damage.• The operator must start in a work area without bystanders. Flying debris can cause serious injury.• Do not operate the tool unless thoroughly trained or under the supervision of an instructor. Establish a training programfor all operators to ensure safe operation.• Always wear safety equipment such as goggles, ear and head protection, and safety shoes at all times when operatingthe tool. Use gloves and aprons when necessary.• The operator must be familiar with all prohibited work areas such as excessive slopes and dangerous terrain conditions.• Do not inspect, clean or replace any part(s) if the hydraulic power source is connected. Do not inspect or clean the toolwhile the hydraulic power source is connected. Accidental engagement of the tool can cause serious injury.• Always connect hoses to the tool hose couplers before energizing the hydraulic power source. Be sure all hose connectionsare tight and are in good condition.• Do not operate the tool at oil temperatures above 140°F/60°C. Operation at higher temperatures can cause higher thannormal temperatures at the tool which can result in operator discomfort.• Do not operate a damaged, improperly adjusted, or incompletely assembled chain saw. Be sure that the chain stopsmoving when the control trigger is released.• Never wear loose clothing that can get entangled in the working parts of the tool.• Keep all parts of your body away from the chain saw and maintain proper footing and balance at all times.• Do not rely exclusively upon the safety devices built into the saw. As a chain saw user, several steps must be taken tokeep your cutting jobs free from accidents or injury.• With basic understanding of kickback, you can reduce or eliminate the element of surprise. Sudden surprise contributesto accidents.• To avoid personal injury or equipment damage, all tool repair, maintenance and service must only be performed by authorizedand properly trained personnel.• Keep a good fi rm grip on the saw with both hands, the right hand on the rear handle and the left hand on the front handlewhen operating the saw. Use a fi rm grip with thumbs and fi ngers encircling the chain saw handles. A fi rm grip will helpreduce kickback and maintain control of the saw. Do not let go.• Make sure the area in which you are cutting is free of obstructions. Never allow the nose of the guide bar to contact thelog, branch or any obstruction that can be accidently hit while operating the saw.6
SAFETY PRECAUTIONS• Never start the tool while it is lying on the ground.• Cut at rated operating speeds (gpm).• Do not overreach or cut abaove shoulder height.• Follow the manufacturer’s sharpening and maintenance instructions for the saw chain.• Only use replacement bars and chains specifi ed by Stanley Hydraulic Tools. Chains must meet the requirements of ANSIB175.1 for low kickback performance.• Always be well rested and mentally alert before operating the chain saw.• Do not allow other persons to be near the chain saw when starting or cutting with the chain saw. Keep bystanders andanimals out of the work area.• Do not starting cutting until you have a clear work area, secure footing and a planned escape path from a falling tree.• Carry the saw with the unit de-energized and the bar and chain to the rear of your body.• Use extreme caution when cutting small size brush and saplings. Twigs may catch the saw chain and be whipped towardthe operator or pull the operator off balance.• When cutting a limb that is under tension, be alert for springback so that you will not be struck when the tension on thelimb is released.• Keep the handles dry, clean and free of oil.• Do not operate a chain saw while in a tree unless you have been specially trained to do so.• When using tools near energized transmission lines, be sure to use only hoses labeled and certifi ed non-conductive.• Turn off the power unit or move the hydraulic control vlave to neutral before setting the saw down.• Use a guide bar scabbard when transporting the saw.• Know the location of buried or covered electrical services before starting work.• The spiked bumper (bucking cleat) must be installed for felling operations.7
ELECTRICAL HAZARDSTable 2 - Minimum approach distances to energized conductors for persons other than qualifiedline-clearance arborists and qualified line- clearance arborist trainees.Nominal VoltageDistancekV phase-to-phase 1)ft-inm0.0 - 1.0 <strong>10</strong>-00 3.051.1 - 15.0 <strong>10</strong>-00 3.0515.1 - 36.0 <strong>10</strong>-00 3.0536.1 - 50.0 <strong>10</strong>-00 3.0550.1 - 72.5 <strong>10</strong>-09 3.2872.6 - 121.0 12-04 3.76138.0 - 145.0 13-02 4.00161.0 - 169.0 14-00 4.24230.0 - 242.0 16-05 4.97345.0 - 362.0 20-05 6.17500.0 - 550.0 26-08 8.05785.0 - 800.0 35-00 <strong>10</strong>.551) Exceeds phase-to-ground.The tie-in position should be above the work area and located in such a way that a slip would swing the arborist awayfrom any energized electrical conductors or other identifi ed hazard.While climbing, the arborist should climb on the side of the tree that is away from energized electrical conductors as requiredin Tables 1 and 2.Footwear, including lineman’s overshoes, having electrical-resistant soles, shall not be considered as providing any measureof safety from electrical hazards.Rubber gloves, with or without leather or other protective covering, shall not be considered as providing any measure ofsafety from electrical hazards.Ladders, platforms and aerial devices, including insulated aerial devices, shall be subject to minimum approach distancesin Table 1 and 2.Aerial devices and attached equipment (such as chippers) contacting energized electrical conductors shall be consideredenergized. Contact shall be avoided, except where emergency rescue procedures are being carried out. Emergency rescueshould be performed in accordance with 4.3.Storm Work and Emergency Conditions-Line ClearanceLine clearance shall not be performed during adverse weather conditions such as thunderstorms, high winds and snowand ice strorms.Qualifi ed line-clearance arborists and qualifi ed line-clearance arborists trainees performing line clearance in the aftermathof a storm or under similar conditions shall be trained in the special hazards associated with this type of work.Line-clearance operations shall be suspended when storm work or emergency conditions develop involving energizedelectrical conductors. Electrical system owners/operators shall be notifi ed immediately.9
TOOL STICKERS & TAGSTo avoid serious injury or death28409Composite Decal(CE Models Only)E40 LPM @ 138 BAREHTMA CATEGORY12535Circuit Type E Decal(CE Models Only)F___ LPM @ ___ BAREHTMA CATEGORY12536Circuit Type F Decal(CE Models Only)DANGERFailure to use hydraulic hose labeled and certifiedas non-conductive when using hydraulic tools onor near electric lines may result in death orserious injury.ELECTROCUTIONHAZARDFor proper and safe operation read owners manualand mwke sure that you have been properlytrained in correct procedures required for workon or around electric lines.28323CE Decal03790GPM Decal02751Name Tag12412Electrical Warning Decal04746Auto Oiler Decal13907Kickback WarningDecalDANGERDANGER29036Sound Power LevelDecal1. FAILURE TO USE HYDRAULIC HOSE LABELED AND CERTIFIEDAS NON-CONDUCTIVE WHEN USING HYDRAULIC TOOLSON OR NEAR ELECTRICAL LINES MAY RESULT IN DEATHOR SERIOUS INJURY.BEFORE USING HOSE LABELED AND CERTIFIED AS NON-CONDUCTIVE ON OR NEAR ELECTRIC LINES BE SURE THEHOSE IS MAINTAINED AS NON-CONDUCTIVE. THE HOSESHOULD BE REGULARLY TESTED FOR ELECTRIC CURRENTLEAKAGE IN ACCORDANCE WITH YOUR SAFETY DEPART-MENT INSTRUCTIONS.D DO NOT LIFT OR CARRY TOOL BY THE HOSES. DONOT ABUSE HOSE. DO NOT USE KINKED, TORN ORDAMAGED HOSE.3. MAKE SURE HYDRAULIC HOSES ARE PROPERLY CONNECTEDTO THE TOOL BEFORE PRESSURING SYSTEM. SYSTEMPRESSURE HOSE MUST ALWAYS BE CONNECTED TO TOOL“IN” PORT. SYSTEM RETURN HOSE MUST ALWAYS BECONNECTED TO TOOL “OUT” PORT. REVERSING CONNEC-TIONS MAY CAUSE REVERSE TOOL OPERATION WHICH CANRESULT IN SEVERE PERSONAL INJURY.NOTETHE INFORMATION LISTED ONTHE STICKERS SHOWN, MUST BELEGIBLE AT ALL TIMES.REPLACE DECALS IF THEYBECOME WORN OR DAMAGED.REPLACEMENTS ARE AVAILABLEFROM YOUR LOCAL STANLEYDISTRIBUTOR.The safety tag (p/n 15875) at right is attachedto the tool when shipped from the factory. Readand understand the safety instructions listed onthis tag before removal. We suggest you retainthis tag and attach it to the tool when not in use.2. A HYDRAULIC LEAK OR BURST MAY CAUSE OIL INJECTIONINTO THE BODY OR CAUSE OTHER SEVERE PERSONALINJURY.A DO NOT EXCEED SPECIFIED FLOW AND PRESSURE FORTHIS TOOL. EXCESS FLOW OR PRESSURE MAY CAUSE ALEAK OR BURST.B DO NOT EXCEED RATED WORKING PRESSURE OF HY-DRAULIC HOSE USED WITH THISTOOL. EXCESS PRESSURE MAYCAUSE A LEAK OR BURST.C CHECK TOOL HOSE COUPLERS AND CONNECTORS DAILYFOR LEAKS. DO NOT FEEL FOR LEAKS WITH YOURHANDS.CONTACT WITH A LEAK MAYRESULT IN SEVERE PERSONALINJURY.IMPORTANTREAD OPERATION MANUAL ANDSAFETY INSTRUCTIONS FOR THISTOOL BEFORE USING IT.USE ONLY PARTS AND REPAIRPROCEDURES APPROVED BYSTANLEY AND DESCRIBED IN THE OPERA-TION MANUAL.TAG TO BE REMOVED ONLY BYTOOL OPERATOR.SEE OTHER SIDESAFETY TAG P/N 15875(shown smaller then actual size)4. DO NOT CONNECT OPEN-CENTER TOOLS TO CLOSED-CEN-TER HYDRAULIC SYSTEMS. THIS MAY RESULT IN LOSS OFOTHER HYDRAULIC FUNCTIONS POWERED BY THE SAMESYSTEM AND/OR SEVERE PERSONAL INJURY.5. BYSTANDERS MAY BE INJURED IN YOUR WORK AREA. KEEPBYSTANDERS CLEAR OF YOUR WORK AREA.6. WEAR HEARING, EYE, FOOT, HAND AND HEAD PROTEC-TION.7. TO AVOID PERSONAL INJURY OR EQUIPMENT DAMAGE, ALLTOOL REPAIR MAINTENANCE AND SERVICE MUST ONLY BEPERFORMED BY AUTHORIZED AND PROPERLY TRAINEDPERSONNEL.IMPORTANTREAD OPERATION MANUAL ANDSAFETY INSTRUCTIONS FOR THISTOOL BEFORE USING IT.USE ONLY PARTS AND REPAIRPROCEDURES APPROVED BYSTANLEY AND DESCRIBED IN THE OPERA-TION MANUAL.TAG TO BE REMOVED ONLY BYTOOL OPERATOR.SEE OTHER SIDE<strong>10</strong>
HYDRAULIC HOSE REQUIREMENTSHOSE TYPESThe rated working pressure of the hydraulic hose must be equal to or higher than the relief valve setting on the hydraulicsystem. There are three types of hydraulic hose that meet this requirement and are authorized for use withStanley Hydraulic Tools. They are:Certified non-conductive - constructed of thermoplastic or synthetic rubber inner tube, synthetic fi ber braid reinforcement,and weather resistant thermoplastic or synthetic rubber cover. Hose labeled certified non-conductive is theonly hose authorized for use near electrical conductors.Wire-braided (conductive) - constructed of synthetic rubber inner tube, single or double wire braid reinforcement,and weather resistant synthetic rubber cover. This hose is conductive and must never be used near electrical conductors.Fabric-braided (not certifi ed or labeled non-conductive) - constructed of thermoplastic or synthetic rubber innertube, synthetic fi ber braid reinforcement, and weather resistant thermoplastic or synthetic rubber cover. This hose is notcertified non-conductive and must never be used near electrical conductors.HOSE SAFETY TAGSTo help ensure your safety, the following DANGER tags are attached to all hose purchased from Stanley Hydraulic Tools.DO NOT REMOVE THESE TAGS.If the information on a tag is illegible because of wear or damage, replace the tag immediately. A new tag may be obtainedfrom your Stanley Distributor.THE TAG SHOWN BELOW IS ATTACHED TO “CERTIFIED NON-CONDUCTIVE” HOSEDO NOT REMOVE THIS TAGD A N G E R1 FAILURE TO USE HYDRAULIC HOSE LABELED AND CERTIFIED AS NON-CONDUCTIVEWHEN USING HYDRAULIC TOOLS ON OR NEAR ELECTRIC LINES MAYRESULT IN DEATHOR SERIOUS INJURY.FOR PROPER AND SAFE OPERATION MAKE SURE THAT YOU HAVE BEEN PROPERLYTRAINED IN CORRECT PROCEDURES REQUIRED FOR WORK ON OR AROUNDELECTRIC LINES.2. BEFORE USING HYDRAULIC HOSE LABELED AND CERTIFIED AS NON-CONDUCTIVE ONOR NEAR ELECTRIC LINES. WIPE THE ENTIRE LENGTH OF THE HOSE AND FITTINGWITH A CLEAN DRY ABSORBENT CLOTH TO REMOVE DIRT AND MOSISTURE AND TESTHOSE FOR MAXIMUM ALLOWABLE CURRENT LEAKAGE IN ACCORDANCE WITH SAFETYDEPARTMENT INSTRUCTIONS.D A N G E R3. DO NOT EXCEED HOSE WORKING PRESSURE OR ABUSE HOSE. IMPROPER USE ORHANDLING OF HOSE COULD RESULT IN BURST OR OTHER HOSE FAILURE. KEEPHOSE AS FAR AWAY AS POSSIBLE FROM BODY AND DO NOT PERMIT DIRECT CONTACTDURING USE. CONTACT AT THE BURST CAN CAUSE BODILY INJECTION AND SEVEREPERSONAL INJURY.4. HANDLE AND ROUTE HOSE CAREFULLY TO AVOID KINKING, ABRASION, CUTTING, ORCONTACT WITH HIGH TEMPERATURE SURFACES. DO NOT USE IF KINKED. DO NOT USEHOSE TO PULL OR LIFT TOOLS, POWER UNITS, ETC.5. CHECK ENTIRE HOSE FOR CUTS CRACKS LEAKS ABRASIONS, BULGES, OR DAMAGE TOCOUPLINGS IF ANY OF THESE CONDITIONS EXIST, REPLACE THE HOSE IMMEDIATELY.NEVER USE TAPE OR ANY DEVICE TO ATTEMPT TO MEND THE HOSE.6. AFTER EACH USE STORE IN A CLEAN DRY AREA.DO NOT REMOVE THIS TAGSIDE 1 SIDE 23 (shown smaller than actual size)THE TAG SHOWN BELOW IS ATTACHED TO “CONDUCTIVE” HOSE.DO NOT REMOVE THIS TAGD A N G E R1 DO NOT USE THIS HYDRAULIC HOSE ON OR NEAR ELECTRIC LINES. THIS HOSE ISNOT LABELED OR CERTIFIED AS NON-CONDUCTIVE. USING THIS HOSE ON OR NEARELECTRICAL LINES MAY RESULT IN DEATH OR SERIOUS INJURY.2. FOR PROPER AND SAFE OPERATION MAKE SURE THAT YOU HAVE BEEN PROPERLYTRAINED IN CORRECT PROCEDURES REQUIRED FOR WORK ON OR AROUNDELECTRIC LINES.3. DO NOT EXCEED HOSE WORKING PRESSURE OR ABUSE HOSE. IMPROPER USE ORHANDLING OF HOSE COULD RESULT IN BURST OR OTHER HOSE FAILURE. KEEPHOSE AS FAR AWAY AS POSSIBLE FROM BODY AND DO NOT PERMIT DIRECT CONTACTDURING USE. CONTACT AT THE BURST CAN CAUSE BODILY INJECTION AND SEVEREPERSONAL INJURY.4. HANDLE AND ROUTE HOSE CAREFULLY TO AVOID KINKING, CUTTING, OR CONTACTWITH HIGH TEMPERATURE SURFACES. DO NOT USE IF KINKED. DO NOT USE HOSE TOPULL OR LIFT TOOLS, POWER UNITS, ETC.D A N G E R5. CHECK ENTIRE HOSE FOR CUTS CRACKS LEAKS ABRASIONS, BULGES, OR DAMAGE TOCOUPLINGS IF ANY OF THESE CONDITIONS EXIST, REPLACE THE HOSE IMMEDIATELY.NEVER USE TAPE OR ANY DEVICE TO ATTEMPT TO MEND THE HOSE.6. AFTER EACH USE STORE IN A CLEAN DRY AREA.DO NOT REMOVE THIS TAGSEE OTHER SIDESIDE 1 SIDE 2(shown smaller than actual size)11
Tool to Hydraulic Circuit Hose RecommendationsThe chart to the right shows recommended minimumhose diameters for various hose lengthsbased on gallons per minute (gpm)/liters per minute(lpm). These recommendations are intendedto keep return line pressure (back pressure) to aminimum acceptable level to ensure maximum toolperformance.This chart is intended to be used for hydraulic toolapplications only based on Stanley Hydraulic Toolstool operating requirements and should not be usedfor any other applications.All hydraulic hose must have at least a ratedminimum working pressure equal to the maximumhydraulic system relief valve setting.All hydraulic hose must meet or exceed specificationsas set forth by SAE J517.Oil Flow Hose Lengths Inside Diameter USE Min. Working PressureGPM LPM FEET METERS INCH MM (Press/Return) PSI BARCertified Non-Conductive Hose - Fiber Braid - for Utility Bucket Trucks4-9 15-34 up to <strong>10</strong> up to 3 3/8 <strong>10</strong> Both 2250 155Conductive Hose - Wire Braid or Fiber Braid -DO NOT USE NEAR ELECTRICAL CONDUCTORS4-6 15-23 up to 25 up to 7.5 3/8 <strong>10</strong> Both 2500 1754-6 15-23 26-<strong>10</strong>0 7.5-30 1/2 13 Both 2500 1755-<strong>10</strong>.5 19-40 up to 50 up to 15 1/2 13 Both 2500 1755-<strong>10</strong>.5 19-40 51-<strong>10</strong>0 15-30 5/8 16 Both 2500 1755/8 16 Pressure 2500 1755-<strong>10</strong>.5 19-40 <strong>10</strong>0-300 30-903/4 19 Return 2500 175<strong>10</strong>-13 38-49 up to 50 up to 15 5/8 16 Both 2500 175<strong>10</strong>-13 38-49 51-<strong>10</strong>0 15-30<strong>10</strong>-13 38-49 <strong>10</strong>0-200 30-6013-16 49-60 up to 25 up to 85/8 16 Pressure 2500 1753/4 19 Return 2500 1753/4 19 Pressure 2500 1751 25.4 Return 2500 1755/8 16 Pressure 2500 1753/4 19 Return 2500 17513-16 49-60 26-<strong>10</strong>0 8-303/4 19 Pressure 2500 1751 25.4 Return 2500 175PRESSURE>Typical Hose Connections12
HTMA REQUIREMENTSTOOL CATEGORYHYDRAULIC SYSTEMREQUIREMENTS TYPE 1 TYPE II TYPE III TYPE RRFLOW RATETOOL OPERATING PRESSURE(at the power supply outlet)SYSTEM RELIEF VALVE SETTING(at the power supply outlet)MAXIMUM BACK PRESSURE(at tool end of the return hose)Measured at a max. fl uid viscosity of:(at min. operating temperature)TEMPERATURESuffi cient heat rejection capacityto limit max. fl uid temperature to:(at max. expected ambient temperature)4-6 gpm 7-9 gpm 11-13 gpm 9-<strong>10</strong>.5 gpm(15-23 lpm) (26-34 lpm) (42-49 lpm) (34-40 lpm)2000 psi 2000 psi 2000 psi 2000 psi(138 bar) (138 bar) (138 bar) (138 bar)2<strong>10</strong>0-2250 psi 2<strong>10</strong>0-2250 psi 2<strong>10</strong>0-2250 psi 2200-2300 psi(145-155 bar) (145-155 bar) (145-155 bar) (152-159 bar)250 psi 250 psi 250 psi 250 psi(17 bar) (17 bar) (17 bar) (17 bar)400 ssu* 400 ssu* 400 ssu* 400 ssu*(82 centistokes) (82 centistokes) (82 centistokes) (82 centistokes)140° F 140° F 140° F 140° F(60° C) (60° C) (60° C) (60° C)Min. cooling capacityat a temperature difference ofbetween ambient and fl uid tempsNOTE:Do not operate the tool at oil temperatures above 140° F (60° C). Operation at higher temperatures can cause operatordiscomfort at the tool.FILTERMin. full-fl ow fi ltrationSized for fl ow of at least:(For cold temp. startup and max. dirt-holding capacity)3 hp 5 hp 7 hp 6 hp(2.24 kW) (3.73 kW) (4.47 kW) (5.22 kW)40° F 40° F 40° F 40° F(22° C) (22° C) (22° C) (22° C)25 microns 25 microns 25 microns 25 microns30 gpm 30 gpm 30 gpm 30 gpm(114 lpm) (114 lpm) (114 lpm) (114 lpm)HYDRAULIC FLUIDPetroleum based(premium grade, anti-wear, non-conductive)VISCOSITY(at min. and max. operating temps)<strong>10</strong>0-400 ssu* <strong>10</strong>0-400 ssu* <strong>10</strong>0-400 ssu* <strong>10</strong>0-400 ssu*(20-82 centistokes)NOTE:When choosing hydraulic fl uid, the expected oil temperature extremes that will be experienced in service determine themost suitable temperature viscosity characteristics. Hydraulic fl uids with a viscosity index over 140 will meet the requirementsover a wide range of operating temperatures.*SSU = Saybolt Seconds UniversalNOTE:These are general hydraulic system requirements. See tool Specifi cation page for tool specifi c requirements.13
OPERATIONPREOPERATION PROCEDURESHYDRAULIC SYSTEM REQUIREMENTSThe hydraulic system should provide a fl ow of <strong>10</strong>-14gpm/38-53 Ipm at an operating pressure of 1500-2000 psi/<strong>10</strong>5-140 bar. Recommended relief valve settings are 2<strong>10</strong>0-2250 psi/145-155 bar.The system should have no more than 250 psi/17 bar backpressuremeasured at the tool end of the operating hoses.The system conditions for measurement are at maximumfl uid viscosity of 400 ssu/82 centistokes (minimum operatingtem peratures).The hydraulic system should have suffi cient heat rejectioncapacity to limit the maximum oil temperature to 140° F/60°C at the maximum ex pected ambient temperature. Therecommended minimum cooling capacity is 7 hp/5.22 kW ata 40° F/22° C difference between ambient temperature andoil temperature.The hydraulic system should have a minimum of 25 micronfi ltration. It is recommended that fi lter elements be sizedfor a fl ow of at least 30 gpm/114 Ipm for cold temperaturestartup and maxi mum dirt holding capacity.The hydraulic fl uid used should have a vis cosity between<strong>10</strong>0 and 400 ssu/20 and 82 cen tistokes at the maximumand minimum expected operating temperatures. Petroleumbased hydraulic fl uids with antiwear properties and aviscosity index over 140 ssu/28 centistokes will meet therecom mended requirements over a wide range of oper atingtemperatures.The recommended hose size is .625-inch/16 mm I.D. up to50 ft/15 m long and .750-inch/20 mm I.D. minimum up to<strong>10</strong>0 ft/30 m long.CHECK POWER SOURCE1. Using a calibrated fl owmeter and pressure gauge, checkthat the hydraulic power source develops a fl ow of <strong>10</strong>-14gpm/38-53 Ipm at 1500 -2000 psi/<strong>10</strong>5-140 bar.2. Make certain that the hydraulic power source is equippedwith a relief valve set to open at 2<strong>10</strong>0 -2250 psi/145-155bar.CONNECT HOSES1. Wipe all hose couplers with a clean lint-free cloth beforemaking connections.2. Connect the hoses from the hydraulic power source tothe tool fi ttings or quick disconnects. It is good practice toconnect return hoses fi rst and disconnect them last to minimizeor avoid trapped pressure within the tool.3. Observe the arrow on the couplers to ensure that thefl ow is in the proper direction. The female coupler on thetool hose is the inlet (pressure) coupler.4. Move the hydraulic circuit control valve to the “ON” positionto operate the tool.Note:If uncoupled hoses are left in the sun, pressure increaseinside the hose may make them difficult to connect.Whenever possible, connect the free ends of thehoses together.OPERATING PROCEDURESThe following are general wood cut ting procedures andtechniques. Dif ferences in the terrain, vegetation, and typeof wood will make this infor mation more or less valid forparticu lar areas. For advice on specifi c woodcutting problemsor techniques for your area, consult your local Stanleyrepresentative or your county agent. They can often provideinfor mation that will make your work safer and moreproductive.CUTTING TIPS1. Check the lean of the tree. Tie a weight to a piece ofstring about 2 feet long. Hang the weight in your line ofsight. The string is a good vertical line to help you judge thelean of the tree. The tree should fall the way it is leaning.Trees that are straight (leaning no more than 5 degrees)gener ally can be felled in any direction.2. Avoid felling across another tree, log, rocks, gulley orridge. Do not fell straight uphill or down hill. Fell the tree diagonallyto the hill. Consider the wind direction and velocity.Do not attempt cutting in strong winds.3. Check the weight distribution. A tree is heavier on theside with the most limbs. It will try to fall on its heavy side.Trim a few limbs to “balance” the tree.14
OPERATION4. Clear the work area. You need a clean area all aroundthe tree for good footing. Get every thing out of the areawhere the tree will fall. Do not cut trees near structures.Because of the danger of electrocution, use extreme carewhen cutting trees near power lines.5. Before starting the cut, prepare your escape path. Makesure the escape path is clear of brush and branches. Theescape path should be at an angle away from the directionof fall.6. The saw chain should cut with very little pres sure appliedto the handle. If you have to force the saw to cut or if thecut is not straight, cease cutting immediately to prevent furthersaw chain and bar damage. See the Maintenance andAdjustments section of this manual for chain replacementor adjustment procedures.7. Underwater models require daily preventive maintenance.See the Maintenance and Adjust ments section ofthis manual for these mainte nance procedures.FELLING(CUTTING DOWN A TREE) (FIGURE 1)Observe all safety precautions. The spiked bumber (buckingcleat) must be installed for this operation.FELLING OR BACK CUT5. The felling or back cut is made on the side opposite andat least 2 inches above the hori zontal undercut (the fellingcut is made higher as the size of the tree increases). Placethe saw so the hand guard is close to the tree trunk and thebucking cleat is dug in.6. Start the cut horizontally. Pivot the bar in until the cut isbeing made parallel to the notch cut. Cut until the saw isabout 1 or 2 inches from the notch. Do not cut through thenotch.Note:The uncut wood between the felling and notch cuts iscalled the hinge. The hinge controls the fall of the treeand should be of uniform thick ness.7. As the saw nears the back cut, watch the treetop andthe cut for signs of movement. Be alert as soon as the treestarts to move, turn off the saw, pull it from the tree andmove away quickly on your escape route.8. For trees larger than bar length, make two felling cuts.Cut in as far as the bar will go, move to the other side andstart the second cut in the same manner as the fi rst whilepivoting the saw to complete the felling cut.BUCKINGBucking is the sawing of a log or fallen tree into smallerpieces.1. Observe all safety precautions.2. Use both hands. Grip the saw fi rmly.Figure 1. Felling a TreeNOTCHING OR UNDERCUTTING1. The notching or undercutting cut is made on the side youwant the tree to fall. Place the saw so the hand guard isclose to the tree trunk and the bucking cleat is dug in.2. Start the cut horizontally. Pivot the nose of the bar in last.Cut to about one-quarter of the tree’s diameter.Watch out for falling limbs.4. Make a diagonal cut down to meet the hori zontal cut andremove the wood from the notch.3. Stand uphill. A log that is cut loose may rool downhill.4. Keep the chain out of the dirt. Dirt will dull the chain. Adull chain is unsafe.5. Stand to the left of the saw.CROSSCUTTINGNote:Before starting to cut through a log try to imagine whatis going to happen. Look out for stresses in the log andcut through the log in such a manner that the guide barwill not get pinched.15
OPERATIONLOGS WITH PRESSURE ON TOP (FIGURE 2)1. Observe all safety precautions.2. Begin with an upper cut, down from the top. Do not cuttoo deeply. A cut of about 1/3 of the log diameter is enough.3. Finish with a bottom cut. They should meet.THICK LOGS LARGER THAN BAR LENGTHWITH PRESSURE ON TOP (FIGURE 3)1. Observe all safety precautions.2. Begin by cutting on the opposite side of the log.3. Pull the saw towards you and cut from the top.4. Cut from the bottom. Make a boring cut if the log is closeto the ground.5. Finish with a bottom cut. Figure 3. Crosscutting Logs Larger than Bar Length WithPressure on Top.LOGS/LIMBS WITH PRESSURE ON BOTTOM(FIGURE 4)1. Observe all safety precautions.16
OPERATION2. Begin with a bottom cut. The depth of the cut should beabout 1/3 of the log diameter.4. Do not cut overhead. Keep the saw below chest level.The chain is too close to your face in this position.3. Finish with an upper cut, down from the top. The sawcuts should meet.Figure 4. Crosscutting Logs/Limbs withPressure on Bottom.THICK LOGS LARGER THAN BAR LENGTHWITH PRESSURE ON THE BOTTOM(FIGURE 5)1. Observe all safety precautions.2. Begin by cutting on the opposite side of the log.3. Pull the saw towards you and cut from the top.4. Cut from the bottom. Make a boring cut if the log is closeto the ground.5. Finish with a top cut.PRUNING AND DEBRANCHING1. Observe all safety precautions.2. Use both hands. Keep a fi rm grip.3. Be alert for kickback. Do not allow the tip of the bar totouch anything while the chain is in motion.Figure 5. Crosscutting Logs Larger than Bar Length withPressure on Bottom.17
OPERATIONCOLD WEATHER OPERATIONIf the saw is to used during cold weather, preheat the hydraulicfl uid at low engine speed. When using the normallyrecommended oils, oil should be at or above 50° F/<strong>10</strong>° C(400 ssu/ 82 centistokes) before use.Damage to the hydraulic system or saw can result from usewith fl uid that is too viscous or thick.Cutting frozen wood causes the cutters to wear, crack andbreak at the back rivet hole unless proper precautions aretaken. To extend chain life when cutting in cold weather:a. Be sure the oiler is working.b. Keep the chain tensioned and check often.c. Keep the cutters properly sharpened. Touch up at leastevery hour. Never force a dull chain to cut.d. Clean out the bar groove and keep the oil hole open.Turn the bar over to equalize wear on the rails.e. Always install a new sprocket with a new chain.18
TOOL EQUIPMENT & CARENOTICEIn addition to the SafetyPrecautions on page in thismanual, observe the following forequipment protection and care.• Make sure all couplers are wiped clean before connection.• The hydraulic circuit control valve must be in the “OFF” position when coupling or uncouplinghydraulic tools. Failure to do so may result in damage to the quick couplers and cause overheatingof the hydraulic system.• Always store the tool in a clean dry space, safe from damage or pilferage.• Make sure the circuit PRESSURE hose (with male quick disconnect) is connected to the “IN” port.The circuit RETURN hose (with female quick disconnect) is connected to the opposite port. Do notreverse circuit fl ow. This can cause damage to internal seals.• Always replace hoses, couplings and other parts with replacement parts recommended by StanleyHydraulic Tools. Supply hoses must have a minimum working pressure rating of 2500 psi/172 bar.• Do not exceed the rated fl ow and pressure. See Specifi cations page in this manual for correct fl ow rate andpressure rating. Rapid failure of the internal seals may result.• Always keep critical tool markings, such as warning stickers and tags legible.• Tool repair should be performed by experienced personnel only.• Make certain that the recommended relief valves are installed in the pressure side of the system.• Do not use the tool for applications for which it was not intended.19
TROUBLESHOOTINGIf symptoms of poor perforamnce develop, the following hart cna be used as a guide to correct the problem. When diagnosingfaults in operation of the saw, always make sure the hydraulic power source is supplying the correct hydraulic fl owand pressure to the saw as listed in the table. Use a fl owmeter know to be accurate. Check the fl ow with the hydraulicfl uid temperature at least 80° F/27° C.Cuts slow.Bar turns color.Tool does not run.Tool runs backwards.PROBLEM CAUSE REMEDYOn/Off trigger is hard to press.Oil leakage around drive sprocket.Oil leakage between rear gear housingand valve handle assembly.Chain continues to move after valve isshut off.Insuffi cient fl uid fl ow or low relief valvesetting.Chain dull.Backpressure too high.Insuffi cient oiler fl ow.Power unit not functioning.Coupler or hoses blocked.Mechanical failure.Pressure and return reversed.Pressure and return reversed.Backpressure too high.Motor shaft seal failure.Motor face seal failure.Chain is too loose.Input fl ow too high.Adjust fl uid fl ow to proper gpm. Foroptimum performance adjust reliefvalve to 2250 psi/155 psi.Sharpen per instructions or replace.Should not exceed 250 psi/17 bar at14 gpm/53 lpm measured at the end ofthe tool operating hoses.Use manual oiler during heavy cuts.Adjust oiler per service instructions.Check power unit for proper fl ow andpressure (<strong>10</strong> gpm/38 lpm at 1500psi/<strong>10</strong>4 bar minimum).Remove obstruction.Disassemble tool and inspect for damage.Connect for proper fl ow direction. Motorshaft rotates clockwise.Correct for proper fl ow direction.Should not exceed 250 psi/17 bar at14 gpm/53 lpm measured at the end ofthe tool operating hoses.Replace as required. Make sure thatoil present is not the result of excessoiler fl ow.Replace as required.Tighten chain.Decrease fl ow.20
SPECIFICATIONSCapacity............................................................................................... 24,30,36, 43 inches/61, 76, 91, <strong>10</strong>9 cm Cut LengthsWeight ............................................................................................................................................................... 14 lbs/6.3 kgLength...........................................................................................................................................................17 inches/43 cmWidth ..............................................................................................................................................................9 inches/23 cmPressure ......................................................................................................................................1500-2000 psi/<strong>10</strong>5-140 barFlow Range ..........................................................................................................................................<strong>10</strong>-14 gpm/38-53 lpmOptimum Flow ................................................................................................................................................14 gpm/53 lpmPorting ............................................................................................................................................................. 8 SAE O-RingConnect Size and Type ........................................................................................................... 1/2 inch Male Pipe Hose EndHose Whips ......................................................................................................................................................................YesMotor .......................................................................................................................................................................HyrevzKickback Reduction Features ..................... Low Kickback Saw Chain, Front Hand Guard, Low Inertia Motor/Drive SystemSOUND AND VIBRATION DECLARATIONMeasured A-weighted sound power level, Lwa (ref. 1pW) in decibelsUncertainty, Kwa, in decibelsMeasured A-weighted sound pressure level, Lpa (ref. 20 μPa) at operator’s position, in decibelsUncertainty, Kpa, in decibels97.2 dBA3 dBA89.2 dBA3 dBAValues determined according to noise test code given in ISO 15744, using the basic standard ISO3744NOTE- The sum of a measured noise emision value and its associated uncertaintyrepresents an upper boundry of the range of values which is likely to occur in measurements.Declared vibration emission value in accordance with EN 12096Measured vibration emmission value (Main Handle): aUncertainty: KMeasured vibration emmission value (Assist Handle): aUncertainty: KValues determined according to ISO 7505, ISO 8662-1, ISO 5349-1,25.2 m/sec²1.0 m/sec²4.1 m/sec²1.0 m/sec²ACCESSORIES24 inch Chain................................................................................................................................................................0182424 inch Sprocket Nose Bar ...........................................................................................................................................02684Sprocket .......................................................................................................................................................................0293830 inch Sprocket Nose Bar ...........................................................................................................................................0319236 inch Sprocket Nose Bar ...........................................................................................................................................0319330 inch Chain................................................................................................................................................................0319436 inch Chain................................................................................................................................................................03195SERVICE TOOLSMotor Seal Kit, 3 Pc (for p/n 03272 Motor) ...................................................................................................................03327Repair Kit ....................................................................................................................................................................03328O-Ring Tool Kit .............................................................................................................................................................04337Bearing Installation Tool ...............................................................................................................................................05044Motor Seal Kit, 2 Pc (for p/n 21444 Motor) ...................................................................................................................<strong>10</strong>569Repari Kit ....................................................................................................................................................................<strong>10</strong>570Motor Seal Kit, 2 Pc (for p/n 21443 Motor) ...................................................................................................................<strong>10</strong>571Repair Kit ....................................................................................................................................................................<strong>10</strong>57221
22<strong>CS11</strong> PARTS ILLUSTRATION
<strong>CS11</strong> PARTS LISTITEMNO.PART NO. QTY DESCRIPTION1 00612 8 CAPSCREW2 31849 1 REAR GEAR HOUSING3 06316 4 BUSHING4 06853 1 DRIVE GEAR5 06854 1 IDLER SHAFT6 06855 1 IDLER GEAR7 00713 2 DOWEL PIN8 00178 1 O-RING*9 21417 1 FRONT BEARING HOUSING<strong>10</strong> 00171 1 O-RING*11 00669 1 QUAD RING*12 19884 1 SEAL GLAND13 00170 1 RETAINER RING14 06881 1 NEEDLE ROLLER15 07359 1 MOTOR SHAFT16 00148 1 BEARING•17 02905 1 O-RING*18 03<strong>10</strong>4 1 KEEPER, SEAL & BEARING19 031<strong>10</strong> 1 TEFLON SEAL*20 00633 1 RETAINER RING21 01211 1 O-RING*22 03280 1 SPACER, SEAL RACE23 02924 1 MANUAL OIL TRIGGER24 02751 1 NAME TAG25 00094 1 SCREW26 02915 1 TORSION SPRING27 02945 1 VALVE HANDLE ASSY28 02941 1 TRIGGER29 03007 1 RETAINER RING30 02943 1 SAFETY CATCH31 02914 1 SPRING32 00026 1 O-RING*33 00717 1 O-RING*34 02931 1 VALVE CAP35 01604 1 O-RING*36 02925 1 VALVE SPOOL37 03279 1 ROLL PIN38 02911 1 HOSE CLIP39 03278 1 ROLL PIN40 06830 2 HOSE WHIP41 02932 1 MANUAL OIL PLUG42 02922 1 MANUAL OIL PLUNGER43 05632 1 O-RING*44 01411 1 O-RING*45 04139 1 WASHER46 01362 1 O-RING*47 03974 1 COUPLER SET 1/2” NPT48 01362 1 O-RING*49 02921 1 AUTO OILER ADJUSTMENT PLUG50 12535 1 CIRCUIT TYPE “E” DECALITEMNO.PART NO. QTY DESCRIPTION51 12536 1 CIRCUIT TYPE “F” DECAL52 02916 1 SPRING53 01604 1 O-RING*54 09437 1 PLUG55 02912 2 OIL TUBE56 00175 4 O-RING*57 03006 2 CAPSCREW58 02764 1 CAPSCREW59 12175 2 WASHER60 02933 1 CHAIN GUARD61 07473 1 HAND GUARD62 28409 1 COMPOSITE SAFETY DECAL63 20460 1 HANDLE STRUT64 03277 2 STUD65 02765 1 SCREW•66 12174 1 CHAIN STOP67 04746 1 AUTO OILER DECAL68 03275 1 BAR ADJUSTMENT NUT•69 17134 1 NUT•70 02766 2 PLAIN WASHER71 03276 2 NUT•01824 SAW CHAIN, 24 inch Saw Bar 72LP-82X72 03194 1 SAW CHAIN, 30 inch Saw Bar 72LP-98X03195 SAW CHAIN, 36 inch Saw Bar 72LP-117X02684 SAW BAR, 24 inch Sprocket Nose73 03192 1 SAW BAR, 30 inch Sprocket Nose03193 SAW BAR, 36 inch Sprocket Nose74 02947 1 CHAIN SAW ADAPTOR ASSY75 02764 <strong>10</strong> CAPSCREW76 02649 3 HANDLE BAR RETAINER77 12412 1 WARNING DECAL ELECTRICAL78 02643 3 NEOPRENE WASHER79 13907 1 WARNING DECAL, KICKBACK80 03790 1 GPM DECAL81 02936 1 HANDLE BAR82 00018 1 O-RING*83 02913 1 BUCKET CLEAT84 02449 1 CAPSCREW85 02938 1 DRIVE SPROCKET•86 03273 1 NUT87 03023 1 KEY•88 12248 1 LINK PLATE89 28323 1 CE DECAL90 29036 1 SOUND POWER LEVEL DECAL91 09277 1 HEX NUTMOTOR ASSEMBLY <strong>CS11</strong>..........................................21444SEAL KIT (<strong>CS11</strong>).........................................................<strong>10</strong>569•REPAIR KIT (Includes Seal Kit <strong>10</strong>569)........................<strong>10</strong>570* Denotes Part in Seal Kit• Denotes Part in Repair Kit23
WARRANTYStanley Hydraulic Tools (hereinafter called “Stanley”), subject to the exceptions contained below, warrants new hydraulic tools for a period of one year from the date of sale tothe fi rst retail purchaser, or for a period of 2 years from the shipping date from Stanley, whichever period expires fi rst, to be free of defects in material and/or workmanship atthe time of delivery, and will, at its option, repair or replace any tool or part of a tool, or new part, which is found upon examination by a Stanley authorized service outlet or byStanley’s factory in Milwaukie, Oregon to be DEFECTIVE IN MATERIAL AND/OR WORKMANSHIP.EXCEPTIONS FROM WARRANTYNEW PARTS: New parts which are obtained individually are warranted, subject to the exceptions herein, to be free of defects in material and/or workmanship at the timeof delivery and for a period of 6 months after the date of fi rst usage. Seals and diaphragms are warranted to be free of defects in material and/or workmanship at the timeof delivery and for a period of 6 months after the date of fi rst usage or 2 years after the date of delivery, whichever period expires fi rst. Warranty for new parts is limited toreplacement of defective parts only. Labor is not covered.FREIGHT COSTS: Freight costs to return parts to Stanley, if requested by Stanley for the purpose of evaluating a warranty claim for warranty credit, are covered under thispolicy if the claimed part or parts are approved for warranty credit. Freight costs for any part or parts which are not approved for warranty credit will be the responsibility of theindividual.SEALS & DIAPHRAGMS: Seals and diaphragms installed in new tools are warranted to be free of defects in material and/or workmanship for a period of 6 months after thedate of fi rst usage, or for a period of 2 years from the shipping date from Stanley, whichever period expires fi rst.CUTTING ACCESSORIES: Cutting accessories such as breaker tool bits are warranted to be free of defects in material and or workmanship at the time of delivery only.ITEMS PRODUCED BY OTHER MANUFACTURERS: Components which are not manufactured by Stanley and are warranted by their respective manufacturers.a. Costs incurred to remove a Stanley manufactured component in order to service an item manufactured by other manufacturers.ALTERATIONS & MODIFICATIONS: Alterations or modifi cations to any tool or part. All obligations under this warranty shall be terminated if the new tool or part is altered ormodifi ed in any way.NORMAL WEAR: any failure or performance defi ciency attributable to normal wear and tear such as tool bushings, retaining pins, wear plates, bumpers, retaining rings andplugs, rubber bushings, recoil springs, etc.INCIDENTAL/CONSEQUENTIAL DAMAGES: To the fullest extent permitted by applicable law, in no event will STANLEY be liable for any incidental, consequential or specialdamages and/or expenses.FREIGHT DAMAGE: Damage caused by improper storage or freight handling.LOSS TIME: Loss of operating time to the user while the tool(s) is out of service.IMPROPER OPERATION: Any failure or performance defi ciency attributable to a failure to follow the guidelines and/or procedures as outlined in the tool’s operation andmaintenance manual.MAINTENANCE: Any failure or performance defi ciency attributable to not maintaining the tool(s) in good operating condition as outlined in the Operation and Maintenance<strong>Manual</strong>.HYDRAULIC PRESSURE & FLOW, HEAT, TYPE OF FLUID: Any failure or performance defi ciency attributable to excess hydraulic pressure, excess hydraulic back-pressure,excess hydraulic fl ow, excessive heat, or incorrect hydraulic fl uid.REPAIRS OR ALTERATIONS: Any failure or performance defi ciency attributable to repairs by anyone which in Stanley’s sole judgement caused or contributed to the failureor defi ciency.MIS-APPLICATION: Any failure or performance defi ciency attributable to mis-application. “Mis-application” is defi ned as usage of products for which they were not originallyintended or usage of products in such a matter which exposes them to abuse or accident, without fi rst obtaining the written consent of Stanley. PERMISSION TO APPLY ANYPRODUCT FOR WHICH IT WAS NOT ORIGINALLY INTENDED CAN ONLY BE OBTAINED FROM STANLEY ENGINEERING.WARRANTY REGISTRATION: STANLEY ASSUMES NO LIABILITY FOR WARRANTY CLAIMS SUBMITTED FOR WHICH NO TOOL REGISTRATION IS ON RECORD. Inthe event a warranty claim is submitted and no tool registration is on record, no warranty credit will be issued without fi rst receiving documentation which proves the sale ofthe tool or the tools’ fi rst date of usage. The term “DOCUMENTATION” as used in this paragraph is defi ned as a bill of sale, or letter of intent from the fi rst retail customer. AWARRANTY REGISTRATION FORM THAT IS NOT ALSO ON RECORD WITH STANLEY WILL NOT BE ACCEPTED AS “DOCUMENTATION”.NO ADDITIONAL WARRANTIES OR REPRESENTATIONSThis limited warranty and the obligation of Stanley thereunder is in lieu of all other warranties, expressed or implied including merchantability or fi tness for a particular purposeexcept for that provided herein. There is no other warranty. This warranty gives the purchaser specifi c legal rights and other rights may be available which mightvary depending upon applicable law.24
25Stanley Hydraulic Tools38<strong>10</strong> SE Naef RoadMilwaukie, Oregon503-659-5660 / Fax 503-652-1780www.stanleyhydraulic.com


