Menu for Voice Mail Operations - TelData Communications, Inc.
Menu for Voice Mail Operations - TelData Communications, Inc.
Menu for Voice Mail Operations - TelData Communications, Inc.

You also want an ePaper? Increase the reach of your titles
YUMPU automatically turns print PDFs into web optimized ePapers that Google loves.
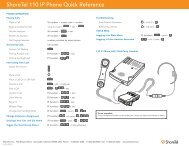
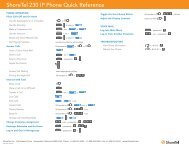
ShoreTel <strong>Voice</strong> <strong>Mail</strong> Quick Reference<br />
VOICE MAIL OPERATIONS<br />
(Instructions <strong>for</strong> <strong>Voice</strong> <strong>Mail</strong> owners)<br />
New <strong>Voice</strong> <strong>Mail</strong> Indicators<br />
Your voice mailbox contains unplayed messages<br />
if:<br />
● You hear a stutter tone on the handset.<br />
OR<br />
● The phone’s message waiting light flashes.<br />
Checking <strong>Voice</strong> <strong>Mail</strong><br />
To check voice mail from your extension<br />
<strong>Voice</strong> <strong>Mail</strong><br />
1 Press or (while logged in), lift the handset<br />
and press #.<br />
2 At the prompt, use the dial pad to enter your<br />
password. (If you have not been assigned a<br />
password, use the default password, 1234.)<br />
3 Press #.<br />
NOTE If you are logging in <strong>for</strong> the first time, the<br />
system prompts you <strong>for</strong> a new password and<br />
asks you to record your name.<br />
To check voice mail from another extension<br />
1 Press # twice.<br />
2 Enter your extension.<br />
3 Enter your password.<br />
4 Press #.<br />
To check voice mail from an external phone<br />
1 Dial your voice mail access number.<br />
2 Press #.<br />
3 Enter your extension.<br />
4 Enter your password.<br />
5 Press #.<br />
Listening To Messages<br />
At the Main <strong>Menu</strong> prompt, press 1. The voice<br />
mail system plays urgent messages first, then<br />
newly arrived messages.<br />
The system gives the delivery date and time <strong>for</strong><br />
each message. (You can disable this feature from<br />
the <strong>Mail</strong>box Options <strong>Menu</strong>.)<br />
Managing Messages<br />
After listening to a message, you can replay it,<br />
send a reply to the person who left the message,<br />
<strong>for</strong>ward it to someone else, replay the date and<br />
time in<strong>for</strong>mation, save it, or delete it.<br />
To replay all of your saved messages<br />
● Press 3 at the Main <strong>Menu</strong> prompt.<br />
As a safeguard against accidental erasures, the system<br />
retains deleted messages <strong>for</strong> a few hours.<br />
To listen to your deleted messages<br />
1 Press 7 at the Main <strong>Menu</strong> prompt.<br />
2 Press 7.<br />
<strong>Voice</strong> mail plays all the deleted messages still<br />
available to the system. During playback, you can<br />
manage deleted messages as if they were newly<br />
arrived messages.<br />
To restore a deleted message<br />
● Press 2.<br />
To send a recorded message from voice mail<br />
After recording a message, voice mail asks you to<br />
supply an address.<br />
1 Address the message to individual recipients<br />
by entering their extension numbers.<br />
2 Specify groups of recipients by entering a<br />
distribution list number.<br />
To identify a recipient by name, specify a personal<br />
distribution list, or broadcast to all extensions,<br />
press 0 and follow the prompts.<br />
To mark a message as urgent<br />
● After addressing the message and confirming<br />
the addressee(s), press 1.<br />
To <strong>for</strong>ward the message you're reviewing<br />
1 Press 4 and follow the recorded prompts.<br />
To reply to the message you're reviewing<br />
1 Press 5 and follow the recorded prompts.<br />
2 Press 1 to reply with a voice mail, or press 2 to<br />
reply with a call back.<br />
Changing <strong>Mail</strong>box Options<br />
Personalize your voice mail by changing your<br />
name, password, or personal greeting.<br />
To change personal settings from the Main <strong>Menu</strong>,<br />
press 7 and follow the recorded prompts.<br />
Changing Extension Assignment<br />
If you have the proper permission, you can assign<br />
your extension to any phone on the system.<br />
1 Log in to voice mail from the target phone–<br />
an extension other than your own.<br />
2 At the Main <strong>Menu</strong> prompt, press 7.<br />
3 Press 3 to re-assign the extension.<br />
4 Press 1 to assign the extension.<br />
5 Press 2 to un-assign the extension. (The phone<br />
reverts to its original extension.)<br />
Setting Call Handling And Forwarding<br />
NOTE Use ShoreWare Call Manager to configure<br />
the modes with different call <strong>for</strong>warding destinations<br />
and personal greetings.<br />
You can set one of five distinct call handling<br />
modes <strong>for</strong> your extension. When you record a<br />
personal greeting, it is linked to the active call<br />
handling mode.<br />
To enable one of the five distinct call handling<br />
modes:<br />
● Press 7 at the Main <strong>Menu</strong> prompt.<br />
● Press 2, then follow the prompts.<br />
Enabling FindMe<br />
To enable or disable FindMe Forwarding so that<br />
callers can <strong>for</strong>ward their calls to your destination:<br />
● Press 7 at the Main <strong>Menu</strong> prompt.<br />
● Press 9 <strong>for</strong> additional mailbox options.<br />
● Press 5, then follow the prompts.<br />
NOTE You must have permission to use FindMe Forwarding.<br />
Troubleshooting<br />
If the number of messages in your mailbox<br />
exceeds the limit, the system notifies callers that<br />
your mailbox is full and unable to accept new<br />
messages. (Recently deleted messages remain in<br />
the mailbox and are included in the total count.)<br />
If your mailbox is full, first purge any backlog of<br />
deleted messages.<br />
To purge deleted messages<br />
1 At the Main <strong>Menu</strong> prompt, press 7.<br />
2 Press 8 to remove deleted messages.<br />
ShoreTel, <strong>Inc</strong>., 960 Stewart Drive Sunnyvale, Cali<strong>for</strong>nia 94085 USA Phone: +1.408.331.3300 +1.800.425.9385 Fax: +1.408.331.3333 www.shoretel.com<br />
PN 800-1032-01<br />
LEAVING A MESSAGE<br />
(<strong>Voice</strong> mail options when in mailbox)<br />
3 Press 1 to confirm deletion.<br />
Leave Message<br />
When dialing into a ShoreTel system, if the person<br />
you are trying to reach does not answer, your call<br />
will be sent to a mailbox and you will hear a standard<br />
greeting. You can select from the following<br />
options:<br />
# Bypass greeting<br />
0 Transfer to assistant<br />
1 Forward to recipient’s<br />
FindMe destination<br />
9 Transfer to<br />
Auto-Attendant<br />
Message Recording<br />
If you choose to leave a recorded message, the<br />
following options are available after recording your<br />
message:<br />
# Message options<br />
* Re-record<br />
0 Send message, transfer to assistant<br />
1 Send message, <strong>for</strong>ward to recipient’s<br />
FindMe destination<br />
9 Send message, transfer to Auto-Attendant<br />
NOTE Hanging up sends the message.<br />
# Message Options<br />
When leaving a message, select from the following<br />
options:<br />
# Send message<br />
* Cancel<br />
1 Review<br />
2 Re-record<br />
3 Mark/unmark urgent<br />
0 Send message, transfer to assistant<br />
9 Send message, transfer to Auto-Attendant
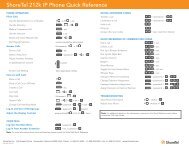
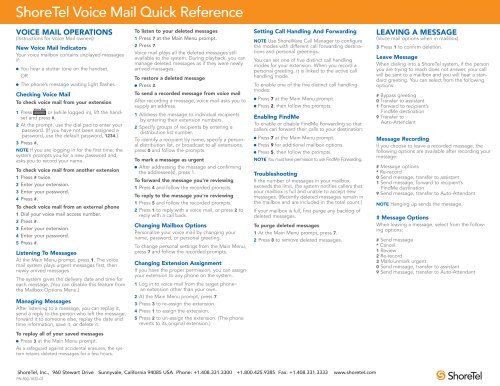
ShoreTel <strong>Voice</strong> <strong>Mail</strong> Quick Reference<br />
PRESS<br />
1<br />
2<br />
3<br />
7<br />
8<br />
9<br />
#<br />
ShoreTel, <strong>Inc</strong>., 960 Stewart Drive Sunnyvale, Cali<strong>for</strong>nia 94085 USA Phone: +1.408.331.3300 +1.800.425.9385 Fax: +1.408.331.3333 www.shoretel.com<br />
PN 800-1032-01<br />
Main <strong>Menu</strong> <strong>for</strong> <strong>Voice</strong> <strong>Mail</strong> <strong>Operations</strong><br />
Listen to Messages<br />
Select one of the following options during or at the end of a message:<br />
1 Replay<br />
2 Save<br />
3 Delete<br />
4 Forward<br />
5 Reply<br />
6 Play envelope<br />
7 Move backward<br />
8 Pause<br />
9 Move <strong>for</strong>ward<br />
# Skip<br />
* Cancel<br />
Send a Message # Accept<br />
Record your message at the tone.<br />
When finished, press # and select<br />
from the following options:<br />
# Accept<br />
1 Review<br />
2 Re-record<br />
* Cancel<br />
Listen to Saved Messages<br />
Refer to “Listen to Messages” <strong>for</strong><br />
message options while listening to<br />
saved messages.<br />
Change <strong>Mail</strong>box Options<br />
1 Record greeting<br />
2 Set call handling mode<br />
3 Re-assign extension<br />
4 Set password<br />
5 Enable/disable envelope in<strong>for</strong>mation<br />
6 Record name<br />
7 Listen to deleted messages<br />
8 Remove deleted messages<br />
9 Additional options<br />
* Cancel<br />
Log Off<br />
Return to<br />
Auto-Attendant<br />
Hear <strong>Mail</strong>box<br />
Status<br />
Enter the extension or the system<br />
distribution list to receive the message:<br />
# Conclude addressing<br />
0 Additional addressing options<br />
* Cancel last address<br />
** Cancel<br />
1 Record Greeting<br />
5 Reply<br />
Record your greeting <strong>for</strong> the currently<br />
active mode at the tone. When finished,<br />
press # and select from the following<br />
options:<br />
# Accept 3 Delete<br />
1 Review * Cancel<br />
2 Re-record<br />
2 Set Call Handling Mode<br />
1 Standard 5 Custom<br />
2 In a meeting 6 No change<br />
3 Out of office * Cancel<br />
4 Extended absence<br />
Select one of the following :<br />
1 Reply with a voice mail<br />
2 Reply with a call back<br />
# Conclude Addressing<br />
# Send<br />
1 Mark/unmark urgent<br />
2 Mark/unmark <strong>for</strong> return receipt<br />
* Cancel<br />
0 Addressing Options<br />
1 Address by name<br />
2 Address by personal distribution list<br />
3 Broadcast<br />
3 Re-assign Extension<br />
Press either 1 to Assign,<br />
or 2 to Un-assign.<br />
4 Set Password<br />
Enter password twice in<br />
response to the prompts.<br />
* Cancel<br />
5 Enable Envelope Info<br />
Press either 1 to enable,<br />
or 2 to disable<br />
Log In: Internal Log In: External<br />
a) From your own extension, lift the headset,<br />
press #, enter password, and press #<br />
b) From another extension, press # twice,<br />
enter extension, enter password, and press #<br />
6 Record Name<br />
Record your name at the<br />
tone. When finished, press<br />
# and select from the following<br />
options:<br />
# Accept 3 Delete<br />
1 Review * Cancel<br />
2 Re-record<br />
8 Remove Deleted<br />
Messages<br />
1 Confirm * Cancel<br />
1 Address by Name<br />
Call your voice mail access<br />
number, enter extension,<br />
enter password, and press #<br />
Spell the name of the person, last name first.<br />
Press 7 <strong>for</strong> Q and 9 <strong>for</strong> Z. * Cancel<br />
Note: System returns to Addressing after name is entered.<br />
2 Address by Personal Distribution List<br />
Enter the two-digit personal distribution list number.<br />
* Cancel<br />
9 Additional Options<br />
1 Enable or disable Outlook<br />
automated call handling<br />
2 Change email delivery options<br />
3 Change Agent state<br />
5 Change Find Me Forwarding state<br />
* Cancel<br />
2 Email Delivery Options<br />
1 Disable email delivery<br />
2 Enable email delivery<br />
3 Enable email delivery with voice<br />
mail attached<br />
4 Mark voice mail heard after<br />
email delivery<br />
3 Agent State<br />
1 Log in and assign extension<br />
2 Log out<br />
3 Log in without assigning extension