
Create successful ePaper yourself
Turn your PDF publications into a flip-book with our unique Google optimized e-Paper software.
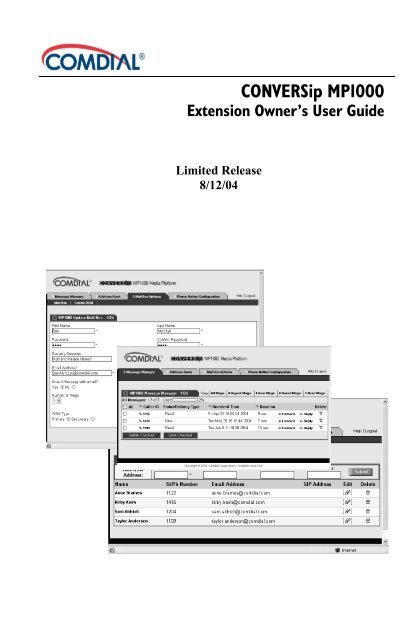
CONVERSip <strong>MP1000</strong><br />
Extension Owner’s <strong>User</strong> <strong>Guide</strong><br />
Limited Release<br />
8/12/04
CONVERSip <strong>MP1000</strong><br />
Extension Owner’s <strong>User</strong> <strong>Guide</strong><br />
Copyright © 2004 Comdial Corporation<br />
All rights reserved. Unauthorized use of this<br />
document is prohibited.<br />
Comdial Corporation<br />
106 Cattleman Road, Sarasota, FL 34232<br />
(941) 554-5000 or (800) 266-3425<br />
-Notice-<br />
Comdial reserves the right to make any<br />
changes and improvements in the product<br />
described in this document at any time and<br />
without prior notice.<br />
CONVERSip, <strong>MP1000</strong>, EP300 Voice IP Endpoint, and EP200<br />
Multimedia IP Endpoint are trademarks of Comdial Corporation. All<br />
other product names are trademarks of their respective owners.<br />
First Edition<br />
XXX, 2004<br />
GCA70-403 Aug ‘04 ii
CONVERSip <strong>MP1000</strong> <strong>User</strong><br />
TABLE OF CONTENTS<br />
INTRODUCTION .......................................................... VII<br />
Audience Description .................................................... vii<br />
Related Publications ...................................................... vii<br />
Conventions Used in this Manual ................................. viii<br />
1. Overview ................................................................. 11<br />
1.1 Logging On ............................................................. 11<br />
2. Updating Mail Box Settings................................... 15<br />
2.1 Changing Your Personal Information ..................... 15<br />
2.1.1 Controlling Voice Mail Attachments ...................... 17<br />
2.1.2 Forwarding Calls ................................................... 17<br />
2.2 Customizing Your Outgoing Message (OGM) ........ 18<br />
2.2.1 Setting the Current OGM ...................................... 18<br />
2.2.2 Creating a New OGM Using Your PC ................... 19<br />
3. Assigning Your EP300’s Programmable Buttons 21<br />
4. Setting Up Your Address Book............................. 23<br />
5. Using the Message Manager................................. 25<br />
5.1 Viewing and Listening to Your Messages .............. 25<br />
5.2 Forwarding Messages ............................................ 27<br />
5.3 Replying to Messages ............................................ 29<br />
Aug ‘04 Comdial iii
Contents<br />
5.4 Deleting Messages ................................................. 30<br />
iv Comdial Aug ‘04
REVISION HISTORY<br />
CONVERSip <strong>MP1000</strong> <strong>User</strong><br />
Version Changes Date<br />
01 Initial version xx-xx-2004<br />
Aug ‘04 Comdial v
This Page Intentionally Left Blank<br />
vi Comdial Aug ‘04
Introduction<br />
CONVERSip <strong>MP1000</strong> <strong>User</strong><br />
This manual describes how to set up the user interface of the<br />
CONVERSip <strong>MP1000</strong> Media Platform system. It also contains procedures<br />
covering how to modify base settings entered by the System<br />
Administrator, when allowed.<br />
This manual is intended to provide:<br />
• basic knowledge of the functions and features of the <strong>MP1000</strong><br />
user interface.<br />
• step-by-step procedures for controlling individual extension<br />
settings.<br />
Audience Description<br />
This manual is intended for persons who:<br />
• use CONVERSip <strong>MP1000</strong> extensions on a day-to-day basis.<br />
This manual assumes:<br />
• familiarity with using an Internet browser page, either Internet<br />
Explorer or Netscape 7.0 or later.<br />
You should:<br />
• read this manual in normal reading sequence before first using<br />
the <strong>MP1000</strong> <strong>User</strong> Interface.<br />
• refer to this manual as necessary while modifying your<br />
extension settings.<br />
Related Publications<br />
This manual refers you to related publications, when appropriate, for<br />
additional information.<br />
• CONVERSip EP300 Voice IP Endpoint <strong>User</strong> <strong>Guide</strong> for <strong>MP1000</strong>,<br />
part number GCA70-398<br />
Aug ‘04 Comdial vii
Introduction<br />
Conventions Used in this Manual<br />
Many of the procedures require you to enter settings or to choose<br />
from a list of variables. To signify when you are to act upon an item,<br />
parameter, button, etc. we italicize the name of the item being acted<br />
upon. For example, the following sentences instruct you to press a<br />
specific key on your keyboard.<br />
• Press Enter.<br />
• Press Esc.<br />
• Press Page Up or Page Down.<br />
• Press and hold the Shift and Ctrl keys simultaneously.<br />
In contrast, the following sentence instructs you to type in a required<br />
response; notice the word “Enter” when used in this way is not italicized<br />
because you are not pushing a specific key name.<br />
• Enter the value you want to use for this feature.<br />
Similarly, when you select a menu option, we italicize the name of the<br />
menu item because you are required to take the action of choosing it,<br />
even though the item may not appear in italics on the system menu or<br />
display.<br />
• Use the arrow keys to highlight Programming and press Enter.<br />
At other times in the manual, we discuss prompts that the system displays<br />
to you. In these cases, we enclose the exact wording of the<br />
prompt in quotation marks to signify that the system is, in essence,<br />
speaking to you.<br />
• The system prompts, “Enter your password now.”<br />
If the system is actually playing a recording aloud, we enclose the<br />
exact wording of the prompt in quotation marks and italics to signify<br />
that the system is in actually speaking to you.<br />
• The system says, “You have no more new messages.”<br />
Italics and quotes are also of course used in their normal contexts, that<br />
is, for emphasis and to identify what words are spoken.<br />
viii Comdial Aug ‘04
CONVERSip <strong>MP1000</strong> <strong>User</strong><br />
• This is called a hot transfer, that is, the system transfers the call<br />
without ringing the extension.<br />
There are times when this manual will instruct you to enter a number<br />
from within a range of numbers. In this instance, we use the “~ “<br />
character to indicate the range. For example, 05-01-1~3-001~100<br />
tells you to enter:<br />
• 05<br />
• 01<br />
• a 1, 2, or 3,<br />
• a three-digit number that falls in the 001 to 100 range.<br />
Aug ‘04 Comdial ix
Introduction<br />
x Comdial Aug ‘04
1. OVERVIEW<br />
CONVERSip <strong>MP1000</strong> <strong>User</strong><br />
The <strong>MP1000</strong> system provides a <strong>User</strong> Interface that allows you to:<br />
• Control Mail Box Settings<br />
• Control EP300 Button Settings<br />
• Add/Delete Members from your Address Book, and<br />
• View listings of your voice mail messages and listen to the<br />
attached sound files.<br />
You can perform all of these functions via the <strong>User</strong> GUI (Graphical<br />
<strong>User</strong> Interface). The GUI is browser-based, so that all you have to do<br />
is open your resident browser (Internet Explorer 6.0 or Netscape Navigator<br />
7.0) and enter the URL of the <strong>MP1000</strong>.<br />
1.1 Logging On<br />
1. Open the browser window and enter the IP address of the<br />
<strong>MP1000</strong> in the Address Bar. If you do not know this IP<br />
address, see your System Administrator. The <strong>MP1000</strong> displays<br />
the Login Page.<br />
Aug ‘04 Comdial 11
Overview<br />
enter <strong>MP1000</strong> IP address here<br />
2. In the Login ID/Extension Number field, enter your extension<br />
number. This is a three or four digit number assigned by your<br />
System Administrator.<br />
3. Enter your password in the Password field. If you have not yet<br />
customized your password, the default is 1234. Note: If you<br />
have already set a custom password but have forgotten what it<br />
is, click on Forgot Password? and answer the security question.<br />
Keep in mind that the security question answer is case<br />
sensitive.<br />
12 Comdial Aug ‘04
CONVERSip <strong>MP1000</strong> <strong>User</strong><br />
4. Click on Submit. The system then opens the user interface<br />
page for your extension at the Message Manager page.<br />
Note: The first time you log on, the <strong>MP1000</strong> may send you<br />
directly to the Mail Box Options page and ask you to complete<br />
the information on that page. For details on entering mail box<br />
information, see Section 2.1, Changing Your Personal Information.<br />
Once you have entered this information, when you log<br />
on subsequently the <strong>MP1000</strong> opens at the Message Manager<br />
page.<br />
The <strong>MP1000</strong> GUI contains four functional tabs across the top that<br />
allow you access to additional pages. Below each tab name are links<br />
to additional pages related to that tab.<br />
Aug ‘04 Comdial 13
Overview<br />
pages<br />
within<br />
single<br />
tab<br />
Now that you have logged onto your user interface page, you can<br />
control the settings as follows.<br />
Function Refer to:<br />
Updating Mail Box Settings Section 2., Updating Mail Box<br />
Settings<br />
Controlling EP300 Button<br />
Settings<br />
Adding/Deleting Members<br />
from your Address Book<br />
Viewing lists of and listening<br />
to your voice mail messages.<br />
functional tabs<br />
Section 3., Assigning Your<br />
EP300’s Programmable<br />
Buttons<br />
Section 4., Setting Up Your<br />
Address Book<br />
Section 5., Using the Message<br />
Manager<br />
14 Comdial Aug ‘04
CONVERSip <strong>MP1000</strong> <strong>User</strong><br />
2. UPDATING MAIL BOX SETTINGS<br />
<strong>MP1000</strong> allows you to change your mail box settings to best meet<br />
your needs. The settings you can change include:<br />
• Personal Information (name, password, email addresses.<br />
security question and answer),<br />
• Whether or not you want the system to attach a voice file to the<br />
email notification it sends you when you receive a new<br />
message,<br />
• How you want the system to handle your calls when you do not<br />
answer after a specified number of rings,<br />
• Which outgoing message (primary or secondary) you want to<br />
use.<br />
2.1 Changing Your Personal Information<br />
To change your personal information, perform the following steps.<br />
Aug ‘04 Comdial 15
Updating Mail Box Settings<br />
1. Click on the Mail Box Options tab. The system displays the<br />
Mail Box page.<br />
2. In the First Name and Last Name fields, change your name as<br />
needed.<br />
3. In the Password field, enter a new password if desired. Be sure<br />
to enter the same new password again in the Confirm Password<br />
field.<br />
4. Enter the question you want <strong>MP1000</strong> to ask you if you cannot<br />
remember your password in the Security Question field.<br />
5. Enter the answer to the security question in the Security<br />
Answer field. Note that this field is case-sensitive, so the<br />
answer must match exactly what you enter here, including capitolization.<br />
6. In the Email Address1 and Email Address2 fields, change your<br />
email addresses on file as needed.<br />
16 Comdial Aug ‘04
CONVERSip <strong>MP1000</strong> <strong>User</strong><br />
2.1.1 CONTROLLING VOICE MAIL ATTACHMENTS<br />
The Attach message with email? field allows you to instruct the<br />
system to attach sound files to email new message notifications.<br />
If you set this field to Yes, the system attaches a file containing the<br />
voice mail message to the email notification it sends to your inbox.<br />
You can then click on this file from the email to listen to the voice<br />
mail message. Your other choices for listening to your voice messages<br />
include using the IP endpoint (EP300 or EP200) and using the<br />
Message Manager. The voice file is a .wav file; your PC uses<br />
whatever sound device it has installed to play the message.<br />
If you set this field to No, the system sends only the email notification<br />
to your inbox when you receive a new voice mail message. You can<br />
only listen to the message by using your endpoint to retrieve the<br />
message, or by logging on to the <strong>User</strong> Interface and using the<br />
Message Manager tool.<br />
For details on retrieving messages using your EP300, see the<br />
CONVERSip EP300 Voice IP Endpoint for <strong>MP1000</strong> <strong>User</strong> <strong>Guide</strong>. For<br />
details on the Message Manager, see Section 5., Using the Message<br />
Manager.<br />
2.1.2 FORWARDING CALLS<br />
The <strong>MP1000</strong> system allows you to specify where to forward<br />
incoming calls:<br />
• when you are already on the phone,<br />
• when you do not answer after a set number of rings, or<br />
• when you want to automatically forward all of your incoming<br />
calls.<br />
To set these options, use the Call Forward and Number of Rings fields<br />
on the Mail Box page.<br />
1. In the Number of Rings field, set when you want the system to<br />
take action on unanswered incoming calls. Valid choices<br />
include 1 through 5 rings. The default is 3 rings.<br />
Aug ‘04 Comdial 17
Updating Mail Box Settings<br />
2. Next, in the Call Forward field, choose the condition upon<br />
which you want the system to forward your calls. The available<br />
options include Always, On Busy, and No Answer. You<br />
may choose more than one option, i.e. you can tell the system<br />
to forward all busy calls AND all calls that you do not answer<br />
within the specified number of rings. The default is that Call<br />
Forward is turned off.<br />
3. Enter where you want the system to forward your calls in the<br />
To ext. field. You can specify any valid extension number in<br />
the system.<br />
2.2 Customizing Your Outgoing<br />
Message (OGM)<br />
The <strong>MP1000</strong> allows you to use two outgoing messages. The first is<br />
called the Primary OGM, and is usually your standard message, such<br />
as “You have reached Jane Doe. I am unavailable to take your call<br />
now, but if you leave a message I’ll get back to you shortly.”<br />
You can then use your Secondary OGM for special occasions, such as<br />
when you are out of the office or on vacation. You can control what<br />
OGM the system plays to your callers.<br />
2.2.1 SETTING THE CURRENT OGM<br />
To set the current OGM, perform the following procedure.<br />
1. On the Mail Box page, scroll down to the bottom of the page.<br />
2. Select whether you want the system to use the Primary or Secondary<br />
OGM under the OGM Type field. Note: You must have<br />
previously recorded these messages and attached them to the<br />
system. The default is Primary.<br />
3. Click on Submit.<br />
18 Comdial Aug ‘04
CONVERSip <strong>MP1000</strong> <strong>User</strong><br />
2.2.2 CREATING A NEW OGM USING YOUR PC<br />
If you want to customize or change your OGMs, you can record the<br />
new greeting using an EP300 (for details see the CONVERSip EP300<br />
Voice Endpoint for <strong>MP1000</strong> <strong>User</strong> <strong>Guide</strong>). Or, you can record your<br />
new OGM using your PC.<br />
For example, you can use the Microsoft Sound Recorder resident on<br />
most PCs (via Start/All Programs/Accessories/Entertainment/Sound<br />
Recorder) and the microphone on your PC. Simply open Sound<br />
Recorder, record your message, and then save it in u-law (or mu-law)<br />
format.<br />
Next, you must attach the new sound file to the <strong>MP1000</strong> system; to do<br />
so, perform the following steps.<br />
1. From the Mail Box page, click on Create OGM. The system<br />
displays the Create <strong>User</strong> OGM page.<br />
2. Click on the Browse button to select the .wav file you just created<br />
and saved in u-law format. Navigate to the appropriate<br />
area and select the sound file.<br />
Aug ‘04 Comdial 19
Updating Mail Box Settings<br />
3. Next, specify whether you want the greeting recorded in this<br />
file to be your primary or secondary OGM. In the Select OGM<br />
field, choose Primary OGM or Secondary OGM from the drop<br />
down list.<br />
4. Click on Submit to save your assignment.<br />
5. Add any other OGMs you want to create in the same manner.<br />
You can use any recorder resident on your PC, as long as it produces a<br />
.wav file in u-law format.<br />
20 Comdial Aug ‘04
CONVERSip <strong>MP1000</strong> <strong>User</strong><br />
3. ASSIGNING YOUR EP300’S<br />
PROGRAMMABLE BUTTONS<br />
The <strong>MP1000</strong> system allows you to customize your EP300 buttons to<br />
meet your specific needs.<br />
The EP300 has either 12 or 24 programmable buttons located beneath<br />
the LCD display. All of these buttons may not be available to you<br />
because your System Administrator has priority in setting these<br />
buttons. If a button is not available for your personal settings, the<br />
system displays it as grayed out and does not allow you to select settings.<br />
For each button, you can choose to set it to someone in your Address<br />
Book, or you can set it as a Direct <strong>Station</strong> Selector/Busy Line Field<br />
(DSS/BLF). If you set it as a DSS/BLF, the system lights the button<br />
when the line mapped to it is busy; you can also direct dial that line<br />
by pressing the button.<br />
1. Click on the Phone Button Configuration tab. The system displays<br />
the Phone Button Configuration page.<br />
Aug ‘04 Comdial 21
Assigning Your EP300’s Programmable Buttons<br />
2. For the button you wish to program, click on the arrow to view<br />
the drop down list. You can only program those buttons that<br />
are not grayed-out.<br />
3. To program a button to someone on your address book, select<br />
Addr. Book. In the Addr. Book dropdown list, select the extension<br />
to which you want to assign this button.<br />
4. To program a button as a DDS, select DSS/BLF. In the DSS/<br />
BLF dropdown list, select the extension to which you want to<br />
assign this button. Whenever that extension is in use, the BLF<br />
button on your EP300 lights. To dial that extension, simply<br />
press the corresponding DSS button.<br />
5. When you have finished setting your available programmable<br />
buttons, click Submit to save your changes.<br />
22 Comdial Aug ‘04
CONVERSip <strong>MP1000</strong> <strong>User</strong><br />
4. SETTING UP YOUR ADDRESS<br />
BOOK<br />
The <strong>MP1000</strong> system provides you with an address book that you can<br />
use to store frequently-used extension numbers, SIP addresses, and<br />
email addresses. You can then use this address list when assigning<br />
buttons on EP300s via the Phone Button Configuration tab (see<br />
Section 3., Assigning Your EP300’s Programmable Buttons), and<br />
when forwarding voice mail messages to other extensions in the<br />
system (see Section 5.2, Forwarding Messages).<br />
You can also use your address list when programming the EP300<br />
through its LCD display. For details on programming through the<br />
LCD, see the CONVERSip EP300 Multimedia IP Endpoint for<br />
<strong>MP1000</strong> <strong>User</strong> <strong>Guide</strong>.<br />
1. Click on the Address Book tab. The system displays the<br />
IP-PBX Address Book page.<br />
2. The system lists the members of your address book in alphabetical<br />
order. For each member, it lists the extension number,<br />
email address, and SIP address.<br />
3. To add a new member to your list, enter the required information<br />
in the Add New Address section of the Address Book page.<br />
Aug ‘04 Comdial 23
Setting Up Your Address Book<br />
4. You can delete any member simply by clicking on the delete<br />
icon to the right of the member line.<br />
Click here to delete this member.<br />
Click here to edit this member.<br />
5. You can change most of the settings for a member by clicking<br />
on the edit icon. The system displays the Edit Address Book<br />
page.<br />
You can change all settings except the name. Make the changes<br />
you need, then click on Submit. Note: If you need to change<br />
the name, delete the existing member and then add a new one<br />
with the correct name.<br />
24 Comdial Aug ‘04
5. USING THE MESSAGE<br />
MANAGER<br />
CONVERSip <strong>MP1000</strong> <strong>User</strong><br />
The <strong>MP1000</strong> system allows you to listen to your voice mail messages<br />
using your browser and whatever audio player is installed on your<br />
PC.<br />
Your mailbox can hold up to a total of 150 voice mail messages. This<br />
total includes all types of messages: urgent, new, saved, and read.<br />
The system displays warnings when you are getting close to your<br />
limit: yellow warning at 100 messages, and a red warning when you<br />
reach 130 messages. When your mailbox contains 150 messages,<br />
<strong>MP1000</strong> does not accept any more messages until you remove some<br />
from your mailbox.<br />
5.1 Viewing and Listening to Your<br />
Messages<br />
1. Click on the Message Manager tab. The system displays the<br />
Message Manager page.<br />
Aug ‘04 Comdial 25
Using the Message Manager<br />
2. The system displays all of your messages, but you can view<br />
only a subset of your messages if you like. To view only the<br />
urgent messages, click on Urgent Msgs. To view only your<br />
new messages, click on New Msgs. To view messages you<br />
have saved, click on Saved Msgs. To view all messages you<br />
have already read, click on Read Msgs.<br />
For each message, the system lists the identification of the<br />
caller (if available), the status of the message (urgent, new,<br />
saved, read, etc.), the time that the message was received, and<br />
the length of the message.<br />
3. To listen to a message, click on the Caller ID field for the message.<br />
The system initiates whatever sound player you have<br />
installed on your PC and plays the message.<br />
4. The Used field towards the top of the menu shows you how<br />
much of your allotted space is currently used by your messages.<br />
Since you can have up to 150 messages, the <strong>MP1000</strong><br />
indicates when you are in danger of reaching that limit by<br />
changing the color of the bar in the Used field. When you<br />
reach 100 messages, the system changes the color of the bar to<br />
yellow; when you reach 130 messages the system colors the<br />
bar red. Once you reach 150 messages, the <strong>MP1000</strong> cannot<br />
accept any new messages for your mailbox until you clean out<br />
your messages and reduce the number on the system.<br />
26 Comdial Aug ‘04
5.2 Forwarding Messages<br />
CONVERSip <strong>MP1000</strong> <strong>User</strong><br />
You can forward a message in your Message Manager to another<br />
extension on the system.<br />
1. Click Forward on the line where the message appears. The<br />
system displays the Message Manager > Forward Message<br />
page.<br />
2. In the To box, enter the email address to which you want to forward<br />
this message. You can use your address book by selecting<br />
an extension in the List of Addresses field and clicking on<br />
Add. To forward this message to multiple email addresses,<br />
simply separate email addresses with a comma.<br />
3. In the Subject box, enter a subject for your email.<br />
4. In the Content box, enter a description of the contents of the<br />
voice message that you are fowarding.<br />
Aug ‘04 Comdial 27
Using the Message Manager<br />
5. Click on Submit. The system then forwards the voice mail<br />
message with your comments to the email address you specified.<br />
28 Comdial Aug ‘04
5.3 Replying to Messages<br />
CONVERSip <strong>MP1000</strong> <strong>User</strong><br />
The <strong>MP1000</strong> system allows you to respond to voice mail messages.<br />
The person to whom you are replying must have a mail box on the<br />
<strong>MP1000</strong> system. Therefore, you cannot use the reply feature when<br />
responding to outside callers.<br />
1. Click on Reply for the message. The system displays the Message<br />
Manager > Reply Message page.<br />
2. The system automatically fills in the To and Subject fields for<br />
you, based on who left you the message to which you are<br />
replying. If the message is from an outside caller (who does<br />
not have a mailbox on the <strong>MP1000</strong> system), the To and Subject<br />
fields are blank, and you cannot use reply.<br />
3. In the Attach Message field, you can control whether or not the<br />
system attaches the original voice mail sound file to your reply.<br />
If you do not want this file attached, simply uncheck this field.<br />
4. Enter your comments in the box below the Attach Message<br />
field, then click on Submit to send the reply.<br />
Aug ‘04 Comdial 29
Using the Message Manager<br />
5.4 Deleting Messages<br />
From the Message Manager page you can delete voice mail as necessary.<br />
1. On the line containing the voice mail, click on the box to the<br />
left of the Caller ID field to select the voice mail. Then click<br />
the Delete Checked button.<br />
Select All<br />
Box<br />
Click here to<br />
select this<br />
message<br />
Click here to delete<br />
selected messages<br />
Single Click<br />
Delete<br />
If you prefer, you can delete a message in a single click by<br />
clicking on the trashcan icon to the right of the Reply field.<br />
2. You can also delete all messages at once by clicking on the All<br />
box; the system selects all messages. Then click the Delete<br />
Checked button.<br />
30 Comdial Aug ‘04
A<br />
address book 23<br />
Assigning Your EP300’s Programmable<br />
Buttons 21<br />
attachments, voice mail 17<br />
B<br />
buttons, assigning programmable 21<br />
C<br />
Changing Your Personal Information 15<br />
Controlling Voice Mail Attachments 17<br />
Creating a New OGM Using Your<br />
PC 19<br />
Customizing Your Outgoing<br />
Message 18<br />
D<br />
Deleting Messages 30<br />
F<br />
Forwarding Calls 17<br />
Forwarding Messages 27<br />
L<br />
listening to messages 25<br />
Logging On 11<br />
M<br />
mail box, updating 15<br />
message manager, using 25<br />
messages, deleting 30<br />
messages, forwarding 27<br />
INDEX<br />
CONVERSip <strong>MP1000</strong> <strong>User</strong><br />
messages, outgoing 18<br />
messages, replying to 29<br />
messages, viewing and listening to 25<br />
mu-law 19<br />
Aug ‘04 Comdial 31<br />
O<br />
OGM, creating via PC 19<br />
OGM, setting 18<br />
outgoing messages, customizing 18<br />
P<br />
personal information, changing 15<br />
programmable buttons, assigning 21<br />
R<br />
Replying to Messages 29<br />
S<br />
Setting the Current OGM 18<br />
Setting Up Your Address Book 23<br />
U<br />
u-law 19<br />
Updating Mail Box Settings 15<br />
Using the Message Manager 25<br />
V<br />
Viewing and Listening to Your<br />
Messages 25<br />
voice mail attachments 17
GCA70-403 Rev Limited Release Aug ‘04