Create successful ePaper yourself
Turn your PDF publications into a flip-book with our unique Google optimized e-Paper software.
USER MANUAL
Table of contents<br />
IMPORTANT SAFETY INSTRUCTIONS ........................................................................................4<br />
BLOCK DIAGRAM ..........................................................................................................................6<br />
DJ GLOSSARY ...............................................................................................................................7<br />
WELCOME ......................................................................................................................................9<br />
FEATURES ...................................................................................................................................10<br />
1. STARTING UP ..........................................................................................................................11<br />
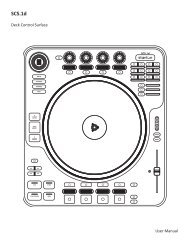
2. UNIT OVERVIEW ......................................................................................................................13<br />
DECK A (LEFT SIDE) ...............................................................................................................13<br />
DECK B (RIGHT SIDE) .............................................................................................................13<br />
DECK CONTROLS ...................................................................................................................14<br />
MIXER CONTROLS .................................................................................................................17<br />
FRONT AND REAR PANELS ..................................................................................................20<br />
3. PERFORMING YOUR FIRST MIX OF 2 SONGS .....................................................................22<br />
4. PLAYBACK/ PERFORMANCE CONTROLS ...........................................................................24<br />
4.1 Play Controls ......................................................................................................................24<br />
4.2 Loop Controls .....................................................................................................................26<br />
4.3 Platter Controls ...................................................................................................................27<br />
4.4 Pitch Controls .....................................................................................................................29<br />
4.5 EFFECT Controls ...............................................................................................................30<br />
4.6 Mix Controls .......................................................................................................................32<br />
4.7 Headphone (Cue) & Master Volume Controls .....................................................................34<br />
4.8 Microphone Controls ..........................................................................................................35<br />
4.9 Recording Controls .............................................................................................................35<br />
5. MAIN SYSTEM SCREENS/ CONTROLS .................................................................................36<br />
5.1 Startup & Shutdown ............................................................................................................36<br />
5.2 STATUS BAR ......................................................................................................................37<br />
5.3 Home Screen ......................................................................................................................38<br />
5.4 Waveform Screen ................................................................................................................39<br />
5.5. How to Browse Your Music Library ....................................................................................41<br />
5.6 Sorting Options ....................................................................................................................41<br />
5.7 Search Display ....................................................................................................................43<br />
5.8 Search Results Display .......................................................................................................44<br />
5.9 Track Info Display ................................................................................................................45<br />
5.10 Active Playlist Display .......................................................................................................46<br />
5.11 Playlist Load Display .........................................................................................................48<br />
6. SYSTEM SETTINGS .................................................................................................................49<br />
6.1 Main System Display ...........................................................................................................49<br />
6.2 Audio Settings Display ........................................................................................................51<br />
6.3 Platter Settings Display .......................................................................................................52<br />
6.4 CrossFader Settings Display ...............................................................................................53<br />
6.5 Display Settings Display ......................................................................................................54<br />
6.6 Video & Demonstration Mode...............................................................................................55<br />
6.7 Device Settings ...................................................................................................................56<br />
6.8 MIDI Controller Mode ..........................................................................................................57<br />
7. KEYBOARD SHORTCUTS .......................................................................................................58<br />
8. TROUBLESHOOTING ..............................................................................................................59<br />
9. TECHNICAL SPECIFICATION .................................................................................................61<br />
10. WARRANTY ............................................................................................................................63<br />
3
IMPORTANT SAFETY INSTRUCTIONS<br />
CAUTION: THE LIGHTNING FLASH WITH AN ARROWHEAD SYMBOL WITHIN AN EQUILATERAL<br />
TRIANGLE IS INTENDED TO ALERT THE USER TO THE PRESENCE OF UN-INSULATED DANGEROUS<br />
VOLTAGE WITHIN THE UNITS ENCLOSURE THAT MAY BE OF SUFFICIENT MAGNITUDE TO<br />
CONSTITUTE A RISK OF ELECTRIC SHOCK TO PERSONS.<br />
WARNING: THE EXCLAMATION POINT WITHIN AN EQUILATERAL TRIANGLE IS INTENDED<br />
TO ALERT THE USER TO THE PRESENCE OF IMPORTANT OPERATING AND MAINTENANCE<br />
(SERVICING) INSTRUCTIONS IN THE LITERATURE ACCOMPANYING THE PRODUCT.<br />
NOTE: THE HAND WITHIN AN EQUILATERAL TRIANGLE IS INTENDED TO ALERT THE USER<br />
TO SPECIFIC GUIDANCE AND INFORMATION REGARDING THE OPERATION OF THE UNIT, ND<br />
SHOULD BE READ FULLY BEFORE USING THE UNIT FOR THE FIRST TIME.<br />
CAUTION: TO REDUCE THE RISKS OF FIRE OR ELECTRIC SHOCK DO NOT REMOVE ANY COVERS,<br />
OR OPEN THE UNIT. THERE ARE NO USER-SERVICABLE PARTS INSIDE. ALL SERVICING SHOULD<br />
BE REFERRED TO QUALIFIED SERVICE ENGINEERS.<br />
WARNING: READ AND FOLLOW ALL THE SAFETY AND OPERATING INSTRUCTIONS BEFORE<br />
CONNECTING OR USING THIS UNIT. RETAIN THIS USER MANUAL FOR FUTURE REFERENCE. ALL<br />
WARNINGS ON THE UNIT AND ITS PACKAGING SHOULD BE READ AND FOLLOWED.<br />
WARNING: This product contains a chemical known to the State of California to cause cancer and birth<br />
defects or other reproductive harm.<br />
CAUTION: To reduce the risks of fire or electric shock do not expose this product to rain or moisture. Do<br />
not use this product near water; for example, near a bath tub, washbowl, kitchen sink, laundry tub, in a wet<br />
basement or near a swimming pool. Unplug the unit from the wall outlet before cleaning. Never use thinner,<br />
cleaning fluids, solvents or chemically impregnated cloths. For cleaning always use a soft dry cloth. Unplug<br />
this product during lightning storms or when unused for long periods of time.<br />
CAUTION: The unit should be installed so that its location or position does not interfere with its proper<br />
ventilation. For example, it should not be situated on a bed, sofa, rug or similar surface that may block the<br />
ventilation openings; or placed in a built-in installation, such as a bookcase or cabinet, that may impede the<br />
flow of air through its ventilation openings. The unit should be situated from heat sources such as radiators,<br />
heat registers, stoves or other devices (including amplifiers) that produce heat. No naked flame sources,<br />
such as lighted candles, should be placed on, or near the unit.<br />
WARNING: Do not place this unit on an unstable surface, cart, stand or tripod, bracket or table. The unit<br />
may fall, causing serious injury to a child or adult and serious damage to the unit. Use only with a cart,<br />
stand, tripod, bracket or table recommended by the manufacturer or sold with the unit. Any mounting of<br />
the device on a wall or ceiling should follow the manufacturer’s instructions and should use a mounting<br />
accessory recommended by the manufacturer. An appliance and cart combination should be moved with<br />
care. Quick stops, excessive force and uneven surfaces may cause the appliance and cart combination<br />
to overturn. Use only with the cart, stand, tripod, bracket, or table specified by the manufacturer, or sold<br />
with the apparatus. When a cart is used, use caution when moving the cart/apparatus combination to avoid<br />
injury from tip-over.<br />
NOTE: Should the unit become damaged beyond repair, or reaches the end of its life, please consult the<br />
regulations regarding disposal of electronic products in your region.<br />
NOTE: S tanton Magnetics cannot be held responsible for damage, and, or including data loss caused by<br />
improper use of the unit and or the applications provided for use with the unit.<br />
4
IMPORTANT SAFETY INSTRUCTIONS<br />
CAUTION TO PREVENT ELECTRIC SHOCK, MATCH WIDE BLADE OF PLUG TO WIDE SLOT FULLY<br />
INSERT.<br />
ENGLISH: The apparatus shall be connected to a Mains socket outlet with a protective earthing connection.<br />
GERMAN: Das Gerät ist eine Wandsteckdose mit einem Erdungsleiter angeschlossen werden.<br />
FRENCH: L’appareil doit être connecté à une prise secteur avec connexion à la terre.<br />
SPANISH: El aparato estará conectado a una toma de red eléctrica con una conexión a tierra.<br />
ITALIAN: L’apparecchio deve essere collegato a una presa di rete con una connessione a terra protettiva.<br />
1. The unit and power supply should only be connected to a power supply outlet only of the voltage and<br />
frequency marked on its casing.<br />
2. Protect the power cable from being walked on or pinched particularly at plugs, convenience receptacles,<br />
and the point where they exit from the apparatus.<br />
3. Do not defeat the safety purpose of the polarized or grounding-type plug. A polarized plug has two<br />
blades with one wider than the other. A grounding type plug has two blades and a third grounding prong.<br />
The wide blade or the third prong is provided for your safety. If the provided plug does not fit into your<br />
outlet, consult a qualified electrician for replacement of the obsolete outlet.<br />
4. If the mains plug supplying this product incorporates a fuse then it should only be replaced with a fuse<br />
of identical or lower rupture value.<br />
5. Never use a damaged or frayed power cable; this can introduce serious risk of exposing lethal voltages.<br />
6. The power supply cable of the unit should be unplugged from the wall outlet when it is to be unused for<br />
a long period of time.<br />
7. Only use attachments/accessories specified by the manufacturer.<br />
DO NOT ATTEMPT SERVICING OF THIS UNIT YOURSELF. REFER SERVICING TO QUALIFIED<br />
SERVICE PERSONNEL.<br />
Upon completion of any servicing or repairs, request the assurance that only Factory Authorized<br />
Replacement Parts with the same characteristics as the original parts have been used, and that the routine<br />
safety checks have been performed to guarantee that the equipment is in safe operating condition.<br />
REPLACEMENT WITH UNAUTHORIZED PARTS MAY RESULT IN FIRE, ELECTRIC SHOCK OR<br />
OTHER HAZARDS.<br />
ATTENTION POUR …VITER LES CHOC ELECTRIQUES, INTRODUIRE LA LAME LA PLUS LARGE DE<br />
LA FICHE DANS LA BORNE<br />
CORRESPONDANTE DE LA PRISE ET POUSSER JUSQUíAU FOND.<br />
This unit should be serviced by qualified service personnel when:<br />
The power cord or the plug has been damaged<br />
Objects have fallen, or liquid has been spilled into the unit<br />
The unit has been exposed to rain or liquids of any kind<br />
The unit does not appear to operate normally or exhibits a marked change in performance<br />
The device has been dropped or the enclosure damaged.<br />
REGULATORY CERTIFICATION<br />
<strong>Stanton</strong> Magnetics declare under our sole responsibility that this product, to which this declaration relates, is in<br />
conformity with the following standards:<br />
The Declarations of Conformity can be obtained from 382 Ave. de la Couronne, B-1050 Brussles<br />
Authorized European representative: Phone: +3226450500 Fax: +326450505<br />
5
BLOCK DIAGRAM<br />
PLAY/PAUSE<br />
CUE<br />
SYNC<br />
TAP<br />
AUTO<br />
MULTIPLY<br />
DIVIDE<br />
RELOOP<br />
FILTER<br />
FLANGE<br />
SLICE<br />
DELAY<br />
-INF to +6dB<br />
PITCH<br />
R<br />
PLATTER<br />
DECK B<br />
LOOP CONTROL<br />
ISOLATING EQ<br />
EFFECTS<br />
Headphone<br />
Cue B<br />
MASTER OUTPUT<br />
ZOUT >75 OHMS<br />
L<br />
+BEND<br />
-BEND<br />
TOUCH<br />
SCRATCH<br />
LOW<br />
MID<br />
HIGH<br />
TIME/RATE<br />
FREQ/AMOUNT<br />
MASTER VOLUME<br />
-INF - +10dB<br />
DECK B VOLUME FADER<br />
ROUTING<br />
R<br />
MASTER OUTPUT<br />
ZOUT >75 OHMS<br />
CROSSFADER<br />
OUTPUT MIX<br />
H/P LEVEL<br />
L<br />
6<br />
DECK A VOLUME FADER<br />
ROUTING<br />
PLAY/PAUSE<br />
CUE<br />
SYNC<br />
TAP<br />
AUTO<br />
MULTIPLY<br />
DIVIDE<br />
RELOOP<br />
FILTER<br />
FLANGE<br />
SLICE<br />
DELAY<br />
-INF to +6dB<br />
PITCH<br />
HEADPHONES<br />
OUTPUT<br />
ZOUT >32 OHMS<br />
DECK A<br />
LOOP CONTROL<br />
ISOLATING EQ<br />
HEADPHONES MIX<br />
PLATTER<br />
EFFECTS<br />
Headphone<br />
Cue A<br />
+BEND<br />
-BEND<br />
TOUCH<br />
SCRATCH<br />
LOW<br />
MID<br />
HIGH<br />
TIME/RATE<br />
FREQ/AMOUNT<br />
MIC VOLUME<br />
MICROPHONE INPUT<br />
DYNAMIC ZIN >10 KOHMS
DJ GLOSSARY<br />
Beat Matching:<br />
A mixing technique where two programs with similar beat structure are mixed together in tempo,<br />
creating a seamless transition between the two songs.<br />
BPM:<br />
An abbreviation of Beat Per Minute (the number of steady even pulses in music occurring in one<br />
minute and therefore defining the tempo).<br />
Beat Grid:<br />
The Grey Lines on top of your song’s Waveform that display the individual beats of your song.<br />
Channel:<br />
A path the signal takes through the unit via the two EQ/Fader sections.<br />
Crossfade:<br />
Fading in one track while fading out another.<br />
Crossfader:<br />
A transitional slide control on a mixer for fading in one channel while fading out another, using only<br />
a signal control.<br />
Cue:<br />
A point in a song that you want to start from, which you select and listen to before using your<br />
Crossfader or Line Fader to increase the volume of the audio so your audience can hear the music.<br />
Cueing is usually done on the first beat of a song, when beat matching.<br />
db (Decibel):<br />
A unit of measurement of audio volume, in relation to a specified reference point such as 0db, which<br />
is an agreed upon standard based on the threshold of hearing of the average person.<br />
DSP Effects (FX):<br />
Electronic filtering or modification of an audio signal to change the sound. In the case of <strong>SCS.4DJ</strong><br />
this processing is done by a DIGITAL SIGNAL PROCESSOR (DSP)<br />
Equalization (EQ):<br />
The process of boosting or cutting audio signals at a specific frequency, to help one song mix<br />
sonically with another.<br />
Line Fader:<br />
A control used to adjust the volume of an input or output channel on a mixer.<br />
Headphones:<br />
Miniature speakers worn on the head that allow you to hear the audio output, used by DJs to assist<br />
in cueing songs.<br />
LED (Light Emitting Diode):<br />
An electronic light which is illuminated to show the status of a signal or feature. These can be<br />
bi-color, meaning they light two different colors depending on function.<br />
7
Loop:<br />
A seamless repeat of an audio sample or musical segment.<br />
MIDI Controller:<br />
A hardware device used to control software via MIDI protocol (messaging). MIDI stands for Musical<br />
Instrument Digital Interface usually found in keyboards & drum machines. One of the many use<br />
cases for MIDI controllers are for controlling software applications which run on an external<br />
computer (not required to use <strong>SCS.4DJ</strong>, but available should you wish to use).<br />
Mixer<br />
A unit designed to blend together two or more sound sources.<br />
Mixing:<br />
The process of blending two songs by synchronizing the BPMs (speed/tempo) and using the<br />
Volume Faders/Crossfader to balance the volume between the two.<br />
Monitor:<br />
To carefully listen to and study a recording or mix so as to make adjustments. This can be listening<br />
to the Master Output (what is coming out of your speakers) or the Cue Bus (Pre-Listen Cue, the<br />
signal coming from your decks before you move your faders for the audience to hear a signal).<br />
Platter/ Jog Wheel:<br />
A circular disc designed to emulate the functions of a Vinyl record disc on a turntable, allowing you<br />
to “grab” the audio to “scratch”.<br />
Scratch:<br />
A turntable mix technique that involves rocking the record back and forth by hand with the phono<br />
cartridge in the playing position, creating a variety of rhythmic sound patterns.<br />
Synchronization (Sync):<br />
In the case of the SCS4.DJ, pressing the SYNC button so that the beats and BPM’s of a song are<br />
matched and in perfect unison.<br />
Waveform:<br />
The visual representation of the volume and individual frequencies of your music.<br />
USB:<br />
The input/output type for storage or computer connection on your SCS4.DJ. Stands for Universal<br />
Serial Bus and is an interface standard for communication between a computer and external<br />
peripherals over an inexpensive cable (USB Cable) using two way transmissions.<br />
USB Hub:<br />
A device that lets you plug one USB cable into your unit, and provides multiple USB inputs for<br />
expansion.<br />
8
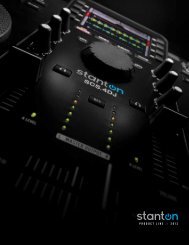
WELCOME<br />
Congratulations on choosing the <strong>SCS.4DJ</strong>, the most advanced DJ Mix Station on the planet. From<br />
professional to novice, bedroom to dance floor, <strong>Stanton</strong>’s <strong>SCS.4DJ</strong> is your complete DJ solution.<br />
<strong>SCS.4DJ</strong> is a compact, road-worthy DJ rig that gives you the power of traditional analog and<br />
computer based DJ setups in a single unit.<br />
MIXING MADE SIMPLE<br />
The <strong>Stanton</strong> <strong>SCS.4DJ</strong> is the first truly integrated DJ system offering advanced one-button<br />
automatic synchronization. The embedded computer system assists your mixing by automatically<br />
synchronizing the tracks at the push of a button. This advanced digital mix engine also allows the<br />
<strong>SCS.4DJ</strong> to be placed into “Auto-DJ” mode, where the unit will automatically mix the music in your<br />
playlist based on your chosen style of mixing.<br />
MIX AND DJ FROM YOUR DIGITAL MEDIA LIBRARY<br />
DJ directly from your digital media library located on your USB memory stick, hard drive or smart<br />
phone. <strong>SCS.4DJ</strong> supports most unprotected file formats including WAV, MP3 and AAC files. The<br />
layout is instantly familiar to the experienced DJ, and logical enough for any novice to grasp. As<br />
a mobile DJ, <strong>SCS.4DJ</strong> gives you the the portability, durability and flexibility you need to perform<br />
night after night, with an intuitive yet simple surface, easy access USB ports, and a rugged chassis.<br />
BECOME MORE CREATIVE<br />
<strong>SCS.4DJ</strong>’s powerful one-button sync engine and built in tempo and beat grid calculations let<br />
you spend less time keeping things synchronized, giving you more time to be creative. The beat<br />
synchronized features including FX and Auto Loops will give you professional sounding mixes from<br />
your first mix out of the box.<br />
RECORD CAPABILITY<br />
Press the Record button and <strong>SCS.4DJ</strong> will record your performance to any mass storage device,<br />
which can be shared between friends or used to produce a CD for distribution.<br />
9
FEATURES<br />
• Auto Sync control in the embedded computer system instantly beat matches one deck to the<br />
other with incredible accuracy.<br />
• Dual high-resolution touch-sensitive weighted platters with cue, scratch and pitch bend control.<br />
• Multicolor 4.3 inch high resolution LCD with dual waveform display makes visual beatmatching<br />
easy.<br />
• Record your mixes directly to WAV files for sharing, replaying and producing/publishing<br />
performances.<br />
• Auto Loop mode automatically creates a beat synchronized loop to keep the mix going longer.<br />
• Four USB ports, two within a compartment large enough for hard drives, media players and<br />
other mass storage devices.<br />
---------------------------<br />
Unpacking<br />
Please check that you have received the following items:<br />
(1) <strong>SCS.4DJ</strong> unit<br />
(1) Power supply (12 VDC)<br />
(1) <strong>SCS.4DJ</strong> Quick Start Guide<br />
(1) <strong>SCS.4DJ</strong> <strong>User</strong> <strong>Manual</strong><br />
Let’s get started by hooking up the <strong>SCS.4DJ</strong>.<br />
10
1. STARTING UP<br />
STEP ONE<br />
Connect the AC/DC adaptor to the DC POWER JACK found on the rear of the unit. Fasten the<br />
SECURITY CLAMP (found beside the DC power jack) on top of the cable by unscrewing the<br />
fastener and then screwing it back down on the cable, so that it is not possible for the cable to<br />
become dislodged.<br />
STEP TWO<br />
Connect either the 1/4” type (Balanced) audio output and/or the RCA type (Unbalanced) AUDIO<br />
OUTPUTS to a power amplifier, set of powered speakers or mixer (see diagram below). The<br />
<strong>SCS.4DJ</strong> features balanced and unbalanced connectors to connect to a wide variety of audio<br />
equipment, and both outputs can be used simultaneously.<br />
RCA Outputs<br />
(UNBALANCED)<br />
Security Clamp<br />
1/4” Jack TRS Outputs<br />
(BALANCED)<br />
11<br />
DC Power Jack
STEP THREE<br />
Connect your primary USB device to one of the USB 2.0 PORTS located on the <strong>SCS.4DJ</strong> (top, rear<br />
or bottom of unit beneath the door). You may use any driverless USB device that has a FAT32,<br />
NTFS, or HFS+ (non-journaled only) file system. For just starting out, it may make sense to place<br />
only a few songs on a USB drive or use the included demo material so you don’t have to wait long<br />
for drive analysis (where <strong>SCS.4DJ</strong> calculates your song information, including BPM and Waveform)<br />
to be completed to start playing. You may also connect a USB keyboard, as well as a powered<br />
(active) USB hub to augment the amount of available ports, giving you the advantage of connecting<br />
more USB storage devices.<br />
USB Port 1 (top right of unit)<br />
STEP FOUR<br />
Press the POWER BUTTON located to the right of the rear panel. The unit will take about 45<br />
seconds to boot up, and will start the process of detecting and analyzing the content located on any<br />
USB devices that are currently connected. When the Song Analysis symbol disappears, then your<br />
songs are analyzed and you can take full advantage of the <strong>SCS.4DJ</strong> feature set.<br />
Power Button<br />
Now, let’s take a brief tour of the <strong>SCS.4DJ</strong>’s controls and connections.<br />
12<br />
USB Port 2 (rear of unit)<br />
Song Analysis Symbol
2. UNIT OVERVIEW<br />
MIXER<br />
DECK A (LEFT SIDE) DECK B (RIGHT SIDE)<br />
13
DECK CONTROLS<br />
1<br />
6<br />
2 3<br />
10<br />
4<br />
14<br />
9<br />
11<br />
5<br />
7<br />
8
1. USB CONNECTOR (type A) (RIGHT SIDE OF UNIT ONLY)<br />
This connector is used to attach the USB (1.1 or 2.0) mass storage device containing your song<br />
library. Suitable mass storage devices include: external hard drives, flash drives, portable digital<br />
music players, memory card readers, and USB hubs.<br />
2. PLAY/PAUSE BUTTON<br />
Press to play the song at the current location, and again to pause at the current location.<br />
3. CUE BUTTON<br />
The CUE Button lets you practice your mixes in advance by playing sections of the audio without<br />
having to engage full playback with the PLAY/PAUSE button. During normal playback, pressing<br />
this button immediately moves the play position of the track to the last set cue point and pauses<br />
playback when released. Pressing CUE again will engage the CUE PLAY function, which plays the<br />
track from the cue point until you release the CUE button. If you press PLAY/ PAUSE at any time<br />
other than the currently stored cue point, pressing CUE will reset the cue point to the new position.<br />
4. PLATTER (JOG WHEEL)<br />
The touch-sensitive top portion of the PLATTER (JOG WHEEL) is made to feel and function like a<br />
real vinyl turntable and, the outer non-slip PLATTER bump ring for pitch bending provides ultimate<br />
in response control. The PLATTER has multiple functions:<br />
a. When playing or paused in SCRATCH mode, the PLATTER can be used as a frame search<br />
control, allowing you quickly search through a song. Holding down the SCRATCH button, the<br />
wheel is used for high-speed FAST FORWARD/REWIND SEARCH.<br />
b. Without the SCRATCH button engaged, the PLATTER works as a pitch bend, similar to a<br />
“push” or a “drag” on a turntable. Turning the PLATTER counterclockwise temporarily slows<br />
down the playback speed according to the speed, velocity, and duration of the platter rotation.<br />
Turning the PLATTER clockwise temporarily speeds up the playback speed. Pitch will return to<br />
the current setting when the wheel stops.<br />
c. When in SCRATCH mode, the PLATTER acts just like a vinyl turntable, moving the song<br />
position forward or back in response to your movements. The outer non-slip PLATTER bump<br />
ring still performs the pitch bend function.<br />
d. TOUCH REWIND mode is similar to SCRATCH mode, except playback returns to the Cue point<br />
anytime the top portion of the platter (which is touch-sensitive) is touched. The outer non-slip<br />
PLATTER bump ring still performs the pitch bend function.<br />
5. SCRATCH BUTTON<br />
Enables the touch sensitive PLATTER to respond like a turntable and allow the “Scratching” of your<br />
audio. Most Hip Hop/Scratch DJ’s will want this button the majority of the time. During normal play<br />
mode, touching the platter will pause playback, and moving the platter forward or backward will<br />
create scratch sounds. Holding down the scratch button and moving the PLATTER engages the<br />
Fast-Forward/Rewind function of the player.<br />
6. TOUCH REWIND BUTTON<br />
This function enables you to touch the PLATTER non-rubberized center section to quickly return<br />
to your set CUE POINT instantly, enabling rapid return to a CUE POINT for scratch effects (as the<br />
TOUCH REWIND button also turns on the SCRATCH BUTTON). Touching and releasing the jog<br />
wheel once will return playback to the last marked CUE POINT, letting you quickly return to a cue<br />
point or rapidly trigger a sample/song portion.<br />
15
7. PITCH CONTROL SLIDER<br />
The main speed control for your music. This slide, when pushed towards the bottom of the unit<br />
(+), increases the tempo of playback. When the slide is pushed towards the top of the unit (-), the<br />
tempo of playback is decreased. Pitch Range is selectable in ranges of +/-5% to +25/-100% from<br />
the ‘SYSTEM’ menu.<br />
8. PITCH BEND BUTTONS (- / + BUTTONS)<br />
Used to temporarily decrease or increase the playback speed. Pitch will return to the current setting<br />
when released.<br />
9. SYNC BUTTON<br />
The main control of the internal SYNC engine, allowing for one-touch beat matching of your playing<br />
songs. During playback, pressing this button will change the speed and beat position of the selected<br />
track to match that of the track playing on the opposing deck. This overrides the PITCH CONTROL<br />
SLIDER(#5). When the PITCH CONTROL SLIDER is moved again it’s operation depends on the<br />
value of the Soft Takeover (if the PITCH CONTROL SLIDER(#5) responds immediately to your<br />
movement or after you have moved past the virtual pitch setting) setting in the <strong>SCS.4DJ</strong> Settings<br />
menu. If the setting is On (Soft Takeover enabled – default value), Pitch value will not change until<br />
the PITCH SLIDER is moved to match the virtual value of the Pitch set by the SYNC engine.<br />
The AUTO LED at the midpoint of the PITCH CONTROL SLIDE indicates when the two are not<br />
synchronized, ie: if PITCH CONTROL SLIDE and VIRTUAL PITCH POSITION (the pitch position<br />
chosen by the SYNC engine, regardless of PITCH CONTROL SLIDE position) are not the same.<br />
The LCD Display also has an arrow displayed next to the TEMPO value indicating which way to<br />
move the PITCH CONTROL SLIDE. If the setting is OFF, (No Soft Takeover) then any movements<br />
of the PITCH CONTROL SLIDE will become effective immediately.<br />
10. DSP EFFECT SELECTION/CONTROLS<br />
Dual effect processors, one for each deck, and both can be used at the same time. This section<br />
controls the four on board audio effects FILTER, FLANGER, SLICE and DELAY. Using the two<br />
EFFECT CONTROL knobs, you can individually adjust two effect parameters depending on what<br />
effect you are in.<br />
11. TAP BUTTON<br />
Tap along with the music to enter manual BPM values for use with DSP EFFECTS or SYNC<br />
ENGINE. This is used to manually enter BPMs when the Auto BPM function is unable to lock on a<br />
beat. You must tap at least four times to enter a new BPM value.<br />
16
MIXER CONTROLS<br />
2 1<br />
2<br />
5<br />
6<br />
8<br />
3<br />
9<br />
7<br />
17<br />
4 5<br />
8<br />
6
1. LCD DISPLAY<br />
This is the main window to every part of your mixing journey. The full color, 4.3’’ LCD displays<br />
information such as track/waveform, parameter adjustments and search information. Contrast is<br />
adjustable in the onscreen SYSTEM menu.<br />
2. MENU “SOFT” BUTTONS<br />
There are 8 total “soft’ function buttons. The 4 physical buttons on each side of the display change<br />
their function depending on what menu you are located in (hence “soft” buttons), and control<br />
functions such as search, song loading, song sorting, etc.<br />
3. SYSTEM BUTTONS<br />
There are 4 buttons located at bottom of the LCD DISPLAY, and each changes the functionality of<br />
and information on the LCD DISPLAY based on the selected function. The 4 functions are:<br />
HOME/WAVEFORM: The main performance screen. Press this button to switch between the<br />
HOME view and the WAVEFORM view.<br />
The WAVEFORM view shows colored waveforms for both decks as well as beat locations and CUE<br />
and LOOP locators.<br />
The HOME view shows your album art, a beatkeeper for keeping your decks aligned as well as a<br />
small version of the waveform for each deck with current play position in the waveform indicated.<br />
Pressing the HOME/WAVEFORM button after being in a different display will return you to whichever<br />
view (HOME or WAVEFORM) was displayed last.<br />
BROWSE: The main browse menu. From this menu you can view the songs on your MASS<br />
STORAGE DEVICES, select songs to load in your playlists, and choose the songs to play on decks<br />
A and B.<br />
PLAYLISTS: The main preparation menu. From this menu you can prepare song lists, load, save<br />
and delete playlists.<br />
SYSTEM: The system customization menu. From this menu, you can customize the controls of your<br />
unit, change pitch range, etc.<br />
4. NAVIGATION WHEEL/ ENTER & BACK BUTTONS<br />
These are the main Menu navigation controls. You can scroll between songs, search for songs<br />
and name playlists using the virtual keyboard, go forward/back in menus, and change system<br />
parameters.<br />
18
5. EQ CONTROLS<br />
Use the High, Mid and Low knobs to modify the frequency content of your music. The EQ controls<br />
provide a complete frequency kill (volume at zero for each frequency band) on the LOW (BASS),<br />
MEDIUM (MID-RANGE)and HIGH (TREBLE) frequency bands, as well as a 6db boost.<br />
6. CHANNEL FADERS<br />
The CHANNEL FADERS for each deck are used to control audio volume. Use these in conjunction<br />
with the EQ CONTROLS on each channel to match song volume and tonal quality of each song.<br />
7. CROSSFADER<br />
The CROSSFADER is used to fade audio between channels A and B for mixing transitions. The<br />
CROSSFADER has a user-selectable Crossfader-Curve (speed at which program volume changes<br />
through crossfader travel) from the ‘System’ menu.<br />
Hear<br />
Channel A<br />
8. HEADPHONE (CUE) BUTTONS<br />
Use the HEADPHONE buttons to listen to decks A or B cue (before CHANNEL FADER and<br />
CROSSFADER) preview. Use the CUE VOLUME control (located on the front of the unit) to control<br />
cue volume.<br />
9. RECORD BUTTON<br />
Use the RECORD button to record your performances on to the MSD (Mass Storage Device) of<br />
your choice. The .WAV file saved can then be transferred to your computer for sharing, saving your<br />
performances and broadcast.<br />
19<br />
Hear<br />
Channel B
FRONT AND REAR PANELS<br />
5<br />
4<br />
1<br />
8<br />
7<br />
20<br />
2<br />
3<br />
6<br />
9
1. DC POWER JACK<br />
This connector is used in conjunction with the AC/DC adaptor to power the unit. Next to the DC<br />
power jack is a security clamp, which can be fastened over the power cable to prevent it from being<br />
dislodged.<br />
WARNING: ALWAYS USE THE SUPPLIED POWER ADAPTER OR A REPLACEMENT<br />
ADAPTER PURCHASED FROM AN AUTHORIZED STANTON DEALER!!!<br />
2. MASTER OUT LEFT/RIGHT RCA connectors (UNBALANCED)<br />
RCA type unbalanced stereo audio output. These connectors output the mixed audio signal<br />
generated from the <strong>SCS.4DJ</strong> unit.<br />
3. MASTER OUT LEFT/RIGHT 1/4” TRS connectors (TIP RING SLEEVE BALANCED)<br />
1/4” TRS type balanced stereo audio output. These connectors output the mixed audio signal<br />
generated from the <strong>SCS.4DJ</strong> unit.<br />
4. MICROPHONE INPUT & VOLUME CONTROLS<br />
The <strong>SCS.4DJ</strong> has one 1/4” microphone input, located on the front panel. Microphone level is<br />
controlled by the microphone rotary volume control located on the front panel to the right of the<br />
microphone jack. Suitable microphones are any standard dynamic-style microphone.<br />
5. POWER BUTTON<br />
Press the Power Button momentarily to turn on or turn off the unit.<br />
WARNING: Do not remove the power cable or unplug the unit to shut it off. This could cause<br />
data corruption to your drive, damaging your songs and other data. In case the unit does not<br />
respond with the shutdown screen the power button can be pressed and held for 10 seconds<br />
for an emergency shutdown procedure.<br />
6. 1/4” and 1/8” HEADPHONE JACKS & MIX (CUE) CONTROLS<br />
The headphone jacks located on the front of the <strong>SCS.4DJ</strong> are designed to accept any standard<br />
stereo headphone using either a 1/4’‘ or 1/8” jack. Use the MIX knob to fade between the CUE and<br />
MASTER OUTPUT preview. Use the HEADPHONE VOLUME KNOB to adjust headphone volume.<br />
Both outputs can be used at the same time to share a single headphone signal to two headphones.<br />
7. USB CONNECTOR (type A) (TO UNIT)<br />
This connector is used to attach the USB mass storage device that contains your music library.<br />
Suitable mass storage devices include, but are not limited to: external hard drives, USB thumb<br />
drives, portable digital music players, memory card readers, and active USB hubs.<br />
8. USB CONNECTOR (type B) (FROM UNIT)<br />
This connector is used to attach the <strong>SCS.4DJ</strong> to a personal computer for MIDI CONTROLLER<br />
mode, This connection is both Windows PC and OSX (Apple) compatible.<br />
9. KENSINGTON® SECURITY LOCK<br />
Use with a Kensignton® security lock for permanent installations to prevent theft or for display<br />
purposes.<br />
21
3. PERFORMING YOUR FIRST MIX OF 2 SONGS<br />
Now let’s perform our first DJ mix of two songs by synchronizing the BPM’s (Beats Per<br />
Minute) and use the Crossfader to do a volume fade between the two songs. Before you<br />
start, make sure your EQ knobs are set in the middle, your EFFECTS are turned off, LOOPS<br />
are not engaged and your CROSSFADER is set to one side.<br />
STEP ONE<br />
Wait for the connected USB Mass Storage Device to finish analyzing. Depending on size of<br />
collection, this can take a while, so it might be best to load a drive with a few songs to start out with<br />
until you get the hang of things. We have also included demo content on the unit to test with for<br />
your convenience. Songs are analyzed at 1/5 real time, so a large collection may take a day or two<br />
to finish analyzing.<br />
Next, press the BROWSE button to go into the BROWSE screen. Load the selected songs<br />
to your playback decks (virtual turntables) by using the NAVIGATION WHEEL to select<br />
your songs, then press the LOAD A soft button, located on the bottom of the screen for your<br />
selected songs. Press BROWSE again and repeat for side B (Note: by default, your unit<br />
will go to the HOME screen upon song load. Press the BROWSE button again to<br />
re-enter your song library.)<br />
NAVIGATION<br />
WHEEL<br />
BROWSE<br />
22
STEP TWO<br />
Now that you have your two songs loaded, use the PLAY button on each deck to start playback of<br />
your songs (leaving your CROSSFADER on one side):<br />
Press the SYNC button on one deck to automatically beat-match the song playing on that deck to<br />
the song playing on the other deck using <strong>SCS.4DJ</strong>’s powerful synchronization engine to perfectly<br />
align the speed and beats of the songs.<br />
STEP THREE<br />
Move the CROSSFADER to the middle to hear both songs, and move from one side to the other to<br />
fade between your two playback tracks. Use your two CHANNEL FADERs to further adjust volume<br />
levels. As long as the SYNC engine is engaged and you have not moved the position of your pitch<br />
sliders, your songs should remain aligned. If your tracks drift out of alignment just hit the SYNC<br />
button again! (This can happen if a song’s tempo is not fixed and varies over time)<br />
STEP FOUR<br />
Use your EQ’s to tailor your mix by boosting the bass, etc. Finally, return the BROWSE screen from<br />
STEP ONE and start again to load new songs and mix further songs together. Congratulations, you<br />
have just completed your first mix!!!<br />
Now let’s learn more detail about the individual performance controls and menus that your new<br />
<strong>SCS.4DJ</strong> offers, and how to use their functionality.<br />
23
4. PLAYBACK/ PERFORMANCE CONTROLS<br />
4.1 Play Controls<br />
PLAY/PAUSE BUTTON<br />
Starts/Pauses playback of a track.<br />
CUE BUTTON<br />
During normal playback, pressing this button immediately returns the track to the last set cue point<br />
(either one you have set, or the point at which audio starts, found by your <strong>SCS.4DJ</strong>’s AUTO-<br />
CUE engine) and pauses playback when released. Holding the CUE button down will engage CUE<br />
PLAYBACK, which plays the track from the cue point until you release the CUE button. If the PLAY<br />
button is pressed while holding the CUE button down, then playback will continue even after the<br />
CUE button has been released. If no CUE POINT has been created, pressing the CUE BUTTON<br />
will bring the playback point to the start of the track, or to the AUTO CUE point as selected by the<br />
<strong>SCS.4DJ</strong><br />
CREATING A CUE POINT<br />
1) With a track currently playing, press the PLAY/PAUSE button and playback will pause at the<br />
current position. Although the track has been stopped, a new CUE POINT has not been created.<br />
2) Press CUE to create a CUE POINT at your current location in the track. Pressing and holding<br />
the CUE button again will start playback from the current position until you let go of the CUE<br />
button. If you want to change your CUE POINT position, you can use the touch-sensitive top<br />
section of the PLATTER in SCRATCH mode while the CUE BUTTON is NOT held down to<br />
move the audio to the point that you want, followed by pressing the CUE button again to set<br />
the new CUE POINT. The CUE POINT will be a RED LINE, while GREY LINES are the current<br />
BEAT GRID, which is the internal SYNC ENGINE’s reference to your current song’s beats.<br />
GREY LINES<br />
SHOW BEAT GRID,<br />
USED FOR SYNC<br />
ENGINE<br />
3) With the track playing, press the CUE button and the music will immediately stop and playback<br />
will return to the last CUE POINT you have set. From here, you can press PLAY/PAUSE to<br />
resume playback, or hold down the CUE BUTTON again to engage CUE PLAY.<br />
24<br />
RED LINE SHOWS<br />
CURRENT CUE<br />
POINT POSITION
4) If you wish to continue playback while holding the CUE button, pressing the PLAY button will<br />
disengaged the CUE button and start the <strong>SCS.4DJ</strong> to play in normal play mode. Both buttons<br />
can then be released.<br />
5) If you wish to create a new CUE POINT, press the PLAY/PAUSE button again at the location<br />
you wish to create the CUE POINT at, and press the CUE BUTTON once again. A new CUE<br />
POINT will be set.<br />
SYNC Button<br />
Pressing the SYNC button on a deck changes the Pitch to match the BPM of the opposite deck<br />
and lines up the playback position of the BEAT GRID (shown in the diagram on page 28) of the<br />
song on the other deck. As the tracks play forward, this button can be used again to synchronize<br />
the tracks back together if they fall off beat for any reason.<br />
To use the SYNC button it is necessary that both tracks have BPM values associated with them<br />
(greater than zero). This value normally comes from when your <strong>SCS.4DJ</strong> analyzed your tracks, but<br />
can also come from a tapped BPM value or a BPM value stored with the track data if analysis has<br />
not yet occurred.<br />
If the BPM of the two tracks differs too greatly, or the current pitch slider range for the deck is less<br />
than the needed pitch value change, the pitch is changed to the maximum value allowed by the<br />
pitch slider, and the play position of the slave deck is jumped to beat align momentarily with that of<br />
the master deck. If either track is not analyzed or the BPM has been tapped or edited or the deck<br />
on which SYNC is pressed is not playing, the pitch of the deck will be changed but the playback<br />
position will not jump to be beat aligned.<br />
The <strong>SCS.4DJ</strong>’s sync engine can match BPM’s based on half or double-timed BPM’s, making it so<br />
that you can mix tracks with a far-apart BPM value (ie: mixing an 80bpm track with a 160bpm track).<br />
TAP Button<br />
The TAP Button provides a method to correct the automatically generated BPM value.<br />
While the song is playing, Tap the TAP button in time with beats of the music. Multiple taps will set<br />
the BPM value to the rhythm. The tapped BPM value is the average value of the values tapped in.<br />
You must tap the TAP button at least four times to set a new BPM. If you wish to defeat the manually<br />
tapped BPM value, press and hold the TAP button for 2 seconds to reset the detection to <strong>SCS.4DJ</strong>’s<br />
AutoBPM value. The new tapped BPM value is then displayed on the screen.<br />
Please keep in mind that the BEAT GRID is not altered with the tapped BPM so the beat grid will<br />
be out of sync with the new tapped BPM, which can have an adverse effect on the SYNC engine<br />
should SYNC be used. While the TAP function does allow for functions such as SYNC to function<br />
before a song is analyzed, LOOP still needs the full song analysis to be completed for the function<br />
to work.<br />
25
4.2 Loop Controls<br />
Loop Buttons<br />
The LOOP BUTTONS help create a seamless loop of audio from within the playing program<br />
material; this can be anything from a small section of audio like a vocal sample to a beat loop. With<br />
<strong>SCS.4DJ</strong>’s advanced beat-sync engine, this loop will always be perfectly on-beat, with no stuttering<br />
or gaps of silence.<br />
The LOOP playing is displayed on the WAVEFORM screen with a light-blue or green shaded block<br />
over the currently playing loop section, showing you both the start and end points of your loop.<br />
The loop start and end points will “snap” (lock) to the closest beat if you enable the SNAP control,<br />
located on a soft button on your LCD. With SNAP engaged, you can be sure that your timing is<br />
rarely off.<br />
The available loop controls are:<br />
Loop<br />
This button is pressed to engage a beat synced loop. Pressing the AUTO button<br />
a second time will exit the loop. The default length of the auto loop can be selected in the SYSTEM<br />
Menu. Six different loop lengths are available: 1, 2, 4, 8 and 16 bars.<br />
Divide (÷)<br />
When a loop is active this button changes the end point of the loop to divide<br />
the loop length in half. Use this button to cut down the audio loop to your desired length.<br />
Multiply (x)<br />
When a loop is active this button changes the end point of the loop to double the loop length.<br />
Reloop<br />
This button jumps the playing track to the start point of the last loop. If the deck is playing the deck<br />
will loop. If the deck is paused the deck will stay paused. The last loop created will be remembered<br />
until the track is unloaded from the deck.<br />
NOTE: If you are playing with the loop controls, it is very easy to accidently rest your hand<br />
on or touch the PLATTER, which can stop or pitch-bend audio playback. Please be careful<br />
not to be touching the platter while you are using the loop controls so you do not alter audio<br />
playback in a way you may not want! As such, you may want to keep the SCRATCH and<br />
TOUCH buttons off when you are looping.<br />
26
4.3 Platter Controls<br />
Platter (Jog Wheel)<br />
The high resolution touch-sensitive PLATTER is used for scratching, seeking and pitch bend, and<br />
responds like a real vinyl turntable. (Note-this wheel is sometimes known as a “Jog” wheel, for its<br />
ability to “nudge” the audio forward or back) The top of the wheel is touch sensitive so that the<br />
“turntable” can be slowed down when touched and sped up when released, The outer non-slip<br />
PLATTER bump ring is not touch-sensitive, and is used for PITCH BEND.<br />
Scratch Button<br />
Pressing the Scratch Button switches the jog wheel operation between Vinyl mode and Normal<br />
mode. In Normal mode the Scratch button is not lit. In this mode the entire PLATTER is used for<br />
pitch bend (speeding up or slowing down a song temporarily to get it to be aligned with the song<br />
playing on the opposite deck).<br />
In SCRATCH mode the SCRATCH button is lit red. This allows you to move the platter back and<br />
forth and “grab” the audio, just like a vinyl record. The outer non-slip PLATTER bump ring is still<br />
used for pitch bend. If the deck is playing, the top section of the jog wheel is used for scratching,<br />
while touching only the outer rubberized portion of the PLATTER will not stop audio but instead<br />
engage a pitch bend.<br />
27
To stop the track from playing, simply place your finger on the top of wheel. To scratch, move your<br />
finger to rotate the jog wheel to create the feel of scratching on vinyl. Making a fast motion in either<br />
direction on the scratch surface will cause the song to backspin or forward spin in the desired<br />
direction. More velocity will cause a faster spin in either direction and the track will slow back down<br />
to the original speed similar to that of a vinyl record.<br />
If the SCRATCH BUTTON is held down then the top section of the jog wheel functions as a HIGH<br />
SPEED FAST-FORWARD/REWIND. This can be used to quickly find a point in a song or seek<br />
backwards to the beginning or end of a song.<br />
Touch Button<br />
Pressing the Touch Button toggles the jog wheel operation between touch rewind mode and normal<br />
operation. When touch rewind is in on the TOUCH and SCRATCH buttons will both lit red, otherwise<br />
it will be off. The touch rewind mode overrides the setting of the Scratch Button.<br />
When touch rewind is on, tapping or touching the top of the jog wheel causes a jump to the main<br />
CUE point. On release of the jog wheel, audio continues to play from wherever the scratch ended.<br />
The outer rim of the jog wheel remains as pitch bend. When touch rewind is turned off, whatever<br />
mode you were in last (PITCH BEND or SCRATCH) is the mode you return to (ie: if SCRATCH was<br />
off, then SCRATCH will turn off again).<br />
28
4.4 Pitch Controls<br />
PITCH BEND BUTTONS<br />
Used to temporarily decrease or increase the playback speed plus or minus<br />
2%. Pitch will return to the current pitch slider setting when released.<br />
PITCH SLIDER<br />
The high resolution PITCH SLIDERS can be set for four different pitch ranges.<br />
The PITCH SLIDER RANGE is selected in the SYSTEM menu under AUDIO<br />
SETTINGS, with selectable ranges of +/-5%, +/-10%, +/-25%, +25% -100%.<br />
The pitch slider range alters the amount of pitch change that can be performed<br />
by the slider, and acts to control the maximum range of pitch adjustment that<br />
can be made by the SYNC or AUTO-DJ functions.<br />
AUTO LED<br />
When the SYNC button is used, this turns off your PITCH SLIDER, and the <strong>SCS.4DJ</strong>’s SYNC<br />
ENGINE takes over. The AUTO LED provides a visual indicator of when this is happening. This<br />
LED has two operating states when ON, depending on the setting in the SYSTEM MENU:<br />
- Soft Takeover: LED is lit until the PITCH SLIDER is moved past the VIRTUAL pitch setting.<br />
- Direct Physical Takeover: LED turns off when PITCH SLIDER is moved, PITCH will instantly<br />
jump to the current physical position.<br />
When the PITCH SLIDER is moved to match the VIRTUAL POSITION (when SOFT TAKEOVER<br />
is on) or simply moved at all (when Direct Physical Takeover is on), the AUTO LED will then turn<br />
OFF. This also means that the SYNC ENGINE is no longer in control of your mix, so your mix might<br />
be thrown off.<br />
KEYLOCK LED<br />
KEYLOCK allows you to move the PITCH SLIDER up and down to change playback speed without<br />
altering the key of the song. The KEYLOCK LED illuminates when the corresponding KEYLOCK<br />
BUTTON is used in either the your HOME or WAVES screen. When the KEYLOCK function is<br />
turned off, the LED will not be illuminated.<br />
29
4.5 EFFECT Controls<br />
EFFECTS CONTROLS<br />
<strong>SCS.4DJ</strong> has dual EFFECTS processors (Deck A & B), with each capable of processing audio on<br />
an single deck. The four available EFFECTS are FILTER, FLANGE, SLICE and DELAY. Each<br />
button turns the selected effect on or off, or instantly switches to a different EFFECT while turning<br />
the last one off. When one of the EFFECT BUTTONs is pressed, an LED turns on and the effect<br />
is ACTIVE.<br />
Each of the EFFECTS onboard <strong>SCS.4DJ</strong> automatically sync to the beat of your music, and the LCD<br />
panel displays your changes in real time, making it easy to remember your “perfect” settings. The<br />
TIME/RATE controls allow you to adjust your EFFECTS time in relation to the beat, with 16, 8, 4,<br />
2, 1, ½, ¼, 1/8, 1/16 beat multipliers available. The FREQ/AMOUNT knob controls the amount of<br />
the effect in relation to the original audio, the frequency of the filter cutoff, and the “chaos” of the<br />
SLICE effect.<br />
The Effect Knobs change the following parameters per effect:<br />
Effect TIME/RATE FREQ/AMOUNT<br />
Filter Rate (SPEED) Cutoff (Lowpass/Highpass)/Resonance<br />
Flange Rate (SPEED) Depth (Delay and Feedback)<br />
Slice Rate (LENGTH) Chaos (Increased amount and styles of slicing/”glitching”)<br />
Delay Rate (SPEED) Regen (Feedback)<br />
The available EFFECTS on <strong>SCS.4DJ</strong> are:<br />
FILTER<br />
A FILTER is a kind of EQ, letting only high or low frequencies through. The FILTER moves based<br />
on the BPM of the playing track, and can be used as a transition effect between songs in place of<br />
the EQ controls. In FILTER, the TIME/RATE controls the rate of the LFO (low-frequency oscillator)<br />
on cutoff frequency set by the FREQ/AMOUNT knob. The FREQ/AMOUNT control is a combination<br />
high-pass (lets only treble through) and low-pass (lets only bass through) filter. When the FREQ/<br />
AMOUNT knob is towards the left it acts as a low pass filter. When the FREQ/AMOUNT knob is<br />
towards the right it acts as a high pass filter. Resonance changes away from the center position of<br />
the knob depending on the cutoff frequency.<br />
30
FLANGE<br />
The FLANGE creates an extremely short delay of the audio, creating an effect similar to a jet taking<br />
off. This classic effect can also be done by manually playing two copies of the same record at the<br />
same speed and nudging one to be slightly out of sync. In FLANGE, the TIME/RATE controls the<br />
LFO (Low Frequency Oscillator, a type of modulation that creates a “wavy” sound in this case), time<br />
as well as the speed of the flange. FREQ/AMOUNT controls the amount of delay and feedback.<br />
SLICE<br />
The SLICE effect is a sample-based effect, creating a rhythmic re-sequencing of the<br />
audio (aka glitch or stutter) of your audio. This can be anything from simple repeating<br />
beats (similar to a drummer playing extra beats for a drum fill, or a skipping CD), to<br />
full-blown audio chaos!<br />
The SLICE effect is different from the other effects in that the audio playback continues to<br />
move under the SLICE effect, even though you will only hear a portion of the audio around<br />
the point at which you engaged the SLICE effect, and if SLICE is on when you press the PLAY/<br />
PAUSE button, audio will continue until you turn SLICE off. When SLICE is disengaged, the<br />
song position will be at the position it would have been had you not engaged the effect.<br />
The TIME/RATE knob controls the time length of the individual slices as well as the number of<br />
different slices played. The FREQ/AMOUNT knob increases both the number of effects (Repeat,<br />
Reverse, Normal Playback for set length of time, like a loop) applied to the slices as well how often<br />
the effects occur, with total random effects at the maximum setting. At the maximum settings, a full<br />
random re-sequencing of your audio is occurring, while at the lowest settings, a repeatable and<br />
unchanging audio loop occurs.<br />
One note, the SLICE effect can be used as a tempo-synced sampler effect-you can take a loop of<br />
audio by setting the TIME/RATE knob to the desired beat length, and then the FREQ/AMOUNT<br />
knob to .01 (all the way to the left). This will create a perfect loop that can be remixed on the fly!<br />
DELAY<br />
The DELAY effect plays back portions of the original signal, slightly behind the original (similar<br />
to yelling in a cave). On the shortest settings, the DELAY sounds similar to a quick echo. On the<br />
longest settings, the DELAY can sound like a concert hall echo applied to the playing audio. In<br />
Delay, the TIME/RATE changes the length of the delay, and FREQ/AMOUNT controls the amount<br />
of feedback/repeats on the delay.<br />
31
4.6 Mix Controls<br />
32
EQ Knobs<br />
The EQ KNOB allow you to boost or kill the HIGH (treble), MID (midrange) and LOW (bass)<br />
frequencies of your music. Three EQ knobs with central detent allow you to boost or kill (cut to<br />
silent) each of the bands. Turning each EQ KNOB the left side, the EQ’s provide a full frequency<br />
kill. Turning each EQ KNOB to the right, the EQ’s provide a 6dB boost.<br />
Deck Clip Meters<br />
These are two bi-color LEDs that display the audio levels for each deck. The LED is off when audio<br />
is less than -30db, green when audio is between -30db and -9db, yellow when audio is between<br />
-9db and -3db, and red when audio is above -3db.<br />
Master Output Volume Meters<br />
These are two LED ladder meters that display the audio levels for master output jacks.<br />
Microphone LED<br />
The MICROPHONE INPUT has an LED that displays the microphone input level. The LED is off<br />
when audio is lower than -30db, green when audio is between -30db and -9db, yellow when audio<br />
is between -9db and -3db, and red when audio is above -3db.<br />
Channel faders<br />
These control the output level of the Deck A and Deck B pre-cross fader, post auto-gain. Since<br />
<strong>SCS.4DJ</strong> uses a digital mix engine, the life of all faders/knobs/switches is extended long past that<br />
of typical DJ mixer faders, and will provide you with years of worry-free performance.<br />
Cross Fader<br />
This fader controls the relative mix between Deck A and Deck B. Since <strong>SCS.4DJ</strong> uses a digital<br />
mix engine, the life of all faders/knobs/switches extended far beyond that of a typical DJ mixer<br />
crossfader, and will provide years of worry-free performance. The crossfader curve (speed at which<br />
volume comes in on each side) can be adjusted in the SYSTEM menu.<br />
Fader Position LED’s<br />
When in AUTO-DJ mode, These LEDs blink while the AUTO DJ is moving the VIRTUALCROSSFADER<br />
POSITION and turn steady on when the crossfade is complete.<br />
NOTE: Crossfader has no Soft Takeover function when in AUTO DJ mode-if you make a movement,<br />
the virtual position will instantly jump to whatever physical position you have moved the crossfader<br />
to.<br />
33
4.7 Headphone (Cue) & Master Volume Controls<br />
CUE Select (Headphone Symbol Buttons)<br />
These buttons select which deck (A or B) will be fed into the CUE side of the HEADPHONE MIX<br />
control. Use this control to pre-listen to your decks before you move the volume/crossfader controls<br />
to allow the audience to hear your performance. As well, this allows you to hear what activating any<br />
of your FX will sound like before turning up the volume of a song.<br />
MIX<br />
When the knob is turned fully to the LEFT side, this will allow you to hear your selected CUE source<br />
through your headphones (Channel A or B). When this knob is turned to the RIGHT, the MASTER<br />
OUTPUT will be fed to your headphones. When the knob is in the MIDDLE, both sources will be<br />
heard at the same time.<br />
PLEASE NOTE: When the SPLIT CUE option is selected in the SYSTEM MENU, the MASTER<br />
OUTPUT is routed to the right side of your headphones, and the CUE SELECT to the right<br />
side. The cue mix knob acts as a fader controlling the relative volume of the left earpiece<br />
and the right earpiece.<br />
Headphone Volume<br />
This knob controls the volume of your HEADPHONE output.<br />
Master Volume<br />
This knob controls the volume of your <strong>SCS.4DJ</strong> to your main 1/4” and RCA outputs on the rear of<br />
your unit.<br />
34
4.8 Microphone Controls<br />
MIC Volume<br />
This knob controls the volume of your MICROPHONE output.<br />
4.9 Recording Controls<br />
Record Button<br />
The RECORD BUTTON is used to record a CD quality (16bit/44.1khz).WAV file on your Mass<br />
Storage Device. To engage recording, press the RECORD BUTTON once. To end recording, press<br />
the RECORD BUTTON again.<br />
If there is more than one mass storage device attached, then a pop-up menu with a list allows<br />
you to select which device to save your recording to. You can also hit the BACK button to exit<br />
without recording. The RECORD button will flash when the device is close to full and recording will<br />
automatically turn off if the device is full. To end your recording, press the RECORD button again.<br />
When a recording session is complete the session will appear in the Browse menu with a name<br />
containing the <strong>SCS.4DJ</strong> system name you have selected, the time of day and date.<br />
NOTE: <strong>SCS.4DJ</strong> will record on the selected Mass Storage Device until you turn off recording<br />
or run out of space. If you run out of space, you can press the RECORD button, and if<br />
you have another Mass Storage Device connected, you may select your other device and<br />
continue recording.<br />
35
5. MAIN SYSTEM SCREENS/ CONTROLS<br />
5.1 Startup & Shutdown<br />
-Startup<br />
Upon power up, your <strong>SCS.4DJ</strong> automatically scans any connected mass storage devices and, if<br />
there is currently a previously created database, scans for changes to your library. If a device has<br />
not been previously used with the <strong>SCS.4DJ</strong> system, or updated using a computer, the tracks on<br />
your device will be automatically analyzed in the background, allowing you to play songs with basic<br />
pitch and performance controls (though you will lose controls like looping or accurate sync until your<br />
song is analyzed).<br />
-Shutdown<br />
To ensure that your connected Mass-Storage devices are not damaged, please make sure to shut<br />
down your <strong>SCS.4DJ</strong> properly by pressing the POWER BUTTON momentarily or using the shutdown<br />
option in the SYSTEM MENU. Once your <strong>SCS.4DJ</strong> has been powered down, you may safely<br />
remove any connected devices.<br />
WARNING: Do not remove the power cable or unplug the unit to shut it off. This could cause<br />
data corruption to your drive, damaging your songs and other data. In case the unit does not<br />
respond with a shutdown screen, the power button can be pressed and held for 10 seconds<br />
for an emergency shutdown procedure.<br />
36
5.2 STATUS BAR<br />
The STATUS BAR is your main location for playback information, and is found at the TOP of all<br />
screens on your <strong>SCS.4DJ</strong>. On each deck, from left to right, the following is displayed:<br />
- Song Name<br />
- Artist Name<br />
- If the song is PLAYING or PAUSED<br />
- Time Elapsed (or remaining if you have changed this in the SYSTEM MENU).<br />
- PITCH SLIDER percentage,<br />
- BPM<br />
- FX Parameter Value<br />
As well, upon boot, the STATUS BAR will also show a circle upon drive scan/ database build and<br />
an analysis symbol to show that your <strong>SCS.4DJ</strong> is processing your songs, Please note that screen<br />
operation may be slowed down while the Drive Scan process is happening.<br />
Drive Scan<br />
Symbol<br />
The STATUS BAR keeps you in touch with what is happening with your <strong>SCS.4DJ</strong> system, no matter<br />
what screen you are located in!<br />
37<br />
Drive Analysis<br />
Symbol
5.3 Home Screen<br />
The HOME/WAVEFORM button, located below the LCD screen, is used to toggle between the<br />
HOME and WAVEFORM screens.<br />
The HOME SCREEN displays useful information about the currently playing tracks. This includes<br />
Play/Pause status, Album Art, Progress on a Mini Waveform, Pitch/Tempo percentage, FX and<br />
Time elapsed/remaining, and a 4-segment BEAT COUNTER display to assist you in lining up your<br />
songs beats. AUTO-DJ is also accessed from this menu.<br />
The soft buttons available from this screen are:<br />
Song Progress<br />
Waveform<br />
- KEYLOCK A/B - Toggles the KEYLOCK function separately for Decks A and B.<br />
- SNAP – Locks Loop/Cue functions to the beat nearest to where you activate a function, for more<br />
accurate sync.<br />
- Next A/B – Auto-loads the next track available from the active playlist (described on page 52) into<br />
Deck A or B.<br />
- Edit BPM A/B – This brings up a pop-up screen allowing the BPM of the track loaded<br />
in the deck to be doubled or halved. Use this in function if the unit has accidently<br />
mis-calculated the BPM of a song.<br />
- AUTO-DJ – Turns Auto-DJ mode on and off. (Described on page 46)<br />
38<br />
Beat Counter<br />
to line up your<br />
beats
5.4 Waveform Screen<br />
Song Progress<br />
Bar<br />
Current Cue<br />
Point<br />
Current Play<br />
Position<br />
The waveform display is accessed by using the HOME/WAVEFORM button to switch between the<br />
WAVEFORM and HOME display. The WAVEFORM SCREEN shows the waveforms of the tracks<br />
loaded in each deck. The TOP WAVEFORM is for DECK A, the BOTTOM WAVEFORM is for<br />
DECK B. If the track has not been analyzed, the WAVEFORM area for the song will be EMPTY.<br />
The waveform of a track is multi-color with color associated with frequency and brightness with<br />
amplitude to give you a quick visual reference to aid in mixing. Waveform colors are based on EQ<br />
frequency, with orange to yellow for bass frequencies, midrange in green and high frequencies in<br />
blue.<br />
A red vertical line with a red triangle on top occurs for the current active CUE POINT. An additional<br />
center line in the middle of the waveform shows the current playback position in each track. When<br />
the pitch of the deck is adjusted from it’s native value, the waveform will stretch or compress, to give<br />
you a quick visual aid when referencing the amount of your speed change. This also helps you to<br />
keep the beats of the two decks aligned.<br />
The SYSTEM MENU also provides the option of switching to the HOME/WAVEFORM display<br />
automatically when a track is loaded to a deck. This can be useful if you wish to load more than one<br />
track on your decks before switching to the HOME/WAVEFORM screen.<br />
39
The buttons available in the WAVEFORM DISPLAY mode are as follows:<br />
- KEYLOCK A/B - Toggles the KEYLOCK function on Decks A and B.<br />
- SNAP – Locks Loop/Cue functions to the beat nearest to where you activate a function, for more<br />
accurate sync.<br />
- Next A/B – Auto-loads the next track available from the active playlist into Deck A or B.<br />
- ZOOM - Toggles between a close up and wide overview of the track WAVEFORM.<br />
- Edit BPM A/B – This brings up a pop-up screen allowing the BPM of the track loaded in the deck<br />
to be doubled or halved. Use this in function if the unit has accidently mis-calculated the BPM of<br />
a song.<br />
More about <strong>SCS.4DJ</strong>’s AUTO-DJ Mode:<br />
AUTO DJ<br />
SYMBOL<br />
The Auto-DJ mode of <strong>SCS.4DJ</strong> is incredibly powerful, and allows you to step away from the decks<br />
for a break, to engage the audience, or to plan ahead for the rest of your set. <strong>SCS.4DJ</strong> offers six<br />
different Auto DJ fade times selectable in the SYSTEM MENU. These fade times are altered by<br />
whatever you have set your current CROSSFADER CURVE to in the SYSTEM MENU as well<br />
(meaning that you hear more or less of the next song more quickly when the song is fading in).<br />
When Auto-DJ is active, you will see a small headphone icon on your information bar, letting you<br />
know that Auto-DJ is in control. Auto-DJ mode may be started or stopped at any time. If a track is<br />
already loaded to a deck and playing, the Auto-DJ will take over immediately and load subsequent<br />
tracks from the Active playlist and auto-crossfade for you. If a track is loaded but not playing,<br />
pressing PLAY on the loaded track will start off the Auto-DJ. If no tracks are loaded but there are<br />
songs in the Active playlist, pressing play will automatically load the first song in the Active playlist<br />
and start to play it.<br />
40
5.5. How to Browse Your Music Library<br />
The main way to browse your music library is through the BROWSE screen. The BROWSE screen<br />
is accessed by pressing the BROWSE BUTTON located under the LCD SCREEN, and is your main<br />
overview of song content stored on your Mass Storage Devices. Content from all Mass Storage<br />
Devices is grouped within this screen, so you never have to switch between connected drives<br />
to look for songs. Four columns of information are displayed, with the type of information being<br />
dependant upon your chosen sorting option (described in the section below).<br />
5.6 Sorting Options<br />
Upon entering your library, the TITLES sorting option is the default sort. This display shows a list<br />
of all of the tracks available in the current collection in alphabetical order. There are also columns<br />
displaying the Artist , BPM, and duration of the tracks. On the right side, there is a vertical scroll bar<br />
to show your position within your library.<br />
The following button choices are available:<br />
- Sort – brings up a pop-up menu where you can choose your SORTING OPTIONS: Title, Album,<br />
Artist, BPM, Duration, Comments, Genre and Sessions. Selecting the same sort option twice in a<br />
row will reverse the sort order (ie: BPM will go from High to Low or from Low to High)<br />
41
(SORT SOFT BUTTONS CONTINUED)<br />
- A – Jumps the highlighted line back one letter alphabetically in the list<br />
- Z – Jumps the highlighted line forward one letter alphabetically in the list<br />
- Navigation Wheel Motion- scrolls between the available songs in your library / playlist<br />
- ToPlaylst – adds the highlighted track to the end of the active playlist<br />
- Load A/B– load the selected track into deck A or B<br />
- Enter – brings up a track info window that displays more information about the currently highlighted<br />
track. Pressing BACK returns you to the BROWSE SCREEN. The track info screen can also be<br />
scrolled through using the Navigation Wheel to see the detailed information for adjacent tracks.<br />
- Search – takes you to the Search display section<br />
The following choices are available for SORT:<br />
- Artists Sort - Sorts by ARTIST name in alphabetical order. In this sort option, the A and Z tabs<br />
moves up and down the list by ONE LETTER increments by ARTIST NAME.<br />
- Genres Sort - Sorts by GENRES in alphabetical order. In this sort option, the A and Z tabs moves<br />
up and down the list by ONE LETTER increments by GENRE.<br />
- BPM Sort - Sorts by BPM. In this sort option, the A and Z tabs become +10/-10 tabs, and moves<br />
up and down the list in TEN BPM increments.<br />
- Album Sort - Sorts by ALBUM. In this sort option, the A and Z tabs moves up and down the list<br />
by ONE LETTER increments by ALBUM NAME.<br />
- Comments Sort - Sorts by the COMMENTS field in your ID3 tags. In this sort option, the A and Z<br />
tabs move up and down the list by ONE LETTER increments by the first letter in the COMMENT<br />
FIELD.<br />
- Time Sort - Sorts by TIME. In this sort option, The A Z buttons become >>
5.7 Search Display<br />
On the top right corner of your BROWSE and PLAYLISTS screens is a SEARCH<br />
soft-button. <strong>SCS.4DJ</strong> has a powerful search function that allows you to quickly find songs by<br />
entering in the word you remember from ANY field (title/artist/comments/etc), and brings up the<br />
results in a sortable list. There are two ways to enter in characters here:<br />
1. Use the NAVIGATION WHEEL to select letters and confirm your choice with the ENTER button.<br />
Use the BACK button to delete the last letter.<br />
2. Connect a USB Keyboard to your unit and type. To delete your last letter, use the Backspace<br />
key. Use the Enter key to start your search.<br />
The Search display has two soft keys:<br />
- Go - starts the search for the entered string<br />
- Exit Search - exits Search mode and returns you to the screen you were in prior to SEARCH.<br />
All searches are global searches that search for the word(s) or characters in any of the searchable<br />
fields. The searchable fields are: Title, Artist, Album, Genre, Comments, Duration, and BPM. A<br />
maximum of TEN LETTERS may be entered as a search word or phrase. Only the beginning of<br />
each word in an ID3 tag is searched, When the search is complete the display will change to the<br />
Search Tracks result screen.<br />
43
5.8 Search Results Display<br />
After you have pressed the GO key, the SEARCH RESULTS display is shown. From here, you can<br />
select your track to load, add a song to a playlist, sort your search results, or edit your search to<br />
narrow down your choices.<br />
The following button choices are available:<br />
- Sort – Brings up a pop-up menu that allows the list to be sorted by Title, BPM, Time or the<br />
Comments field of the song ID3 tag.<br />
- (Page Up/Down Arrows)– Pages up and down your search results in 10-song increments.<br />
- Load A/B– load the selected track into either deck A or B<br />
- Navigation wheel - changes the currently selected song<br />
- Search – Press SEARCH again to exit the SEARCH menu<br />
- Edit – Use to refine your SEARCH results by changing the letters/numbers searched for.<br />
- ToPlaylst - adds your song to the ACTIVE PLAYLIST<br />
44
5.9 Track Info Display<br />
With a song highlighted in the BROWSE or PLAYLIST screen, press ENTER to view track<br />
information. The Track info display provides extra information about the track based on track<br />
analysis and ID3 tags. The BPM field is color coded to show if the track has been analyzed, or<br />
where the BPM readout comes from, with the following colors:<br />
a. Red N/A – no tag id, not analyzed<br />
b. Red – tag id, not analyzed<br />
c. Purple – not analyzed – tapped<br />
d. White – analyzed<br />
e. Blue – analyzed and edited i.e. BPM * 2 or BPM / 2 or tapped<br />
Information displayed in this view includes:<br />
- Title – The title of the song<br />
- Artist – the song artist(s)<br />
- Album – the name of the album from which the song appears<br />
- Genre – the genre of the song<br />
- BPM – the track BPM.<br />
- Track # - as it appears on the album<br />
- Release Date (year) – the year the song was released<br />
- Play time – track length<br />
- Bitrate – the bitrate of the MP3 compression<br />
- Device – the device containing the song<br />
- Comments - any information in the ‘Comments’ ID3 field<br />
To exit the SONG INFORMATION screen, press the BACK button at any time.<br />
45
5.10 Active Playlist Display<br />
To enter the ACTIVE PLAYLIST screen, press the PLAYLIST button at any time. The ACTIVE<br />
PLAYLIST contains the list of songs in your currently loaded playlist, songs you have played during<br />
the course of your session, or songs you have loaded into the playlist. If you have not selected and<br />
loaded a playlist, this display contains any songs that have been previously loaded on to DECK A<br />
or B. As you play songs, or use the ToPlayLst button within the browse menu, this list will grow,<br />
allowing you to build playlists on the fly, or save your “set” for later use.<br />
When songs have been played, they will be grayed out, indicating to you that you have already<br />
played the song sometime during your session. Playlists can be edited or saved from within this<br />
menu, using the controls listed on the next page.<br />
46
Editing your Active (Current) Playlist<br />
Editing your Active (currently loaded) playlist is easy. To enable you to edit your playlist, the<br />
following buttons are available from within the playlist display:<br />
- Shuffle – shuffles the order of the tracks in the list. If a song has been grayed out, then it has<br />
already been played or is playing currently, and will not be added to the shuffle.<br />
- Save – brings up a pop-up menu that allows the current active playlist to be saved as a playlist.<br />
From here, you can choose the location to save your playlist in. This playlist can be opened later<br />
from applications such as iTunes or Winamp for further editing.<br />
- Delete - provides a pop-up menu with choices to remove the currently selected track or remove<br />
all tracks from the active playlist. Use this option if you need to quickly edit your playlist to start<br />
from scratch.<br />
- Move – moves the position of the currently selected track within the active playlist. To move a<br />
track, use the scroll wheel to select the new location, and press the MOVE button a second time<br />
to drop the track in the newly selected position. If you try to move a song that has already been<br />
played a copy of this song will be moved to the new location.<br />
- Load A/B– load the selected track into deck A/B<br />
- Navigation wheel – Scrolls within the Active Playlist. If the Move button has been pressed, the<br />
scroll wheel moves the currently selected track within the playlist. If a fast scroll motion is used, a<br />
letter/number display will pop up, allowing you to jump by large numbers of songs quickly.<br />
- Enter button – brings up the track info display, showing more information about the currently<br />
highlighted track.<br />
- Playlists – takes you to a list of playlists available on the Mass Storage Device. These can be<br />
playlists created on <strong>SCS.4DJ</strong> or created within applications such as iTunes or Winamp. This<br />
section is described on the next page.<br />
- Search – takes you to the Search display.<br />
47
5.11 Playlist Load Display<br />
The PLAYLIST LOAD display can be accessed from the PLAYLIST display by pressing the<br />
PLAYLISTS SOFT BUTTON in the upper left-hand corner when within the PLAYLIST menu. From<br />
here you can access the playlists on your storage devices.<br />
The following button choices are available:<br />
- ToPlaylst – Loads currently highlighted playlist to the bottom of the active playlist<br />
- Replace – Performs the same function as the delete all in the active playlist and then loads<br />
the currently highlighted playlist to the active playlist effectively making the selected playlist the<br />
current active playlist<br />
- Navigation wheel - changes the currently selected list item<br />
- Enter button (Physical button next to navigation wheel). – Changes the display to the Playlist<br />
Browse Display described in the previous section.<br />
- Sort – Brings up a pop-up menu that allows the list to be sorted by Title, Date or Device.<br />
- > - takes you up and down the playlist display in 10-playlist increments<br />
- Search – takes you to the search display<br />
- Active Playlist – takes you back to your current playlist<br />
NOTE: The <strong>SCS.4DJ</strong> search engine does not search for Playlists; to find a playlist please use<br />
the Playlist Load screen and sort to locate your playlist.<br />
48
6. SYSTEM SETTINGS<br />
6.1 Main System Display<br />
The main SYSTEM MENU screen contains a left pane and a right pane. The left pane lists the<br />
eight main categories of settings. The right pane lists the different settings items in the currently<br />
highlighted main category. The Enter Button selects the submenu. When a submenu is selected the<br />
contents of the right pane moves over to the left pane.<br />
Once you have entered the right pane, you can view detailed information explaining the highlighted<br />
setting, as well as the available setting choices and the current setting value. Pressing Enter moves<br />
the right pane menu to the main focus, allowing you to edit.<br />
The ENTER BUTTON sets the new setting choice and moves the focus back to the left pane. The<br />
BACK BUTTON moves back through the menu settings, much like the back key of a web browser.<br />
All settings are also saved through powering on and off your <strong>SCS.4DJ</strong>, so you do not have to<br />
change back settings when turning on the unit again.<br />
On the four corners of this screen are main control tabs for quick access to important<br />
system settings. They are:<br />
- Power – shuts down the system safely.<br />
- Lock – locks <strong>SCS.4DJ</strong>’s controls, with the exception of MASTER, MICROPHONE and<br />
HEADPHONE volume controls. To unlock, press BACK and ENTER buttons together. This<br />
function is so you can leave your <strong>SCS.4DJ</strong> unattended without worry.<br />
Note: make sure that you look at the positions of your knobs and sliders when you return to<br />
unlock the system and return them to the last position if they have been changed, as if there<br />
have been changes the value will jump when unlocked!!!<br />
49
Eject – This will safely eject the device from <strong>SCS.4DJ</strong> without any fear of drive corruption, which<br />
could result in loss of music, song analysis files and other data on your drive.<br />
Factory Reset – This resets all internal settings of your <strong>SCS.4DJ</strong> to the original factory conditions.<br />
The main system categories are:<br />
- Audio Settings<br />
- Platter Settings<br />
- <strong>SCS.4DJ</strong> Settings<br />
- Display Settings<br />
- Devices<br />
- Modes of Operation<br />
- Midi Controller<br />
50
6.2 Audio Settings Display<br />
Auto Cue – Chooses between the following CUE POINT behaviors:<br />
- Cue at audio start point: sets the CUE POINT at the start of the song (cuts off any silence at the<br />
start of a song)<br />
- Cue at beginning of file: sets the CUE POINT at the start of the audio file (even if there is silence<br />
at the start of the song)<br />
- Cue at user CUE POINT: sets the CUE POINT at the last CUE POINT you set in a song (or the<br />
audio start point if no CUE POINT has been set yet).<br />
Auto Loop length – specifies the length of the auto loop engaged when pressing the Auto button,<br />
with ranges of 1, 2, 4, 8, 16 bars<br />
Headphone Split – On/Off<br />
- When ON, routes deck audio to the left earpiece and mix audio to the right earpiece. The<br />
HEADPHONE MIX knob becomes the volume for each side of the earpiece.<br />
Pitch Slider Range – selects the maximum range of adjustment of the PITCH FADER, with ranges<br />
of +/-5%, +/-10%, +/-25%, +25% -100%.<br />
51
6.3 Platter Settings Display<br />
Start Up Speed – slow, medium, fast, none, the time it takes audio to ramp up to full speed when<br />
the Play button is pressed<br />
Brake Speed – slow, medium, fast, none, the time it takes for audio to ramp down to zero when the<br />
Pause button is pressed<br />
Release Speed – slow, medium, fast, none. The time it takes audio to ramp up to full speed when<br />
the finger releases from the platter. This control can be used to more accurately simulate the feel of<br />
releasing a vinyl record after scratching.<br />
52
6.4 CrossFader Settings Display<br />
Crossfader Curve Select – chooses between the following Crossfader volume curves<br />
- Constant Power- Consistent volume fade through length of Crossfader<br />
- Linear- Gradual Build<br />
- Transition- Small Volume dip in middle of Crossfader<br />
- Slow Fade- Slow, gradual fade<br />
- Fast Cut- Sharp cut, typically used for scratching or to rapidly cut audio on/off<br />
CrossFader Reverse – Swaps sides of your crossfader to reverse, with your B deck on the A side,<br />
and the A deck on the B side. Typically used for certain techniques in scratching.<br />
53
6.5 Display Settings Display<br />
Set Language – English/French/German/Spanish<br />
- Sets the language of the screens on <strong>SCS.4DJ</strong><br />
Load Confirm – On/Off<br />
- Provides a warning when loading a track into a playing deck, or ejecting a Mass Storage Device<br />
when a song is playing off the drive.<br />
Track time – Remaining/Elapsed<br />
- Changes the time displayed for each track on the Home and Waveform screens from Remaining<br />
to Elapsed.<br />
Jump on Load – On/Off<br />
- Sets the unit to automatically switch to the HOME/WAVEFORM screen upon loading a song, or to<br />
remain in the BROWSE/PLAYLIST screens.<br />
End of track warning time<br />
- gives a visible warning of when the track is ending, with a selectable time of 5,10,20,30 seconds<br />
Auto Shut Off – 10 minutes, 30 minutes, disabled<br />
- This control allows you to select a time after which the unit will shut down if you have not touched<br />
the unit, or no music has been playing. Use this to save power, as well as extend the life of your<br />
<strong>SCS.4DJ</strong>.<br />
NOTE: Auto Shut Off does not turn off your <strong>SCS.4DJ</strong> if your unit is in AUTO DJ mode.<br />
Hide Demo Content – Off/On<br />
- When this item is turned on it will cause the built in audio demo content to not be<br />
displayed in the Browse menus.<br />
Contrast – screen contrast<br />
54
6.6 Video Mode & Demonstration Mode<br />
The Video Player Menu displays a list of the videos detected by the system. Only videos with the<br />
extension .avi will be listed. The list of available videos includes both the built-in demo videos as well<br />
as any .avi files that you may have on attached storage devices. Use the scroll wheel to select your<br />
desired video. There are two soft keys available in this display: EXIT and PLAY. Pressing EXIT or<br />
the BACK button will return you to the previous screen. Pressing PLAY will play the selected video.<br />
To exit the video and return to the DJ application press the lower right hand SOFT BUTTON. The<br />
PLAY/PAUSE buttons may be used to start and stop the video. The CUE buttons may be used<br />
to return to the beginning of the video. When a video is played it is automatically selected as the<br />
default video used in the Demo mode.<br />
Demonstration Mode<br />
When you power on the <strong>SCS.4DJ</strong> unit for the first time it will ask you to select your language.<br />
Following this you will see a screen announcing that a video demonstration will be shown. After a<br />
count down of 10 seconds the demonstration video will be played automatically. If you do not wish<br />
to see the video and do not want the demo video to display at power-up again, follow the on-screen<br />
instructions to turn off DEMO MODE completely. To re-enable DEMO MODE, you must perform a<br />
FACTORY RESET.<br />
55
6.7 Device Settings<br />
Eject – This will safely eject the selected device from <strong>SCS.4DJ</strong> without any fear of drive corruption,<br />
which could result in loss of music, song analysis files and other data on your drive.<br />
Unplayable Songs – Provides a list of songs that could not be analyzed or played by <strong>SCS.4DJ</strong>.<br />
This can be due to corruption or DRM (Digital Rights Management)<br />
Clean Database – If you are having issues with your song database (database is not updating,<br />
etc) when new songs are loaded on the drive, this option will delete the current database so your<br />
<strong>SCS.4DJ</strong> can start fresh.<br />
56
6.8 MIDI Controller Mode<br />
MIDI CONTROLLER MODE<br />
<strong>SCS.4DJ</strong> is not only a powerful all-in-one solution, but also acts as a highly functional MIDI<br />
controller, compatible with a wide range of DJ applications such as Native Instruments Traktor,<br />
Atomix Virtual DJ and Mixvibes Cross.<br />
<strong>SCS.4DJ</strong> sends NOTE ON messages when buttons are pressed, Note off messages when buttons<br />
are released, and Control Change messages when sliders or knobs are moved. The LEDs on<br />
<strong>SCS.4DJ</strong> can be controlled by host applications by sending Note on messages for individual LEDs<br />
and Control Change messages for controlling the LEDs in VU meters.<br />
MIDI note number and Control Change message numbers can be edited offline on your computer.<br />
Please visit www.stantondj.com/scs4dj.htm for details.<br />
MIDI Channel – Allows you to set the channel upon which your SCS4.DJ sends/receives MIDI<br />
commands from 1-16. Use the Navigation wheel to change the channel number.<br />
MIDI Mode – Highlight this item and press ENTER to enter MIDI Controller Mode. Note that this will<br />
shut down the <strong>SCS.4DJ</strong> playback functionality. When a host computer is attached MIDI messages<br />
will be sent to the host computer and messages from the host computer to illuminate LEDs will be<br />
honoured.<br />
For a complete list of MIDI commands available for <strong>SCS.4DJ</strong>, please visit<br />
www.stantondj.com/scs4dj.htm<br />
57
7. KEYBOARD SHORTCUTS<br />
USB Keyboard Support<br />
A USB Keyboard can be connected to your <strong>SCS.4DJ</strong> for even more control! From within your<br />
SEARCH screen, you can use a USB keyboard to type in characters for fast searching. As well, the<br />
following controls are available for playback:<br />
F1 – Play A<br />
F2 – Auto DJ<br />
F3 – Sync A<br />
F4 – Load A<br />
F5 – Home<br />
F6 – Browse<br />
F7 – Playlist<br />
F8 – Search<br />
F9 – Play B<br />
F11 – Sync B<br />
F12 – Load B<br />
Page Up, Page Down – shifts current list up or down one page<br />
Home, End – jumps to beginning or last page of list<br />
Up / Down arrow Keys – same as encoder knob for single stepping<br />
Left / Right arrow keys – same as back and enter keys<br />
Backspace –Same as BACK button<br />
Enter – Same as ENTER key<br />
58
8. TROUBLESHOOTING<br />
1. My Mass Storage Device isn’t showing up<br />
<strong>SCS.4DJ</strong> supports a majority of USB-based Mass Storage Devices (hard drives, iPod’s/iPhone’s,<br />
Thumb Drives). However, <strong>SCS.4DJ</strong> does not support the following device types:<br />
1.HFS+ Journaled Format Drives<br />
2.Windows 7 Phones<br />
While many drives can be powered by the USB-bus present on the <strong>SCS.4DJ</strong>, there are drives that<br />
require an external power source. Be sure to externally power any USB drive that has an external<br />
power supply.<br />
2. I don’t see a waveform on screen/ I don’t see a BPM reading/ I can’t use automatic looping<br />
or syncing<br />
<strong>SCS.4DJ</strong> analyzes all files to prepare them for performance. This is a very extensive analysis, and<br />
does take time (around 1/5th of the time it takes your song to play from start to finish). While you<br />
will get basic playback functionality during this time, some of the more advanced features won’t<br />
be available until the analysis is finished. If you need to perform before then, you can use the TAP<br />
TEMPO function to get a BPM readout to start performing now.<br />
3. My drive won’t finish analyzing<br />
If a drive is unplugged or your <strong>SCS.4DJ</strong> is powered down improperly, this can corrupt the files<br />
on your drive, causing analysis to fail. Please connect your drive to your unit and use the “Clean<br />
Database” function, located in the ‘DEVICES’ menu under the ‘SYSTEM’ button. This will cause<br />
your unit to start fresh. Also note, there is a 20,000 song limit per drive, so, if you have a collection<br />
larger than 20,000 songs any songs after the first 20,000 will be unavailable.<br />
4. The Platters won’t “scratch” properly<br />
<strong>SCS.4DJ</strong> does a calibration every time the unit is turned on for the platters to ensure the most<br />
accurate performance possible. If the platters were held down during startup, this can cause<br />
performance to be degraded due to an improper calibration. Please re-boot your unit to calibrate<br />
again, this time not touching the platters.<br />
5. My Mass Storage Device is taking way too long to finish analyzing<br />
As stated before, your <strong>SCS.4DJ</strong> does VERY extensive calculations to determine BPM, waveforms,<br />
etc. As such, analyzing on your <strong>SCS.4DJ</strong> can take a long time depending on the size of your<br />
collection. (1/5th real time)<br />
6. I’m seeing the wrong BPM value for my music<br />
<strong>SCS.4DJ</strong> has a powerful analysis engine, but sometimes the song’s BPM is off. 90% of the time this<br />
has been because of the engine seeing the song as half/double the tempo it actually is. From the<br />
HOME/WAVEFORM screen, you can edit your BPM with the EDIT BPM soft button. This should<br />
correct your issue, the beat grid of the song is not edited, however the new BPM value is used by<br />
59
the auto SYNC engine. If it is still wrong, you can use the TAP BPM button to get the correct BPM,<br />
though please note that the <strong>SCS.4DJ</strong> will still use the BEAT GRID from the initial analysis.<br />
7. I don’t see my entire collection in the browse list?<br />
There are a few reasons that you may not see your entire collection in the browse list. If some<br />
of your tracks are not playable by the <strong>SCS.4DJ</strong> (ie: files in data formats that <strong>SCS.4DJ</strong> does not<br />
support) they will not appear in your browse list. If you look under the SYSTEM menu -> Devices<br />
-> Unplayable Songs, a list of your tracks that can not be played due to incorrect format or data<br />
corruption in the file are listed.<br />
If you have inserted a large device for the first time it can take a long time to find and display all of<br />
the songs in your collection. The scanning icon will display in the center of the status header<br />
when your songs are being discovered. The scanning icon will display when the first page of your<br />
browse list is available but your browse list is not yet completely available. This icon will go away<br />
when the full collection is available for browsing.<br />
Also note, there is a 20,000 song limit per drive, so, if you have a collection larger than 20,000<br />
songs, only your first 20,000 songs will be available.<br />
8. It is very difficult to turn the storage compartment locking tabs on the bottom of the unit<br />
(when removing the bottom cover)<br />
Especially when <strong>SCS.4DJ</strong> systems are new, those locking tabs can be hard to turn with just your<br />
fingers. On the top of each locking tab is a slot in which the edge of a coin can be placed to make<br />
turning them easier.<br />
9. I locked my system and I can’t unlock it<br />
Press the BACK and ENTER buttons together to unlock your system.<br />
10. AUTO-DJ mode isn’t playing my entire playlist<br />
AUTO-DJ mode will skip over any songs you have played so far. If you want a song to play again,<br />
you must re-load it in your playlist. If your playlist contains songs that are not resident on your<br />
currently attached storage devices <strong>SCS.4DJ</strong> will skip over them.<br />
11. The LED by the PITCH FADER isn’t lighting up when the PITCH FADER is in the middle<br />
The LED by the PITCH FADER lights up when SYNC is turned on and the PITCH FADER position<br />
is not the same as the physical position, not when the PITCH FADER is at zero.<br />
12. <strong>SCS.4DJ</strong> is not remembering my CUE POINTS<br />
Please make sure that your <strong>SCS.4DJ</strong> is set to “Cue at user CUE point” from within the AUDIO<br />
SETTINGS menu, called up using the SYSTEM button.<br />
13. My problem isn’t covered here<br />
Please go to www.stantondj.com/scs4dj.htm for all of the latest troubleshooting updates and<br />
information.<br />
60
9. TECHNICAL SPECIFICATION<br />
USB Compatibility<br />
<strong>SCS.4DJ</strong> is compatible with all USB 2.0 specifications and standards.<br />
USB Mass Storage Devices<br />
<strong>SCS.4DJ</strong> is class compliant with all standard USB mass storage devices.<br />
USB Power Requirements<br />
The <strong>SCS.4DJ</strong> built in USB hub has four USB slave ports. USB devices can be attached to these<br />
ports in any position and in any order. <strong>SCS.4DJ</strong> will support the USB hub standards. The <strong>SCS.4DJ</strong><br />
can provide 500 ma of current to each USB slave port. USB hubs and USB HDDs attached to the<br />
<strong>SCS.4DJ</strong> hub only need be powered if they require more than 500 mA of current. The <strong>SCS.4DJ</strong><br />
itself must be plugged into an AC outlet.<br />
61
Mic Preamp:<br />
Equivalent Input Noise: < -112 dBu A-weighted, measured<br />
Sensitivity @ clip: -14 dBu (trim at max)<br />
Supported file types:<br />
MP3, MP4, AAC, M4A, WAV, AIFF<br />
Mic Input to Line Output:<br />
SNR 20Hz-22kHz: > 99dB A-weighted<br />
THD+N @1kHz, 20Hz-22kHz BW: < 0.007%<br />
Frequency Response: 20Hz – 20kHz +/- 3 dB, +/-0.25dB 100Hz to 15kHz<br />
Sampling: 24-bit, 44.1kHz<br />
Digital Playback:<br />
Frequency Response: 20Hz – 20kHz +/- 2 dB, +/-0.25dB 100Hz to 15kHz<br />
Signal/Noise Ratio: >106 dB A-weighted<br />
THD+N @1kHz, 20Hz-22kHz BW: 0.005%<br />
Max Output Level: +14.5 dBu<br />
Crosstalk (left to right): < -90dB @ 1kHz<br />
Sampling: 24-bit, 44.1kHz<br />
Headphone Amp:<br />
Frequency Response: 20Hz – 20kHz +/- 3 dB, +/-0.25dB 100Hz to 15kHz<br />
Signal/Noise Ratio: >90 dB A-weighted<br />
Fader Kill: -85 dB<br />
Mic Input: 1/4” TRS<br />
Master Outputs: RCA unbalanced, ¼” pseudo balanced<br />
Headphone Output: ¼ ”, 1/8”<br />
Power: Supplied Adapter<br />
Power Into 33 Ohms: 180mW RMS @ 0dBFS<br />
Power Into 150 Ohms: 40mW RMS @ 0dBFS<br />
Minimum Safe Load: 16 Ohms<br />
Dimensions & Weight<br />
17.4” x 11.4” x 2.9” / 442mm x 291mm x 73mm<br />
Weight: 5.0lbs / 2.2 kgs<br />
62
10. WARRANTY<br />
Thank you for choosing <strong>Stanton</strong>!<br />
Your satisfaction is extremely important to us. We proudly stand behind the quality of our work and<br />
appreciate that you put your trust in us. Registering your product will help us guarantee that you are<br />
kept up to date on our latest advances.<br />
Warranty Service in the United States:<br />
Please contact <strong>Stanton</strong> Tech Support BEFORE sending your product. In some cases, our Tech<br />
Support team can resolve your problem immediately, avoiding down time due to shipping delays.<br />
However, if Tech Support determines that a repair is needed; please call us at +1 954.316.1500<br />
(Option 3) to obtain a Return Authorization Number (RA#) PRIOR to shipping your product to us.<br />
Warranty Service outside the United States:<br />
To initiate a warranty repair, please contact the authorized <strong>Stanton</strong> dealer from whom you purchased<br />
your product, and follow the dealer’s return policy.<br />
Save your shipping boxes and all packaging materials!<br />
For the fastest and safest product return to <strong>Stanton</strong>, please use the original shipping carton and<br />
packaging materials. <strong>Stanton</strong> cannot be responsible<br />
for any damages incurred during the shipping process due to poor or inadequatepacking. Please<br />
remember to insure your shipment!<br />
<strong>Stanton</strong> Warranty<br />
Through <strong>Stanton</strong>’s authorized dealers around the World, <strong>Stanton</strong>, or one of <strong>Stanton</strong>’s authorized<br />
distributors outside the U.S., will, without charge, repair or replace, at the sole discretion of the<br />
entity responsible for making the repair or providing the replacement, any <strong>Stanton</strong> merchandise<br />
proved defective in material or workmanship for a period of one (1) year following the date of original<br />
purchase. Exceptions to this warranty are<br />
as noted below:<br />
The warranty for mechanical parts which are subject to wear and tear are limited to either the earlier<br />
of thirty (30) days following the date of original purchase or for 10,000 cycles for switches.<br />
<strong>Stanton</strong> will warrant all replacement parts and repairs for ninety (90) days from the date of original<br />
shipment. Repairs made necessary by reason of misuse, alteration, normal wear, or accident are<br />
not covered under this warranty.<br />
63
Returns<br />
Authorized <strong>Stanton</strong> dealers are only authorized to sell and distribute merchandise within a specific<br />
country. All goods requiring warranty repair or replacement must be returned (freight prepaid if not<br />
hand-delivered) to the authorized <strong>Stanton</strong> dealer from whom the merchandise was purchased and<br />
in the same country where the merchandise was purchased. For purposes of purchases made via<br />
the Internet, the merchandise must be returned to the authorized <strong>Stanton</strong> dealer in the country<br />
where the authorized <strong>Stanton</strong> dealer which sold the merchandise to purchaser is located and not<br />
the authorized <strong>Stanton</strong> dealer in the country where the purchaser is located or the country in which<br />
the merchandise was received. Any returns to a non-authorized dealer or to an authorized <strong>Stanton</strong><br />
dealer not in the same country as the merchandise was intended to be sold or as set forth above<br />
will void this warranty.<br />
To initiate a warranty repair, you must contact the authorized <strong>Stanton</strong> dealer from whom you<br />
purchased the merchandise, and follow such authorized <strong>Stanton</strong> dealer’s return policy.<br />
<strong>Stanton</strong> assumes no risk and shall be subject to no liability for damages or loss resulting from the<br />
specific use or application made of the merchandise. <strong>Stanton</strong>’s liability for any claim, whether based<br />
on breach of contract, negligence, infringement of any rights of any party, or product liability, and<br />
relating to the merchandise shall not exceed the price received by <strong>Stanton</strong> from your purchase of<br />
such merchandise. In no event will <strong>Stanton</strong> be liable for any special, incidental or consequential<br />
damages (including loss of use, loss of profit and claims of third parties) however caused, whether<br />
by the negligence of <strong>Stanton</strong> or otherwise. To the extent permitted by law and except as otherwise<br />
provided above, <strong>Stanton</strong> disclaims any express or implied warranties of merchantability or fitness<br />
for a particular purpose.<br />
The above warranty provides you with specific legal rights. You may also have additional rights,<br />
which are subject to variation from state to state and country to country.<br />
If there is a dispute regarding the warranty of merchandise that does not fall under the warranty<br />
conditions stated above, please include a written explanation with the merchandise when returned<br />
pursuant to the terms and conditions set forth herein.<br />
64