You also want an ePaper? Increase the reach of your titles
YUMPU automatically turns print PDFs into web optimized ePapers that Google loves.
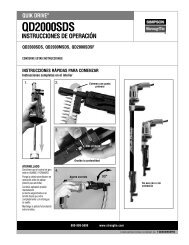
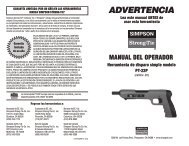
QUIK DRIVE ® 800-999-5099 www.strongtie.comQD2000SDSOPERATING INSTRUCTIONSQD2000SDS, QD2000MSDS, QD2000SDSFSAVE THESE INSTRUCTIONSQUICK START INSTRUCTIONS Complete instructions inside1.2.Pointed End First3.DeeperSet Driving DepthDRIVING SCREWSBe sure screwgun is inFORWARD.Start screwgun beforeapplying driving pressure.Continue to apply pressure,keeping bit engaged untilscrew is fully driven andclutch releases.Keep screwgun runningbetween screws.4.Correct Grip90˚Use With Or Without The“Stand-up” Extension© 2006 SIMPSON STRONG-TIE COMPANY, INC. T-QDSDSINS06
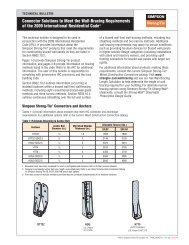
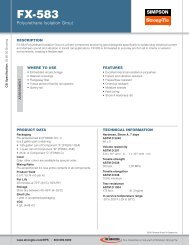
PARTS - SCHEMATIC - COMPONENTSAttachmentExtensionScrewgunExtension Mandrel inside extensionG2 Locking LeverDepth Adjustment WheelHandleNose PieceGuide TubeBit Release SlotBitMandrel inside attachmentPart #: PMANDREL75Nose Pieces in QD2000SDS, QD2000MSDS SystemsBit Release KeyBuilt in on all G2 modelsFeed Pawl Lever(Must be engaged inFeed Pawl AssemblySlot)NPA25G21¹⁄₂”- 2¹⁄₂” screwsNose Pieces in QD2000SDSF SystemsNPA3G23” screwsFeed Pawl AssemblyNPA2G21”- 2” screwsUse the correct driving bit.The bit(s) included in each box of Quik Drive ® screws should drive the entire box.Variations in materials and driving technique can cause excessive wear. Additional bit packs are available for purchase.Reference the description on the bit sticker in your box of screws or the screw box label to ensure correct selection.Quik Drive Systems utilize five recess drive types and sizes.Drive Type / Size Bit#2 square drive BIT2S for most screws with #2 recess and interior grade coating#2U (Undersized) BIT2SU for most screws with #2 recess and exterior grade coating#3 square drive BIT3S for most screws with #3 recess and interior grade coating#3U (Undersized) BIT3SU for most screws with #3 recess and exterior grade coating#2 phillips BIT2P for all Quik Drive screws with phillips recessNPA25G21¹⁄₂”- 2¹⁄₂” screwsTROUBLESHOOTING GUIDEQuik Drive tools are easy to use. As with any power tool, there are a few basic things to remember.PROBLEMScrews won’t drive.They spin for a second, then fall overon their side. Little or no penetration.Screws won’t drive completely.They go down about halfway,then the bit spins out.Screws won’t drive completely.They are almost completely driven butwon’t countersink completely.SOLUTIONMake sure the screwgun is not in reverse.Check to be sure you are using the correct bit for the type of screws you are driving.Check for bit wear. It may be time to install a new bit.Push harder when driving.Check the depth adjustment on the attachment. Reset if necessary.You may have missed the substrate.Example: In flooring, this will occur if you miss the joist.Screws don’t advance properlycausing tool to jam.Use only Quik Drive ® brand collated screws.Be sure the screw strip is inserted correctly - pointed end first.Lift the tool completely off the work surface after driving each screw.Don’t drag screw strips on the work surface as you move to the next position.Be sure the feed pawl assembly is intact and feed lever is engaged.800-999-5099
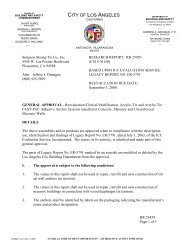
OPERATING INSTRUCTIONSATTACH ADAPTOR TO YOUR SCREWGUN(If you purchased a complete system with screwgun;skip this step)• Remove nose-cone and bit holder from your screwgunaccording to manufacturer’s directions (most will pull straight off).• Replace with Quik Drive ® adaptor made for the screwgun.Follow specific instructions included with Quik Drive adaptor.INSTALL CORRECT BIT• Be sure you have the correct bit for the screws you are driving.It’s a good practice to install one of the free bits included withour screws when you open a new box.• Remove the attachment and pull the mandrel from the unit.Extend the bit release key and pry out the old bit.Put a new bit in place and push against a solid surface until it snaps in place.Insert end of bitrelease key intoslot and pry outthe old bitCONNECT ATTACHMENTTO SCREWGUN OR EXTENSION• Insert mandrel in extension or screwgun,slide attachment on and push tight - untilthe locking lever snaps in place.• You can rotate the attachment any waythat is desired.Depress at topto release• New tools may be tight and hard to lockin place. If so, just put the nose against asolid surface and push down sharply(see photo at far right). NOT locked on Locked onSeat mandrel first,then add attachmentLocking Leverflush with topof toolLocking Leverflush withside of toolCheck locking lever position to be sureattachment is locked onTo remove, release locking lever and pullIf new tool ishard to lock on,place nose onsolid surfaceand push downATTACH EXTENSION TO SCREWGUN• Turn the Clamping Handle in the “off” direction (clockwise) to movethe internal clamp out of the way.• Insert the screwgun, with G2 Adaptor attached, into the end of the extension.Push tight and tighten Clamping Handle.• If it won’t fully insert, start the screwgun slightly until the drives mesh.Turn clockwise to openclampClamping HandleInternalclampHex end ofextensiondrive shaftPointed end firstScrew release lever(silver) - push down to unload screwsDEEPERDEPTHRELEASELOADING AND UNLOADING SCREWSInsert a screw strip pointed end first, until they click inplace. Push release lever to unload.SET DEPTHPress DEPTH RELEASE to adjust.Test in scrap material to achieveoptimal setting.
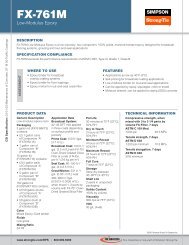
READ AND FOLLOW ALL INSTRUCTIONSWHEN SERVICING USE ONLY IDENTICAL QUIK DRIVE ® REPLACEMENT PARTS.ATTENTION - Please see screwgun manufacturer's instructions for safe use of electric power tools.QUIK CHANGE NOSEPIECE• Gives you the ability to drive the full rangeof screw lengths available for your system.• Just twist the nose counterclockwiseand pull it off.• Push the desired nosepiece completely intotool body (fig. c.) and twist clockwise intoposition.• Make sure the FEED LEVER aligns withthe FEED LEVER RECESS.a. b. c.Twist 1/4 turnand pullFeed leverFeed lever recessNose Piece mustbe fully insertedFeed Lever must engagerecess in Feed LeverAssembly as shownQD2000SDS, QD2000MSDS, and QD2000SDSF Systems are covered by one or more of the following patents.5,337,635 5,531,143 5,699,704 5,927,163 6,089,132 6,439,085 D391,1355,351,586 5,568,753 5,884,541 5,934,162 6,244,140 6,453,7805,469,767 5,570,618 5,918,512 6,055,891 6,363,818 6.959,630LIMITED LIFETIME WARRANTYThis Limited Lifetime Warranty applies to all Quik Drive products (except the QDA158 product) and must be read in conjunction withthe General Notes, Terms and Conditions of Sale, and Corrosion Resistance information contained in the current Quik Drive catalog and atwww.strongtie.com/info, along with any information provided with a <strong>Simpson</strong> product. Screwguns that may be supplied with the Productsare manufactured by others and are warrantied by their respective manufacturers. <strong>Simpson</strong> <strong>Strong</strong>-<strong>Tie</strong> Company Inc. (“<strong>Simpson</strong>”) warrantsthe Products to the original purchaser to be free from substantial defects in material, manufacturing, and design for the lifetime of theproduct, if properly stored, maintained and used. This Warranty does not cover normal wear and tear or any Product that was:(1) purchased other than from an authorized <strong>Simpson</strong> dealer, retailer or distributor; (2) modified or altered; (3) used with any fastenersother than authentic Quik Drive fasteners; (4) improperly serviced; or (5) subject to negligence, excessive uses, or any use not in accordancewith the printed materials provided with the Product as determined by <strong>Simpson</strong>. Purchaser’s sole remedies are replacement or repair uponreturn to <strong>Simpson</strong> with proof of purchase (shipping prepaid by purchaser). To obtain warranty service go to www.strongtie.com or contact<strong>Simpson</strong> promptly at (800) 999-5099. The repaired or replaced Product is warranted under the terms of this Warranty.WHERE LAWFUL, SIMPSON DISCLAIMS ALL OTHER WARRANTIES, INCLUDING BUT NOT LIMITED TO IMPLIED WARRANTIES OFMERCHANTABILITY AND FITNESS FOR A PARTICULAR PURPOSE. IN NO EVENT WILL SIMPSON BE LIABLE FOR INCIDENTAL,CONSEQUENTIAL, PUNITIVE OR SPECIAL DAMAGES OR DIRECT OR INDIRECT LOSS OF ANY KIND, INCLUDING BUT NOT LIMITED TOPROPERTY DAMAGE AND PERSONAL INJURY. SIMPSON’S ENTIRE LIABILITY IS LIMITED TO THE PURCHASE PRICE OF THIS PRODUCT.SOME STATES DO NOT ALLOW LIMITATIONS ON IMPLIED WARRANTIES, OR THE EXCLUSION OR LIMITATION OF INCIDENTAL ORCONSEQUENTIAL DAMAGES, SO THE ABOVE LIMITATIONS AND EXCLUSIONS MAY NOT APPLY TO YOU. THIS LIMITED WARRANTYGIVES YOU SPECIFIC LEGAL RIGHTS, AND YOU MAY ALSO HAVE OTHER RIGHTS THAT VARY FROM STATE TO STATE.Home Office5956 W. Las Positas Blvd.Pleasanton, CA 94588Tel: 925/560-9000Fax: 925/847-1603Northwest USA5151 S. Airport WayStockton, CA 95206Tel: 209/234-7775Fax: 209/234-3868Southwest USA260 N. Palm StreetBrea, CA 92821Tel: 714/871-8373Fax: 714/871-9167Southeast USA2221 Country LaneMcKinney, TX 75069Tel: 972/542-0326Fax: 972/542-5379Northeast USA2600 Int’l StreetColumbus, OH 43228Tel: 614/876-8060Fax: 614/876-0636Quik Drive Branch436 Calvert DriveGallatin, TN 37066Tel: 615/230-8788Fax: 615/451-9806800-999-5099 www.strongtie.com