


Create successful ePaper yourself
Turn your PDF publications into a flip-book with our unique Google optimized e-Paper software.
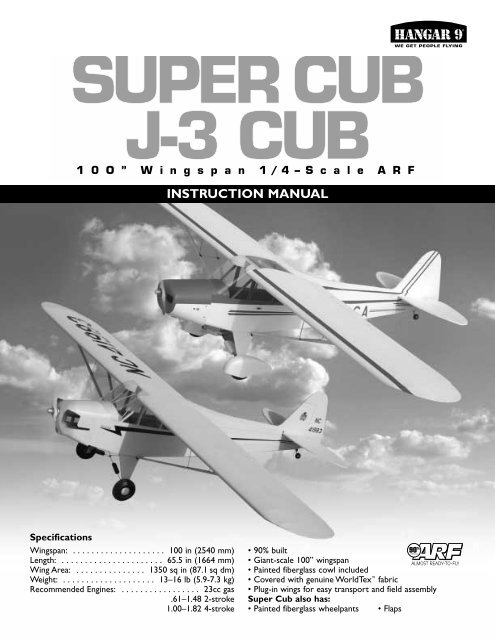
Additional Required Equipment4 channels (minimum)5 servos (JRPS8101 recommended)Standard 600-1000mAh-receiver battery packY-harness (non-computer radio)Recommended JR Systems:JR XP652JR XP662JR XP783JR XP8103PCM10XJR XP8103JR PCM10xEngine RequirementsRecommended Engines:1.08–1.48 2-cycle engines1.20–1.80 4-cycle enginesZenoah ® G23 gas engineRecommended 2-Cycle Engines:Webra 1.20MDS 1.48MDS 1.48(MDSE14800)Recommended 4-Cycle Engines:Saito 1.20–1.80Saito 1.20GK–1.80GKSaito 1.82 TwinSaito 1.82 Twin(SAIE182)Recommended Gasoline Engine:Zenoah G23Zenoah G23(ZENE23A)5
Other Items Needed (not included in the kit)• Propeller• Pro Fuel filter (HAN143) (for gas or glow fuel)• Servo extensions (2) (JRPA098, 12" HD Gold)and (2) (JRPA102, 24" HD Gold)• Fuel tubing (for gas or glow fuel)• Fuel Filler (HAN115)• Radio packing foam• Shut-off switch for gasoline engine (Kill Switch) (ZEN2000)Also Available for Gas Engine OperationZenoah ®Gas Start Kit (ZEN20002) Includes:• Kill Switch (ZEN20000)• Oil (2 cycle) (ZEN20001)• Fuel Filler (HAN115)• Mix cup (HAN3101)• Gas Stopper (DUB400)• 3’ gas fuel tubing (DUB799)• Fuel Line Clips (DUB677)Tools and Adhesives Needed (not included in the kit)Tools• Drill• Drill Bits: 1/16, 1/8, 5/32• Soldering iron• Phillips screwdriver (small and medium)• Pliers: Z-bend and needle-nose• Moto-tool with sanding drum and cutoff wheel• Hobby knife with #11 blades• Mixing sticks• Epoxy brush• 90-degree triangle• Sanding bar• Sandpaper (medium)• Straight edge• Measuring device (e.g. ruler, tape measure)• Canopy scissors• Paper towels• Rubbing alcohol• Wax paper• Felt-tipped penAdhesives• Thin CA (cyanoacrylate) glue• 6-minute epoxy• 30-minute epoxy• Blue Locktite Z-42• Canopy glue (Formula 560)• Silver solder• Masking tape6
Contents of Kit (<strong>Super</strong> <strong>Cub</strong>)DA927B8112C11510436Large PartsABCDFuselage (HAN1653)Wing Set (HAN1651)Tail Set (HAN1652)Cowl (HAN1654)Other Parts123456Pushrod and AccessoriesPlywood Die-Cut Motor Spacer PartsHardware Bags for Control SurfacesFuel Tank and Hardware (HAN1460)Wheel Pants (HAN1655)WheelsContents of Kit (J-3 <strong>Cub</strong>)789101112Motor Mounts w/Hardware (HAN2033)Tail Wheel and Hardware (HAN2026)Windshield Set (HAN1656)Wing Strut Set (HAN1657)Landing Gear (HAN1658)Aluminum Wing Tube ( HAN1659)AD8261B7C111094 53Large PartsABCDFuselage (HAN1578)Wing Set (HAN1576)Tail Set (HAN1577)Cowl (HAN1579)Other Parts1 Pushrod and Accessories2 Plywood Die-Cut Motor Spacer Parts3 Hardware Bags for Control Surfaces4 Fuel Tank and Hardware (HAN1460)5 Wheels6 Motor Mounts w/Hardware (HAN2033)7891011Tail Wheel and Hardware (HAN2026)Windshield Set (HAN1580)Wing Strut Set (HAN1581)Landing Gear (HAN1582)Aluminum Wing Tube (HAN1659)7
Section 1: Hinging the Ailerons and FlapsParts Needed• Right wing panel with aileron and hinges (J-3)• Left wing panel with aileron and hinges (J-3)• Right wing panel with aileron, flap and hinges (<strong>Super</strong> <strong>Cub</strong>)• Left wing panel with aileron, flap and hinges (<strong>Super</strong> <strong>Cub</strong>)Tools and Adhesives Needed• Thin CA glue• CA remover/debonder• Paper towels• T-pins (one for each hinge)Step 3. Slide the aileron onto the wing until there is only aslight gap between the wing panel and aileron. The hinge is nowcentered in the wing panel and the aileron. You can now removethe T-pins and push the aileron up against the wing panel. Forthe <strong>Super</strong> <strong>Cub</strong>, repeat the hinge installation for the flap. Beforegluing the hinges in place, make sure the control surfaces do notbind on the stationary trailing edge of the wing or each other.ACaution: The control surfaces, including the ailerons,flaps (<strong>Super</strong> <strong>Cub</strong>), elevators and rudder, come with thehinges installed, but the hinges are not glued in place. Thehinge is constructed of a special material that allows thethin CA to "wick" or penetrate and distribute throughoutthe hinge, securely bonding them to the wood structure. Itis imperative that you properly secure the hinges in placeper these instructions using high quality thin CA glue.BStep 1. Carefully remove the aileron and flap (<strong>Super</strong> <strong>Cub</strong>) fromone of the wing panels, noting the position of the hinges. TheHanger 9 ® <strong>Cub</strong> comes with high-quality CA-type hinges.Step 2. Remove the hinges from the wing panel and place aT-pin in the center of each hinge as shown. Slide each hingeinto the wing panel until the T-pin is snug against the trailingedge of the wing panel.Step 4. Deflect the aileron and completely saturate the hingewith thin CA glue. Be sure not to deflect the aileron too far; thetop of the aileron should just touch the top of the wing trailingedge. When the hinge is glued in place there should be no morethan a 1/32" gap maintained throughout the length of the aileron.For the <strong>Super</strong> <strong>Cub</strong>, repeat the gluing process for the flap.8
Step 5. Turn the wing panel over, deflect the aileron in theopposite direction and apply thin CA to the other side of thehinges as in the previous step. Make sure the thin CA penetratescompletely into both the control surface and wing panel.Step 7. Repeat the previous Steps (1-6) for the opposite wing.Step 8. Allowing time for both wings to completely dry, firmlygrasp the wing and control surfaces and applying mediumpressure, checking that they are securely attached and cannotbe pulled apart. Use caution when gripping the wing and controlsurface, so as not to crush the structure.Step 6. Using CA remover/debonder and a paper towel, removeany excess CA glue that has accumulated on the wing or aileronsurface.Step 9. Work the aileron and flap (<strong>Super</strong> <strong>Cub</strong>) up and downseveral times to "work in" the hinges and check for propermovement.9
Section 2: Installing the Aileron and Flap ServosParts Needed• Right wing assembly• Left wing assembly• Standard Servo (2, J-3) (4, <strong>Super</strong> <strong>Cub</strong>) (JRPS537 or equivalent)• Servo Extensions (18") (JRPA101) (2)• Nylon string (36")• Y-harness (if using non-computer radio)Tools and Adhesives NeededHobby knifeDrillDrill Bit: 1/16"Phillips screwdriverThin CAMasking tapeStep 2. Install the servo hardware supplied with your radiosystem (rubber grommets and eyelets) to the servos. Attach an18" servo extension lead to the aileron servo and a 6" extensionto the flap servo as well. Secure the connectors with tape or byusing a commercial connector that prevents the servo lead andextension from pulling apart.Step 1. Locate the aileron servo opening in the bottom of thewing panel. Use a sharp hobby knife to carefully trim away thecovering over the servo opening. For the <strong>Super</strong> <strong>Cub</strong>, also openthe flap servo opening.AStep 3. Trial fit the aileron servo into the opening. Sometrimming may be required, depending on the type of servo youare using. Position the servo so that the output shaft is closerto the trailing edge of the wing.BStep 4. With the servo in place, mark the location for the servomounting screws that are used to mount the servo to the wing.10
Step 5. Use a 1/16" drill bit to drill the servo screw locationsmarked in the previous step. To strengthen the servo mountholes use a drop of thin CA in on each screw hole and allowit to cure completely before mounting the servo to themounting plate.Step 7. Once you have the string threaded through the wing, tieone end to the servo lead extension connector and carefullythread the servo wires through the wing from the servo openingto the servo lead opening in the wing root. Repeat the processfor the flap servo of the <strong>Super</strong> <strong>Cub</strong>.Step 6. Before mounting the servo, run the servo lead andextension through the wing and out of the opening provided inthe root rib. We suggest this simple method to thread the servolead and extension through the wing servo opening. Attach asmall weight (wheel collar) to a 36" length of string and drop itthrough the servo opening in the bottom of the wing. Hold thewing with the tip pointing up and fish the weight through thewing and out the servo lead opening in the wing root.Step 8. To prevent the extensions from falling back inside thewing, use masking tape to temporarily hold it in place by tapingit to the bottom of the wing.Step 9. Secure the servos to the wing with the screws providedwith your radio system.Step 10. For the opposite wing panel, aileron and flap servo,repeat Steps 1-9.Note: If using a non-computer radio, it will be necessaryto use a Y-harness to connect both aileron servos to theaileron channel of your receiver.11
Step 5. Attach the control horn to the aileron using the hardwareprovided (two long brass screws and nylon back plate) andfasten it in place with a small Phillips screwdriver. Trim off theexcess screws with a moto-tool and cut-off wheel.AStep 7. Attach one end of the linkage to the servo arm, notingthat the arm is parallel to the aileron hinge line as shown. Withthe aileron at 0-degrees deflection (taped to the trailing edge)adjust the linkage until the clevis lines up with holes in thecontrol horn and attach the clevis to the horn. Also install theclevis keepers at this time. Final adjustments will be made inSection 17, "Control Throw Recommendations."Note: Cut off the servo arms not used for the linkage.BStep 8. Repeat Steps 1–7 for the opposite wing.Step 9. Follow the same steps for installing the flap linkageof the <strong>Super</strong> <strong>Cub</strong>. Follow the radio manufacturers steps foradjusting the neutral position of the flap servo.Step 6. Locate the 4-40 aileron wire linkage (3 3 ⁄4" long,threaded at both ends). Thread a jam nut and clevis onto eachend of the wire; the clevises must be threaded on a minimum of10 turns.13
Section 4: Mounting the Wing to the FuselageParts Needed• Fuselage• Right wing assembly• Left wing assembly• Wing tube• 1/4" x 20 nylon wing bolts w/washer (2)Tools Needed• Flathead screwdriverBStep 1. Locate the aluminum wing tube and slide it into thefuselage, leaving an equal amount on either side of the fuselage.Step 3. Repeat Step 2 for the other wing panel.Step 4. Remove the wings at this time. The wing struts will beinstalled later in Section 16.Note: You will need to reinstall the wings during theinstallation of the horizontal stabilizer.Step 2. Carefully slide one wing panel onto the wing tube. Feedthe servo extension leads through the hole in the fuselage wingroot. Align the anti-rotation dowel with its hole in the fuselageand seat the wing against the fuselage. Thread a 1/4" x 20 nylonwing bolt and washer through the fuselage wing root and into thepreinstalled blind nut in the wing. Tighten the bolts finger tight.A14
Section 5: Installing the Horizontal andVertical StabilizersParts Needed• Fuselage• Wing panels• Horizontal stabilizer• Vertical finTools and Adhesives Needed• 30-minute epoxy• Sharp hobby knife• Long ruler or tape measure• Rubbing alcohol• Paper towelsStep 3. Mark the center of the stabilizer saddle at the trailingedge of the saddle.Step 1. The slots for the horizontal and vertical stabilizer arelocated in the rear of the fuselage.Step 4. Slide the horizontal stabilizer through the saddle openingand align the marks made in the two previous steps. Once youare satisfied with the alignment, carefully place a T-pin throughthe stabilizer and the saddle at the trailing edge. This will keepthe horizontal stabilizer in place during wing alignment.Step 2. Locate the horizontal stabilizer and elevator assemblyand remove the elevators and hinges. Use a felt-tipped pen/penciland ruler to mark the center of the stabilizer at the trailing edgeas shown.Step 5. Mount the wing to the fuselage and using a longruler measure the distance from the wing tip to the tip of thehorizontal stabilizers as shown in the illustration below. Carefullyadjust the horizontal stabilizer until the measurement (a) is equalon both sides, making sure to keep the marks on the stabilizerand saddle aligned.aa15
Step 6. With the horizontal stabilizer properly aligned, carefullymark the stabilizer where it meets the fuselage. Mark both the topand bottom of the horizontal stabilizer.Step 9. Locate the vertical fin and rudder assembly and removethe rudder and hinges from the fin. Trial fit the fin into the fuselageas shown, making sure to align the trailing edge of the rudderwith the fuselage. Mark the fin where it meets the fuselage.Step 7. Remove the stabilizer. Then use a sharp hobby knife tocarefully remove the covering from the center of the stabilizer,cutting 1/16" inside the lines you marked in the previous step.Use only enough pressure to cut the covering and not thewood underneath, as doing so will weaken the structure of thehorizontal stabilizer.Step 10. Remove the fin and use a sharp hobby knife to removethe covering where the fin inserts into the fuselage, cutting 1/16"inside the lines you drew in the previous step. Use only enoughpressure to cut the covering, not the wood underneath.AStep 8. Re-install the stabilizer into the fuselage. Use the linesdrawn in Step 6 to reposition the stabilizer correctly. Look frombehind the plane to make sure the horizontal stabilizer is parallelto the wing as shown in the illustration below. If any adjustmentsare required, lightly sand the stabilizer saddle to bring the horizontalstabilizer into alignment with the wing.BCorrectIncorrect16
Step 11. Re-install the fin into the fuselage to check the fit.Step 14. Use the remaining epoxy to coat the bottom of thevertical fin and the slot in the fuselage for the fin. Insert the fininto the fuselage and make sure it is fully seated in the slot. Wipeaway any excess epoxy with rubbing alcohol and paper towels.Note: Read through the remaining steps of this sectionbefore proceeding to Step 12 and have all your suppliesand parts laid out ready to install.Step 12. Remove the horizontal stabilizer and vertical fin fromthe fuselage. Mix at least 1 ounce of 30-minute epoxy and coatthe horizontal stabilizer saddle and then coat both sides of thestabilizer center section.Step 15. Check the alignment of the horizontal stabilizer withthe wing and use masking tape to secure it in place. The verticalfin should be secured perpendicular to the horizontal stabilizer(90 degrees). Use rubbing alcohol and paper towels to clean upany excess epoxy, then allow the epoxy to completely cure.AStep 13. Insert the stabilizer into the fuselage and align withthe wing. Wipe off the excess epoxy using rubbing alcohol andpaper towels.B17
Section 6: Hinging the ElevatorsParts Needed• Fuselage assembly• Left and right elevator halves• Hinges (6)Tools and Adhesives Needed• Thin CA• CA remover/debonder• T-pinsStep 2. Remove the T-pins and push the elevators up againstthe stabilizer until there is only a slight gap (1/32" or less) at thehinge line.Caution: The hinges included with the J-3 <strong>Cub</strong> are madeof a special material that allows the thin CA to "wick" orpenetrate and distribute throughout the hinge, securelybonding them to the wood structure. It is imperative thatyou properly secure the hinges in place per these instructionsusing high quality thin CA glue.Step 3. Deflect the elevators down and, using high-quality thinCA glue, completely saturate each hinge.Step 1. Locate the left and right elevator halves and CA hinges.Place a T-pin in the center of each hinge and slide the hingesinto the horizontal stabilizer until the T-pin is against the trailingedge as shown.18
Step 4. Turn the fuselage over and repeat the hinge gluingprocess by deflecting the elevators in the opposite direction andagain completely saturating each hinge with thin CA. Wipe awayany excess CA with CA remover/debonder and a paper towel.Allow the CA glue to completely dry.Step 5. Once the CA has dried, check the hinges for securityby trying to pull the elevators from the stabilizer. Use only slightpressure and be sure not to crush the wood structure of thestabilizer or elevator.AB19
Section 7: Installing the Rudder andTail Wheel AssemblyParts Needed• Fuselage assembly• Rudder• CA hinges (4)• Tail wheel assembly w/bushingTools and Adhesives Needed• Thin CA• CA remover/debonder• 6-minute epoxy• Pencil• Sharp hobby knife• Drill• Drill Bit: 3/32"• Pliers• Rubbing alcohol• Paper towelsStep 2. Temporarily install the rudder using the hinges provided.Do not glue the hinges at this time. Hold the tail wheel assemblyup to the fuselage as shown and using a pencil lightly mark thelocation where the wire will insert into the rudder. Also mark thelocation where the tail wheel bushing will insert into the back ofthe fuselage. Remove the rudder.Step 1. Locate the tail wheel assembly. Slide the wire throughthe bushing and using a pair of pliers, make a 90-degree bend1/4" up from the bushing as shown. This portion of the wire willbe inserted into the rudder. The nylon bushing will be insertedinto the back of the fuselage.AStep 3. Use a 3/32" drill bit to drill the rudder following themarks you made in the previous step. Make sure to drill straightinto the rudder. Use a sharp hobby knife to make a notch in thebottom portion of the rudder to accept the tail wheel bushing andallow the rudder to seat properly against the vertical fin.Hint: Use a piece of masking tape on the drill bit as adepth gauge to avoid drilling too deep.ABB20
Step 4. Cut a slot and V-groove in the back of the fuselage asmarked to accept the nylon tail wheel bushing. The bushingmust slide in far enough to allow the wire to line up with thehinge line of the rudder.Step 6. To permanently attach the rudder, begin by installingthe rudder hinges, placing a T-pin through the center of eachhinge as shown to keep it centered.ABStep 7. Mix at least 1/4 ounce of 6-minute epoxy and using atoothpick as an applicator, coat the inside of the hole you drilledin the rudder. Also coat the wire that inserts into the rudder. Coatthe portion of the tail wheel bushing that slides into the fuselage,as well as the slot. Use caution not to get epoxy into the tailwheel bushing or where the rudder contacts the bushing.Step 5. Test fit the rudder and tail wheel assembly to thevertical fin and make adjustments until there is only a slightgap (1/32" or less) at the hinge line. Once satisfied with the fit,remove the rudder and hinges.Step 8. Install the rudder and wipe off any excess epoxy usingrubbing alcohol and paper towels. Remove the T-pins and pushthe rudder against fin until there is only a slight gap (1/32" orless). Use masking tape to secure the rudder to the fin and allowthe epoxy to cure.21
Step 9. Once the epoxy has cured, deflect the rudder fully inone direction and saturate each hinge with thin CA. Deflect therudder in the opposite direction and again saturate each hingewith thin CA. Allow the CA to dry. Use CA remover/debonder towipe off any excess CA on the rudder hinge line.Step 10. Once the CA has completely dried, check the rudderfor security by trying to pull the rudder from the fuselage. Useonly enough pressure to test for security and be careful not todamage the wood structure of the rudder or fin.AB22
Section 8: Installing the Elevator andRudder Control HornsParts Needed• Control horn w/backplate (3)• Control horn screws (6)• Fuselage assemblyTools Needed• Drill• Drill Bit: 1/16"• Felt-tipped pen/pencil• Phillips screwdriver (medium)• RulerStep 2. Place the center of the control horn on the elevator atthe mark made in the previous step. Mark the position of thescrew holes with a felt-tipped pen or pencil. Repeat the processfor the other control horn.ABImportant: When installing the control horns, it's importantthat the holes in the horn where the pushrod attachesare directly in line with the control surface hinge line.Step 1. To locate the elevator control horn position, measureover 1" from the fuselage on the bottom right and left side of thehorizontal stabilizer. Mark the elevator as shown with a felt-tippedpen or pencil. This mark will be the center of the elevator controlhorn location.Step 3. Use a drill and 1/16" drill bit to drill the holes throughthe elevators as marked. Make sure to drill these holes parallel toeach other to allow the backplate of the horn to fit properly.23
Step 4. Attach the elevator control horns with a Phillips screwdriverusing the screws and backplate provided.Step 7. Use a drill and 1/16" drill bit to drill the holes throughthe rudder as marked. Make sure to drill these holes parallel toeach other to allow the backplate of the horn to fit properly.Step 5. Measure 1" up from the bottom left side of the rudder.Mark the location with a felt-tipped pen or pencil. This mark willserve as the center for the rudder control horn.Step 8. Attach the control horn to the left side of the rudderusing a Phillips screwdriver and the screws and backplateprovided.Step 6. Center the rudder control horn over the mark you'vejust made. Make sure the horn is positioned over the hinge line,just like you did for the elevator. Use a felt-tipped pen or pencilto mark the mounting screw hole locations on the rudder.24
Section 9: Installing the Main Landing Gear—<strong>Super</strong> <strong>Cub</strong>Note: Skip to section 9a for J-3 <strong>Cub</strong> landing gearinstallation.Parts Needed• Fuselage assembly• Main landing gear• Main landing gear bolt 4mm x 20mm (4)• 4mm washer (4)• Main wheels (2)• Axles (2)• Wheel collar w/setscrew (4)• Landing gear wires (2)• Landing gear bracket w/hardware (4)• Bungee covers• Wheel pants w/mounting hardware (2)• Plywood plate 1 1 ⁄2" square (2)Tools and Adhesives Needed• Phillips screwdriver• Hex Wrench: 1/16"• Adjustable wrench• Ratchet w/1/2" socket• 6-minute epoxy• Threadlock• Felt-tipped pen/pencil• Rubbing alcohol• Paper towelsStep 2. Mix at least 1/2 ounce of 6-minute epoxy. Spread theepoxy into the slot of the bungee and place it onto the wire asmarked in the previous step. Epoxy the thin balsa strip intothe slot of the bungee and wipe away any excess epoxy usingrubbing alcohol and a paper towel. Position the wire 90 degreesto the wire as shown. Repeat the process for the other bungeeand wire making sure to make a left and a right wire. Set themaside and allow the epoxy to cure.ABStep 1. Locate the two landing gear wires. Measure 2" from thebend of each wire and make a mark as shown. This will be thelocation of the bungee.C25
Step 3. Locate the wheel pants, axles and wheels. Slide the axlethrough the wheel and center the wheel in the wheel pant. Use afelt-tipped pen to mark the edge of the wheel pants where thebase of the axle will pass through the wheel pants as shown.Step 5. Use 6-minute epoxy to secure the plates to the wheelpants. Use the outline you traced onto the wheel pant as a guide.Allow the epoxy to completely cure before proceeding.Step 4. Locate the 1 1 ⁄2" square plywood plates (2). Center theplate on the forward mark 1/4" up from the bottom edge of thewheel pant as shown and trace the outline of the plate onto thewheel pants. Be sure to mark a left and right wheel pants.Step 6. To locate the position of the axle use a 90-degreesquare placed flat against the forward bottom edge of the wheelpant and measure 3/4" up from the forward mark you made inStep 3. Mark this location on the wheel pants.ABStep 7. Use a 5/32" drill bit to drill the axle location youmarked in the previous step. Make certain you only drill throughthe side of the wheel pant with the plywood plate.26
Step 8. Slide the axle through the hole you just drilled andmark the edges of the axle base with a felt-tipped pen. Remove theaxle and enlarge the hole using a moto-tool and router bit so theaxle base will slide through the wheel pants (approximately 1/2").Step 10. Mount the landing gear to the fuselage using the 4mmscrews and washers provided. Blind nuts have already beeninstalled. Be sure to use Threadlock on the screws to preventthem from coming loose.ABStep 11. Locate the four landing gear wire brackets, two withan L-bend and two with a V-bend. Mount the brackets using thefour small screws, washers and nuts. Use a washer under thehead of the screw and the nut. Mount the "L" bracket in theupper holes and the "V" in the lower holes near the axles.Use Threadlock on the small screws to prevent them fromcoming loose.Step 9. Secure the axles to the landing gear using a ratchet with1/2" socket and adjustable wrench.27
Step 12. Temporarily install the wheel pants and wheel. Withthe <strong>Super</strong> <strong>Cub</strong> sitting upright on the main wheels, position thewheel pants so the trailing edge is 1" from the work surface andmark the location of the mounting hole through the landing gear.Remove the wheel pants and drill a 5/32" hole through the wheelpants at the mark you just made.AStep 14. Install onto the axle in the following order: wheel pant,wheel collar, wheel, and then another wheel collar. It will benecessary to fit the parts inside the wheel pants and slide themonto the axle. Fasten the wheel pants in place using 4-40 x 3/8"button head screws through the landing gear and into the blindnut in the wheel pants. Use Threadlock and securely tighten thescrews to properly seat the blind nuts.BStep 15. Center the wheel in the wheel pants and tighten thesetscrews on the wheel collars using a 1/16" ball driver.Step 13. Using a pair of pliers and scrap piece plywood to protectthe out side of the wheel pants, press the 4-40 blind nutsinto the wheel pants as shown.Step 16. Connect the two landing gear wires using the rubberband supplied, carefully doubling the rubber band several times.Clip the landing gear wires into the brackets installed in Step 11as shown.28
Section 9a: Installing the Main Landing Gear—J3 <strong>Cub</strong>Parts Needed• Fuselage assembly• Main landing gear• Main landing gear bolt 4mm x 20mm (4)• 4mm washer (4)• Main wheels (2)• Axles (2)• Wheel collar w/setscrew (4)• Landing gear wires (2)• Landing gear bracket w/hardware (4)• Bungee coversStep 2. Mix at least 1/2 ounce of 6-minute epoxy. Spread theepoxy into the slot of the bungee and place it onto the wire asmarked in the previous step. Epoxy the thin balsa strip intothe slot of the bungee and wipe away any excess epoxy usingrubbing alcohol and a paper towel. Position the wire 90-degreesto the wire as shown. Repeat the process for the other bungeeand wire, making sure to make a left and a right wire. Set themaside and allow the epoxy to cure.ATools and Adhesives Needed• Phillips screwdriver• Hex Wrench: 1/16"• Adjustable wrench• Ratchet w/1/2" socket• 6-minute epoxy• Threadlock• Felt-tipped pen• Rubbing alcohol• Paper towelsBStep 1. Locate the two landing gear wires. Measure 2" from thebend of each wire and make a mark as shown. This will be thelocation of the bungee.C29
Step 3. Secure the axles to the landing gear using a ratchet with1/2" socket and adjustable wrench.Step 6. Locate the main wheels (2) and wheel collars withsetscrew (4). Slide a wheel collar onto the axle and secure it1/4" out from the beginning of the axle. Next slide on a wheeland another collar tight against the first wheel collar and markthe axle with a felt-tipped pen.AStep 4. Mount the landing gear to the fuselage using the fourscrews and washers provided. Blind nuts have already beeninstalled. Be sure to use Threadlock on the screws to preventthem from coming loose.BStep 5. Locate the four landing gear wire brackets, two with anL-bend and two with a V-bend. Mount the brackets using thefour small screws washers and nuts. Use a washer under thehead of the screw and the nut. Mount the "L" bracket in theupper holes and the "V" in the lower holes near the axles.Use Threadlock on the small screws to prevent them fromcoming loose.30
Step 7. Cut the axle at the mark made in the previous stepusing a moto-tool and cut-off wheel. Align the outside wheelcollar with the end of the axle and tighten the setscrew. Nextslide the inboard wheel collar against the wheel hub and tightenthe setscrew. The wheel should turn freely with no binding.Repeat Steps 6 and 7 for the opposite wheel.Step 8. Connect the two landing gear wires using the rubberband supplied, carefully doubling the rubber band several times.Clip the landing gear wires into the brackets installed in Step 5.AB31
Section 10: Mounting the EngineParts Needed• Fuselage assembly• Engine mount rails• Plywood engine spacer• 4mm x 30mm screw (8)• 4mm T-nut (4)• 4mm nut (4)• 4mm washer (12)• Nylon throttle pushrod and housing• Nylon clevis w/threaded endsStep 2. Temporarily install the engine to the rails using 4mmscrews, washers and nuts. Hold the mount up to the firewall andmark the locations for the blind nuts. Remove the engine fromthe rails.Tools and Adhesives Needed• Phillips screwdriver• Drill• Drill Bit: 7/32"• Measuring device• 6-minute epoxy• Threadlock• Felt-tipped pen/pencilNote: The J-3 <strong>Cub</strong> comes with oval shaped holes cut outin the firewall to accept the 4mm T-nuts for mounting theengine. This allows for different sized engines to be used.Note that the engine should be mounted inverted.Step 1. Locate the engine mounting rails and associated hardware.Step 3. To install the 4mm T-nuts, use a length of music wirewith an L-bend on one end. Slide a T-nut onto the wire and pullthe wire through the mount hole from inside the fuselage andalign with the marks made previously. To seat the T-nuts in thefirewall, tighten the engine mounting screws. After seating theT-nuts, carefully glue them in place using thin CA. Mount therails to firewall using the plywood spacer between the firewalland the rails, making sure to use Threadlock on the screws.ANote: You may need to elongate the holes in the plywoodplate to accommodate the width of your engine.B32
Step 4. Loosely mount the engine to the rails and measure6 1 ⁄4" from the firewall to the prop drive washer of the engine.Secure the engine to the rails by tightening the mountinghardware, (4 each 4mm x 30mm screws and nuts, 8 each 4mmwashers). Mark the location of the engine on to the mount witha permanent marker. Use these marks to properly reposition theengine if it needs to be removed in the future.Note: Use Threadlock on the engine mounting screws.Step 2G. Locate the center of the plywood mounting adapterand draw a vertical line as shown. Align the adapter plate withthe top of the firewall and the two lines on the firewall andadapter plate. Using the adapter plate as drill guide, drill throughthe firewall at the four small mounting hole locations using a5/32" drill bit.AABBImportant: Use steps 1G through 5G for installation ofthe Zenoah ® G23 Gas Engine.Note: When installing the Zenoah G23 gasoline engine, itwill be necessary to drill holes in the firewall for mountingthe engine.Step 3G. To install the 4mm T-nuts in the firewall, use a lengthof music wire with an L-bend on one end. Slide a T-nut ontothe wire and pull the wire through the mount holes drill in theprevious step from inside the fuselage. To seat the T-nuts in thefirewall, tighten the engine mounting screws. After seating theT-nuts, carefully glue them in place using thin CA.AStep 1G. To establish the proper engine offset, use a felt-tippedpen and place a mark halfway between the top two existingmount holes. Follow the same procedure for the lower holes.Connect the two marks with a straight edge to establish theproper offset.B33
Step 4G. The plywood adapter mount replaces the metal one onthe G23 motor and is used to mount the motor to the firewall.Remove the metal motor plate from the G-23 and replace itwith the plywood motor mount, using 5mm x 30mm countersunk screws.Step 6. Test fit the throttle pushrod housing through the firewalland into the fuselage. Once satisfied with the fit, mix 1/4 ounce of6-minute epoxy and glue the housing into the firewall. Allow theepoxy to cure. If you removed the engine to install the throttlepushrod housing, reinstall it at this time while the epoxy cures.Note: The holes on the backside of the plywood motormount are counter sunk for the screws. The bolt pattern ofthe counter sunk holes matches the screw locations on theG23 engine. When mounted, the plywood motor mountshould fit flush against the firewall.Step 7. Install the mounting hardware on the throttle servo,supplied with your radio system (rubber grommets and eyelets).Fit the servo into the servo plate on the side where the throttlepushrod tube is located and mark the four servo mounting screwlocations.Step 5G. Mount the engine and adapter plate to the firewallusing the 4mm x 35 mm screws. Use Threadlock on themounting screws to prevent them from coming loose in flight.(Go to Step 5)Step 8. Remove the servo and use a 1/16'' drill bit to drill thefour screw locations previously marked. To strengthen the servomount holes, use a drop of thin CA on each screw hole andallow it to cure completely before mounting the servo to themounting plate.AStep 5. Determine the proper location for the throttle pushrod.Mark the location with a felt-tipped pen or pencil and use a drilland 7/32'' drill bit to drill the firewall for the pushrod housing.Remove the engine if necessary.B34
Step 9. With your servo arm 90-degrees to the throttlepushrod tube, measure forward 1'' and make a mark. Cut thetube at that mark.Step 12. Locate the threaded Z-bend rod end and thread itcompletely into the throttle pushrod. Remove the clevis fromthe other end of the pushrod and slide the pushrod throughthe tube from the servo end. Connect the Z-bend to the throttleservo and thread the clevis back onto the other end of thethrottle pushrod and connect it to the throttle arm. Be sure touse a clevis keeper on the clevis to prevent it from becomingdisconnected during flight.AStep 10. Locate the inner (smaller) throttle pushrod tube, brassthreaded rod end and nylon clevis. Thread the brass end into thethrottle tube approximately half way and then thread the clevis ona minimum of 12 full turns. This will be the end of the throttlepushrod that connects to the engine.BStep 11. Slide the throttle pushrod through the tube and connectthe clevis to the throttle arm of the engine. With the throttle servoand carburetor set to half throttle, mark the pushrod with a felttippedpen where it crosses the servo arm. Remove the pushrodand measure 7/8'' from the mark you made and cut the pushrod.AB35
Section 11: Assembly and Installationof the Fuel TankParts Needed• Clunk (fuel pickup)• Fuel pickup tubing• Fuel tank• Plastic caps (2)• Rubber stopper (gas/glow)• 3mm screw and nut• Fuel tubing (3 ft)Tools and Adhesives Needed• Hobby knife• Phillips screwdriverStep 3. Locate the tank stopper and insert the 2" metal fueltube into one of the open holes in the stopper so that an equalamount of tube extends from each side of the stopper. This tubewill be the fuel tank pickup that provides fuel to the engine.Note: The stopper provided with the J-3 <strong>Cub</strong> can be usedfor gasoline or glow fuel. Also provided are two types offuel tubing used for the clunk attachment inside the tank,neoprene (black) for gas engines and silicone (blue) forglow fuel engines. You will need to supply 3 feet of theappropriate fuel tubing for your engine selection.Step 1. Locate the fuel tank and related parts.Step 4. Slide the smaller of the two caps over the tube on thesmaller end of the tank stopper. The small end will be insertedinto the fuel tank. The larger cap is placed on the other side ofthe stopper. Loosely install the 3mm screw through the large capand stopper and into the small cap and nut.Step 2. Cut one of the metal fuel tubes to an overall length of2" with a tubing cutter. You can also cut the metal tubing with asharp hobby knife, carefully rolling it back and forth over a hardsurface using medium pressure until it breaks. De-bur the end ofthe tubing after it is cut.Step 5. Locate the other metal fuel tube and bend it usingyour fingers as shown. This will be the fuel tank vent tube. Usecaution not to kink the metal tubing.36
Step 6. Slide the vent tube into one of the two remaining holesin the stopper from the tank (small cap) side.Step 9. Tighten the 3mm screw carefully; do not over tighten.This allows the rubber stopper to form a seal by being slightlycompressed, thus sealing the fuel tank opening.Important: Be sure to differentiate between the vent andthe fuel pick-up tube. Once the tank is mounted inside thefuselage, it will be difficult to tell the tubes apart.Step 7. Locate the short piece of fuel tubing and the fuel tankclunk. Install the clunk onto one end of the tubing and the otherend onto the fuel tank pickup tube (straight tube) in the stopper.Caution: Use the appropriate fuel tubing for the type ofengine you are using.Step 10. Cut two lengths of fuel line (gas or glow to matchengine choice) 18 inches long. Attach the tubing to the fueltanks supply and vent tubes. Use masking tape marked with an"S" (Supply) and "V" (Vent) for identification on the ends of thefuel lines.Step 8. Carefully insert the assembly into the fuel tank. Note theposition of the vent tube. It must be at the top portion of the fueltank to function properly. Also, it may be necessary to shortenthe length of the fuel pickup tubing to make sure the clunk doesnot rub against the back of the fuel tank. The clunk should movefreely in all directions.37
Step 11. Feed the marked fuel line through the opening in thefirewall and slide the tank into place in the front of the fuselage.Use RC foam placed around the fuel tank to isolate it fromvibration and hold the tank in place. For added security, youmay wish to use eyehooks and rubber bands to hold the tankin place.BANote: If using a gasoline engine in your plane, you willneed to drill through the firewall to run the fuel lines tothe engine.38
Section 12: Installing the Radio EquipmentParts Needed• Fuselage assembly• Radio system (4-channel minimum)• Standard Servo w/hardware (2) (JRPS537 or equivalent)• RC foam• Antenna tube (optional)Tools and Adhesives Needed• Thin CA• Drill• Drill Bit: 1/16"• Phillips screwdriver• Masking tape• Felt-tipped pen/pencilStep 3. Use a drill and 1/16" bit to drill pilot holes for the twoservos marked in the previous step. To strengthen the servomount holes, use a drop of thin CA in each screw hole andallow it to cure completely before mounting the servo to themounting plate.Step 1. Install the mounting hardware on the elevator and rudderservos supplied with your radio system (rubber grommets andeyelets). Trial fit the servos into the preinstalled servo tray in thefuselage.Step 4. Secure the servos in place with the screws providedwith your radio system.Step 2. With the servos positioned as shown, mark the locationfor the screw mounting holes.Step 5. Locate the position of the switch, making sure to mountthe switch in the balsa sheeting of the fuselage and not throughthe plywood doublers. Remove the switch plate and mark thelocation of the screw holes as well as the opening for the switch.Drill the screw holes with a 1/16" bit. Use a sharp hobby knife tocarefully cut out the opening for the switch.39
Step 6. Attach the switch to the fuselage using the two screwssupplied with the switch. Plug in the switch to the receiver andreceiver battery. Be sure it is off as you proceed with the constructionsequence.Step 8. Use radio packing foam (not included) to install thereceiver and battery. With a sharp hobby knife, cut three layers offoam the size of the compartment that is in front of the servo tray.Cut out an area to accept the receiver and battery in the centerlayer of foam.Step 7. Attach the servo leads to the receiver prior to installingthe receiver in the radio packing foam. The servos from left toright are rudder, elevator and throttle. Route the antenna backthrough the fuselage using an antenna tube (not included) orroute it outside the fuselage.Step 9. Place the precut foam layers with the battery andreceiver in place in the front compartment of the fuselage.Secure the battery and receiver in the foam by tack-gluing apiece 1/8" ply between the fuselage sides using CA glue.40
Section 13: Installing the Rudder andElevator LinkagesParts Needed• Fuselage• 12" threaded 4-40 rods (3)• 6" threaded 4-40 rods (2)• Wood pushrods (25 1 ⁄8") (2)• String• 4-40 clevis (5)• 4-40 nuts (5)• Clevis clips (5)Tools and Adhesives Needed• 6-minute epoxy• Hobby knife• Masking tape• Ruler• Drill• Drill Bit: 1/8"• Pliers: standard and side cut• Felt-tipped pen/pencilStep 3. Locate two 12" 4-40-wire pushrods threaded on oneend. Using a felt-tipped pen, measure and mark them at 8 1 ⁄2"from the threaded end. Align these marks with the end of woodenpushrod where the holes are drilled from Step 2. Mark the wireswhere they cross over the holes drilled in the pushrod. The 4-40wires will be glued on to the opposite sides of the woodenpushrod to create a "Y" for controlling the elevators.AStep 1. To construct the elevator pushrod, locate one of thehardwood pushrods (25 1 ⁄8"). Measure in 2" from one end andmake a mark centered on the pushrod. Make another mark at 3"on the same end of the pushrod.BStep 2. Use a 3/32" drill bit to drill through the pushrod at themarks made in the previous step. Make sure these holes aredrilled parallel to each other.Step 4. Use pliers to make a 90-degree bend in the wires atthe mark made in the previous step. Next, measure 1/4" from the90-degree bend and cut off the excess wire using side cutters ora Dremel tool and cut-off wheel.41
Step 5. Carefully cut a groove approximately 1/16" deep intothe wooden pushrod from the hole to the end of the pushrod,one on either side of the wooden pushrod. This will help securethe wire in place. Use a Dremel tool and cut-off wheel oruse both sides of the wire as a guide and hold the knife at a45-degree angle to cut a V-groove.Step 7. To construct the rudder pushrod, locate the other hardwoodpushrod (25 1 ⁄8"). Measure in 3" from one end and make amark centered on the pushrod. Use a 3/32"drill bit to drillthrough the pushrod at the mark you just made.ABStep 8. Locate the remaining 12" 4-40-wire pushrod threadedon one end. Use a felt-tipped pen to mark it at 8 1 ⁄2" from thethreaded end. Align the mark with the end of wooden pushrodwhere the hole is drilled from the previous step. Mark the wirewhere it crosses over the hole.AStep 6. Locate the included string and cut it to four equallengths. Mix 1/4 ounce of 6-minute epoxy and coat both wiresand the wooden pushrod end. Be sure to get epoxy down intothe holes. Install the wires and secure them in place by wrappingthe string around the pushrod assembly and tie it off. Make surethe wires are seated down in the groove of the pushrod. Coatthe string with epoxy and set the assembly aside while theepoxy cures.B42
Step 9. Use pliers to make a 90-degree bend in the wirewhere marked in the previous step. Next, measure 1/4" from the90-degree bend and cut off the excess wire using side cutters ora Dremel tool and cut-off wheel.Step 12. At the rear of the fuselage there are precut slots for theelevator and rudder pushrods. They were covered up during thecovering process. Use a sharp hobby knife to carefully removethe covering around the exit holes. Open up the top two for thesplit ("Y") elevator pushrod and the bottom left for the rudderpushrod.AStep 10. Carefully cut a groove approximately 1/16" deep intothe wooden pushrod from the hole to the end of the pushrod tohelp secure the wire in place. Use a Dremel tool and cut-offwheel or use both sides of the wire as a guide and hold the knifeat a 45-degree angle to cut a V-groove.BStep 11. Mix 1/4 ounce of 6-minute epoxy and coat the wireand the wooden pushrod end. Be sure to get epoxy down intothe hole. Install the wire and secure it in place by wrapping oneof the remaining strings around the pushrod assembly and tie itoff. Make sure the wire is seated down in the groove of thepushrod. Coat the string with epoxy and set the assembly asidewhile the epoxy cures.Step 13. Spread the elevator control wires 2" apart and carefullyslide them through the fuselage and out the exit holes in the rearof the fuselage. Thread a 4-40 clevis onto each of the threadedcontrol wires at least 10 turns and connect them to the controlhorns on the elevators.43
Step 14. Locate one of the 6" 4-40 wire threaded on one endand thread a 4-40 clevis on at least 10 turns. Use masking tapeto hold the elevators at their neutral position. With the elevatorservo set at the neutral position, place one of the 6" wires andclevis in the outer hole of the elevator servo arm. Align theelevator control rod and 6" wire, marking the wire where itmeets the end of the wooden elevator pushrod. Remove theclevis and wire from the elevator servo arm and the elevatorcontrol rod from the fuselage.Step 17. Align the mark with the end of wooden pushrod wherethe hole is drilled from the previous step. Mark the wire where itcrosses over the hole. Use pliers to make a 90-degree bend inthe wire where you just marked. Next, measure 1/4" from the90-degree bend and cut off the excess wire using side cuttersor a Dremel tool and cut-off wheel.Step 15. Repeat Step 14 for the rudder control rod.Step 18. Carefully cut a groove approximately 1/16" deep intothe wooden pushrod from the hole to the end of the pushrod tohelp secure the wire in place. Use a Dremel tool and cut-offwheel or use both sides of the wire as a guide and hold the knifeat a 45-degree angle to cut a V-groove.Step 16. Measure 2" from the end of the wooden elevatorcontrol rod and make a mark. Use a 1/8" drill bit to drill a holethrough the wooden rod perpendicular (90 degrees) to the holesdrilled in the other end.Step 19. Mix 1/4 ounce of 6-minute epoxy and coat the wireand the wooden pushrod end. Be sure to get epoxy down intothe hole. Install the wire and secure it in place by wrapping oneof the two remaining strings around the pushrod assembly andtie it off. Make sure the wire is seated down in the groove of thepushrod. Coat the string with epoxy and set the assembly asidewhile the epoxy cures.44
Step 20. Repeat Steps 17 through 19 for the rudder controllinkage. Once the epoxy has cured, reinstall the elevator andrudder control linkages connecting them to the control surfacehorns and respective servo arms. Use the 4-40 nuts and clevisto secure each clevis to the control horns.BA45
Section 14: Attaching the CowlParts Needed• Fuselage assembly• Cowl• Mounting screws (4)• Cowl mounting blocks (4) (<strong>Super</strong> <strong>Cub</strong>)Tools and Adhesives Needed• Moto-tool with cut-off wheel and sanding drum• Hobby knife• Felt-tipped pen/pencil• Masking tapeStep 2a. (J-3 <strong>Cub</strong>) Looking at the firewall notice the plywoodfuselage doublers extending out on both sides of the fuselage.Measure 1" from the top of the doubler and make a mark. Makeanother mark at 3 1 ⁄2" from the top. Measure in 3/8" from thefront of the fuselage at the marks. This will be the location of the4-40 T-nuts. (Go to Step 3a.)AStep 1. Trial fit the cowl to the fuselage. Noting where theengine cylinder head hits the cowl. Use a moto-tool to carefullytrim away the fiberglass to allow the cowl to slide on to thefuselage. Remove the cowl.BStep 2. (<strong>Super</strong> <strong>Cub</strong>) Looking at the firewall, notice the plywoodfuselage doublers extending out on both sides of the fuselage.Measure 3/4" from the top of the doubler and make a mark.Make another mark at 3 1 ⁄4" from the top. This will be thelocation of the top of the mounting blocks.Step 3. (<strong>Super</strong> <strong>Cub</strong>) Align the top edge of the blocks with themarks made in Step 2. The taller block is in the upper locationand the shorter block in the lower. Trace around the outside ofthe block and carefully remove the covering at each blockslocation. (Go to Step 4.)46
Step 3a. (J-3 <strong>Cub</strong>) Use a 1/8" drill bit to drill the locationsmarked in Step 2a. Install the T-nuts into the holes and seatthem using a scrap piece of plywood and pliers. Secure theT-nuts in place with a few drops of CA to prevent them fromfalling out.Step 5. Using an old folder or card stock, cut four stripsapproximately 2" wide and make a 1/8" hole in one end. Alignthe hole in the card with the T-nut and tape the strips to thefuselage. Carefully slide the cowl into place and with the cowlaligned properly, mark the four hole locations onto the cowl.Step 4. With the covering removed, mix 1/4 ounce of 6-minuteepoxy and glue the mounting blocks in place on both sides ofthe fuselage. Hold the blocks in place with masking tape whilethe epoxy cures.Step 6. Use a 1/8" drill bit to carefully drill the four cowlmounting screw locations.ANote: The blocks are angled and should conform to theshape of the cowl. Before gluing the blocks in place,double-check for the correct angle.Step 7. Mount the cowl using the 4-40 button head screwsprovided.B47
Section 15: Attaching the Windshield, SideWindows, and Overhead WindowParts Needed• Fuselage assembly• Windshield• Side windows• Top hatchTools and Adhesives Needed• Canopy scissors• Drill• Drill Bit: 1/16"• Phillips screwdriver• Canopy glue• Masking tapeStep 3. Trial fit the side windows to the fuselage, trimming thewindows where needed. Once satisfied with the fit, remove thewindows and run a bead of canopy glue around the edges andre-install the windows. Wipe away any excess glue with waterand paper towels. Use masking tape to hold the window in placeas the glue dries.Step 1. Using the cut line etched into the windshield as aguide, trim the windshield using scissors. Trial fit the windshieldto make sure it will fit properly.Step 4. Locate the four preinstalled T-nuts in the top cabin windowopening and remove the covering. Align the hatch/windowover the opening in the top of the fuselage and mark the locationof the holes onto the window/hatch.Step 2. When you are satisfied with the fit, run a small bead ofcanopy glue around the windshield. Tape in place and allow theglue to dry. For added security use the small wood screws providedalong the top and sides of the windshield. Use a 1/16" drillbit to make pilot holes through the windshield.Step 5. Drill a 1/8" hole at each of the four marks and securethe window/hatch to the fuselage using the 4-40 button headscrews provided.48
Section 16: Installing the Wing StrutsParts Needed• Fuselage assembly• Right and left wing panels w/wing tube• Precovered right and left wing struts• 4-40 button head screws (6)• 4-40 washers (8)• 4-40 nuts (2)Tools and Adhesives needed• Hex Driver: 1/16"• ThreadlockStep 3. Mount the wing panels to the fuselage as outlined insection four of this manual. Install the wing struts using the4-40 button head screws and washers provided. Do not tightenthe button head screws at this time.Note: The wing struts on the <strong>Hangar</strong> 9 ® <strong>Super</strong> <strong>Cub</strong> and J3<strong>Cub</strong> are not functional. The plane can be flown with thestruts removed.Step 1. Locate the precovered wing struts and mountinghardware.Step 4. Using the 4-40 button head screws, nuts and washersprovided, secure the wing strut to the landing gear through thesmall hole in the rear portion of the landing gear. You may wishto use a small amount of Threadlock to prevent the screws fromcoming loose in flight.Step 2. Locate the wing strut mounting points located in eachwing panel. The blind nuts for the mounting screws have beeninstalled at the factory.Note: Each wing panel has two sets of holes on eitherside of the aileron servo. The holes on the outside are forthe 4-40 mounting screws and the holes on the inside arefor the wire braces. The wire braces do not attach to thewing; they float in the holes provided.Step 5. Tighten the 4-40 button head screws (4) on the bottomof the wing panels.Wire Brace HolesMounting Holes49
Section 17: Balancing and ControlThrow RecommendationsCaution: Do not skip these steps!Recommended CG LocationAn important part in preparing your <strong>Hangar</strong> 9 ® <strong>Super</strong> <strong>Cub</strong>/J3<strong>Cub</strong> aircraft for flight is properly balancing the model. This isespecially important when various engines are mounted.The recommended Center of Gravity (C.G.) location for the<strong>Hangar</strong> 9 <strong>Super</strong> <strong>Cub</strong> and J3 <strong>Cub</strong> is 4 3 ⁄4" to 5" behind theleading edge of the wing measured at the fuselage sides.If necessary, move the battery pack or add weight to either thenose or the tail until the correct balance is achieved. Stick-onweights are available at your local hobby shop and work wellfor this purpose.Recommended Control ThrowsAileron .....................................................Elevator ....................................................Rudder .......................................................Flaps (<strong>Super</strong> <strong>Cub</strong>) ................................................Flap/Elevator Mix(<strong>Super</strong> <strong>Cub</strong>) .....................5/8" up, 1/2" down7/8" up, 7/8" down1 1 ⁄2" right and left1 1 ⁄2"down3/8" down at full (1 1 ⁄2") down flapThe following control throws offer a good place to start with yourfirst flights on the <strong>Hangar</strong> 9 <strong>Super</strong> <strong>Cub</strong>/J3 <strong>Cub</strong>. We recommendonly one rate setting for both the <strong>Super</strong> <strong>Cub</strong> and J3 <strong>Cub</strong>. As youbecome more familiar with the handling of your model, you maywish to add a second rate setting.Section 18: Preflight at the Field1. Before each flying session, be sure to range check your radio.This is accomplished by turning on your transmitter with theantenna collapsed. Turn on the radio in your airplane. With yourairplane on the ground, you should be able to walk 30 pacesaway from your airplane and still have complete control of allfunctions. If not, don't attempt to fly! Have your radio equipmentchecked out by the manufacturer.2. Double-check that all controls (aileron, elevator, throttle,rudder, etc.) move in the correct direction.3. Be sure that your batteries are fully charged, per theinstructions included with your radio.4. Completely read the instructions included with your engineand follow the recommended break-in procedure. At the fieldadjust the engine to a slightly rich setting at full throttle andadjust the idle and low-speed needle so that a consistent idle isachieved. Before you fly, be sure that your engine reliably idles,transitions, and runs at all throttle settings. Only when this isachieved should any plane be considered ready for flight.50
AMA National Model Aircraft Safety Code EffectiveJanuary 1, 2001Model flying must be in accordance with this code in order forAMA Liability Protection to apply.General1. I will not fly my model aircraft in sanctioned events, air shows,or model flying demonstrations until it has been proven airworthyby having been successfully flight tested previously.2. I will not fly my model higher than approximately 400 feetwithin 3 miles of an airport without notifying the airportoperator. I will give right-of-way and avoid flying in theproximity of full-scale aircraft. Where necessary, an observershall be utilized to supervise flying to avoid having modelsfly in the proximity of full-scale aircraft.3. Where established, I will abide by the safety rules for theflying site I use, and I will not willfully and deliberately flymy models in a careless, reckless, and/or dangerous manner.4. At all flying sites a straight or curved line(s) must beestablished, in front of which all flying takes place and theother side designated for spectators. Only personnelinvolved with flying the aircraft are allowed in front ofthe flight line. Flying over the spectator side of the line isprohibited, unless beyond the control of the pilot(s). In anycase, the maximum permissible takeoff weight of the modelswith fuel is 55 pounds.5. At air shows or model flying demonstrations, a singlestraight line must be established, one side of which is forflying and the other side designated for spectators. Onlythose persons accredited by the contest director or otherappropriate officials as necessary for flight operations orhaving duties or functions relating to the conduct of theshow or demonstration are to be permitted on the flyingside of the line. The only exceptions which may be permittedto the single straight line requirements, under specialcircumstances involving consideration of site conditionsand model size, weight, speed, and power, must be jointlyapproved by the AMA President and the Executive Director.6. Under all circumstances, if my model weights over 20pounds, I will fly it in accordance with paragraph 5 of thissection of the AMA Safety Code.7. I will not fly my model unless it is identified with my nameand address or AMA number on or in the model. (This doesnot apply to models while being flown indoors.)8. I will not operate models with metal-bladed propellers orwith gaseous boosts, in which gases other than air entertheir internal combustion engine(s); nor will I operate modelswith extremely hazardous fuels, such as those containingtetranitromethane or hydrazine.9. I will not operate models with pyrotechnics (any devicethat explodes, burns, or propels a projectile of any kind)including, but not limited to, rockets, explosive bombsdropped from models, smoke bombs, all explosive gases(such as hydrogen-filled balloons), or ground-mounteddevices launching a projectile. The only exceptions permittedare rockets flown in accordance with the National ModelRocketry Safety Code or those permanently attached (as perJATO use); also those items authorized for Air Show Teamuse as defined by AST Advisory Committee (documentavailable from AMA HQ). Models using rocket motors as aprimary means of propulsion are limited to a maximumweight of 3.3 pounds and a G series motor. (A model aircraftis defined as an aircraft with or without an engine, not ableto carry a human being.)10. I will not operate any turbo jet engine (axial or centrifugalflow) unless I have obtained a special waiver for suchspecific operations from the AMA President and ExecutiveDirector, and I will abide by any restriction(s) imposed forsuch operation by them. (This does not apply to ducted fanmodels using piston engines or electric motors.)11. I will not consume alcoholic beverages prior to nor duringparticipation in any model operations.Radio Control1. I will have completed a successful radio equipment groundrange check before the first flight of a new or repaired model.2. I will not fly my model aircraft near spectators until I becomea qualified flier, unless assisted by an experienced helper.3. I will perform my initial turn after takeoff away from the pitor spectator areas, and I will not thereafter fly over pit orspectator areas, unless beyond by control.4. I will operate my model using only radio control frequenciescurrently allowed by the Federal Communications Commission.(Only properly licensed amateurs are authorized to operateequipment on Amateur Band frequencies.)5. I will not knowingly operate an R/C system within 3 milesof a pre-existing model club flying site without a frequencysharingagreement with that club.6. Models flown in air-to-air combat are limited to maximumtotal engine displacement of .30 cubic inches and a maximumdry weight prior to flying of 4 pounds.7. An RC racing event, whether or not an AMA Rule Bookevent, is one in which model aircraft compete in flight overa prescribed course with the objective of finishing thecourse faster to determine the winner.AMA National Model Aircraft Safety CodeOrganized RC Racing EventA. In every organized racing event in which contestants,callers,and officials are on the course:1. All officials, callers and contestants must properlywear helmets which are OSHA, DOT, ANSI, SNELL, orNOCSAE approved or comparable standard while onthe race course.2. All officials must be off the course except for thestarter and his/her assistant.3. “On the course” is defined as any area beyond thepilot/staging area where actual flying takes place. B. Iwill not fly my model aircraft in any organized racingevent which does not comply with paragraph A aboveor which allowsmodels over 20 pounds unless thatcompetition event is AMA sanctioned.Note: Refer to AMA Headquarters for Free Flight,Control Line, boat, car, and rocket safety codes.Academy of Model Aeronautics5161 East Memorial DriveMuncie, Indiana 47302-925251
52J-3 and <strong>Super</strong> <strong>Cub</strong>Front Cabin Floor3mm Lite-Ply
Notes53
54J-3 and <strong>Super</strong> <strong>Cub</strong>Rear Cabin Floor3mm Lite-Ply
Notes55
© Copyright 2002, Horizon Hobby, Inc.(217) 355-95114728
Section 1: Hinging the Ailerons and Flaps57


