User manual - Bellman & Symfon
User manual - Bellman & Symfon
User manual - Bellman & Symfon

You also want an ePaper? Increase the reach of your titles
YUMPU automatically turns print PDFs into web optimized ePapers that Google loves.
BELLMAN AUDIO DOMINODEDKENESFIFRITJPNLPLSESI-CNTR-CNAPPPERSONAL HEARING SYSTEM
Contents50 Contents51 Introduction52 Figure references54 Getting started54 Testing55 Accessories56 What is in the box?57 How to use <strong>Bellman</strong> AudioDomino58 Symbols and indicators59 Charging60 Using the Receiver Unit60 Switching on the Receiver Unit60 Selecting the sound volume61 Selecting the tone61 Using the Transmitter Unit61 Switching on the Transmitter Unit62 Listening via the Transmitter Unit62 Listening on the Receiver Unit’smicrophone again63 Switching off63 Choice of microphones64 Choice of microphone on theReceiver Unit64 Choice of microphone on theTransmitter Unit65 External sound source65 External microphone66 Combined signal sources67 Wireless digital transfer68 Battery indicator68 Establishing a temporary linkwith another Transmitter Unit70 Troubleshooting in brief72 Safety regulations314 Appendix332 Areas of application340 Warranty card50
<strong>Bellman</strong> Audio DominoPersonal Hearing System, BE2210/BE2230IntroductionThank you for choosing products from <strong>Bellman</strong> & <strong>Symfon</strong>.<strong>Bellman</strong> Audio is an assistive listening system. The system consists of a numberof units which facilitate listening under different circumstances. <strong>Bellman</strong> Audioproducts make everyday life easier for many people and give them the freedomto freely pursue their interests.<strong>Bellman</strong> Audio Domino comprises easy-to-use wireless audio products whichhave been specially developed to help in circumstances where listening is difficult.The use of the latest technology in digital signal processing, encryptionand wireless technology provides you with fantastic sound quality, secure andreliable radio transmission and great flexibility in how you use the system. Theradio solution used and the flexible battery charging ensure that the productscan be used safely and easily throughout the world.Read through the entire user <strong>manual</strong> before starting to use the product. Referto the diagrams showing the accessories and connection options.DEDKENESFIFRITJPNLPLSESI-CNTR-CNAPP51
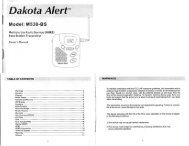
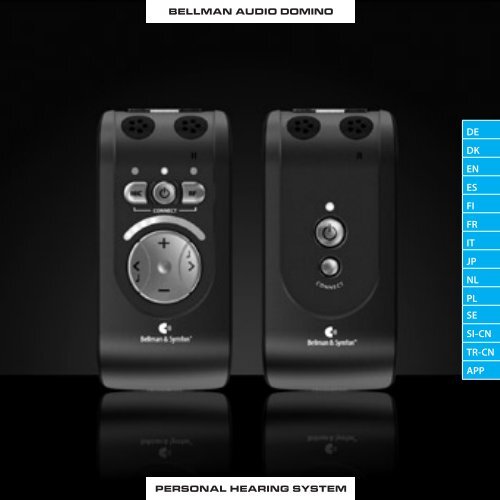
Figure referencesReceiver unit1 Internal microphone forReceiver Unit2 Internal microphone setting LEDGreen: Omnidirectional microphoneOrange: Directional microphone3 Battery status LEDGreen: Switched on with wellcharged batteryBlinking Green: Switched on but thebattery charge is lowBlinking Orange: Switched on withflat battery - will soon switch itselfoffOrange: Charging4 LED for listening via transmitterGreen: Omnidirectional microphoneOrange: Directional microphoneOrange and Green: Line in (externalsound source)5 Button for selecting internalmicrophone6 On/off button7 Button for selecting listening viatransmitter8 Volume and Tone LED Indicator9 Button for increasing sound level10 Button for reducing sound level11 Button for reducing treble12 Button for increasing treble52
13 Headphone output 3.5 mm jackplug14 Charging socket15 ClipTransmitter unit16 Internal microphone for TransmitterUnit17 Battery status LEDGreen: Switched on with wellcharged batteryBlinking Orange and Green severaltimes: An external sound source hasbeen connectedBlinking Green: Switched on butthe battery charge is lowBlinking Orange: Switched on withflat battery - will soon switch itselfoffOrange: Charging18 On/off button19 Button for pairing up TransmitterUnit with Receiver Units20 External sound source input2.5 mm jack plug21 Charging socket22 ClipDEDKENESFIFRITJPNLPLSESI-CNTR-CNAPP53
Getting startedTesting1 Both the Transmitter and Receiver Units are supplied with built-in rechargeablebatteries. The batteries in both the Transmitter and Receiver Units must be fullycharged before using the products for the first time. Please use the chargersupplied.2 Connect the Headphones to the headphone output (13) and switch on theReceiver Unit with the On/Off button i (6). Listen to the Receiver Unit’s microphoneand adjust the volume using the Volume Buttons + or - (9 or 10).3 Switch on the Transmitter Unit using the On/Off button i (18) and switchover to listen via the Transmitter Unit’s microphone by pressing the externalsound button (7). If you connect the Transmitter Unit Sound Input (20) to theheadphone output on an external sound source, you can, for example, listen tomusic via the Transmitter.The Receiver Unit always starts with the internal microphone (1) selected as asound source. In addition, the volume control is always set to low volume toavoid unpleasant sound levels.The volume control adjusts the sound level. + (9) raises and - (10) lowers54
the volume while the Volume and Tone LED Indicator (8) shows the sound level.The more LEDs that are lit the higher the volume. The LED indicator goes out 5seconds after the sound volume has been set.The tone control adjusts the sound quality. > (12) increases and < (11) reducesthe treble. The Volume and Tone LED Indicator (8) shows the tone setting. TheLED indicator goes out 5 seconds after the sound quality has been set.When you have finished, you can switch off the Transmitter and Receiver Unitsby pressing the On/Off buttons i (6, 18) and holding them down until the BatteryStatus LEDs (3, 17) go out.AccessoriesThe following accessories are available:• BE9122 Stereo headphones• BE9124 Ear phones• BE9125 Stetoclips• BE9126 Stereo Cable Kit, 5m (16 feet)• BE9127 External microphone, 5m (16 feet)• BE9128 Neck loop• BE9143 USB car charger• BE1360 Scart switch boxDEDKENESFIFRITJPNLPLSESI-CNTR-CNAPPFor all accessories and for more information about the latest accessories pleasevisit our website at http://www.bellman.com.55
What is in the box?The box contains everything you normally need in order to use <strong>Bellman</strong>Audio Domino. There are storage areas in the lining of the box for accessoriessupplied with the equipment. The box contains:ABCDEFGHIJKBE2210 Receiver unitBE2230 Transmitter unitBE9141 Travel case<strong>User</strong> <strong>manual</strong>Pocket Reference GuideBE9142 Universal charger with 4 mains plugsBE9139 Charging cable, USB (2 off)BE9136 Microphone with clipBE9137 Stereo cable, 1. 5 m with adapter from 3. 5 mm jack to RCA (phono) connec torsBE9135 Neck strap with safety clasp (2 off)BE9124 In-ear Phones56
How to use <strong>Bellman</strong> Audio DominoThe BE2210 and BE2230 <strong>Bellman</strong> Audio Domino Personal Hearing Systems arepersonal hearing systems which have been specifically developed to providean excellent sound experience even in demanding situations. <strong>Bellman</strong> AudioDomino works extremely well for speech and music. You can use the built-inmicrophones in the Receiver Unit and the Transmitter Unit or use an externalsound source. You can use the external microphone supplied as an externalsound source or connect the Stereo Cable Set supplied to a stereo soundsource.DEDKENESFIFRITJPNLPLSESI-CNTR-CNAPP57
Symbols and indicatorsThe following symbols are used in the user <strong>manual</strong> and can be explained asfollows:The warning triangle indicates information which must be followed in orderto guarantee operation and also in some cases to ensure personal safety.The light bulb (tip, note) indicates information which can be useful to helpyou get the most out of the product.IIIIII5 sIVIIIA permanently lit LED is indicated by a solidindicator.A blinking LED is indicated by a sunlike solidindicator.IIIIndicators that are switched off are indicated byan empty circle.VIVVIf a button must be held down for more than acertain time, this is indicated by a blue buttonand a stop watch symbol with a figure whichcorresponds to the number of seconds that thebutton must be held down for.Button presses are marked in blue on the specifiedbutton.58
ChargingBoth the Transmitter and Receiver Units are supplied with built-in rechargeablebatteries. The batteries in both the Transmitter and Receiver Units must becharged before using the products for the first time.<strong>Bellman</strong> Audio Domino contains Lithium-Ion batteries and a universal chargerwith plugs for the EU, United Kingdom, USA and Australia to suit the majority ofwall sockets used around the world.Warning: The product may only be charged with the charger supplied orusing accessories from <strong>Bellman</strong> & <strong>Symfon</strong>.Connect the charger as illustrated in the fold-out section of the <strong>manual</strong>.Select the mains plug for the appropriate region and check that it is lockedproperly before it is connected to the wall socket. When the charging connectorsare connected to the charger, the Transmitter Unit and the Receiver Unit,the Battery Status LEDs (3 and 17) change from green to orange to indicate thatcharging is taking place. When charging is finished, after about 2.5 h, the LEDsturn green again. You can charge one unit at a time or two at the same time.DEDKENESFIFRITJPNLPLSESI-CNTR-CNAPP59
Using the Receiver UnitConnect BE9122 <strong>Bellman</strong> Stereo Headphones, BE9128 <strong>Bellman</strong> Neck Loop,BE9125 <strong>Bellman</strong> Stetoclip, BE9124 <strong>Bellman</strong> In-ear Phones or another listeningproduct recommended by <strong>Bellman</strong> & <strong>Symfon</strong> to the headphone output (13) onthe right-hand side as illustrated in the fold-out section of the <strong>manual</strong>.Switching on the Receiver UnitPress the On/Off button i (6). The Battery Status LED(3) starts to shine with a green light to indicate that theunit is on.The Receiver Unit always starts with the internalmicrophone selected as the sound source. In addition,the volume control is always set to low volume to avoidunpleasant sound levels.Selecting the sound volumeUse the volume control’s + button (9) to increase andthe - button (10) to decrease the sound level. TheVolume and Tone LED Indicator (8) shows the soundlevel. The more LEDs that are lit the higher the volume.The LED indicator goes out 5 seconds after the soundvolume has been set.60
Selecting the toneUse the tone control’s < button (11) to reduce and the> button (12) to increase the treble in the tone. TheVolume and Tone LED Indicator (8) shows the selectedsetting. The LED indicator goes out 5 seconds after thesound quality has been set.The Receiver Unit can be used as a small and adaptable self-contained callamplifier, but together with the Transmitter Unit it opens up a whole newrange of possibilities. You can achieve the greatest flexi-bility when using theReceiver Unit together with the Transmitter Unit.Using the Transmitter UnitSwitching on the Transmitter UnitPress the On/Off button i (18). The Battery Status LED(17) starts to shine with a green light to indicate thatthe unit is on.DEDKENESFIFRITJPNLPLSESI-CNTR-CNAPP61
Listening via the TransmitterUnitTo listen on the microphonein the Transmitter Unit pressthe R button (7) on theReceiver Unit. The externalsound LED (4) comes onand the sound detected inthe Transmitter Unit is nowheard in the headphones.Listening on the Receiver Unit’s microphoneagainIf you want to switch back to the internal micro-phone,give a short press on the M button (5). The internalmicrophone LED (2) comes on and the sound nowheard in the headphones comes from the InternalMicrophone (1) again.62
OFF 1 s OFF 1 sSwitching offWhen you have finished youcan switch off the Transmitterand Receiver Units by pressingthe On/Off buttons i (6,18) and holding them downuntil the Battery Status LEDs(3, 17) go out.Choice of microphones<strong>Bellman</strong> Audio Domino contains two microphone options so that you can easilyswitch between an omnidirectional and a directional microphone.The microphones on both the Receiver Unit and Transmitter Unit have thisfunction.The Receiver Unit remembers the previously selected microphone settingif you switch between the internal microphone and the Transmitter Unit’smicrophone.With the directional microphone you can ”point” towards the sound sourcethat you are interested in listening to while reducing sound from otherdirections. This is particularly useful in difficult listening situations such as incrowds or in very noisy environments.DEDKENESFIFRITJPNLPLSESI-CNTR-CNAPP63
Choice of microphone on the Receiver UnitYou can switch between omnidirectional and di-rectionalmicrophone reception by pressing the M button(5). The omnidirectional microphone is indicatedby the Microphone LED (2) lighting up green and thedirectional microphone by it lighting up orange.Choice of microphone onthe Transmitter UnitWhen you have chosen tolisten via the TransmitterUnit by pressing the Rbutton (7), you can switchbetween omnidirectionaland directional microphonereception by pressing theR button (7).The omnidirectional microphoneis indicated by theExternal Sound LED (4) lighting up green and the directional microphone by itlighting up orange.64
External sound sourceIf the audio cable supplied, (which has a small 2.5 mm jack plug on one end), orif the External Microphone is connected to the Transmitter Unit’sexternal sound source input (20), the Transmitter Unit’s internal microphonewill be disconnected and the external sound source will be automaticallyselected. The Battery Status LED blinks orange several times to confirm thatan external sound source has been connected. The External Sound LED (4) willlight up green and orange at the same time to indicate that the sound is comingfrom an external sound source.If the audio cable is disconnected, the sound will be reconnected to the TransmitterUnit’s microphone again.With the audio cable connected between a Transmitter Unit and a TV, hi-fiequipment, MP3 player or similar sound source you can listen to absolutely firstclass stereo sound without being limited by cables.The input sensitivity is automatically adjusted to suit different sound sources.External microphoneYou can connect an external microphone to the Transmitter’s 2.5 mm socket(20). The Battery Status LED blinks orange several times to confirm that an externalsound source has been connected. The External Sound LED (4) will lightup green and orange at the same time to indicate that the sound is comingfrom an external sound source.DEDKENESFIFRITJPNLPLSESI-CNTR-CNAPP65
In some cases it may, for example, be easier for a lecturer to have an externalmicrophone and a Transmitter Unit in his/her pocket than to speak in a loudvoice or carry a wired microphone.A Transmitter Unit can transmit speech to one or more Receiver Units at thesame time.The input sensitivity is automatically adjusted to a suitable amplification whenan external microphone is connected.Please note that the Transmitter Unit’s Battery Status LED (17) blinks alternatelygreen and orange several times when an external sound source isconnected.Combined signal2 ssourcesWhen you are listening viathe Transmitter Unit’s microphoneor an External SoundSource, this sound can becombined with the soundthat the internal microphonein the Receiver Unit is receiving.Choose to listen on theTransmitter Unit by pressingthe R button (7). Hold downthe M button (5) until both the MIC (2) and RF LEDs (4) light up.66
The sound from the TransmitterUnit is mixed withthe sound from the internalmicrophone. You can adjustthe balance between theReceiver Unit and the TransmitterUnit’s microphoneby holding down the Mbutton(5) at the same time assetting the balance using the< (11) or > buttons (12).If you want to go back to listening on the Transmitter Unit, press the R-button(7) and if you want to switch over to listening on the internal microphone, pressthe M button (5) instead.Wireless digital transfer<strong>Bellman</strong> Audio Domino uses the latest radio communications technology todigitally transfer sound with an exceptionally high sound quality in stereo.The radio transmission is encrypted to ensure the highest level of security andconfidentiality.DEDKENESFIFRITJPNLPLSESI-CNTR-CNAPPRadio communication takes place on 2.4 GHz which is a frequency rangewhose use is permitted throughout the world.67
Battery indicatorThe Battery Status LED (3, 17) normally lights up green. This indicates that theunit is switched on and the battery level is satisfactory.When the battery is low, the Battery Status LED (3, 17) blinks green until thebattery is almost completely flat when it blinks orange instead. As soon as itblinks green it is time to charge the unit again. If the unit is not charged, it isswitched off automatically.Charging starts automatically when you connect a charger to the ChargingSocket (14, 21). Charging in progress is indicated on both the charger andthe units by an orange light. Once the battery is fully charged, the indicatorchanges to green and the battery is continuously trickle charged until thecharger is disconnected.Establishing a temporary link with another Transmitter UnitThe radio link between the Transmitter and Receiver Units in the <strong>Bellman</strong> AudioDomino must be established in order for radio communication to operate. Tomake it easier to get started, Receiver Units and Transmitter Units which aresupplied together are always paired up so that they will work together.Whenever you want to listen on another Transmitter Unit you can establish atemporary link with it. As soon as you switch off the Receiver Unit it returns toworking with the paired Transmitter Unit again.68
Proceed as follows to establish a temporary radio link between a transmitterand a receiver:• Start both the units with the On/Off buttons i (6, 18).• Hold down CONNECT (19) on the Transmitter Unit.• Hold down both the M button (5) and the R button (7) on the Receiver Unit.5 s 5 sA ”running light” on theReceiver Unit’s Volumeand Tone LED Indicator (8)moving towards the centreindicates that the link hasbeen established.The link can only be established while the Transmitter Unit’s connection buttonis pressed down - this is for safety reasons to prevent a Receiver from beingable to connect to another Transmitter unobserved.Please note that it is possible to connect several Receiver Units to the sameTransmitter Unit by repeating the above procedure. There is, however, a riskthat the number of receivers may affect the performance of the system.DEDKENESFIFRITJPNLPLSESI-CNTR-CNAPP69
Troubleshooting in briefProblemNothing happens whenyou try to start the units.No sound can be heard inthe headphones when theReceiver Unit is switchedon.No sound can be heardn the headphones whenthe Receiver Unit isswitched on and ExternalSound is selected.SolutionConnect the charger and check that charging starts within10 seconds.Please note! If charging does not start within 10 seconds,disconnect the charger immediately and contact the nearestdealer!Turn up the volume using the volume control (9).Check that the internal microphone has been selected asthe signal source and that it works by gently scraping onthe microphones (1).Check that the headphone plug is securely inserted in theheadphone output.Connect the headphones to another sound source (witha 3.5 mm head-phone output) to test whether the headphonesare working.Check that the Transmitter Unit is switched on.Check that the internal microphone has been selected asthe signal source and that it works by gently scraping onthe microphones (16).Check that the Transmitter is within range.70
ProblemA high-pitched noise isheard in the headphones.The sound breaks up orcomes and goes.SolutionConnect the radio link and check that the connection ismade without problems.Check that the Transmitter Unit canswitch between the omnidirectional and directionalmicrophone position.Check that the sound source is correctly connected to theTransmitter if the stereo cable is connected to the ExternalSound Source Input (20).Turn down the volume or increase the distance betweenthe micro-phone and headphones.Direct the microphone away from you.The Receiver Unit is too far away from the TransmitterUnit. Move the units closer together.More than one Receiver is connec-ted to the Transmitterand at least one Receiver is too far away from theTransmitter.Too many Receivers are connected to the same Transmitter.There are too many transmitters on 2.4 GHz or too manyDomino systems nearby which affect one another.Please note that walls, concrete panels and metal reduce therange.DEDKENESFIFRITJPNLPLSESI-CNTR-CNAPP71
Safety regulationsPlease note: The BE2210 and BE2230 <strong>Bellman</strong> Audio Domino Personal HearingSystems are not hearing instruments. <strong>Bellman</strong> & <strong>Symfon</strong> AB recommendthat anyone who is experiencing hearing loss should consult a doctor.Warning! The BE2210 and BE2230 <strong>Bellman</strong> Audio Domino Personal HearingSystems have a very powerful amplifier and the sound level can causediscomfort or, in serious cases, endanger hearing if the product is usedcarelessly. Always turn the volume down to a low level before putting on theheadphones!Warning! The <strong>Bellman</strong> Audio Domino Personal Hearing System ispowered by rechargeable Lithium-Ion batteries. Do not expose thebatteries to fire or to direct sunlight. The batteries must only be changed by<strong>Bellman</strong> & <strong>Symfon</strong> staff and must only be replaced by batteries of the sametype. The batteries must be charged fully before using the products for thefirst time. Batteries should be charged in temperatures of between +5°C and+40°C.Warning! The <strong>Bellman</strong> Audio Domino Personal Hearing System must onlybe charged by charging accessories recommended by <strong>Bellman</strong> & <strong>Symfon</strong>.72
Warning! For the safety of your children - Please be aware that this productmay include small parts. Ensure that the package and small parts are keptout of reach of children.This symbol indicates that integral electrical equipment must not be treatedas household waste. It should be taken to the relevant collection depot forthe recycling of electrical and electronic equipment. You can obtain moredetailed information about recycling of the product from your local authorities,from the nearest recycling station or from the shop you purchased theproduct from.DEDKENESFIFRITJPNLPLSESI-CNTR-CNAPP73
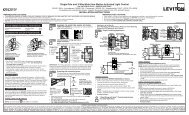
AppendixSettings<strong>Bellman</strong> Audio Domino has more settings than those you can access in usermode. By going into the Settings Menu you can adjust settings that you do notnormally need to change or which are adjusted when first used and never needto be changed again.Settings menuStart the Receiver Unit with the On/Off button i (6).Hold down the On/Off button i (6) and press the VolumeButton - (10) within 1 second until the RF LED(4) starts to blink. When the RF LED (4) starts to blink,you can release both the buttons.Press the R button (7) within 2 seconds of the momentthe RF LED (4) starts to blink and hold down thebutton until the RF LED (4) goes out. Release the Rbutton (7) immediately when the RF LED (4) has goneout.You are now in Balance Control mode.314
Overview of the Settings MenuIn the settings menu you can movebetween the different settingsby pressing the Rbutton (7) or the Mbutton (5).Each press on theR button movesyou clockwiseon to the nextsetting in thelist and theM buttontakes youanti-clockwiseto the previoussetting in the list.8 sBASSSTEREOMAXWhen you havefinished adjusting yoursettings, give a short press onthe On/Off button i (6) to returnto normal user mode.APP315
Balance controlThe balance between the right and left-hand channels can be set to compensate,for example, for a hearing loss in one ear.Press the < button (11) to adjust the balance onthe left and the > button (12) to adjust the balanceon the right.The standard setting is centred balance.Basic attenuationDifferent headphones have different sensitivity levels and you cancompensate for this with basic attenuation. What you actually set is theattenuation you require at the maximum power output you want to have(which is therefore 0 dB attenuation). This settings is useful when you wantto adjust the maximum volume in user mode for a pair of headphones orin-ear phones with a higher sensitivity than the BE9122 <strong>Bellman</strong> StereoHeadphones or, for example, if you want to limit the volume for a child.316
MAXUse the < button (11) to reduce the basic attenuation(increase the volume) and the > button to increasethe basic attenuation (reduce the volume). The basicattenuation is adjusted in increments of 3 dB.The standard setting is 0 dB attenuation, which correspondsto the maximum output signal.STEREOStereo/MonoThe line-in signal can be rendered in either Stereo orin Mono. The speech intelligibility can be increased incertain listening situations such as when watching TV ifthe signal is in Mono.Press the + button to select Stereo.MONOPress the - button to select Mono.APPThe standard setting is Stereo.317
Bass reductionLow-frequency interference such as fans and road noise can be tiring if you areexposed to it for a long period. By activating bass reduction, low-frequencyinterference and sounds are reduced.BASSPress the + button (9) to activate Bass Reduction.BASSPress the - button (10) to deactivate Bass Reductionand get level frequency response.The standard setting is deactivated Bass Reduction.318
Adjusting the Tone ControlThe Tone Control Blocking function has been developed in case you want tomake it easier for the user to use <strong>Bellman</strong> Audio Domino. This setting can beused to choose whether the user should be able to adjust the tone control ornot. If you choose to switch off the tone control buttons, you can preset thetone control that will be used in user mode.Activating and deactivatingTone Control in <strong>User</strong>ModePress the + button (9) toactivate the tone control buttonsand the - button(10) to deactivate them.The standard setting is tone control activated.Presetting the Tone ControlPress the < button (11) and the > button (12) to presetthe tone control to the level that will be used in usermode.APPThe standard setting is Tone Control centred (levelfrequency response)319
Please note that if the tone control is on, the preset value will be changed assoon as the Tone Control is changed in user mode.8 sResetting to the factory settingYou can use this to reset all settings to thestandard settings that the products were suppliedwith from the factory.Press and hold down the + button (9) until all theLEDs on the display are lit. After resetting is completed,the display will blink for a short period.Version informationThe product version information is presented herevia a pattern of lit and blinking LEDs. This internalinformation is only intended as an aid for servicingand support.320
Pairing of unitsThe Transmitter and Receiver Units in the <strong>Bellman</strong> Audio Domino system musthave the radio link established in order for radio communication to operate.To make it easier to get started, a Receiver Unit and a Transmitter Unit whichare paired together are always supplied so that they will work together. Whereyou want to pair a Receiver Unit with a Transmitter Unit which is different fromthe Receiver Unit it was originally supplied with, you can do this in the SettingsMenu. Proceed as follows to pair up the units:5 s 5 s• Start both the units withthe On/Off buttons i(6, 18).• Go into the Settings Menu.• Hold down the CONNECTbutton (19) on the TransmitterUnit.• Hold down both the Mbutton (5) and the R button(7) on the ReceiverUnit.APPA ”running light” on the Receiver Unit’s Volume and Tone LED Indicator (8)moving towards the centre indicates that the link has been established.321
322Please note! If you pair up a Transmitter Unit and a Receiver Unit in theSettings Menu, this replaces the pairing carried out in the factory. This canbe useful when changing a Transmitter Unit under guarantee or if you wantto pair up several Receiver Units to a Transmitter Unit (e.g. in a conferenceroom).
TestingIt is easy to test the <strong>Bellman</strong> Audio Domino Personal Hearing System. If <strong>Bellman</strong>Audio Domino does not operate as described below, you can carry out furthertroubleshooting as instructed under Troubleshooting.How to testThe testing of <strong>Bellman</strong> Audio Domino has been divided into three parts. Onepart for the Receiver Unit for which only the Receiver Unit is required, one partfor the Transmitter Unit for which both units are required and finally one forcharging the two units.Receiver Unit• Switch on the unit and make sure that the Battery Status LED (3) lights up green.• Connect the headphones to the Headphone Socket (13) and scrape carefullyon the round microphone (1) with your finger and check that there is a scrapingsound in the headphones.• Press the M button (5) and make sure that the Microphone LED (2) changescolour and lights up orange.• Scrape carefully on the small microphone hole on the top (1) and the roundmicrophone (1) with your finger and check that there is a scraping sound in theheadphones.• Press the buttons (9, 10, 11, 12) and check that the Volume and Tone Indicatorchanges.APP323
324Transmitter Unit• Switch on the unit and make sure that the Battery Status LED (17) lights upgreen.• Press the R button (7) and make sure that the External Sound LED (4) lights upgreen.• Carefully scrape on the round microphone hole (16) on the top of the TransmitterUnit with the finger and check that there is a scraping sound in the headphones.• Press the R button (7) and make sure that the External Sound LED (4) changescolour and lights up orange.• Carefully scrape on the round microphone (16) on the Transmitter Unit with thefinger and check that there is a scraping sound in the headphones.• Connect an external sound source to the External Sound Source Input (20) andcheck that the sound from the sound source is heard in the headphones. Theexternal sound source input (20) can be tested, for example, by connecting aCD player or a radio to the input via the audio cable supplied. The transmitterunit automatically switches to an external sound source when a connector isconnected to the External Sound Source Input (20).
Charging• Connect the charger to the mains socket and check that the LEDs on thecharger light up green.• Connect the charging cables to both the charger and to the charging socketson the Receiver Unit and the Transmitter Unit (14, 21), see the fold-out sectionof the <strong>manual</strong>.• Check that the LEDs on the charger change from green to red.• Check that the Battery Status LEDs on both the Transmitter Unit and ReceiverUnit light up orange.APP325
TroubleshootingProblemThe sound is louder in one earthan in the other.The sound volume is low eventhough the volume is set to max.SolutionAdjust the Balance in the SettingsMenu.Adjust the Basic Attenuation in theSettings Menu.The sound is only in Mono eventhough it is connected via a stereocable to a sound source whichprovides stereo sound.The bass reproduction is weak.The Tone Control cannot be adjusted.The Receiver Unit is behavingstrangely.Change to Stereo in the Settings Menu.Switch off Bass Reduction in theSettings Menu.Use the Settings Menu to activate theTone Control buttons or to adjust thesound.Reset the unit to the factory settings inthe Settings Menu.326
ProblemSolutionThe Receiver Unit loses its link tothe Transmitter Unit when you switchoff the Receiver Unit.Pair up the Receiver Unit andTransmitter unit permanently in theSettings Menu.Humming occurs when connectingthe stereo cable during charging.Only use the charger supplied, BE9142.APP327
Technical informationPower supplyBattery powerOperating timeTransmitter charging timeReceiver charging timeInput signalsMicrophoneExternal sound source inputOutput signalsHeadphone socketDistortionFrequency rangeTone controlOutput power3.7V Li-Ion battery8 hours (standard battery)2.5 hours (standard battery)2.5 hours (standard battery)Built-in microphone (omnidirectionalor directional)2.5 mm stereo jack plug(0 dBV max input signal)3.5 mm stereo jack plug0.05% THD (electrical)40-10 000 Hz+/- 10 dB, cut-off frequency 1.6 kHz100 mW (16 Ω load)328
Radio communicationFrequencyRangeThe following may also affect theperformance:Security2.4 GHz, 3 channels25 metres, clear line of sight, indoors.Walls, concrete and metal reduce therange.More than one Receiver is connectedto a Transmitter and at least one ofthe Receivers is too far away from theTransmitter.Too many Receivers are connected tothe same Transmitter.Too many transmitters at 2.4 GHz ortoo many Domino systems close to oneanother.Encrypted communication, automaticchannel searching, coexists with otherradio transmitters on 2.4 GHzAPP329
Additional informationFor indoor use only.Dimensions WxHxDWeightColourRegulatory requirements48 x 99 x 22 (max) mmBE2210: 69 g, BE2230: 66 gBlack/dark grey metallic with silvercolouredbuttons.CE, FCC, RoHS, WEEE,AccessoriesThe following accessories are available:• BE9122 Stereo headphones• BE9124 Ear phones• BE9125 Stetoclips• BE9126 Stereo cable set, 5m (16 feet)• BE9127 External microphone, 5m (16 feet)• BE9128 Neck loop• BE9143 USB car charger• BE1360 Scart switch330
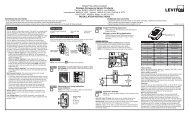
ear phones headphones STETOCLIPSNeck loopmicrophoneThese original accessoriesare especiallydeveloped to maximizethe performance of yourDomino. Contact yournearest dealer or visit:www.bellman.comScart switch CABLE KIT, 16 FEET car chargerAPPFor Europe mainly331