SpeedDome Ultra 8 Camera Dome Install/Service ... - IP CCTV GmbH
SpeedDome Ultra 8 Camera Dome Install/Service ... - IP CCTV GmbH
SpeedDome Ultra 8 Camera Dome Install/Service ... - IP CCTV GmbH
- No tags were found...

You also want an ePaper? Increase the reach of your titles
YUMPU automatically turns print PDFs into web optimized ePapers that Google loves.
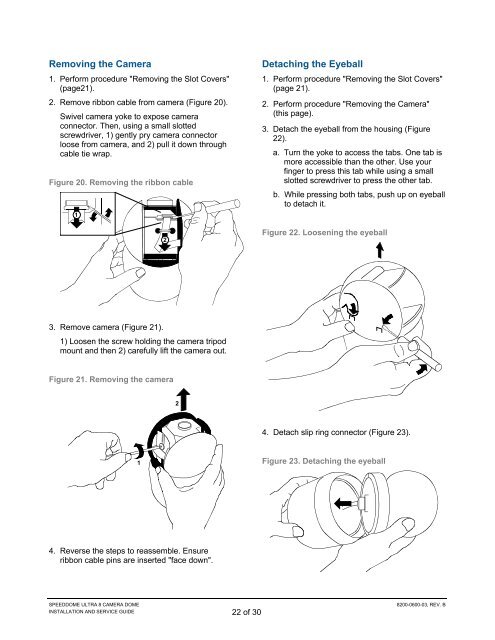
Removing the <strong>Camera</strong>1. Perform procedure "Removing the Slot Covers"(page21).2. Remove ribbon cable from camera (Figure 20).Swivel camera yoke to expose cameraconnector. Then, using a small slottedscrewdriver, 1) gently pry camera connectorloose from camera, and 2) pull it down throughcable tie wrap.Figure 20. Removing the ribbon cable12Detaching the Eyeball1. Perform procedure "Removing the Slot Covers"(page 21).2. Perform procedure "Removing the <strong>Camera</strong>"(this page).3. Detach the eyeball from the housing (Figure22).a. Turn the yoke to access the tabs. One tab ismore accessible than the other. Use yourfinger to press this tab while using a smallslotted screwdriver to press the other tab.b. While pressing both tabs, push up on eyeballto detach it.Figure 22. Loosening the eyeball3. Remove camera (Figure 21).1) Loosen the screw holding the camera tripodmount and then 2) carefully lift the camera out.Figure 21. Removing the camera24. Detach slip ring connector (Figure 23).1Figure 23. Detaching the eyeball4. Reverse the steps to reassemble. Ensureribbon cable pins are inserted "face down".SPEEDDOME ULTRA 8 CAMERA DOMEINSTALLATION AND SERVICE GUIDE 22 of 308200-0600-03, REV. B