Operating Instructions - MEI's On-line Technical Support
Operating Instructions - MEI's On-line Technical Support
Operating Instructions - MEI's On-line Technical Support

You also want an ePaper? Increase the reach of your titles
YUMPU automatically turns print PDFs into web optimized ePapers that Google loves.
KOLLMORGEN Version 1 -11/07 Installing the Hardware<br />
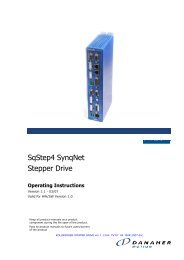
3.3 Connecting the Drive Cables<br />
1. Before connecting the cables ensure that the power source is powered OFF.<br />
2. Use Figure 1 and the two tables below to connect the cables.<br />
3. When all the power cables are connected, turn on the power source.<br />
4. Connect the communications cable.<br />
Table 2: Cable Connection Chart<br />
Figure 1: Front Cable Connection Panel<br />
STEP Connect Cable To Description<br />
1 24V Logic Power P7 12 to 42 Volts at 12 Amps.<br />
2 Encoder C1 to C4 Motor encoders 0 to 3.<br />
3 DC Bus (Input) P3 and P6 DC power for driving the motors (12 to 42 Volts and<br />
12 Amps).<br />
4 Motor Power<br />
Pin 2 Phase A +<br />
Pin 3 Phase A-<br />
P1, P2, P4<br />
and P5<br />
Maximum Output Rating is 50V at 5 Amps.<br />
5 Communication IN C7 Connect one end of the SynqNet communications<br />
cable to the IN connector. The other end connects<br />
to the Motion Control card when it is installed to the<br />
PC.<br />
Table 3: Connector Grouped by Axis<br />
Plug Group Axis 0 Axis 1 Axis 2 Axis 3<br />
Encoder Encoder 0 (C1) Encoder 1 (C2) Encoder 2 (C3) Encoder 3 (C3)<br />
Output Power M0 (P1) M1 (P2) M2 (P4) M3 (P5)<br />
Input Bus B0 (P3) B1 (P6)<br />
SqDC SynqNet DC Drive 7