

Leica M9 users instruction manual in English
Leica M9 users instruction manual in English
Leica M9 users instruction manual in English
- No tags were found...

Create successful ePaper yourself
Turn your PDF publications into a flip-book with our unique Google optimized e-Paper software.
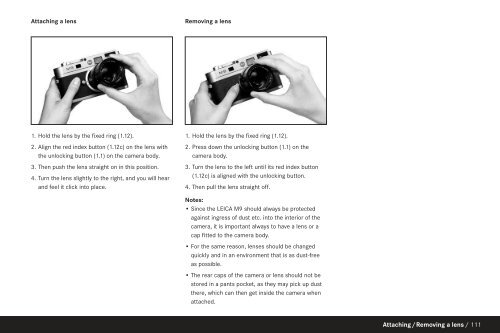
Attach<strong>in</strong>g a lensRemov<strong>in</strong>g a lens1. Hold the lens by the fixed r<strong>in</strong>g (1.12).2. Align the red <strong>in</strong>dex button (1.12c) on the lens withthe unlock<strong>in</strong>g button (1.1) on the camera body.3. Then push the lens straight on <strong>in</strong> this position.4. Turn the lens slightly to the right, and you will hearand feel it click <strong>in</strong>to place.1. Hold the lens by the fixed r<strong>in</strong>g (1.12).2. Press down the unlock<strong>in</strong>g button (1.1) on thecamera body.3. Turn the lens to the left until its red <strong>in</strong>dex button(1.12c) is aligned with the unlock<strong>in</strong>g button.4. Then pull the lens straight off.Notes:• S<strong>in</strong>ce the LEICA <strong>M9</strong> should always be protectedaga<strong>in</strong>st <strong>in</strong>gress of dust etc. <strong>in</strong>to the <strong>in</strong>terior of thecamera, it is important always to have a lens or acap fitted to the camera body.• For the same reason, lenses should be changedquickly and <strong>in</strong> an environment that is as dust-freeas possible.• The rear caps of the camera or lens should not bestored <strong>in</strong> a pants pocket, as they may pick up dustthere, which can then get <strong>in</strong>side the camera whenattached.Attach<strong>in</strong>g/Remov<strong>in</strong>g a lens / 111