Making Labels with Openoffice.org Templates - LibreOffice-NA.US
Making Labels with Openoffice.org Templates - LibreOffice-NA.US
Making Labels with Openoffice.org Templates - LibreOffice-NA.US
- No tags were found...

You also want an ePaper? Increase the reach of your titles
YUMPU automatically turns print PDFs into web optimized ePapers that Google loves.
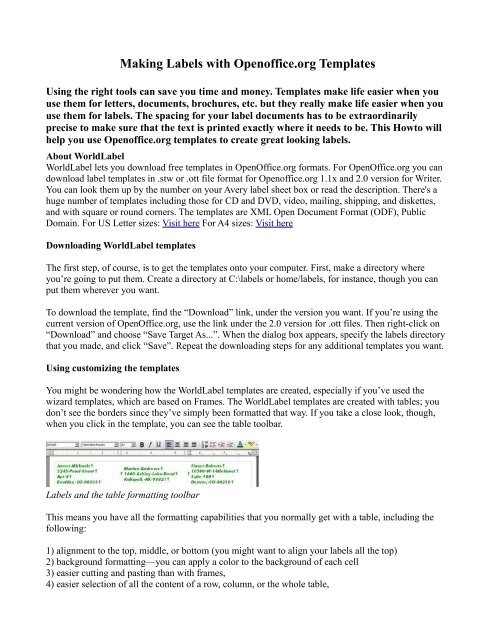
<strong>Making</strong> <strong>Labels</strong> <strong>with</strong> <strong>Openoffice</strong>.<strong>org</strong> <strong>Templates</strong>Using the right tools can save you time and money. <strong>Templates</strong> make life easier when youuse them for letters, documents, brochures, etc. but they really make life easier when youuse them for labels. The spacing for your label documents has to be extraordinarilyprecise to make sure that the text is printed exactly where it needs to be. This Howto willhelp you use <strong>Openoffice</strong>.<strong>org</strong> templates to create great looking labels.About WorldLabelWorldLabel lets you download free templates in OpenOffice.<strong>org</strong> formats. For OpenOffice.<strong>org</strong> you candownload label templates in .stw or .ott file format for <strong>Openoffice</strong>.<strong>org</strong> 1.1x and 2.0 version for Writer.You can look them up by the number on your Avery label sheet box or read the description. There's ahuge number of templates including those for CD and DVD, video, mailing, shipping, and diskettes,and <strong>with</strong> square or round corners. The templates are XML Open Document Format (ODF), PublicDomain. For <strong>US</strong> Letter sizes: Visit here For A4 sizes: Visit hereDownloading WorldLabel templatesThe first step, of course, is to get the templates onto your computer. First, make a directory whereyou’re going to put them. Create a directory at C:\labels or home/labels, for instance, though you canput them wherever you want.To download the template, find the “Download” link, under the version you want. If you’re using thecurrent version of OpenOffice.<strong>org</strong>, use the link under the 2.0 version for .ott files. Then right-click on“Download” and choose “Save Target As...”. When the dialog box appears, specify the labels directorythat you made, and click “Save”. Repeat the downloading steps for any additional templates you want.Using customizing the templatesYou might be wondering how the WorldLabel templates are created, especially if you’ve used thewizard templates, which are based on Frames. The WorldLabel templates are created <strong>with</strong> tables; youdon’t see the borders since they’ve simply been formatted that way. If you take a close look, though,when you click in the template, you can see the table toolbar.<strong>Labels</strong> and the table formatting toolbarThis means you have all the formatting capabilities that you normally get <strong>with</strong> a table, including thefollowing:1) alignment to the top, middle, or bottom (you might want to align your labels all the top)2) background formatting—you can apply a color to the background of each cell3) easier cutting and pasting than <strong>with</strong> frames,4) easier selection of all the content of a row, column, or the whole table,
5) easier copying and pasting; you can easily select the whole table and copy it onto the next page, tomake multi-page sheets of labels.To apply values to the table, like backgrounds, choose Table→Table Properties and choose theappropriate tab.Formatting labels using the Table windowTo do things to the table, choose View→Toolbars→TableThe Tables toolbarShowing and hiding table bordersTables are easier to work <strong>with</strong>, when you’re doing any extensive customization, if the borders arevisible. To see the borders of the table, select the whole table. You can simply click in the upper rightcell and drag down to the lower right cell, or click in one of the cells and press “Ctrl + A”. Then clickand hold down on the indicated borders icon in the Tables toolbar, and choose the lower right option forborders on all cells.
Selecting content to copy1) Select one column of content (two columns won’t work since the separator column is in thetemplate) and copy it2) Go to the label template, click in one cell, and paste. The pasted content will fit into the labeltemplate, taking on the correct dimensions3) To apply the correct formatting (you can do this after you’ve pasted all the content), select the pastedcontent and from the styles dropdown list, select Default4) With the pasted content still selected, choose Format→Paragraph, click the “Indents & Spacing” tab,and specify .07 inch in the first two fields5) Click “OK”Pasting content into the labels template
Applying the Default styleApplying the correct indentNote: You could also update the Default style to be indented .07 from each side.Pasting one cell into multiple label cellsLet’s say you’re making moving labels, or business cards, or something else where you need exactlythe same information in every cell. Rather than pasting into each cell individually, you can copy thetext once, then paste into every cell.1) Select the content to paste, as plain text. You don’t need it to be a table cell.2) Go to the labels and select all the cells where you want that text to show up.3) Paste. The content will appear in every selected cell.Again, you’ll need to apply the Default style as before, and as before, only paste one column at a timebecause of the separator columns.
Copying the first page to make additional pagesIf you’re creating labels, you often need more than just one page. So, to make a multi-page sheet oflabels, you essentially just have to select the whole table and paste it onto the next page.Select the whole table. You can simply click in the upper right cell and drag down to the lower rightcell, or click in one of the cells and press “Ctrl + A”.1) Copy the table.2) Click below the table3) Paste. The table will appear on the next page. Repeat these steps to add additional pages.Clicking in the next available line, to paste another pageAdding graphics to any templateA major feature of OpenOffice.<strong>org</strong> templates is the ability to add graphics. You can add them in thecorner, or in the background as a watermark.Inserting a graphicJust click in the cell where you want the graphic.Choose Insert→Picture→From File.Find the graphic on your computer and select it.The graphic will appearTo resize it, hold down “Shift” and drag one of the corner handles in or outA graphic added to a labelResizing a graphic
Wrapping text around a graphicAt this point, you’ve got a graphic but it probably doesn’t look that good <strong>with</strong> the text.A graphic <strong>with</strong>out wrappingTo wrap the text nicely around the text, right-click on the graphic and choose “Page Wrap”.Specifying Page WrapNow you can move the graphic and the text will get out of its way. If necessary, delete any newcarriage returns that were created.A graphic <strong>with</strong> wrappingNote: To specify a little more room around the graphic, right-click and choose “Picture”. In the “Wrap”tab, specify spacing.Adding a background graphic
You can add a graphic to the background of each label, too. I’ll use this lightened watermarkOpenOffice.<strong>org</strong> logo as an example.A watermark graphic1) First, format the text the way you want it, since <strong>with</strong> a background graphic the text will be harder toselect.2) Insert the graphic in the label the same way you do <strong>with</strong> other graphics, by choosingInsert→Picture→From File3) Then right-click on the graphic and choose In Background4) You’ll see the graphic in the backgroundInserting a watermark graphicSending the watermark graphic to the background
The watermark graphic in the background of the labelVisit to : download templatesBiography: Solveig Haugland has worked as an instructor, course developer, author and technicalwriter in the high-tech industry for over 15 years. Visit Solveig at <strong>Openoffice</strong>.blogs.com