weatronic 2.4 Binding-Quickbinding
weatronic 2.4 Binding-Quickbinding
weatronic 2.4 Binding-Quickbinding
- No tags were found...

You also want an ePaper? Increase the reach of your titles
YUMPU automatically turns print PDFs into web optimized ePapers that Google loves.
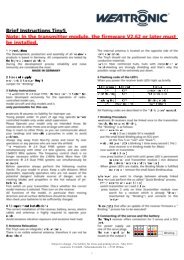
<strong>Binding</strong> - <strong>Quickbinding</strong>for<strong>weatronic</strong> <strong>2.4</strong> Dual FHSS SystemContent1. <strong>Binding</strong> .............................................................................................................................11.1 <strong>Binding</strong> for DR Micro series / DR Smart series..........................................................11.2 <strong>Binding</strong> for Clever series............................................................................................21.3 <strong>Binding</strong> for DR 12-22 R series....................................................................................31.4 Problems and possible mistakes at binding.............................................................42. <strong>Quickbinding</strong>.....................................................................................................................42.1 <strong>Quickbinding</strong> procedure...........................................................................................42.2 Problemes and possible mistakes at quickbinding .................................................51. <strong>Binding</strong><strong>weatronic</strong> recievers have to be bound to the <strong>weatronic</strong> TX module one time.While doing this, the serial number of your TX module will be stored in your reciever.This makes sure that your reciever will only use signals from your TX module.1.1 <strong>Binding</strong> for DR Micro series / DR Smart series1. Remove the eventually pluged jumper from the SCU / USB port of your reciever.2. After turning on your <strong>weatronic</strong> DualReceivers you have 30 seconds to plug the jumper on tothe SCU / USB port of your reciever.After 30 seconds binding is impossible because of safety reasons.• At the Micro series plug the jumper between the pinson bottom and on the middle of the SCU port.• At the Smart series plug the jumper between the pinson outside and on the middle of the SCU port.NEVER plug the jumper on any of the servos ports!!!After 5 seconds the green LED will start flashing once per second.The DualReciever is now in binding mode.
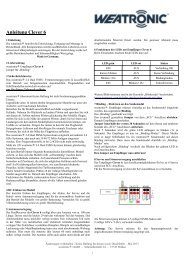
3. This mode will be kept as long until a TX module is found which is also in <strong>Binding</strong> mode.4. Now turn on your TX module.5. After a short self check of one second you have 30 seconds to press button 2.(After 30 seconds <strong>Binding</strong> is impossible because of safety reasons.)6. Hold button 2 for at least 5 seconds. While doing this ignore the flashing of the green LED.After 5 seconds the green LED starts flashing once per second.The TX module is now in <strong>Binding</strong> mode.7. After succesful <strong>Binding</strong> on your DualReceiver the flashing of the green LED will change into acontinous glowing.The same will happen to the LED of your TX module.8. Unplug the jumper. Your DualReceiver is ready for use now.1.2 <strong>Binding</strong> for Clever series1. Remove the eventually pluged jumper from the SCU port of your reciever.2. After turning on your <strong>weatronic</strong> reseiver you have 30 seconds to plug the jumper on to theSCU / USB port of your reciever.After 30 seconds binding is impossible because of safety reasons.Plug the jumper on the pins on top and on the middle of the SCU port.NEVER plug the jumper on any of the servos ports!!!After 5 seconds the green LED will start flashing once per second.The receiver is now in <strong>Binding</strong> mode.3. This mode will be kept until a TX module is found which is also in <strong>Binding</strong> mode.4. Now turn on your TX module.5. After a short self check of one second you have 30 seconds to press Button 2.(After 30 seconds <strong>Binding</strong> is impossible because of safety reasons.)
6. Hold Button 2 for at least 5 seconds. While doing this ignore any flashing of the green LED.After 5 seconds the green LED starts flashing once per second.The TX module is now in <strong>Binding</strong> mode.7. After succesful <strong>Binding</strong> of your receiver the flashing of the green LED will change into aglowing.The same will happen to the LED of your TX module.8. Unplug the jumper. Your receiver is ready for use now.1.3 <strong>Binding</strong> for DR 12-22 R series1. Turn on your DualReciever by unpluging the red REMOVE BEFORE FLIGHT plug.2. You have now 30 seconds to plug the blue BINDING plug into your switch board.(After 30 seconds <strong>Binding</strong> is impossible because of safety reasons.)After 5 seconds the green LED on your switch board and on your DualReceiver will startflashing once per second.The reciever is now in <strong>Binding</strong> mode.3. Now turn on your TX module.After a short self check of one second you have 30 seconds to push button 2.(After 30 seconds <strong>Binding</strong> is impossible because of safety reasons.)4. Hold Button 2 for at least 5 seconds. While doing this ignore the falshing of the green LED.After 5 seconds the green LED starts flashing once per second.The TX module is now in <strong>Binding</strong> mode.5. This <strong>Binding</strong> mode will be kept until a TX module is found which is also in <strong>Binding</strong> mode.6. After succesful <strong>Binding</strong> of your DualReciever the flashing of the green LEDs will change into aglowing.The same will happen to the LED of yout TX module.7. Unplug the blue BINDING plug now. Your DualReciever is ready for use now.
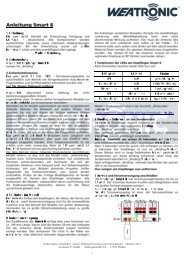
1.4 Problems and possible mistakes at binding1. All 3 LEDs of your TX module are flashing. Firmeware not up to date.→ Please update.2. The green LED of your TX module is flashing once per second. No reciever found.→ Please put your Weatronic DualReceiver into <strong>Binding</strong> mode.3. You waited more than 30 seconds after turning on your reciever to plug the jumper.→ Please turn off Weatronic DualReceiver and restart.4. Distance between TX module and reciever too low..→ Please keep at least 40 cm between Tx module and reciever.5. Aerials are touching.→ Please make sure they can't touch each other at any time.2. <strong>Quickbinding</strong>The <strong>weatronic</strong> <strong>2.4</strong> Dual FHSS system uses active feedback. Beacause of that it is necessary to tellyour TX module to which receiver it is connected to.Changing to an other bound receiver requires <strong>Quickbinding</strong>.It is not necessary to proceed <strong>Binding</strong> again.2.1 <strong>Quickbinding</strong> procedure1. Turn on your TX module.2. After a short self check of one second you have 30 seconds to press Button 2.(After 30 seconds quickbinding is impossible because of safety reasons.)3. Press Button 2 shortly (less than 5 seconds)The TX module is now in quickbinding mode.The green LED flashes twice per second.4. This mode will be kept until a reciever is found.Now turn on your reciever.If 2 bound receivers are turned on the TX module will choose the one with the stronger signalfor quickbinding.5. After succesful quickbinding the flashing of the green LEDs on your reciever and TX modulewill change into glow.
2.2 Problemes and possible mistakes at quickbinding1. Distance between TX module and reciever too low..→ Please keep at least 16 inch - 40 cm between Tx module and reciever.2. Aerials are touching.→ Please make sure they can't touch each other at any time.3. All 3 LEDs of your TX module are flashing. Firmware not up to date.→ Please update.<strong>weatronic</strong> GmbH – Seidenstraße 57 - 70174 Stuttgart - September 2010