SunSky Ridge Cap Installation Guide - Palram Americas
SunSky Ridge Cap Installation Guide - Palram Americas
SunSky Ridge Cap Installation Guide - Palram Americas
- No tags were found...

Create successful ePaper yourself
Turn your PDF publications into a flip-book with our unique Google optimized e-Paper software.
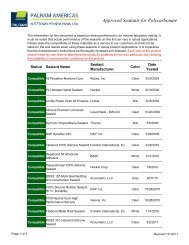
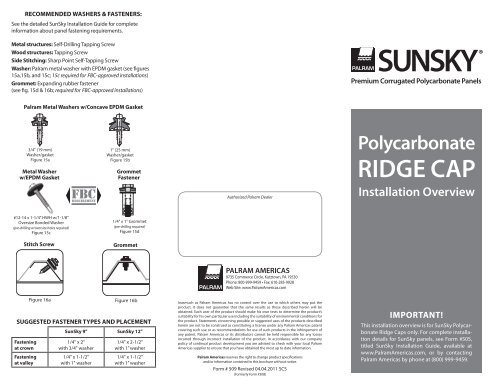
RECOMMENDED WASHERS & FASTENERS:See the detailed <strong>SunSky</strong> <strong>Installation</strong> <strong>Guide</strong> for completeinformation about panel fastening requirements.Metal structures: Self-Drilling Tapping ScrewWood structures: Tapping ScrewSide Stitching: Sharp Point Self-Tapping ScrewWasher: <strong>Palram</strong> metal washer with EPDM gasket (see figures15a,15b, and 15c; 15c required for FBC-approved installations)Grommet: Expanding rubber fastener(see fig. 15d & 16b; required for FBC-approved installations)SUNSKY ®<strong>Palram</strong> Metal Washers w/Concave EPDM Gasket3/4" (19 mm)Washer/gasketFigure 15aMetal Washerw/EPDM Gasket1" (25 mm)Washer/gasketFigure 15bGrommetFastenerAuthorized <strong>Palram</strong> DealerPolycarbonateRIDGE CAP<strong>Installation</strong> Overview#12-14 x 1-1/4" HWH w/1-1/8"Oversize Bonded Washer(pre-drilling w/oversize holes required)Figure 15cStitch Screw1/4" x 1" Grommet(pre-drilling required)Figure 15dGrommetPALRAM AMERICAS9735 Commerce Circle, Kutztown, PA 19530Phone: 800-999-9459 • Fax: 610-285-9928Web Site: www.<strong>Palram</strong><strong>Americas</strong>.comFigure 16aFigure 16bSUGGESTED FASTENER TYPES AND PLACEMENTFasteningat crownFasteningat valley<strong>SunSky</strong> 9" <strong>SunSky</strong> 12"1/4" x 2"with 3/4" washer1/4" x 1-1/2"with 1" washer1/4" x 2-1/2"with 1” washer1/4" x 1-1/2"with 1” washerInasmuch as <strong>Palram</strong> <strong>Americas</strong> has no control over the use to which others may put theproduct, it does not guarantee that the same results as those described herein will beobtained. Each user of the product should make his own tests to determine the product’ssuitability for his own particular use including the suitability of environmental conditions forthe product. Statements concerning possible or suggested uses of the products describedherein are not to be construed as constituting a license under any <strong>Palram</strong> <strong>Americas</strong> patentcovering such use or as recommendations for use of such products in the infringement ofany patent. <strong>Palram</strong> <strong>Americas</strong> or its distributors cannot be held responsible for any lossesincurred through incorrect installation of the product. In accordance with our companypolicy of continual product development you are advised to check with your local <strong>Palram</strong><strong>Americas</strong> supplier to ensure that you have obtained the most up to date information.<strong>Palram</strong> <strong>Americas</strong> reserves the right to change product specificationsand/or information contained in this brochure without notice.Form # 509 Revised 04.04.2011 SCS(Formerly Form #508)IMPORTANT!This installation overview is for <strong>SunSky</strong> Polycarbonate<strong>Ridge</strong> <strong>Cap</strong>s only. For complete installationdetails for <strong>SunSky</strong> panels, see Form #505,titled <strong>SunSky</strong> <strong>Installation</strong> <strong>Guide</strong>, available atwww.<strong>Palram</strong><strong>Americas</strong>.com, or by contacting<strong>Palram</strong> <strong>Americas</strong> by phone at (800) 999-9459.
The following installation points are required inorder to ensure proper installation of the <strong>SunSky</strong><strong>Ridge</strong> <strong>Cap</strong>:Figure 1BCADridge cap from properly expanding and contracting withtemperature changes.6. Be sure to work in one direction. Do not begin fasteningat both ends and working towards the center.7. Fasteners should be installed so that they are securelyfastened to the underlying structure as shown in Figure 3.The ridge cap should be directly connected to the purlinor horizontal support member.8. It is suggested that ridge caps are supported from belowusing either blocks or brackets at intervals of 60" (30"on the 1.0mm <strong>Ridge</strong> <strong>Cap</strong>.) The nature of these supportsis at the discretion of the installer, but the followingobservations must be made:Figure 3Fasteners<strong>SunSky</strong> <strong>Ridge</strong> <strong>Cap</strong>(Lapped over previousridge cap)4" OverlapFasteners withUmbrella Washer<strong>Ridge</strong> <strong>Cap</strong> Overlap Illustration(Figure 4)Butyl Sealant TapePeak or <strong>Ridge</strong> Purlin<strong>SunSky</strong> <strong>Ridge</strong> <strong>Cap</strong>(Lapped under nextridge cap)<strong>SunSky</strong> FoamClosure1. <strong>SunSky</strong> ridge caps A should be installed on XPE(foamed polyethylene) shaped top end-closures B asshown. Foam closures should be set no less than ½” fromthe top of the panel.2. Fasteners C should be installed at the valley of the panel’sD corrugation pattern, for each corrugation interval. Thisshould be done on both sides of the ridge cap.3. Fasteners should be installed at least one inch from theedge of the ridge cap. Installing a fastener too close to theedge may cause the material to eventually tear.4. ALL fastener sites in the ridge cap must be pre-drilled to adiameter at least 1/16" larger than the fastener diameterto account for thermal movement.5. Only <strong>Palram</strong> recommended fasteners may be usedto install <strong>SunSky</strong> ridge caps. <strong>Palram</strong>recommends fasteners using an EPDM orneoprene washer at least 3/4" (19mm) indiameter. Fasteners should be installed sothat the washer is pressed snugly againstthe ridge cap, but not to the point wherethe washer is deformed (see Figure 2). Overtighteningthe fastener will prevent theFigure 290ºBlockand/orBracketPurlina. Blocks and/or brackets should approximate thegeometry of the ridge cap in order to insure that theysit properly.b. Blocks and brackets should be fastened directly to thestructure of the building.c. The <strong>Ridge</strong> <strong>Cap</strong> should be connected to the blocks orbrackets through a pre-drilled, oversized penetration.<strong>Palram</strong> fasteners are recommended and installationshould account for thermal expansion as describedabove.9. <strong>Ridge</strong> cap sections should overlap by at least 4 inches(Figure 4). It is recommended that this overlap be sealedwith ½" Butyl tape. All ridge cap overlaps require a ridgecap block for through fastening (Figure 5).Refer to <strong>Palram</strong> <strong>Americas</strong> or its distributor for other approved sealingor bonding materials should they be required. Unapproved sealingor bonding material may be incompatible, damage the panels, causefailure and void warranty.<strong>SunSky</strong> <strong>Ridge</strong> <strong>Cap</strong>(Lapped over previousridge cap)<strong>Ridge</strong> <strong>Cap</strong> Blockor Bracket(By Others)<strong>SunSky</strong> <strong>Ridge</strong> <strong>Cap</strong>(Lapped under nextridge cap)<strong>SunSky</strong> 12 Panel orMetal Roofing Panel<strong>Ridge</strong> <strong>Cap</strong> Block Illustration(Figure 5)<strong>SunSky</strong> Foam ClosurePeak or <strong>Ridge</strong> Purlin<strong>SunSky</strong> 12 Panel orMetal Roofing Panel