

More Color More Color - O scale trains
More Color More Color - O scale trains
More Color More Color - O scale trains
- No tags were found...

You also want an ePaper? Increase the reach of your titles
YUMPU automatically turns print PDFs into web optimized ePapers that Google loves.
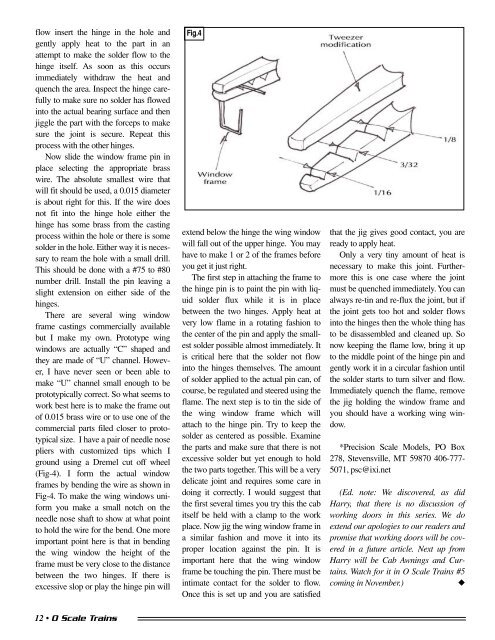
flow insert the hinge in the hole andgently apply heat to the part in anattempt to make the solder flow to thehinge itself. As soon as this occursimmediately withdraw the heat andquench the area. Inspect the hinge carefullyto make sure no solder has flowedinto the actual bearing surface and thenjiggle the part with the forceps to makesure the joint is secure. Repeat thisprocess with the other hinges.Now slide the window frame pin inplace selecting the appropriate brasswire. The absolute smallest wire thatwill fit should be used, a 0.015 diameteris about right for this. If the wire doesnot fit into the hinge hole either thehinge has some brass from the castingprocess within the hole or there is somesolder in the hole. Either way it is necessaryto ream the hole with a small drill.This should be done with a #75 to #80number drill. Install the pin leaving aslight extension on either side of thehinges.There are several wing windowframe castings commercially availablebut I make my own. Prototype wingwindows are actually “C” shaped andthey are made of “U” channel. However,I have never seen or been able tomake “U” channel small enough to beprototypically correct. So what seems towork best here is to make the frame outof 0.015 brass wire or to use one of thecommercial parts filed closer to prototypicalsize. I have a pair of needle nosepliers with customized tips which Iground using a Dremel cut off wheel(Fig-4). I form the actual windowframes by bending the wire as shown inFig-4. To make the wing windows uniformyou make a small notch on theneedle nose shaft to show at what pointto hold the wire for the bend. One moreimportant point here is that in bendingthe wing window the height of theframe must be very close to the distancebetween the two hinges. If there isexcessive slop or play the hinge pin willFig.4extend below the hinge the wing windowwill fall out of the upper hinge. You mayhave to make 1 or 2 of the frames beforeyou get it just right.The first step in attaching the frame tothe hinge pin is to paint the pin with liquidsolder flux while it is in placebetween the two hinges. Apply heat atvery low flame in a rotating fashion tothe center of the pin and apply the smallestsolder possible almost immediately. Itis critical here that the solder not flowinto the hinges themselves. The amountof solder applied to the actual pin can, ofcourse, be regulated and steered using theflame. The next step is to tin the side ofthe wing window frame which willattach to the hinge pin. Try to keep thesolder as centered as possible. Examinethe parts and make sure that there is notexcessive solder but yet enough to holdthe two parts together. This will be a verydelicate joint and requires some care indoing it correctly. I would suggest thatthe first several times you try this the cabitself be held with a clamp to the workplace. Now jig the wing window frame ina similar fashion and move it into itsproper location against the pin. It isimportant here that the wing windowframe be touching the pin. There must beintimate contact for the solder to flow.Once this is set up and you are satisfiedthat the jig gives good contact, you areready to apply heat.Only a very tiny amount of heat isnecessary to make this joint. Furthermorethis is one case where the jointmust be quenched immediately. You canalways re-tin and re-flux the joint, but ifthe joint gets too hot and solder flowsinto the hinges then the whole thing hasto be disassembled and cleaned up. Sonow keeping the flame low, bring it upto the middle point of the hinge pin andgently work it in a circular fashion untilthe solder starts to turn silver and flow.Immediately quench the flame, removethe jig holding the window frame andyou should have a working wing window.*Precision Scale Models, PO Box278, Stevensville, MT 59870 406-777-5071, psc@ixi.net(Ed. note: We discovered, as didHarry, that there is no discussion ofworking doors in this series. We doextend our apologies to our readers andpromise that working doors will be coveredin a future article. Next up fromHarry will be Cab Awnings and Curtains.Watch for it in O Scale Trains #5coming in November.)◆12 • O Scale Trains


