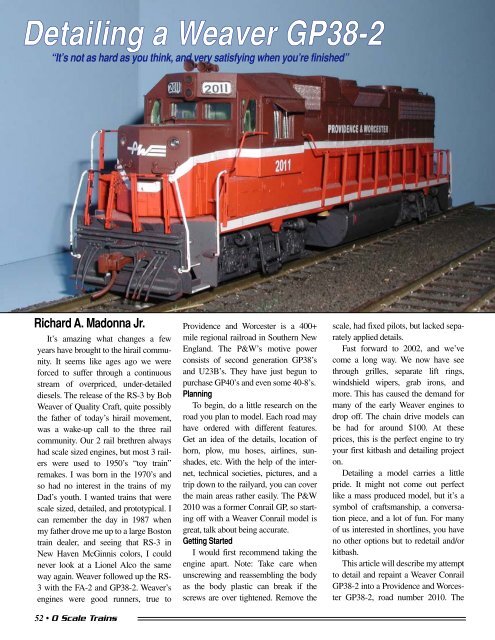
Detailing a Weaver GP38-2“It’s not as hard as you think, and very satisfying when you’re finished”Richard A. Madonna Jr.It’s amazing what changes a fewyears have brought to the hirail community.It seems like ages ago we wereforced to suffer through a continuousstream of overpriced, under-detaileddiesels. The release of the RS-3 by BobWeaver of Quality Craft, quite possiblythe father of today’s hirail movement,was a wake-up call to the three railcommunity. Our 2 rail brethren alwayshad <strong>scale</strong> sized engines, but most 3 railerswere used to 1950’s “toy train”remakes. I was born in the 1970’s andso had no interest in the <strong>trains</strong> of myDad’s youth. I wanted <strong>trains</strong> that were<strong>scale</strong> sized, detailed, and prototypical. Ican remember the day in 1987 whenmy father drove me up to a large Bostontrain dealer, and seeing that RS-3 inNew Haven McGinnis colors, I couldnever look at a Lionel Alco the sameway again. Weaver followed up the RS-3 with the FA-2 and GP38-2. Weaver’sengines were good runners, true to52 • O Scale TrainsProvidence and Worcester is a 400+mile regional railroad in Southern NewEngland. The P&W’s motive powerconsists of second generation GP38’sand U23B’s. They have just begun topurchase GP40’s and even some 40-8’s.PlanningTo begin, do a little research on theroad you plan to model. Each road mayhave ordered with different features.Get an idea of the details, location ofhorn, plow, mu hoses, airlines, sunshades,etc. With the help of the internet,technical societies, pictures, and atrip down to the railyard, you can coverthe main areas rather easily. The P&W2010 was a former Conrail GP, so startingoff with a Weaver Conrail model isgreat, talk about being accurate.Getting StartedI would first recommend taking theengine apart. Note: Take care whenunscrewing and reassembling the bodyas the body plastic can break if thescrews are over tightened. Remove the<strong>scale</strong>, had fixed pilots, but lacked separatelyapplied details.Fast forward to 2002, and we’vecome a long way. We now have seethrough grilles, separate lift rings,windshield wipers, grab irons, andmore. This has caused the demand formany of the early Weaver engines todrop off. The chain drive models canbe had for around $100. At theseprices, this is the perfect engine to tryyour first kitbash and detailing projecton.Detailing a model carries a littlepride. It might not come out perfectlike a mass produced model, but it’s asymbol of craftsmanship, a conversationpiece, and a lot of fun. For manyof us interested in shortlines, you haveno other options but to redetail and/orkitbash.This article will describe my attemptto detail and repaint a Weaver ConrailGP38-2 into a Providence and WorcesterGP38-2, road number 2010. The
glass, cover the reverse unit and motorwith sandwich bags, and remove theWeaver coupler. I originally planned onremoving the stock paint, but after tryingWeaver’s Scalecoat remover onanother shell with “OK” results, I wentahead and let it stay Conrail blue.Weaver has provided plenty of moldedon details which need to go. Micro-Mark sells a nice plastic chisel toremove the molded on parts, and alsocan be used on painted kits to removedetails without ruining the paint. Thetool is a small pencil sized chisel withbeveled edges that cuts like butterthrough the plastic. I removed the liftrings, grab-irons, and door handles.Adding DetailsI was amazed to learn the wealth ofparts available, even parts specific todifferent railroads. Most parts are inbrass, and although they are not cheap,they are what separate a finely detailedmodel from a mass market engine. Ifyou are smart though, you can find aRed Caboose GP-9 body kit for about$49, and have parts left over to detailthe GP38. There will be some drilling,and you will need a pin vise. First lineup the parts and mark off the locationsto drill the necessary holes. Using a pinvise (a small drill holder), I drilled pilotholes to hold the parts, and started gluingthe brass parts in. I added grab ironsto the end of the long hood, and on thetop and side of the short hood. Lift ringswere added to the roof, along with alarge curved grab behind the rear fan.Door handles were added along with<strong>scale</strong> windshield wipers, arm rests, andsun shades. The pilots were dressed upwith <strong>scale</strong> couplers, mu hoses, trainline hoses, and coupler lift brackets andbars. I even drilled out the correctmarker lights and added plastic lenses.At first, adding the small parts was difficult,but with a little practice yourskills will greatly improve. I actuallyassembled 2 Red Caboose GP-9 bodykits in one evening over the Winter.PaintingI have not taken the air-brushplunge, and opted for Weaver’s ScalecoatII paint in spray cans for plasticmodels (Scalecoat II New HavenOrange and Testors Brown). There wasplenty and I was able to do almostthree. Masking was a little tough, butthe P&W has a solid white stripearound the middle of the engine, so thishid any paint bleeding. I didn’t go withflat black on the pilot and trucks, butinstead chose Grimey Black. It appearsto be gray, and I am not sure if I like itor not. It may end up being repaintedjust plain black. The couplers shouldalways be a rust brown (Even factoryrepainted engines have these rusty couplers).DecalsWith the aid of a PC and a colorprinter, you can try and make your owndecals. A little Internet searching, and Iwas able to find almost any decal Icould image, although they were all inHO. HO, how does that become O? Nobig deal in today’s world. Most of thesmall decal makers use computers fortheir decals and its easy to enlarge thedecals to O <strong>scale</strong>. I sent an email off toHighball Graphics, and for about $12 Ihad 2 sets of P&W decals in O <strong>scale</strong>.This was my first decaling attempt, so Ididn’t use all the right finishing agents,but I think it came out pretty good.Remember, even the prototypes getscratched and dirty after a while. Theynever look pristine for long. The stripeon the long-hood was a bear to keeplevel, but I am satisfied with the results.After decaling, I sprayed the entire unitwith Dullcoat, and let it sit to dry.Conversion to 2 railMy plan was to convert the 3 railengine to 2 rail. All that’s needed toconvert to 2 rail is: (A) remove thereverse units; (B) add <strong>scale</strong> 2 railwheelsets; (C) remove the 3rd rail pickup;and (D) reconnect the wires to themotor. Pretty simple and straight-forward.So I removed the reverse unitboard and started taking the sideframesoff the bolsters to remove the wheels.Watch out when removing the sideframesthough, as I broke one off. Icould have left them on, and just gentlypried out the old wheelsets and replacedwith the 2 rail. I thought about stayingwith 3 rail and TMCC, but am planninga layout with a 2 rail loop, and these aretruly <strong>scale</strong> diesels with no swingingpilots, so I thought these would be agood way to get started in 2 rail.Thanks to Jace Kahn’s advice from theO Trains list at Yahoo, I contactedWeaver who sold me the 2 railwheelsets for $20 per engine.ConclusionThis project has unleashed the hiddendetailer in me. I’ve taken it one stepfarther and have begun to chop a LionelNew Haven C-420 into a New Havenprototypical C424/5. Any engine willlook much better with a few added ondetails, a task that is rather easy to donow. Take out an old boxcar or cabooseand try removing and/or adding details.You may get bitten by the same bugthat got me.◆Supplies: Tools, Pin Vise & Drill Bits, Plasticchisel, Glue, Sand Paper, File, SolderingIron, Screwdrivers, Hobby Knife.O Scale Trains • 53