

More Color More Color - O scale trains
More Color More Color - O scale trains
More Color More Color - O scale trains
- No tags were found...

You also want an ePaper? Increase the reach of your titles
YUMPU automatically turns print PDFs into web optimized ePapers that Google loves.
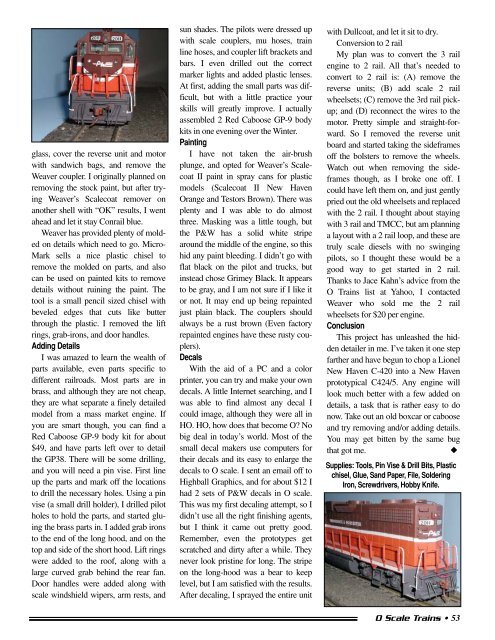
glass, cover the reverse unit and motorwith sandwich bags, and remove theWeaver coupler. I originally planned onremoving the stock paint, but after tryingWeaver’s Scalecoat remover onanother shell with “OK” results, I wentahead and let it stay Conrail blue.Weaver has provided plenty of moldedon details which need to go. Micro-Mark sells a nice plastic chisel toremove the molded on parts, and alsocan be used on painted kits to removedetails without ruining the paint. Thetool is a small pencil sized chisel withbeveled edges that cuts like butterthrough the plastic. I removed the liftrings, grab-irons, and door handles.Adding DetailsI was amazed to learn the wealth ofparts available, even parts specific todifferent railroads. Most parts are inbrass, and although they are not cheap,they are what separate a finely detailedmodel from a mass market engine. Ifyou are smart though, you can find aRed Caboose GP-9 body kit for about$49, and have parts left over to detailthe GP38. There will be some drilling,and you will need a pin vise. First lineup the parts and mark off the locationsto drill the necessary holes. Using a pinvise (a small drill holder), I drilled pilotholes to hold the parts, and started gluingthe brass parts in. I added grab ironsto the end of the long hood, and on thetop and side of the short hood. Lift ringswere added to the roof, along with alarge curved grab behind the rear fan.Door handles were added along with<strong>scale</strong> windshield wipers, arm rests, andsun shades. The pilots were dressed upwith <strong>scale</strong> couplers, mu hoses, trainline hoses, and coupler lift brackets andbars. I even drilled out the correctmarker lights and added plastic lenses.At first, adding the small parts was difficult,but with a little practice yourskills will greatly improve. I actuallyassembled 2 Red Caboose GP-9 bodykits in one evening over the Winter.PaintingI have not taken the air-brushplunge, and opted for Weaver’s ScalecoatII paint in spray cans for plasticmodels (Scalecoat II New HavenOrange and Testors Brown). There wasplenty and I was able to do almostthree. Masking was a little tough, butthe P&W has a solid white stripearound the middle of the engine, so thishid any paint bleeding. I didn’t go withflat black on the pilot and trucks, butinstead chose Grimey Black. It appearsto be gray, and I am not sure if I like itor not. It may end up being repaintedjust plain black. The couplers shouldalways be a rust brown (Even factoryrepainted engines have these rusty couplers).DecalsWith the aid of a PC and a colorprinter, you can try and make your owndecals. A little Internet searching, and Iwas able to find almost any decal Icould image, although they were all inHO. HO, how does that become O? Nobig deal in today’s world. Most of thesmall decal makers use computers fortheir decals and its easy to enlarge thedecals to O <strong>scale</strong>. I sent an email off toHighball Graphics, and for about $12 Ihad 2 sets of P&W decals in O <strong>scale</strong>.This was my first decaling attempt, so Ididn’t use all the right finishing agents,but I think it came out pretty good.Remember, even the prototypes getscratched and dirty after a while. Theynever look pristine for long. The stripeon the long-hood was a bear to keeplevel, but I am satisfied with the results.After decaling, I sprayed the entire unitwith Dullcoat, and let it sit to dry.Conversion to 2 railMy plan was to convert the 3 railengine to 2 rail. All that’s needed toconvert to 2 rail is: (A) remove thereverse units; (B) add <strong>scale</strong> 2 railwheelsets; (C) remove the 3rd rail pickup;and (D) reconnect the wires to themotor. Pretty simple and straight-forward.So I removed the reverse unitboard and started taking the sideframesoff the bolsters to remove the wheels.Watch out when removing the sideframesthough, as I broke one off. Icould have left them on, and just gentlypried out the old wheelsets and replacedwith the 2 rail. I thought about stayingwith 3 rail and TMCC, but am planninga layout with a 2 rail loop, and these aretruly <strong>scale</strong> diesels with no swingingpilots, so I thought these would be agood way to get started in 2 rail.Thanks to Jace Kahn’s advice from theO Trains list at Yahoo, I contactedWeaver who sold me the 2 railwheelsets for $20 per engine.ConclusionThis project has unleashed the hiddendetailer in me. I’ve taken it one stepfarther and have begun to chop a LionelNew Haven C-420 into a New Havenprototypical C424/5. Any engine willlook much better with a few added ondetails, a task that is rather easy to donow. Take out an old boxcar or cabooseand try removing and/or adding details.You may get bitten by the same bugthat got me.◆Supplies: Tools, Pin Vise & Drill Bits, Plasticchisel, Glue, Sand Paper, File, SolderingIron, Screwdrivers, Hobby Knife.O Scale Trains • 53


