- Page 1 and 2:
ChemOffice.Com®ChemOffice®Chem3D,
- Page 3 and 4:
CS Product RegistrationRegistering
- Page 5 and 6:
User’s GuideCS Chem3D 8.0for Wind
- Page 7 and 8:
CambridgeSoft Software License1. Gr
- Page 9 and 10:
No Waiver. The failure of either pa
- Page 11 and 12: The failure of either party to asse
- Page 13 and 14: ContentsIntroduction . . . . . . .
- Page 15 and 16: Rotating Fragments. . . . . . . . .
- Page 17 and 18: Choosing a Hamiltonian . . . . . .
- Page 19 and 20: Appendix D: MM2 . . . . . . . . . .
- Page 22 and 23: Administrator• Faster graphics-3D
- Page 24 and 25: AdministratorInstallation and Syste
- Page 26 and 27: AdministratorModel WindowThe Model
- Page 28 and 29: Table ElementDescriptionObjectDescr
- Page 30 and 31: To specify the rendering type, atom
- Page 32 and 33: AdministratorYou can also build mod
- Page 34 and 35: AdministratorElementBound-to orderS
- Page 36 and 37: Customizing the UserInterfaceAdmini
- Page 38 and 39: AdministratoroptionUse BackBuffer f
- Page 40 and 41: AdministratorExamine the atoms and
- Page 42 and 43: Administrator2. Release the mouse b
- Page 44 and 45: AdministratorReplacing AtomsTo chan
- Page 46 and 47: Change the model display type:Build
- Page 48 and 49: You will also save the frames you c
- Page 50 and 51: Tutorial 4: SearchingFor Conformati
- Page 52 and 53: Administrator3. Click in the model
- Page 54 and 55: Administrator5. In the Theory tab,
- Page 56 and 57: AdministratorFor phenol, the greate
- Page 58 and 59: Creating a Model UsingTemplatesChem
- Page 60 and 61: The Cartesian Coordinates Options d
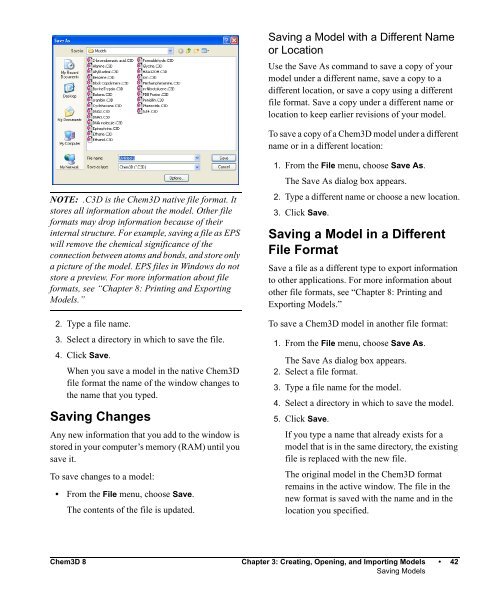
- Page 64 and 65: Administrator44 • Chapter 3: Crea
- Page 66 and 67: AdministratorThe following table de
- Page 68 and 69: After you have the backbone, you ca
- Page 70 and 71: AdministratorThe interpretation of
- Page 72 and 73: AdministratorTo use a substructure
- Page 74 and 75: AdministratorThe standard measureme
- Page 76 and 77: AdministratorTo change the bond ord
- Page 78 and 79: Administratorvalues are the standar
- Page 80 and 81: AdministratorTo remove the formal c
- Page 82 and 83: AdministratorRefining a ModelAfter
- Page 84 and 85: AdministratorSelecting Atoms in a G
- Page 86 and 87: AdministratorWhen you choose Show A
- Page 88 and 89: AdministratorTo perform a rotation
- Page 90 and 91: To move three atoms to a plane and
- Page 92 and 93: Administratorit and other atoms. Al
- Page 94 and 95: AdministratorIf an atom is position
- Page 96 and 97: AdministratorModel TypesThe followi
- Page 98 and 99: AdministratorColoring DisplaysYou c
- Page 100 and 101: To change one of the colors in the
- Page 102 and 103: AdministratorAll atoms currently in
- Page 104 and 105: AdministratorDisplaying MolecularSu
- Page 106 and 107: AdministratorMolecular Surface Colo
- Page 108 and 109: AdministratorSolvent Accessible Sur
- Page 110 and 111: AdministratorTo display a Connolly
- Page 112 and 113:
previously computed surface. If you
- Page 114 and 115:
If you want todisplay …Then Selec
- Page 116 and 117:
Administrator• From the Edit menu
- Page 118 and 119:
AdministratorShowing Dihedral Angle
- Page 120 and 121:
Administrator5. Select the C(2)-C(3
- Page 122 and 123:
AdministratorThe color of the atoms
- Page 124 and 125:
AdministratorTo begin the docking c
- Page 126 and 127:
AdministratorTo perform an overlay,
- Page 128 and 129:
To remove all frames after the fram
- Page 130 and 131:
Administrator106 • Chapter 7: Ins
- Page 132 and 133:
If you want to …Then select …Fi
- Page 134 and 135:
AdministratorBMPThe Bitmap file for
- Page 136 and 137:
When you save a file as a Connectio
- Page 138 and 139:
AdministratorIf you want to …buil
- Page 140 and 141:
Administratorexports .PDB. The .PDB
- Page 142 and 143:
Administrator116 • Chapter 8: Pri
- Page 144 and 145:
AdministratorComputational Chemistr
- Page 146 and 147:
AdministratorThe following table su
- Page 148 and 149:
Administrator• A single point cal
- Page 150 and 151:
Administrator• Potential energy f
- Page 152 and 153:
AdministratorE Stretch= 71.94 ∑ K
- Page 154 and 155:
Administratorinclude interactions w
- Page 156 and 157:
Administratorwhich are used to scal
- Page 158 and 159:
AdministratorQuantum mechanical met
- Page 160 and 161:
AdministratorLinear Combination of
- Page 162 and 163:
AdministratorUHFThe UHF method trea
- Page 164 and 165:
Administrator• Hypervalent compou
- Page 166 and 167:
Administrator138 • Chapter 9: Com
- Page 168 and 169:
AdministratorIf you want to …spec
- Page 170 and 171:
AdministratorThe Total Steric Energ
- Page 172 and 173:
AdministratorThe conformation you c
- Page 174 and 175:
.AdministratorSticks < Ball and Sti
- Page 176 and 177:
AdministratorThe simulation ends wh
- Page 178 and 179:
AdministratorThe units are kcal/mol
- Page 180 and 181:
AdministratorRepeating an MM2Comput
- Page 182 and 183:
AdministratorChoose the appropriate
- Page 184 and 185:
AdministratorTo determine the appro
- Page 186 and 187:
AdministratorFirst excited quintet:
- Page 188 and 189:
AdministratorMOPAC uses its default
- Page 190 and 191:
AdministratorThe following contains
- Page 192 and 193:
The heat of formation is composed o
- Page 194 and 195:
AdministratorComparing Cation Stabi
- Page 196 and 197:
Administratormeta>para>ortho, where
- Page 198 and 199:
Administrator3. Click in the model
- Page 200 and 201:
Form ofglycine∆H(kcal/mole)Solven
- Page 202 and 203:
AdministratorThe following table co
- Page 204 and 205:
AdministratorThe Message window dis
- Page 206 and 207:
AdministratorDescriptionVibrational
- Page 208 and 209:
You can create a structure from the
- Page 210 and 211:
AdministratorIf you want to …reco
- Page 212 and 213:
AdministratorSave a customized job
- Page 214 and 215:
Administrator2. Type the full path
- Page 216 and 217:
Administrator3. From the Basis Set
- Page 218 and 219:
AdministratorA new model window is
- Page 220 and 221:
PropertyDescriptionPropertyDescript
- Page 222 and 223:
PropertyDescriptionError MessageCau
- Page 224 and 225:
PropertyDescriptionThe GAMESS serve
- Page 226 and 227:
The property filters are:Administra
- Page 228 and 229:
AdministratorTo perform property ca
- Page 230 and 231:
The Select Descriptors dialog box a
- Page 232 and 233:
Administrator• Sum• Standard de
- Page 234 and 235:
To access Browse ChemStore.com:The
- Page 236 and 237:
AdministratorTo access the ChemOffi
- Page 238 and 239:
AdministratorDefining Substructures
- Page 240 and 241:
AdministratorA4 • CambridgeSoftDe
- Page 242 and 243:
AdministratorIf an atom can be assi
- Page 244 and 245:
AdministratorExample 3In Example 3,
- Page 246 and 247:
AdministratorEditing ParametersYou
- Page 248 and 249:
Administrator5. A matrix called the
- Page 250 and 251:
AdministratorAdding Parameters toMO
- Page 252 and 253:
AdministratorParameter Table UseEle
- Page 254 and 255:
AdministratorThe ElementsThe Elemen
- Page 256 and 257:
AdministratorTo view the menu of ge
- Page 258 and 259:
AdministratorFinally, the 1-19 bond
- Page 260 and 261:
AdministratorPi AtomsThe Pi Atoms t
- Page 262 and 263:
AdministratorCubic and Quartic Stre
- Page 264 and 265:
potential well increases, as does t
- Page 266 and 267:
AdministratorThe counterintuitive f
- Page 268 and 269:
Administratorcorrespondence between
- Page 270 and 271:
AdministratorAlchemy FileThe follow
- Page 272 and 273:
Administrator2. The first line of a
- Page 274 and 275:
H 102 2.127594 1.865631 1.48999 21
- Page 276 and 277:
Administrator6 1 1.40195 2 107.6989
- Page 278 and 279:
41 3 1 0 0 0 0 0 0 0 0 0 0 1.222366
- Page 280 and 281:
Administrator21 -1.2615 2.1277 0.01
- Page 282 and 283:
Administrator24-42 Bond id, fromato
- Page 284 and 285:
Administrator51 2 1 1 6 0 0.000 0 0
- Page 286 and 287:
Administrator18. Line 49 contains a
- Page 288 and 289:
AdministratorFORTRAN FormatsThe des
- Page 290 and 291:
22 Chain Identifier No12-16 Serial
- Page 292 and 293:
AdministratorLine 18 H 0 0 0Line 19
- Page 294 and 295:
Administratorof hydrogens attached
- Page 296 and 297:
AdministratorNumberof AtomsNumberof
- Page 298 and 299:
AdministratorLine 30 @BONDLine 31 1
- Page 300 and 301:
11-29 Atom type, name,coordinates a
- Page 302 and 303:
AdministratorA66 • CambridgeSoftW
- Page 304 and 305:
AdministratorTroubleshootingThis se
- Page 306 and 307:
4. If the problem still occurs, Fax
- Page 308 and 309:
AdministratorAtom typesassigning au
- Page 310 and 311:
Administratorchem3d.h 17chem3d.tlb
- Page 312 and 313:
AdministratorDisplay Stereo View 80
- Page 314 and 315:
AdministratorFont 16Font size 16For
- Page 316 and 317:
Administratorjdt file format 114, 1
- Page 318 and 319:
AdministratorMolecular Surfacescalc
- Page 320 and 321:
AdministratorParameters 12bond angl
- Page 322 and 323:
AdministratorSelect Fragment comman
- Page 324 and 325:
AdministratorTools palette 6, 44Too
- Page 326 and 327:
Administratorxx • IndexCambridgeS
- Page 328 and 329:
CAMBRIDGESOFTChemOffice Desktop toK
- Page 330 and 331:
CS ChemOfficeSoftware SuitesChemOff
- Page 332 and 333:
DESKTOPCS E-NotebookElectronic Jour
- Page 334 and 335:
DESKTOPCS ChemDrawChemical Structur
- Page 336 and 337:
DESKTOPCS Chem3DMolecular Modeling
- Page 338 and 339:
DESKTOPCS ChemFinderSearching and I
- Page 340 and 341:
DESKTOPCS ChemInfoReference and Che
- Page 342 and 343:
ENTERPRISEChemOffice WebServerEnter
- Page 344 and 345:
ENTERPRISEOracle CartridgeEnterpris
- Page 346 and 347:
KNOWLEDGEE-Notebook EnterpriseDeskt
- Page 348 and 349:
KNOWLEDGEDocument ManagerDesktop to
- Page 350 and 351:
KNOWLEDGE21CFR11 ComplianceElectron
- Page 352 and 353:
RESEARCH&Registration SystemChemica
- Page 354 and 355:
RESEARCH&Inventory ManagerChemical
- Page 356 and 357:
RESEARCH&CombiChem EnterpriseDeskto
- Page 358 and 359:
RESEARCH&BioAssay HTSBiological Ass
- Page 360 and 361:
RESEARCH&BioSAR BrowserBiological a
- Page 362 and 363:
CHEMICALChemACX DatabaseAvailable C
- Page 364 and 365:
CHEMICALThe Merck IndexChemistry’
- Page 366 and 367:
CHEMICALChemical DatabasesReference
- Page 368 and 369:
CONSULTING &Consulting & ServicesDe
- Page 370 and 371:
Administrator
- Page 372 and 373:
MENUSCreate a new model window.Open
- Page 374 and 375:
WORKING WITH SELECTIONSIf you want
- Page 376:
CS ChemOffice®Desktop to Enterpris