
Create successful ePaper yourself
Turn your PDF publications into a flip-book with our unique Google optimized e-Paper software.
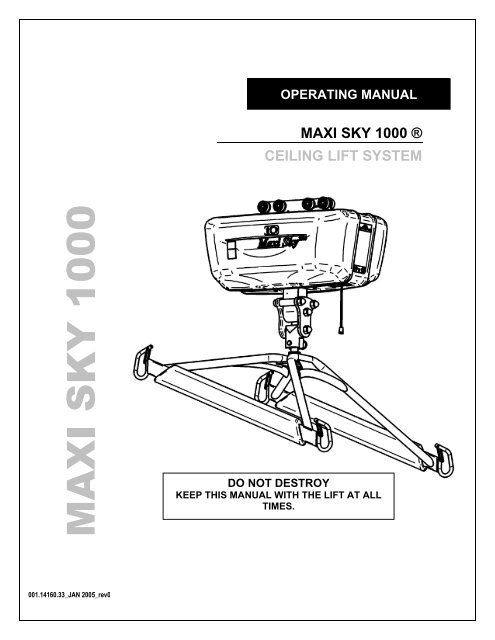
OPERATING MANUAL<strong>MAXI</strong> <strong>SKY</strong> <strong>1000</strong> ®<strong>CEILING</strong> <strong>LIFT</strong> <strong>SYSTEM</strong>DO NOT DESTROYKEEP THIS MANUAL WITH THE <strong>LIFT</strong> AT ALLTIMES.
<strong>MAXI</strong> <strong>SKY</strong> <strong>1000</strong> Operating Manual 2
Arjo designs and manufactures quality engineered patient lifting equipment forthe care of the disabled in hospitals, nursing homes and home care.Please take the time to read the entire manual, including the section on Safety Instructions and Warnings.It contains important information that will allow you to take advantage of all the characteristics of yourARJO patient lift.Arjo CredentialsFDA Registration # 9681684CE mark (European Union Listing)Global operations for in-warranty and out-of-warranty service support for <strong>MAXI</strong> <strong>SKY</strong> <strong>1000</strong> lift.Each finished <strong>MAXI</strong> <strong>SKY</strong> <strong>1000</strong> is individually tested in our laboratory.Lifting capacity is 455 kg (<strong>1000</strong> lbs). Engineering safety factor exceeds European Standards.Complete range of patient lift slings and supports designed and manufactured by Arjo Inc. usingmedical quality materials and fabrics.ISO 9001APPROVALS:CSA 601.1UL 2601.1EN 60601.1EN ISO 10535 (Lifting device) SGSUK Test Report: DUR22107/AC/OONote:Arjo is constantly improving its products. For this reason, it may be possible to encounter amodification of product without revision of this manual.Thank you for trusting your Arjo Partners.<strong>MAXI</strong> <strong>SKY</strong> <strong>1000</strong> Operating Manual 3
TABLE DES MATIÈRESINTRODUCTION ........................................................................................................................................... 5How to use this Manual.............................................................................................................................. 5Equipment Identification............................................................................................................................. 5Verifying the Package Contents................................................................................................................. 5Key to Symbols .......................................................................................................................................... 5SAFETY INSTRUCTIONS AND WARNINGS............................................................................................... 6DESCRIPTION OF EQUIPMENT <strong>MAXI</strong> <strong>SKY</strong> <strong>1000</strong> ................................................................................... 8Lift Unit ....................................................................................................................................................... 8What s included.......................................................................................................................................... 8Dimensions................................................................................................................................................. 8Parts description......................................................................................................................................... 9OPERATION................................................................................................................................................ 10How to use the <strong>MAXI</strong> <strong>SKY</strong> <strong>1000</strong> .............................................................................................................. 10Emergency Stop (Red Cord).................................................................................................................... 11Emergency Lowering Feature .................................................................................................................. 11Emergency Brake..................................................................................................................................... 11Battery Information................................................................................................................................... 12Indicator Lights......................................................................................................................................... 12Charger Specifications: ............................................................................................................................ 13Using the FIDO function (Pre-programmed positions)............................................................................. 13Programming the Lift................................................................................................................................ 14MAINTENANCE .......................................................................................................................................... 15Daily Check List........................................................................................................................................ 15Inspection and Cleaning........................................................................................................................... 15Strap Inspection ....................................................................................................................................... 15Handling and Storage .............................................................................................................................. 16Battery Replacement................................................................................................................................ 16Sling Inspection and Care ........................................................................................................................ 16Annual Inspection..................................................................................................................................... 17Maintenance Requirements ..................................................................................................................... 17ERGOFIT SLINGS....................................................................................................................................... 18Bariatric Sling (TOB) ................................................................................................................................ 19MAINTENANCE INSPECTION CHECKLIST.............................................................................................. 20TROUBLESHOOTING ................................................................................................................................ 21ACCESSORIES........................................................................................................................................... 23LOGBOOK .................................................................................................................................................. 24WARRANTY ................................................................................................................................................ 26WARNING!All rights reserved. CONFIDENTIAL. The reproduction of this document or the transmittal in any form of any information, containedherein, without the authority in writing of an officer of the manufacturer is prohibited.TECHNICAL SPECIFICATIONS AND DESIGN SUBJECT TO CHANGE WITHOUT NOTICE.<strong>MAXI</strong> <strong>SKY</strong> <strong>1000</strong> Operating Manual 4
INTRODUCTIONHow to use this ManualDO NOT ATTEMPT TO USE THISEQUIPMENT WITHOUT UNDER-STANDING THIS MANUAL.To ensure safe operation, read the entiremanual carefully, especially the section onSafety Instructions and Warnings , beforeinstalling, operating, or servicing thisequipment.If anything is not completely understood,please contact your supplier for moredetails. Failure to comply with warnings inthis manual may result in injuries.Keep this manual with the lift and refer to itas required. Contents of this manual aresubject to change without prior notice tousers.Throughout this manual, the following symbolsmay appear. Pay particular attention to theinformation provided under these headings.These special annotations are easily recognizedas follows:WARNING: this symbol is intendedto alert the user to hazards orunsafe practices, which couldresult in serious bodily harm.CAUTION: this symbol is intendedto alert the user of the presence ofimportant operating andmaintenance instructions, whichcould prevent product damage orpossible personal injury.NOTE: this symbol offers helpfulinformation concerning certainoperating procedures.You can purchase additional copies of thismanual by contacting your supplier. Include theUser Manual product number and equipmentidentification number.Equipment IdentificationThe unit's identification number (specification,model, serial number) appears on a silvernameplate attached to the end of the lift.INTRODUCTIONVerifying the Package ContentsUpon receipt of the equipment, verify it against thepacking list to ensure it is complete and inspect theequipment for possible damage due to shipping. Ifthere is any damage, DO NOT USE the equipmentand notify the carrier immediately to file a claim.Provide complete information concerning damageclaims or shipping errors to your supplier. Includeall equipment identification numbers and group partnumbers (if any), as described above along with afull description of the damaged parts.Key to SymbolsThe following symbols are used on the<strong>MAXI</strong> <strong>SKY</strong> <strong>1000</strong> lift:This symbol indicates the power-onindicator.This symbol indicates the chargingindicator light.The symbol indicates the light"Service".This symbol represents the emergencystop.The following symbols are used on lifter sattachment labels:SWLThis symbol is required to be displayed onregulated products for sale in the EuropeanMarket. It indicates that the productcomplies with applicable EuropeanDirectives related to health, safety andenvironment, and consumer protection.Safe Working Load represents the maximumload the lifter is rated for safe operation.The following symbols are used on sling labelsand related to washing instructions:60ºCMaximum washing temperature is 60°C(140°F) inpermanent cycle.Do not use bleach.Do not dry clean.Tumble dry low temperature.Do not iron.Please refer to individual sling labels forcomplete instructions regarding washing anddrying.<strong>MAXI</strong> <strong>SKY</strong> <strong>1000</strong> Operating Manual 5
SAFETY INSTRUCTIONS AND WARNINGSSAFETY INSTRUCTIONS AND WARNINGSA. GENERALIMPORTANT READ THESE INSTRUCTIONS CAREFULLY OR SERIOUS INJURY MAY RESULT.KEEP THESE INSTRUCTIONS AND THE KEY PROVIDED WITH THE <strong>LIFT</strong> AT ALL TIMES.READ OPERATION AND MAINTENANCE INSTRUCTIONS IN THIS MANUAL BEFOREINSTALLING, OPERATING, OR SERVICING THIS EQUIPMENT.Arjo ceiling lifts must be installed by an authorized contractor or installer.Installation must be conformed to accept a <strong>1000</strong> lbs (455 kg) load. (For more information,consult the Installation guide)Only certified technician or installer can remove and reinstall the lift into track.The <strong>MAXI</strong> <strong>SKY</strong> <strong>1000</strong> unit is used only on a straight track. The use of curved rails is prohibitted.YOUR <strong>LIFT</strong> is for transferring patients only. Do not use the lift for any other purpose.ALWAYS carry out the daily checklist before using the lift.Arjo ceiling lifts are specifically designed for Arjo ceiling rail systems, slings and accessories.Slings and accessories designed by any other manufacturer are prohibited and will void Arjowarranty. Use only Ergofit slings and accessories to maintain patient safety and productutility.Arjo ceiling lifts are intended to be used for patients within the specified weight limit indicatedfor the lift. Do not attempt to lift more than the weight limit indicated.Before attempting to transfer, the patient must be assessed by a qualified professional.Arjo ceiling lifts must be used by a caregiver with proper training to work with the patient to betransferred.ONLY trained and qualified caregivers should transfer a patient. DO NOT attempt to use the liftif you have not been properly trained to do so.ALWAYS be prepared before attempting to transfer a patient.DO NOT use a sling that is not recommended for the lift.NEVER use a damaged, torn or frayed sling.ALWAYS place the sling around the patient according to the instructions enclosed.FOLLOW lifting procedures outlined in this manual.USE all controls and safety features only according to the rules specified in this manual.Never attempt to force a control or button on the lift.DO NOT store the charger in a shower, bath or other areas with high humidity.DO NOT drop the patient lift or batteries. Dropping the lift or batteries may cause internaldamage that is not easily seen. If the lift is suspected to be damaged, take to an authorizedtechnician for servicing.Do not put fingers into the strap and pulley system or it could result in injuries.IMPORTANT: Keep all components of the lift clean and dry, and have electrical and mechanicalsafety checkpoints done as instructed in the "Maintenance" section of this manual.Replace any precautionary or instruction labels that cannot be easily read.Avoid violent shock during transportation.B. SHOCK PREVENTIONDO NOT touch or use a lift with bare conductors or a damaged power cord. Electrically liveequipment can electrocute a patient. If the lift or charger has any exposed or damaged wirescontact your local dealer immediately.DO NOT splash or expose electric parts of the device to water or moisture.CHECK nameplate for voltage and cycle requirements. These requirements differ by country.Do not attempt to use the lift in an area that has a different voltage and cycle requirement.<strong>MAXI</strong> <strong>SKY</strong> <strong>1000</strong> Operating Manual 6
SAFETY INSTRUCTIONS AND WARNINGSDO NOT attempt to expose, service or repair the lift, battery or charger. If any unit ismalfunctioning, contact your local dealer.READ batteries and charger instructions thoroughly before using or storing them.C. FIRE AND EXPLOSION PREVENTIONBatteries may explode, leak and cause personal injury if not disposed of properly.Do not place or store the battery under direct sunlight or near a heat sourceDo not dispose of in fireDo not short the battery terminalsFlush with water if electrolyte (Acid) comes in contact with skin or eyes.Batteries must be recycled, disposed of according to local law regulations. When returningbatteries, insulate their terminals with adhesive tape, etc. otherwise, the residual electricity inused batteries may cause fire or explosion.D. EQUIPMENT WARNING LABELSINSPECT all precautionary labels on the equipment. Order and replace all labels that cannot beeasily read.IMPORTANT :CONNECT THE CHARGER AT LEAST 8 HOURS BEFORE THE FIRST USE OF THE <strong>LIFT</strong> INORDER TO COMPLETELY RELOAD THE BATTERIES.<strong>MAXI</strong> <strong>SKY</strong> <strong>1000</strong> Operating Manual 7
DESCRIPTIONDESCRIPTION OF EQUIPMENT<strong>MAXI</strong> <strong>SKY</strong> <strong>1000</strong>Lift UnitThe lift unit is a steel frame based system drivenby a gear reduced high torque motor.OPERATING FEATURES:Lifting capacity: 450 kg (<strong>1000</strong> lbs).Average weight: 22 kg (48 lbs) batteriesincluded.Electronic soft-start and soft-stop motorcontrol.Emergency lowering device.Emergency stop device.Current limiter for circuit protection in case ofoverload.Safety device that stops the motor to liftwhen batteries are too low.Safety device that stops the motor to liftwhen abusing use of the lift causes internaloverheating.Lifting speed: 3 cm/s (1.2 in/s.) at 450 kg(<strong>1000</strong> lbs), 4 cm/sec. (1.6 in/s.) at 230 kg(500 lbs) and 6 cm/s (2.3 in/s) at 0 kg (0 lb).Horizontal displacement speeds: 10, 14, 16and 20 cm/s. Speed by default 16 cm/s. (6,3in/s.).Horizontal axis motors: 24 VDC, 62 wattsand 2 vertical axis motors: 24VDC, 110 w.Emergency brake (in case of mechanicalfailure). Operates on the same principle as acar safety belt mechanismStrap length up to 2.3 m (90 in.) tested for2275 kg (5000 lbs.).CSA No 601.1, UL No 2601-1 and CEcertifications.Respect EMI standardsISO 10535.What s includedITEMQTY<strong>MAXI</strong> <strong>SKY</strong> <strong>1000</strong> lift 1Batteries (inside unit) 2Clip on charging station 1Hand control 14-hook spreader bar 1Power cord 18-mm Allen key 1User Manual 1Dimensions(in millimeters)<strong>MAXI</strong> <strong>SKY</strong> <strong>1000</strong> Operating Manual 8
DESCRIPTIONParts descriptionCharger extensionManual loweringChargerRailUPbuttonDOWNbuttonClip-on chargerstationRed lightfor ServiceStrap and pulleysystemLiftHand control8-mm Allen key4-pointsSpreader barNotes:- the yellow light "charger" flashes while charging and illuminates when charge is finished;- the green light "on" illuminates once the lift is on and ready for use; the green light flasheswhen the batteries are low.- The red light illuminates to confirm that the lift is in the programming service mode.- The red light illuminates in the normal mode when the lift is under overheat protection causingby an overuse.- The red light "service" flashes when servicing is required (contact customer service);- The button "Programming mode" allows you to modify the functions of the product.<strong>MAXI</strong> <strong>SKY</strong> <strong>1000</strong> Operating Manual 9
OPERATIONOPERATIONHow to use the <strong>MAXI</strong> <strong>SKY</strong> <strong>1000</strong>READ « SAFETY INSTRUCTIONSAND WARNING" BEFOREATTEMPTING TO USE THE <strong>MAXI</strong><strong>SKY</strong> <strong>1000</strong>.IMPORTANT :CONNECT THE CHARGER ATLEAST 8 HOURS BEFORE THEFIRST USE OF THE <strong>LIFT</strong> INORDER TO COMPLETELYRELOAD THE BATTERIES.The unit will not lift or lowerwhen in contact with thecharger.1. Install the patient sling (see sling instruction).2. Move the lift directly overthe patient. Use the left andright buttons the handcontrol.Left3. Use the down button on thehand control or on the lift tolower the spreader barunder the patient s chin (toavoid the risk of facialcontact caused by a suddenmovement of the spreaderbar) before beginning toattach the sling straps. If the lift will notUpRightoperate pull red cord once gently, until youhear a click.DownReturntochargeProgrammingmodeIf the lift does not work, gentlypull on the red cord until you heara click. The green light shouldilluminate to confirm the unit ispower on.Note: In a laying down position, lower thespreader bar near the thorax, then install thestraps.Hold the lift spreader bar with onehand at all times when near apatient.4. Attach the straps to the desired position.(See "Ergofit Slings section").5. Carefully observe the patient to ensurehis/her safety as you press the controlbuttons.BEFORE <strong>LIFT</strong>ING THE PATIENT:1. Make sure that all straps areattached to the spreader bar ;2. Make sure the patient iscomfortable;3. Make sure the sling is notcaught on any obstruction(wheelchair brake or arm ofthe chair)If any of the above occurs lower thepatient immediately and correct theproblem.6. To lift the patient, press on the up button,7. Make sure the patient is clear of anyobstacles before moving the patient. Guidethe legs if necessary.8. When the patient is located above thedesired point of transfer, press on the downbutton.9. Use the handles on the back of the sling toposition the patient when transferring into achair. Hold the hand control firmly as thesling lowers and the sling will tilt back toposition the patient.10. Once the patient is properly seated and thestraps are loose, remove the sling from thelift.Hold the lift spreader bar with onehand at all times when near apatient.11. Slide the lift away from the patient.<strong>MAXI</strong> <strong>SKY</strong> <strong>1000</strong> Operating Manual 10
OPERATION12. When the lift is no longer required, return thelift to the charger station by pressing on thereturn button.13. The charging indicator light must be on forthe lift to detect the clip on charging station.Take note that the lift memorizes the chargerstation position.14. Verify the green light at the charging stationand the yellow light (flashing or light) of thelift to ensure that charge function is workingproperly.The <strong>MAXI</strong> <strong>SKY</strong> <strong>1000</strong> is equippedwith a security system toprevent a misuse of the liftingsystem. If the use is over the10% of the duty cycle, the heatdetection system will order tothe processor to block the liftingof a load until transmissiontemperature cools down.Therefore, it will always be possible toactivate the horizontal displacement andthe down functions.When the overheat protection engages,the red light will illuminate during thecooling period.Plus, a buzzer will be heard if the UPbutton is engaged and the motor will notlift. The cooling period is between 10 to 30minutes.Emergency Stop (Red Cord)1. The emergency stop can be activated at anytime to stop the functioning of the lift.2. To stop the lift in an emergency, pull on thered cord once gently, you will hear a "click".Emergency Lowering FeatureIn the event of an electrical or functional failure,the <strong>MAXI</strong> <strong>SKY</strong> <strong>1000</strong> has an emergency manuallowering feature.Only to be used in case of anemergency.If the lift malfunctions when a patient is beingtransferred, the emergency lower deviceprovides a safe way of lowering the patient ontoa chair or a bed.1. Get the 8-mm Allen key provided with thismanual.2. Remove the black cap on the side of thecab.3. Insert the Allen key deep into the gear,visible in the lateral door. Turn it counterclockwise in order to lower your patient. Thekey turns the main gear and each turn of thekey will slowly lower your patient. Do thesame with the gear on the other side of thelift.4. To lower your patient more rapidly, use aratchet or a drill with an 8-mm Allen key.5. Once the patient is lowered and secure on achair or in a bed, call a qualified technicianto inspect the lift.Emergency BrakeThe emergency brake is made of a metal barfixed to the drumRed cordIn case of a chain, gear or motor breakage,the centrifugal force created will block thebar against the frame.Do not pull red cord forcefully.If the cord is pulled tooforcefully, the lift may becomeinoperable.To activate the lift, pull the red cord once gently.The green light confirms that the lift is on.<strong>MAXI</strong> <strong>SKY</strong> <strong>1000</strong> Operating Manual 11
OPERATIONBattery Information2 rechargeable batteries of 12 VDC, 7 Ah.Provides up to 80 transfers with a load of230 kg (500 lbs) and up to 25 transfers witha load of 450 kg (<strong>1000</strong> lbs).Life cycle (number of charging cycles) of thebatteries is largely dependent on the depth ofdischarge in each cycle. More the batteries aredrained, the shorter their life span. The life of thebatteries is also related to such factors asvarying temperatures and rest periods betweencharge and discharge.Graph 1: Number of recharges vs. Depth ofdischargeBattery Capacité capacity (%) (%) de labatterie1008060402000 500 <strong>1000</strong> 1500 2000 2500 3000Charge/discharge Cycles de chargement cycles /déchargement30%50%100%Graph 1 illustrates the relationship between thedischarging depth and expected battery life.If you drain the batteries until they beep everytime, you can expect the batteries to fully chargeonly 600 times.To prolong battery life, returnthe lift to the chargerWHENEVER THE <strong>LIFT</strong> IS NOT INUSE.ARJO uses sealed lead-acid batteries.Contrary to nickel-cadmium, ARJO batteriesdo not have any memory effect. Therefore,batteries should not be completely drainedbefore recharge.Never let a lift with the poweron for a long period of time ifyou did not return the lift to thecharger, otherwise batterieswill be drained and damaged.Do not drain the batteriesexcessively. This will dramaticallyreduce the life span of thebatteries. If the low battery buzzersounds and green light flashes, besure to recharge the batteries assoon as possible.Indicator LightsThe lift and the charging system have manyindicator lights. It important to understand theirsignificance for use and comprehension of thelift.Green lightYellowlightRed lightChargingindicator greenlightClip on chargingstation indicatorgreen lightClip on changingstation redindicatorOperating the lift----------- Low batteriesThe lift is on and ready to use.State of batteries----------- In process of charging batteriesCharging done, batteriescharged.Maintenance----------- Maintenance required by yourlocal representativeLift started by service mode orunder overheat protection.Charger power is onClip power on chargingstation is onProblem with charger, donot use the charger.Graph 2: Number of lifts vs. lift loadNumber of lifts VS load150Number of lifts100500100 250 400 550 700 850 <strong>1000</strong>Load (lbs)<strong>MAXI</strong> <strong>SKY</strong> <strong>1000</strong> Operating Manual 12
MAINTENANCECharging the batteriesDO NOT operate the charger unitwith a damaged cord or if theunit has been dropped ordamaged.DO NOT forcibly bend the power cord orplace a heavy object on it. This willdamage the cord and may cause fire orelectrical shock.DO NOT pour liquid on or near the charger.Do not place the unit in locationsthat are:Extremely hotDusty or dirtyVery humidMoving or vibratingThe recharging steps are asfollow:Press the return to chargerbutton on the hand control. Aprotection device prevents thelift from returning to the chargerwith a load of more than 14 kg(30 lbs)« Prog »« Return»DO NOT SLIDE THE <strong>LIFT</strong> TO THECHARGER FORCEFULLY ORQUICKLY. CHARGER MAYBECOME DAMAGED.The green indicator light will begin flashing ifbatteries are low and need to be recharged.If the light does not illuminate, verify theTroubleshooting" section of this manual.The yellow indicator light will flash when thelift is returned to charger. This indicates thatthe batteries are being charged. Once thecharge is complete the light will stop flashingand become a solid yellow light.If batteries have been completely drained it couldtake up to 6-8 hours to completely rechargethem. In order to reduce charging time, refrainfrom completely draining the batteries and leavethe lift on the charging station between uses.Charger Specifications:Charger input: 100-240 Vac, 50/60 Hz.Charger output: 26-29 VDC, 27Va maxUsing the FIDO function (Preprogrammedpositions)This function can only beactivated by a certifiedtechnician.1. Using the pre-programmed positionsfunction allows the unit to detect stations(positions) (#700.15400.33) locatedalong the track path. The unit will go tothe indicated position by using the handcontrol.2. To do so, indicate to the unit the desiredposition to go: ex.: to go to the 3 rdstation, push three times on thePROG button followed by thedirection (LEFT or RIGHT buttons).3. Then the unit goes by itself to therequested station and stay on hold.4. If the position you asked for is notcorrect, you may stop the lift at any timeby pressing any button on the handcontrol. From this position, re programthe lift to the new desired position.Count the number of stations from whereyou are and indicate the direction to go.Whenever possible, leave the lifton the charger when the lift isnot in use. At minimum, chargethe batteries until the yellow lightstop flashing before using itagain. This will extend the life ofthe batteries.<strong>MAXI</strong> <strong>SKY</strong> <strong>1000</strong> Operating Manual 13
MAINTENANCEProgramming the LiftHow to program the <strong>MAXI</strong> <strong>SKY</strong> <strong>1000</strong>?A) Enter into the Program mode.1. Turn the lift off by pulling the red cord.(The green light must be turned off)2. Press and hold down the PROG buttonon the hand control (bottom left)3. While holding the PROG button, pull onthe red cord once again.4. The green light will flash and the lift willbeep three times.5. Release the PROG button.6. When the red light illuminates, this willconfirm that the lift is in programmingmode Service .The user can easily adjust the speed andheight of the lift while in the ProgramService Mode.Use the UP button on the hand control toselect the parameters desired. Each push ofthe button will bring you to a differentselection:1 beep = Speed displacement2 beeps = Length of the strap3 beeps = Enable/Disable return to chargerTo confirm your selection, press once on thePROG button.B) Speed Adjustment1. Enter into Service Mode and select thefirst choice. (Consult section A).2. Use the left button on the hand controlto select the desired speed as perselection chart below. Each push of thebutton allows you to go from oneselection to the next.1 beep 2 beeps 3 beeps * 4 beeps10 cm/sec 14 cm/sec 16 cm/sec 20 cm/secC) Adjust the height of the spreader barwhen it returns to charger1. Enter into Service mode and select#2. (Consult section A of Programmingthe Lift).2. The strap will completely rewind.3. Once the spreader bar is completelyrewound, use the UP and DOWNbuttons to position the spreader bar tothe desired height when returning unit tocharger.4. To confirm the height desired, press onthe PROG button.5. You can now choose a new selection bypressing on the UP button on the handcontrol, if not turn off the lift and turn itback on by gently pulling on the redcord; this will return the lift to normaluse.D) Enable / Disable Return to chargeReturn to charge function is enabled at factory.The return to charger function can be disabledby user.1. Enter into SERVICE MODE and selectthe 3 rd choice (section A).2. Use hand control left button to selectENABLE, ENABLE LEFT or RIGHT orDISABLE selection.1 beep* 2 beeps 3 beeps 4 beepsENABLEAUTOMATICDISABLEENABLELEFTENABLERIGHT3. To confirm your selection press on thePROG button.4. Now you can choose a new selection bypressing on the UP button on the handcontrol, if not, turn off the lift and it backon by gently pulling on the red cord toreturn the lift to normal use.3. To confirm your choice of speed, presson the PROG button.4. You can now choose a new selection bypressing on the UP button on the handcontrol, if not turn the lift off then turn itback on by gently pulling on the redcord; this will return the lift to normaluse.<strong>MAXI</strong> <strong>SKY</strong> <strong>1000</strong> Operating Manual 14
MAINTENANCEALWAYS CARRY OUT THEDAILY CHECKLIST BEFOREEACH <strong>LIFT</strong> USE.Alterations made to the <strong>MAXI</strong> <strong>SKY</strong> <strong>1000</strong>by someone other than a certifiedtechnician may cause serious injury andvoids the warranty.The <strong>MAXI</strong> <strong>SKY</strong> <strong>1000</strong> and accessoriesmust be inspected ANNUALLY by acertified technician in addition to thedaily and other periodic visual checksdone by the user specified in thissection.Preventive maintenance specified in thismanual can prevent accidents andreduce repair costs.Note all service or repairs to the <strong>MAXI</strong><strong>SKY</strong> <strong>1000</strong> or its accessories in thelogbook at the end of this manual. Havethe document signed by the certifiedtechnicianDaily Check ListTHE FOLLOWING PROCEDURES MUSTBE FOLLOWED BEFORE EACH USE:Have batteries been charged? Park the lifton the charger whenever the lift is not in use.Inspect the lift for any damage. If the liftcasing does not look properly aligned, orthere are any cracks or other damage on thelift, or any parts are missing DO NOT USEIT. Contact your local representative to havethe lift serviced.Inspect the visible strap for any signs ofwear, frays, loose threads or other damage.If there is any evidence of damage DONOT USE IT. Contact your localrepresentative to have the lift serviced.Inspect the sling for tears, frayed straps orloose stitches. If the sling has any of theabove damage DO NOT USE IT. Contactyour local representative to have the slingreplaced or repaired.Inspect the spreader bar for any signs of thecracking or damage.Ensure the split ring and cotter pins thatattach the spreader bar to the strap aresecure.MAINTENANCEInspection and CleaningClean the <strong>MAXI</strong> <strong>SKY</strong> <strong>1000</strong> with a soft dry cloth,or a soft cloth lightly moistened with a milddetergent solution. Do not use any type ofsolvent that may damage the finish.Do not immerse lift in water.To ensure a better rolling surface for the trolleywheels, clean the inside of the track every 4months. To do so, insert a damp cloth in theopening and slide it from one end of the track tothe other.Always reinstall the rail end stopper(if it has been removed) afterservicing.Strap InspectionThis equipment is built with a strap that canwithstand a load of 2275 kg (5000 lbs.)Nonetheless, if this strap is damaged or showssigns of wear, the acceptable load on the strapbefore rupture can drop rapidly and present adanger for the patient or caregiver.Arjo recommends thoroughly inspecting the strapevery 2 months as follows:1. Completely unwind the strap.2. Look for any signs of wear:Loose threads in stitched area.Noticeable discoloration by having awhiter Lighter color strap than the doublethickness stitched area.Noticable decoloration by having aSide wear.Middle wear.If there is any sign of wear asindicated here or other visualdefects, strap should bechanged immediately. Bycontinuing to use the lift withoutchanging the strap, caregiverand patient safety is greatlycompromised.In any case, the manufacturerrecommends changing the strap at leastevery two years. By continuing to use thelift without changing the strap, caregiverand patient safety is greatlycompromised.Take note of inspection results in thelogbook at the end of this manual.<strong>MAXI</strong> <strong>SKY</strong> <strong>1000</strong> Operating Manual 15
Handling and StorageAvoid violent shock during transportation.The lift should not remain stored fmore than twomonths without recharging the batteries.If you store or ship the <strong>MAXI</strong> <strong>SKY</strong> <strong>1000</strong> lift, turnthe power off (green light off).Battery ReplacementARJO uses sealed lead-acid batteries. Contraryto nickel-cadmium, ARJO batteries do not haveany memory effect. Therefore, batteries shouldnot be completely discharged before recharge.Replace the battery when there is a noticeablereduction in the number of transfers that can beperformed between charges. If you notice the<strong>MAXI</strong> <strong>SKY</strong> <strong>1000</strong> lift beeping and a red lightflashing, see the instructions inTroubleshooting to ensure it is a problem withthe battery.To replace a battery, contact your local dealer orrepresentative.DO NOT ATTEMPT TO USE ABATTERY NOT AUTHORIZED BYARJO.ARJO batteries are specially designed forARJO charging systems. Attempting touse an unauthorized battery mayseriously damage the lift and/or thecharger.MAINTENANCEsufficient degree may lead to deterioration orextreme softening of the webbing, which couldlead to the fibres being rubbed off (almost aspowder in extreme cases). It is best to avoidfumes, spray or mists of acid and alkalis ororganic solvents. If contamination is suspected,wash out well in warm water. Avoid contact withexcessive heat, which is likely to affect theproduct.CleaningCertain chemical substances mentioned abovemay be removed with heavy duty cleaner dilutedin warm water. Ensure that any cleaning agentsare removed by rinsing thoroughly in warmwater, maximum 60°C (140°F).For normal washing and cleaning, follow the careinstructions on the label of the product.StorageSlings should be stored away from directsunlight, stress, pressure, excessive heat orhumidity. The sling should be kept away fromcontact with sharp objects, corrosives or otherpossible damaging material.1. Check for any sign of wear on sling straps asdescribed above and at the strap-slingjunction. Buckles on certain slings should bechecked to ensure that the locking/unlockingmechanism opens and closes easily and issecure when locked.Verification of Charger Power SourceIf the light does not illuminate when there arebatteries in, do the following steps:1. Make sure that the power cord is correctlyplugged into the charger in the wall and clipon charging station indicator green light ison.2. Make sure that there is contact between thecontact plates of the lift and the circuit boardof the charging station.3. Check the power of the outlet.4. If the yellow or green light of the chargingstation do not light up, contact your localdealer or representative for assistance.Sling Inspection and CareFor maximum patient safety and hygiene, readthe following instructions:Chemical AttackOil, grease, creosote or paint stains areharmless but other forms of chemical attack of aLoose threads in stitched area.Noticeable discoloration by havingalighter color strap than the doublethickness stitched area.Side wear.Middle wear.2. Check for any sign of deterioration of thesling material. Check for general externalwear, local abrasion, cuts, holes or burns inthe webbing and for chemical attack.3. Look at "stitched areas" for broken, worn,pulled or unraveled stitches.4. Sling should be cleaned as indicated on thetag.If there is any sign of wear or deterioration asindicated above or other visual defect, slingshould be changed immediately. By continuingto use the lift without changing the sling, caregiver and patient safety is greatly compromised<strong>MAXI</strong> <strong>SKY</strong> <strong>1000</strong> Operating Manual 16
MAINTENANCETake note of inspection resultsin the logbook at the end of thismanual.Annual InspectionThe <strong>MAXI</strong> <strong>SKY</strong> <strong>1000</strong> and its accessories mustbe inspected annually by a certified technician.<strong>MAXI</strong> <strong>SKY</strong> <strong>1000</strong> ANDACCESSORIES MUST BESERVICED EVERY 12 MONTHSAS A MINIMUM REQUIREMENT.Do not attempt to do the inspectionunless you are certified to do so.As part of the annual inspection, anannual load test with the safe workingload must be performed on the <strong>MAXI</strong> <strong>SKY</strong><strong>1000</strong>.After annual inspection, have the logbooksigned by the certified technician.Maintenance RequirementsThe <strong>MAXI</strong> <strong>SKY</strong> <strong>1000</strong> is equipped with anelectronic monitor. This red light will flash whena maintenance inspection is necessary to ensurethe durability of the unit and the security of thepatient and user.Once this light red begins to flash please contactyour local dealer/representative in order toperform the necessary maintenance inspectionrequirements.<strong>MAXI</strong> <strong>SKY</strong> <strong>1000</strong> Operating Manual 17
ERGOFIT SLINGSERGOFIT SLINGSEvery patient has different needs. It is very important to choose the right sling based on the needs of thepatient to be transferred as well as their physical ability and size.All Ergofit slings are made from a Polyester/ Nylon material, which is soft and pliable, easy to care for, andinstall. All slings are machine wash and dry on medium temperature. Ergofit slings are covered by a oneyearwarranty.PLEASE READ THE FOLLOWING CAREFULLY, BEFORE USING A ARJO ERGOFIT SLING.ALWAYS CARRY OUT THE DAILY CHECKLIST BEFORE EACH <strong>LIFT</strong> USE.ARJO <strong>CEILING</strong> <strong>LIFT</strong>S ARE SPECIFICALLY DESIGNED FOR ARJO SLINGS AND ACCES-SORIES. SLINGS AND ACCESSORIES DESIGNED BY ANY OTHER MANUFACTURER AREPROHIBITED AND WILL VOID ARJO S WARRANTY. USE ONLY ARJO SLINGS ANDACCESSORIES TO MAINTAIN PATIENT SAFETY AND PRODUCT UTILITY.PATIENT TO BE TRANSFERRED MUST BE ASSESSED BY A QUALIFIED PROFESSIONALBEFORE ATTEMPTING TO TRANSFER.OBSERVE A TRAINED EXPERT TO PERFORM THE TRANSFER PROCEDURES AND THENPRACTICE THEM SEVERAL TIMES WITH A CAPABLE INDIVIDUAL ACTING AS PATIENTBEFORE ATTEMPTING A TRANSFER WITH A PATIENT WITH LIMITED CAPABILITIES.READ CAREFULLY ALL INSTRUCTIONS BELOW BEFORE ATTEMPTING TO INSTALL ASLING.IF YOU HAVE ANY DOUBTS, PLEASE CONTACT YOUR LOCAL REPRESENTATIVE.USE A SLING RECOMMENDED BY THE PATIENT S PHYSICIAN, NURSE OR MEDICALSPECIALIST AS AP-PROPRIATE FOR THE PATIENT S ABILITY AND NEEDS.DO NOT USE ANY KIND OF PLASTIC BACKED INCONTINENCE PAD OR SEATING CUSHIONBETWEEN THE PATIENT AND SLING MATERIAL. THIS MAY CAUSE THE PATIENT TO SLIDEOUT OF THE SLING DURING A TRANSFER.DO NOT EXCEED THE <strong>MAXI</strong>MUM WEIGHT LIMITATION OF THE SLING.WHENEVER POSSIBLE, HAVE SOMEONE ASSIST YOU TO ENSURE THE PATIENT S SAFETYAT ALL TIMES.Laundry Instructions for all slings:The following symbols are used on sling labels and related to washing instructions:60ºCMaximum washing temperature is 60°C (140°F) for permanent cycle.Do not use bleach.Do not dry clean.Tumble dry low temperature.Do not iron.<strong>MAXI</strong> <strong>SKY</strong> <strong>1000</strong> Operating Manual 18
ERGOFIT SLINGSBariatric Sling (TOB)Our truly bariatric size sling is designed for the special needs of a bariatricpatient weighing from 182 to 455 kg (400 to <strong>1000</strong> lbs.). Polyester/nylonmaterial moves easily to reduce friction on tender skin. The area aroundthe legs and buttocks is padded, adding additionnal support and comfort.Positioning loops and handles allow you to adjust the position the person istransferred in as well as position the person properly into a chair. Thebariatric sling is designed to be used only in conjunction with the 4-pointframe support. The frame and the sling fit to <strong>MAXI</strong> <strong>SKY</strong> <strong>1000</strong> overheadceiling lift and the Ergolift-600 mobile lift. The weight capacity is 455 kg(<strong>1000</strong> lbs). It is available in one size only.Sling Placement- from laying position1. The sling has two sides, the white fabric indicates the side that is intended to be next to the patientand the label and handles are on the outside. The upper part of the sling is in a white material and thelower part is padded.2. Fold the sling in half lengthwise with the white part of the sling on the inside of the fold and place nextto the patient to be transferred.When transferring a patient from a bed, have people on each side of it, or raise thebed rails to ensure the patient does not roll off the bed.3. With someone there to assist you, carefully roll the patient onto one side. Now place the fold of thesling at the center of the bed or where the spine of the patient will be. Lift the top fold and tuck next tothe patient.4. Lower the patient down on top of the sling. Roll the patient the opposite direction to pull the sling outthe other side.Sling attachment to Spreader bar1. Ensure the sling is properly placed underneath the patientaccording to the instructions above.2. Adjusting the sling loops higher or lower. The choice of thecolour of the loops must be the same at each fourattachment points.3. Make sure the patient s arms are over top of the sling andthat it is not caught on any obstructions (wheelchair brakeor handle).4. See Operation section for next step..<strong>MAXI</strong> <strong>SKY</strong> <strong>1000</strong> Operating Manual 19
MAINTENANCE INSPECTION CHECKLISTMAINTENANCE INSPECTION CHECKLISTTO BE INSPECTED BY USERITEM INITIALLY BEFOREEVERYUSE<strong>LIFT</strong> DEVICEEVERY2MONTHSEVERY4MONTHSInspect for missing hardware or broken panel. X X XInspect strap for wear. X XRecharging batteries.Make that rail end stoppers are in placeInspect the spreader bar on the strap of the liftfor damage or cracks.Inspect wheels in rail for damage, rust orcracks. Replace if damaged.Clean the rail and the Clip on charging stationcontacts.Overall inspection by authorized personnel.SLING AND HARDWARECheck all sling attachments for sign of wear.Inspect sling material for wear or deterioration.Inspect sling straps for wear.Inspect for any defects or loose threads in the"stitched areas".Cleaning sling as indicated on the tag.Verify emergency stop cordVerify emergency lowering device.When necessaryXXXXXXXXXEVERYYEARXXXEVERY 2YEARSMAINTENANCE BY A CERTIFIED TECHNICIANReplace strapInspect the welding aspect on the frame todetect cracksInspect sprockets for wear.Inspect connecting joints for proper attachmentVerify the emergency brake on the drum isturning freely.Verify emergency devices for good functioning.Load test with the SWL (maximum workingcapacity)Rail end stoppers inspectionXXXXXXXXMaintenance inspection points are suggested by the manufacturer, however in certain cases,some inspections should be done on a more frequent basis. By continuing to use the liftwithout replacing the listed parts in this maintenance inspection checklist, caregiver andpatient safety is greatly compromised.<strong>MAXI</strong> <strong>SKY</strong> <strong>1000</strong> Operating Manual 20
TROUBLESHOOTINGTROUBLESHOOTINGDO NOT attempt to open the <strong>MAXI</strong> <strong>SKY</strong> <strong>1000</strong> lift. Only a certified technician isauthorized to open the <strong>MAXI</strong> <strong>SKY</strong> <strong>1000</strong> lift.Alterations made to the <strong>MAXI</strong> <strong>SKY</strong> <strong>1000</strong> by someone other than a certified technicianmay cause serious injury.PROBLEMSThe red light « Service » is on andflashing.The red light is solid.The unit starts and stops repetitively.The lift emits a "beep" during utilisation.The unit may stop lifting but can stilllower it.Charge indicator on the lift (yellow) doesnot light up when the lift is on thecharger.When returning to charge, the lift passesthe Clip on charging station or takes thewrong direction.Batteries are always dead after a fewtransfers (3 to 5).The light on the charger shows a solidyellow yet the lift will only do one or twotransfers.The light on the charger shows yellowyet the lift will only work when there is noone on the lift. When you attempt totransfer someone, the lift stops.The lift does not work when you pressthe buttons on the hand control.The charging light on the lift remainsflashing yellow and does not turn yellowTO CHECKContact your supplier or your local representative to do themaintenance.The lift is under overheat protection. Wait between 10 and30 minutes until the red light turns off and press on the UPbutton to lift again.If the load is over the safe working load, the unit will notwork due to an overload protection on the motor.Batteries are low. Return the lift to the clip on chargingstation.Is the clip on charging station is plugged into a standardoutlet? If so, does the outlet have power? Clip on chargingstation indicator green light confirms the functionality of thecharger.Clean the contact blades of the charging station with milddetergent. Turn on the lift and pass the lift through thecharging station once manually, then retry the automaticreturn to charger.Verify the functioning of the lift charger and the contactfingers on the clip on charging station.Replace batteries by new ones. The life of the current oneis probably over. It is important to always change bothbatteries at the same time. (Contact your local dealer oryour representative to have batteries replaced)Contact your local dealer or representative to havebatteries replaced.Contact your local dealer or representative to havebatteries replaced.Is the charger light is on? The lift must be moved awayfrom the charger in order to operate. .Is the emergency stop activated? Gently pull the red cordonce until the green light is on.Are the buttons on the lift functioning? If so, the problemmay come from the hand control connection. If not, checkthe charge on the lift.Is the hand control properly plugged into the lift? The handcontrol may be slightly pulled out its socket yet appear asthough it is plugged in. Pull out the plastic cover to checkthe connection.Slide the lift over the clip on charging station. Is the yellowlight on?If, after testing all of the above, the lift will not operate,contact your local dealer or your representative.If available, try another integrated clip on charging stationfrom another lift or a spare one; plug it into the rail and<strong>MAXI</strong> <strong>SKY</strong> <strong>1000</strong> Operating Manual 21
TROUBLESHOOTINGPROBLEMSafter and overnight charge.TO CHECKcharge for 3 hours. If the yellow light is still flashing, contactyour local dealer or your representative.Use a voltmeter, test two contact points on the charger(See diagram T-1). The voltmeter should read between 26-30 volts VDC.Contact your local dealer or your representative.DIAGRAMME T-126-30 Vdc<strong>MAXI</strong> <strong>SKY</strong> <strong>1000</strong> Operating Manual 22
ACCESSORIESACCESSORIESCHARGER AND CLIP ON CHARGINGSTATIONProduct #700.155002-METER CHARGER EXTENSIONProduct #402.15505FIDO CONTACT STATIONProduct number: 700.15400.33CHARGER POWER CORD UKProduct No.402.00001 USA (UL)402.00002 Japan402.00003 CE (Europe)402.00004 Australia402.00005 - UKRAILSTOPPERProduct#700.110054-HOOK SPREADER BAR FOR <strong>MAXI</strong> <strong>SKY</strong><strong>1000</strong>Product #700.05570.33 (only use with the TOBSling)HAND CONTROL FOR <strong>MAXI</strong><strong>SKY</strong> <strong>1000</strong>6-buttons - Product#700.13650.33TOB SLING*Only use with the 4hooks spreader bar700.05550<strong>MAXI</strong> <strong>SKY</strong> <strong>1000</strong> Operating Manual 23
LOGBOOKLOGBOOKProduct Name : <strong>MAXI</strong> <strong>SKY</strong> <strong>1000</strong> (LFXXXXX series)Product Serial Number :Date of purchase :Warranty Period :Distributed By :Owner Checklist :Ensure the lift is serviced regularly as per he Maintenance Inspection Checklist on page 48.Contact an authorized Arjo Distributor / Service Agent immediately if there are any problems with the operationof the device.Ensure the logbook is completed and signed.Record any repairs required.Withdraw the patient lifter from service if inspection reveals that user safety is jeopardized in any way from useof the patient lifter.TO BE COMPLETED AFTER EACH SERVICE OR INSPECTIONService Type Pre-delivery Periodic inspection Minor MajorCondition report :Action taken :Date :Inspected by:_____________________________________ ____________________PrintedSignatureService Type Pre-delivery Periodic inspection Minor MajorCondition report :Action taken :Date :Inspected by:_____________________________________ ____________________PrintedSignature<strong>MAXI</strong> <strong>SKY</strong> <strong>1000</strong> Operating Manual 24
LOGBOOKService Type Pre-delivery Periodic inspection Minor MajorCondition report :Action taken :Date :Inspected by:_____________________________________ ____________________PrintedSignatureService Type Pre-delivery Periodic inspection Minor MajorCondition report :Action taken :Date :Inspected by:_____________________________________ ____________________PrintedSignatureService Type Pre-delivery Periodic inspection Minor MajorCondition report :Action taken :Date :Inspected by:_____________________________________ ____________________PrintedSignatureService Type Pre-delivery Periodic inspection Minor MajorCondition report :Action taken :Date :Inspected by:_____________________________________ ____________________PrintedSignature<strong>MAXI</strong> <strong>SKY</strong> <strong>1000</strong> Operating Manual 25
WARRANTYWARRANTYThis warranty is extended only to the original purchaser/user of ARJO products.Arjo Inc. warrants its products to be free from defects in material under normal use and service, within theperiods stated below from the date of purchase. If within such warranty period any such product shall beproven to be defective, such product shall be repaired or replaced at Arjo option. This warranty does notinclude any labor or shipping charges incurred in replacement part installation or repair of any suchproduct. Arjo sole obligation and your exclusive remedy under this warranty shall be limited to such repairand/or replacement.Patient Lifter1 yearTracks and installation Life time warranty *Weighing Devices1 yearAccessories on Lifter1 yearSlings1 yearBatteries - Voyager Portable3 monthsBatteries - All other lifts1 yearEasytrack System1 yearFor warranty service, please contact the dealer from whom you purchased the Arjo product.Do not return products to our factory without prior authorization. Arjo will issue a Return MerchandiseAuthorization (RMA) Number. C.O.D. shipments will be refused; all shipments to Arjo must be prepaid.For this warranty to be valid, the purchaser must present its original proof of purchase at the moment ofthe claim. The defective unit, assembly or part must be returned to Arjo for inspection. The part orcomponents repaired or replaced are guaranteed for the remaining period of the initial warranty.Limitations and Exclusions:The warranty above does not apply to serial numbered products if the serial number has been removed ordefaced.No warranty claim shall apply where the product or any other part thereof has been altered, varied,modified, or damaged; either accidentally or through improper or negligent use and storage. Warrantydoes not apply to products modified without Arjo express written consent (including but not limited toproducts modified with unauthorized parts or attachments), products damaged by reason of repairs madeto any component without the specific consent of Arjo, or to products damaged by circumstances beyondArjo control. Arjo will solely determine evaluation of warranty claim. The warranty does not apply toproblems arising from normal wear or failure to adhere to the instructions in this manual. Arjo Inc. slingsare void of warranty if not laundered as per instructions on the Sling Label.Arjo Inc. shall not be liable for damages losses or inconveniences caused by a carrier.This warranty replaces any other warranty expressed or implicit and constitutes Arjo Inc. only obligationtowards the purchaser. Arjo shall not be liable for any consequential or incidental damages whatsoever.* Valid only if Arjo did the original installation. Warranty voids if tracks/installation have been modified.<strong>MAXI</strong> <strong>SKY</strong> <strong>1000</strong> Operating Manual 26
<strong>MAXI</strong> <strong>SKY</strong> <strong>1000</strong> Operating Manual 27