v.S1 Cylindrical Lock Installation Instructions 1.10 - Access Control ...
v.S1 Cylindrical Lock Installation Instructions 1.10 - Access Control ...
v.S1 Cylindrical Lock Installation Instructions 1.10 - Access Control ...

Create successful ePaper yourself
Turn your PDF publications into a flip-book with our unique Google optimized e-Paper software.
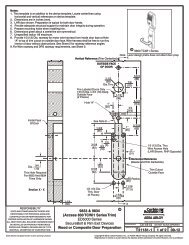
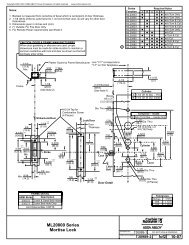
Profile Series v.<strong>S1</strong> PoE <strong>Cylindrical</strong> <strong>Lock</strong>Step #11 – Ciruit Board WiringBefore installing escutcheon, route raceway cables and ground attach tofront of circuit board.Turn the controller assembly over:1. Route the raceway connectors over the top of the controller assemblyand plug into the front of the circuit board (side that faces out whenmounted (J7, J4; Fig. 12A).2. Route the 2 ground ring terminals, one from the lock and the otherfrom the hinge wiring, over the top of the controller assembly and connectboth to the top escutcheon screw.Note: Connectors go on only one way.Do not offset connectors and make sure they are completely seated.GroundRingTerminalInside of DoorStep #12 – Install Inside Escutcheon1. Gently fold the excess ribbon connector and ground wire into thetop hole, JST connectors and ground wire into offset middle hole,and mortise and AX/DPS wires into bottom hole, being careful notto pinch wires (Fig. 12A).2. Insert (2) #8-32 x 1-1/4” screws through inside escutcheon andthread into outside escutcheon (Fig. 12B).3. Straighten escutcheons and check that latch screwsare tightened securely.Fig. 11AInside of DoorLatch ScrewsFig. 12BCopyright © 2011, Sargent Manufacturing Company, an ASSA ABLOY Group company. All rights reserved.Reproductions in whole or in part without express written permission of Sargent Manufacturing Company is prohibited.Fig. 12AA7763B 1702/11/11