Focal Length of Lenses - Ryerson Department of Physics
Focal Length of Lenses - Ryerson Department of Physics
Focal Length of Lenses - Ryerson Department of Physics

You also want an ePaper? Increase the reach of your titles
YUMPU automatically turns print PDFs into web optimized ePapers that Google loves.
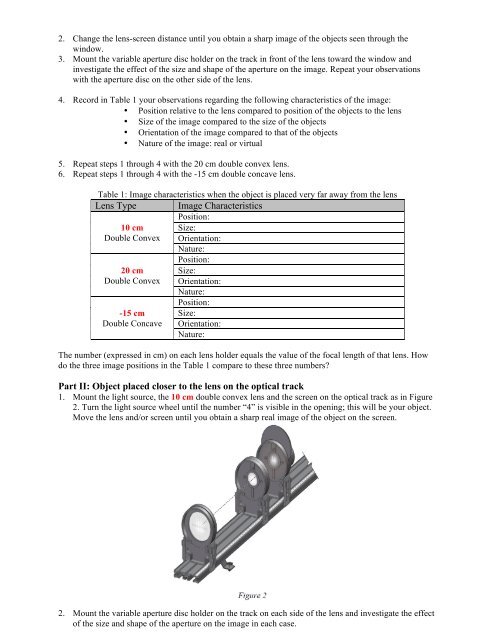
2. Change the lens-screen distance until you obtain a sharp image <strong>of</strong> the objects seen through thewindow.3. Mount the variable aperture disc holder on the track in front <strong>of</strong> the lens toward the window andinvestigate the effect <strong>of</strong> the size and shape <strong>of</strong> the aperture on the image. Repeat your observationswith the aperture disc on the other side <strong>of</strong> the lens.4. Record in Table 1 your observations regarding the following characteristics <strong>of</strong> the image:• Position relative to the lens compared to position <strong>of</strong> the objects to the lens• Size <strong>of</strong> the image compared to the size <strong>of</strong> the objects• Orientation <strong>of</strong> the image compared to that <strong>of</strong> the objects• Nature <strong>of</strong> the image: real or virtual5. Repeat steps 1 through 4 with the 20 cm double convex lens.6. Repeat steps 1 through 4 with the -15 cm double concave lens.Table 1: Image characteristics when the object is placed very far away from the lensLens Type Image CharacteristicsPosition:10 cm Size:Double Convex Orientation:Nature:20 cmDouble Convex-15 cmDouble ConcavePosition:Size:Orientation:Nature:Position:Size:Orientation:Nature:The number (expressed in cm) on each lens holder equals the value <strong>of</strong> the focal length <strong>of</strong> that lens. Howdo the three image positions in the Table 1 compare to these three numbers?Part II: Object placed closer to the lens on the optical track1. Mount the light source, the 10 cm double convex lens and the screen on the optical track as in Figure2. Turn the light source wheel until the number “4” is visible in the opening; this will be your object.Move the lens and/or screen until you obtain a sharp real image <strong>of</strong> the object on the screen.2. Mount the variable aperture disc holder on the track on each side <strong>of</strong> the lens and investigate the effect<strong>of</strong> the size and shape <strong>of</strong> the aperture on the image in each case.