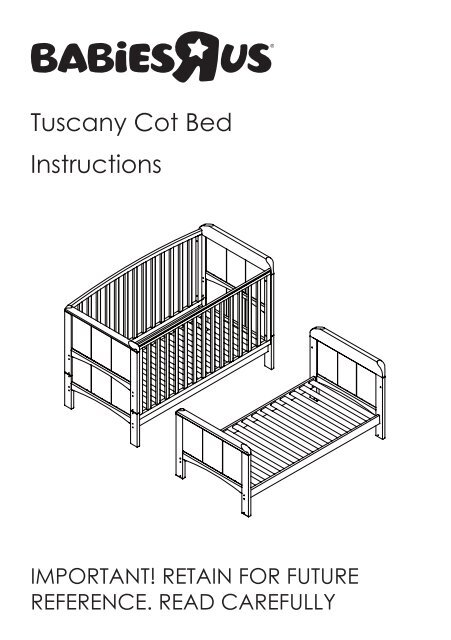
Tuscany Cot Bed Instructions - Toys R Us
Tuscany Cot Bed Instructions - Toys R Us
Tuscany Cot Bed Instructions - Toys R Us
- No tags were found...

You also want an ePaper? Increase the reach of your titles
YUMPU automatically turns print PDFs into web optimized ePapers that Google loves.
1 WelcomeThank you for choosing a Babies R <strong>Us</strong> product.The <strong>Tuscany</strong> cot bed is carefully designed for baby’s safety and features anadjustable height base so you can easily reach baby in the early months and ateething rail to protect the top rail of the straight side from sharp teeth.The cot can be converted to a bed by separating the split end panels and usingthe top sections as the headboard and footboard.The bed is suitable from approximately 18 months to 4 years.To ensure safe, trouble free use, please take a little time to read the importantsafety notes below and the following instructions.2 Safety notes• Warning: Be aware of the risk of open fire and other sources of strong heat, suchas electric bar fires, gas fires, etc. in the near vicinity of the child’s cot or bed, anddo not place near windows or other furniture.• Warning: Do not use the child’s cot or bed if any part is broken, torn or missingand use only spare parts approved by Babies R <strong>Us</strong>.• Warning: Do not leave anything in the cot or place the cot close to anotherproduct, which could provide a foothold or present a danger of suffocation orstrangulation, e.g. strings, blind/curtain cords, etc.• Warning: Do not use more than one mattress in the cot.• In cot mode 3 base height positions are possible. The lowest position is the safestand should always be used as soon as baby is old enough to sit up.• The thickness of the mattress shall be such that the internal height (surface ofthe mattress to the upper edge of the cot frame) is at least 500 mm in the lowestposition of the cot base and at least 200 mm in the highest position of the cotbase.• The cot bed is suitable for a mattress of 1400 mm in length and 700 mm in width,or no less than a size of 1380 mm x 680 mm.• All assembly fittings should always be tightened properly and fittings should bechecked regularly and retightened as necessary.• To prevent injury from falls, when the child is able to climb out of the cot, the cotshall no longer be used for that child. The cot should be converted to a bed.• The safety of the cot could be adversely affected by fitting flammable drapes.• Children are likely to play, bounce, jump and climb on beds, therefore the child’sbed should not be placed too close to other furniture or windows, and should beplaced either tight to any wall or have a gap of 300 mm between the wall andthe side of the bed.• Designed and manufactured to BS EN 716 : 2008 & BS 8508 : 2008.Page 1
3 Parts list (not to scale)Please retain all packaging until you are certain no parts are missing.In the case of assembly difficulties, missing parts or other queries, please contactyour nearest Babies R <strong>Us</strong> store.After assembly, please dispose of all packaging carefully.A medium sized flat bladed screwdriver is required for assembly of the cot.The help of an assistant will make assembly easier.Bolts x 16M6 x 60 mmLeft endBarrel nuts x 8T-nuts x 8Allen key x 2(4 mm)Curved sideBaseRight endStraight sidePage 2
4ax 2<strong>Cot</strong> <strong>Bed</strong> mode - BaseWith the ends and base on their sides, position the base at the preferred height, 1,2 or 3 and insert the bolts part way to stop it moving.Insert two barrel nuts into the holes in one corner of the base and align the slotswith the bolts.Once aligned, screw the bolts into the barrel nuts, but do not fully tighten at thisstage. x 2x 2Repeat for the other corners.x 2x 2x 2x 2x 2321Page 3
4b<strong>Cot</strong> <strong>Bed</strong> mode - SidesAttach the curved side to both ends using one bolt and one T-nut at each corner.Do not fully tighten the bolts at this stage.Page 4
4b<strong>Cot</strong> <strong>Bed</strong> mode - Sides (continued)Carefully stand the cot bed on its feet and fit the straight side in the same way.Finally, fully tighten the side and base bolts.Page 5
5 <strong>Bed</strong> modeDismantle the cot bed carefully and place all parts to one side.Separate the upper and lower parts of both ends as shown below.Note any parts not used for bed mode may be needed for other modes whenconverting so should be stored safely.Page 6
5 <strong>Bed</strong> mode (continued)Insert two barrel nuts into the holes in one corner of the base and align the slotswith the bolts. Once aligned, screw the bolts into the barrel nuts, but do not fullytighten at this stage.Repeat for the other corners then stand the bed on it’s feet and fully tighten all thebolts.x 2x 2x 2x 2Page 7
6aDay <strong>Bed</strong> mode - BaseNote: In day bed mode the base must be in the middle height position to securethe upper and lower parts of the ends together.Insert two barrel nuts into the holes in one corner of the base and align the slotswith the bolts. Once aligned, screw the bolts into the barrel nuts, but do not fullytighten at this stage.Repeat for the other corners then stand the bed on it’s feet.x 2x 2x 2x 2x 2x 2x 2x 2Page 8
6bDay <strong>Bed</strong> mode - BackAttach the curved side to both ends using one bolt and one T-nut at each corner.Finally, tighten the base and side bolts, and store any unused parts safely for futureuse.The cot bed mattress can be used as a seat cushion, and additional cushions orbolsters can be added as required.Page 9
7 Care of your productRegularly check the tightness of bolts and tighten as necessary.Check for damage which could render your cot, cot bed or day bed unsafe orcause splinters.To clean use a damp cloth, avoiding the use of strong detergents or abrasives.An occasional light application of a wax polish will help maintain a goodappearance.Page 10
© 1997 Geoffrey Inc.<strong>Toys</strong> R <strong>Us</strong>Maidenhead, England SL6 4UB122010