DRAIN KIT INSTALLATION INSTRUCTIONS - Amana PTAC
DRAIN KIT INSTALLATION INSTRUCTIONS - Amana PTAC
DRAIN KIT INSTALLATION INSTRUCTIONS - Amana PTAC
- No tags were found...

You also want an ePaper? Increase the reach of your titles
YUMPU automatically turns print PDFs into web optimized ePapers that Google loves.
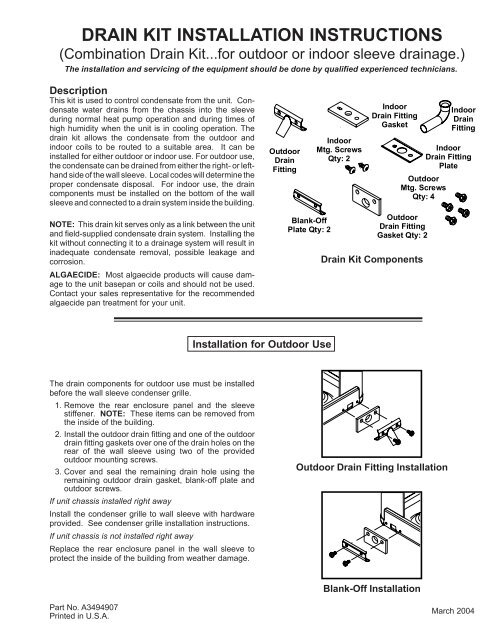
<strong>DRAIN</strong> <strong>KIT</strong> <strong>INSTALLATION</strong> <strong>INSTRUCTIONS</strong>(Combination Drain Kit...for outdoor or indoor sleeve drainage.)The installation and servicing of the equipment should be done by qualified experienced technicians.DescriptionThis kit is used to control condensate from the unit. Condensatewater drains from the chassis into the sleeveduring normal heat pump operation and during times ofhigh humidity when the unit is in cooling operation. Thedrain kit allows the condensate from the outdoor andindoor coils to be routed to a suitable area. It can beinstalled for either outdoor or indoor use. For outdoor use,the condensate can be drained from either the right- or lefthandside of the wall sleeve. Local codes will determine theproper condensate disposal. For indoor use, the draincomponents must be installed on the bottom of the wallsleeve and connected to a drain system inside the building.OutdoorDrainFittingIndoorMtg. ScrewsQty: 2IndoorDrain FittingGasketIndoorDrainFittingIndoorDrain FittingPlateOutdoorMtg. ScrewsQty: 4NOTE: This drain kit serves only as a link between the unitand field-supplied condensate drain system. Installing thekit without connecting it to a drainage system will result ininadequate condensate removal, possible leakage andcorrosion.ALGAECIDE: Most algaecide products will cause damageto the unit basepan or coils and should not be used.Contact your sales representative for the recommendedalgaecide pan treatment for your unit.Blank-OffPlate Qty: 2OutdoorDrain FittingGasket Qty: 2Drain Kit ComponentsInstallation for Outdoor UseThe drain components for outdoor use must be installedbefore the wall sleeve condenser grille.1. Remove the rear enclosure panel and the sleevestiffener. NOTE: These items can be removed fromthe inside of the building.2. Install the outdoor drain fitting and one of the outdoordrain fitting gaskets over one of the drain holes on therear of the wall sleeve using two of the providedoutdoor mounting screws.3. Cover and seal the remaining drain hole using theremaining outdoor drain gasket, blank-off plate andoutdoor screws.If unit chassis installed right awayInstall the condenser grille to wall sleeve with hardwareprovided. See condenser grille installation instructions.If unit chassis is not installed right awayReplace the rear enclosure panel in the wall sleeve toprotect the inside of the building from weather damage.Outdoor Drain Fitting InstallationBlank-Off InstallationPart No. A3494907Printed in U.S.A.March 2004
Installation for Indoor UseThe components of the wall sleeve drain kit for indoor use are shown in figure below. These components must beinstalled prior to the installation of the wall sleeve.MTG.SCREWS (2)<strong>DRAIN</strong>GASKETWALLSLEEVEBOTTOM<strong>DRAIN</strong>FITTINGPLATEDetail A1. Locate an area on the wall sleeve that will be inside theroom when the sleeve is installed. If a subbase isinstalled, locate the kit a minimum of 3 1/2” from thefront flange of the wall sleeve. This clearance willprovide adequate clearance for the subbase.2. Cutout the template shown to the right. Using thistemplate, locate and drill the drain kit holes as close tothe outside wall as possible.3. Using detail A (above) as a guide, assemble the draingasket, drain fitting plate, and indoor drain fitting together.Install the assembly into the drilled holes andsecure using the two indoor mounting screws provided.The screws must be inserted INSIDE the wallsleeve.and TOP driven down into the drain fitting plate.Ensure drain tube is not restricted. Cover the twoscrew heads with a good quality outdoor caulking (notsupplied) for additional corrosion protection.NOTE: If the drain fitting is not connected to an indoordrainage system immediately after the wall sleeve isinstalled; plug the hole with cork (not included) toprevent indoor water damage in case it rains.4. Install a 1/2” ID tube or hose (not included) on the drainfitting and interconnect it to the drain system inside ofthe building. Ensure that there are no kinks or traps intube or hose. Kinks or traps can cause improperdrainage.5. Install the two drain blank-off plates and outdoor draingaskets on the outdoor portion of the wall sleeve asshown in the figure above. These components can beinstalled after the sleeve is secured in the wall openingjust prior to the installation of the condenser grille andchassis..187" DIA.MTG. HOLES(2).687" .687"INSIDE EDGE OFFRONT SLEEVE FLANGE.500" DIA.Template3.5" Min.for PTSBclearance(not toscale)Due to policy of continual productimprovement, the right is reserved tochange specifications and designwithout notice.C L ofMTG.HOLESMIN.DIM.2 Made in USA