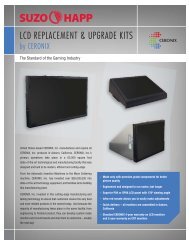
to Download the Conversion Kit Manual (PDF) - Suzo-Happ
to Download the Conversion Kit Manual (PDF) - Suzo-Happ
to Download the Conversion Kit Manual (PDF) - Suzo-Happ
- No tags were found...

Create successful ePaper yourself
Turn your PDF publications into a flip-book with our unique Google optimized e-Paper software.
Feb 2011SECTION 6: HARD DRIVE RECOVERYNOTE: Friction is shipped with a recovery USB flash disk. Hard drives can occasionally fail forvarious reasons. Please follow <strong>the</strong> procedures outlined below if a disk failure should occur. Useextreme care and follow all safety procedures outlined in this manual when attempting <strong>to</strong> res<strong>to</strong>re<strong>the</strong> computer hard drive. Avoid rough handling of <strong>the</strong> PC components and <strong>the</strong> USB flash diskThe following symp<strong>to</strong>ms may indicate a possible failed hard drive:- The game fails <strong>to</strong> finish loading- A BIOS boot error message is displayed when <strong>the</strong> game is powered on or reset- Erratic game play and\or attract modeHARD DRIVE RECOVERY PROCEDURE[1] Turn <strong>the</strong> game OFF[2] Connect <strong>the</strong> USB recovery flash drive <strong>to</strong> an available USB port on <strong>the</strong> back of <strong>the</strong> PC[3] Connect a keyboard <strong>to</strong> <strong>the</strong> PS/2 port or <strong>to</strong> an available USB port. The keyboard will be used <strong>to</strong>set <strong>the</strong> BIOS settings <strong>to</strong> boot from <strong>the</strong> flash drive.Note: If you are connected <strong>to</strong> a CGA\EGA moni<strong>to</strong>r please follow <strong>the</strong> SPECIALINSTRUCTIONS FOR CGA\EGA MONITORS in Section 7.[4] Turn <strong>the</strong> game ON[5] Press <strong>the</strong> DEL key during boot <strong>to</strong> open <strong>the</strong> BIOS (CMOS) Setup Utility.[6] In <strong>the</strong> Main menu make sure that Floppy A is Disabled[7] Ensure that Chipset => South Bridge Chipset Configuration => USB 2.0 Controller isEnabled[8] Check that <strong>the</strong> following USB BIOS settings are set:Advanced => USB configuration => Legacy USB Support is EnabledAdvanced => USB configuration => USB Controller Mode is set <strong>to</strong> Hi SpeedAdvanced => USB Configuration => USB Mass S<strong>to</strong>rage Device Configuration =>Emulation Type is set <strong>to</strong> Hard Disk[9] In Boot => Hard Disk Drives ensure that <strong>the</strong> USB flash drive is first on <strong>the</strong> list (use <strong>the</strong> "-" or"+" keys <strong>to</strong> change <strong>the</strong> settings)[10] In Boot Device Priority => 1st Boot Device ensure <strong>the</strong> USB flash drive is <strong>the</strong> first bootdevice. (use <strong>the</strong> "-" or "+" keys <strong>to</strong> change <strong>the</strong> settings)[11] Press F10 <strong>to</strong> exit and save your settings. Select Ok when prompted <strong>to</strong> save your settings.The machine will now boot in<strong>to</strong> <strong>the</strong> flash drive. At this time <strong>the</strong> screen will turn off and\or no signaldetected is shown if you are connected <strong>to</strong> a CRT VGA moni<strong>to</strong>r. This is normal behavior as <strong>the</strong>Windows Pre-Installation OS is setting a video mode that is not supported by most Arcade VGACRT moni<strong>to</strong>rs.Eventually a windows loading screen appears with a command prompt. A command will appearcalled wpeinit that initializes <strong>the</strong> system. Please note that it may take several minutes <strong>to</strong> get <strong>to</strong>this screen and for <strong>the</strong> command <strong>to</strong> complete. The drive is formatted next and <strong>the</strong> new imageinstalled on <strong>the</strong> target device. The computer will au<strong>to</strong> shu<strong>to</strong>ff when <strong>the</strong> USB flash drive is doneimaging <strong>the</strong> hard drive. At this point you can remove <strong>the</strong> USB flash drive and keyboard and turn<strong>the</strong> machine back on. The system will now boot in<strong>to</strong> <strong>the</strong> game.FRICTION – COPYRIGHT 2011 – FRICTION GAME STUDIOS LLC 30