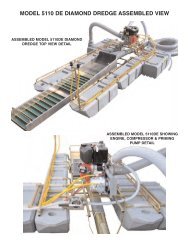
GENERAL OPERATING INSTRUCTIONSTHE FOLLOWING INFORMATION SHOULD ENABLE YOU TO UNDERSTAND THEBASIC THEORY OF OPERATION OF A PORTABLE DREDGE.For more complete understanding on this subject, we recommend you read any one of a variety of books availablethrough the <strong>Keene</strong> Library of Books, such as The Gold Miners Handbook, Dredging for Gold or Advanced DredgingTechniques. The vacuum on a portable dredge is created by a "venturi principal". A volume of water is pumped througha tapered orifice (jet), by a special designed water pump. A high velocity jet stream is created within the jet tube producinga powerful vacuum. As indicated in the diagram gravel is dredged into the suction hose and is delivered to the sluicejet flare. As a slurry of water and gravel enters the jet flare and is spread evenly over a classifier screen. The smaller andheavier particles drop below the classifier screen into an area of less velocity, allowing a slower and more selective classificationof values. Often values are recovered and easily observed before they even enter the riffle section. The lighternon bearing values and larger aggregate are returned back into the water. The riffles, or gold traps in the sluice box arebest described as "Hungarian Riffles". This type of riffle has proven to be the most efficient gold recovery system. Asmaterial flows over the riffles, a vortex, or eddy current is formed between each riffle opening. This force allows the heaviermaterial to settle out of suspension and the lighter, non value bearing material to be washed away. This continuousself cleaning principal allows a dredge to be operated for prolonged periods of time. Normal conditions require a sluicebox to be cleaned only once or twice a day.PRIMING THE PUMPBefore starting the engine, the pump must be fully primed. This means the pump must be full of water and all airremoved. All jetting pumps provided with our dredges have a mechanical water pump seal. Without the presence ofwater in the pump, friction could cause a seal to overheat and require replacement. Priming the pump on some of thesmaller models is accomplished by thrusting the foot valve back and forth under the surface of the water in a reciprocatingmotion. This will pump water into the foot valve assembly and into the pump. A pump is fully primed when water isobserved flowing out of the discharge end of the pump. It may sometimes become necessary to hold the dischargehose above the level of the pump to complete the priming operation. The larger dredges that have a rigid foot valve, areeasily primed by removing the cap provided on the foot valve and filling, until water overflows. Caution must be exercisedto prevent sand from entering the foot valve or intake portion of the pump. Excess amounts of sand could damage thewater pump seal, or pump impeller. It is recommended that the intake portion of the foot valve be placed in a sand freeenvironment underwater, such as a small bucket or pan.PRIMING THE SUCTION HOSEPriming the suction hose need not be of concern in most dredging operations, but is important to understand the principal.When the tip of the suction hose is taken out of the water during operation air will enter the suction system andcause the suction power to cease temporarily, until submerged again. The suction will commence as soon as the air haspassed through the system. It is important to ensure that no air leaks occur in the suction system.SUCTION SYSTEM OBSTRUCTIONSThe suction system can become jammed while dredging. This can be caused by dredging an excess of sand, causingthe suction hose to load up, or a rock that has become stuck in the suction system. Rock jams generally occur in the jet,or just before entry into the jet. This can easily be cleared by removed by flipping the rubber damper back over the jetflare and thrusting the probe rod down through the jet flare and jet in an effort to strike the obstructed area. It may occasionallybe necessary to remove the suction hose to remove an obstruction. If this is not successful. it may be necessaryto locate the blockage in the transparent hose and dislodge it by a striking the obstruction, taking care not to damage thehose.SOLID CONTENTCare must be exercised to prevent dredging excess amounts of sand. A solid to water balance must be maintained. Thesolid content being dredged should never exceed 10%. If a suction tip is buried in the sand and not metered properly thesolid content could cause the suction hose to become overloaded with solids and suction will cease, this will also causethe sluice box to become overloaded with solid content, resulting in a loss of values.SLUICE BOX ADJUSTMENTMost models have a slight adjustment to raise or lower the sluice box. The proper sluice box adjustment can effect therecovery of values. If the sluice does not have enough angle, the sluice box will "load up" causing the riffle openings tofill with unwanted excess material. Too much angle will cause the material to flow too fast, resulting in loss of values, evidencedby the riffles running too clean. The optimum adjustment of a properly working sluice box is evident by only aportion of the riffle is visible while operating. A loss of values can also occur if the solid content of the suction discharge istoo heavy in solid content. Remember, the solid content should not exceed 10 %. A normal sluice box tilt is approximately3/4” inch to the running foot. Afour foot sluice box should have an approximate tilt of 3"CLEANING THE SLUICE BOXBefore attempting to clean the sluice box, it should be allowed to run with only water for a few minutes in order to wash
out any excess gravels that have accumulated. Either turn engine off, or let run with a slow idle, then remove the classifierscreen and replace the wing nut to prevent losing it. Unsnap the riffle latches, fold the riffle tray up, and let rest againstthe jet flare, taking care not to let it drop back into place while cleaning. This could result in a potential injury! Place awide tray, bucket or large gold pan at the end of the sluice, then carefully roll up the riffle matting and wash into the containerat the end of the sluice. Rinse any excess gravel that remains in the sluice into container. All material must beremoved before replacing the riffle matting, riffle tray and classifier screen.ENGINE SPEEDMost small engines are throttle controlled. The speed of the engine can be controlled with the use of a lever. Althoughthe rated horsepower is achieved on most small engines at 3600 R.P.M., it may not be necessary to operate the dredgeat full speed. Lower speeds conserve engine life and fuel economy. Be sure to read all instructions and especially theengine instructions that are provided with each unit. ENGINES ARE NOT SHIPPED FROM THE FACTORY CONTAIN-ING OIL. OIL MUST ADDED PRIOR TO USE! ENGINES OPERATED WITHOUT SUFFICIENT OIL S U P P LY W I L LINVALIDATE ENGINE WARRANTEE!TROUBLE SHOOTING[A] IF SUCTION DECLINES1. Check the suction device for an obstruction. An obstruction can be removed by probing the obstructed area with theprovided probe rod. I may be necessary to check the suction hose for a visible obstruction. This can be remedied byeither back flushing the system or dislodging the obstruction with a gentle blow.2. Check the pump for loss of prime or blockage. The foot valve may be too close to the surface of the water and air mayenter the intake of the pump via a small whirlpool. The pump intake or foot valve screen may be plugged with leaves ormoss, restricting flow into the intake of the pump. Check and tighten all clamps to prevent an air leak.[B] IF PRIMING THE PUMP BECOMES DIFFICULT1. Check all clamps for an air leak.2. It may be necessary to check the foot valve for a small leak. This is accomplished by removing the foot valve assemblyfrom the pump and blowing air into the hose portion of the assembly and listening for an air escape. It may be necessaryto remove the hose and check the rubber valve for an evidence of a leak, or for a small obstruction preventing thevalve from sealing.3. If a water pump seal is either defective or damaged, a leak will be evident on the inside portion of the pump aroundthe drive shaft. Often a new pump will leak slightly, until the seal and gasket has become fully seated. This is a commonoccurrence in most new pumps.INTAKE HOSEPUMPSUCTIONNOZZLEFOOT VALVEPRESSUREHOSERIFFLESSLUICE BOXPOWER JETSUCTION HOSE


