5300 2H-2C User Manual.pdf - Braeburn Systems
5300 2H-2C User Manual.pdf - Braeburn Systems
5300 2H-2C User Manual.pdf - Braeburn Systems

You also want an ePaper? Increase the reach of your titles
YUMPU automatically turns print PDFs into web optimized ePapers that Google loves.
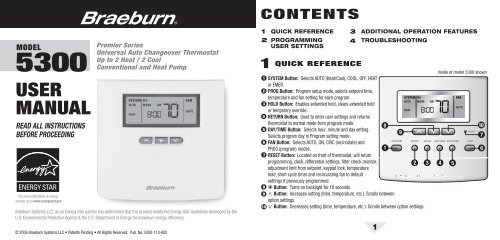
MODEL<strong>5300</strong>USERMANUALREAD ALL INSTRUCTIONSBEFORE PROCEEDINGFor more information on energysavings, go to www.energystar.govPremier SeriesUniversal Auto Changeover ThermostatUp to 2 Heat / 2 CoolConventional and Heat Pump<strong>Braeburn</strong> <strong>Systems</strong> LLC, as an Energy Star partner has determined that this product meets the Energy Star Guidelines developed by theU.S. Environmental Protection Agency & the U.S. Department of Energy for maximum energy efficiency.© 2006 <strong>Braeburn</strong> <strong>Systems</strong> LLC • Patents Pending • All Rights Reserved. Pub. No. <strong>5300</strong>-110-00<strong>2C</strong>ONTENTS121QUICK REFERENCEPROGRAMMINGUSER SETTINGS34QUICK REFERENCEADDITIONAL OPERATION FEATURESTROUBLESHOOTINGInside of model <strong>5300</strong> shown1 SYSTEM Button: Selects AUTO (Heat/Cool), COOL, OFF, HEATor EMER.2 PROG Button: Program setup mode, selects setpoint time,temperature and fan setting for each program.3 HOLD Button: Enables extended hold, clears extended holdor temporary override.456RETURN Button: Used to enter user settings and returnsthermostat to normal mode from program mode.810DAY/TIME Button: Selects hour, minute and day setting.9Selects program day in Program setting mode.7FAN Button: Selects AUTO, ON, CIRC (recirculate) andPROG (program) modes.1 67 RESET Button: Located on front of thermostat, will returnprogramming, clock, differential settings, filter check monitor,adjustment limit from setpoint, keypad lock, temperaturehold, short cycle timer and recirculating fan to defaultsettings if previously programmed.2 3 4 589Button: Turns on backlight for 10 seconds.Button: Increases setting (time, temperature, etc.). Scrolls betweenoption settings.10 Button: Decreases setting (time, temperature, etc.). Scrolls between option settings.1
2 PROGRAMMINGUSER SETTINGS2.1 Setting Current Time of Day and Day of WeekNOTE: It is important for you to set the current time of day (note AM/PM indicator in display), and the current day of weekcorrectly to avoid problems with program execution.1. When in normal operating mode, press the DAY/TIME keypad button.The LCD display will be cleared except for the time, am/pm indicator, dayof week indicator and SET. The hour portion of the time will flash. Pressthe or button to set the current hour.2. Press the DAY/TIME button again; the minute portion of the time willflash. Press the or button to set the current minute.3. Press the DAY/TIME button again, the day of week indicator will flash.Press the or button to set the current day of week.NOTE: The thermostat will return to normal operating mode automatically after 30 seconds if no key is pressed. It will alsoreturn to normal operating mode immediately if the RETURN button is pressed.2.2 Setting Fan ControlThe Fan Control has 4 modes of operation – AUTO, ON, CIRC (Recirculate) and PROG (Program). The Fan mode can be selectedby pressing the Fan button and scrolling through the modes of operation.AUTO: In the Auto mode, the fan is turned on whenever there is a call for heating or cooling. The Auto mode is not availableif the FAN LOCK was enabled in the Installer Options (see Installer Guide).ON: The fan runs continually.CIRC: The fan runs for 12 minutes if there is no call for heating or cooling made after the off cycle set in Section 2.4, SettingThermostat <strong>User</strong> Options. This feature is available in the COOL, OFF, HEAT or EMER System Modes. The RecirculatingFan feature can be locked on during the Installer Setup so that only CIRC or ON are available, see Installer Guide.PROG: The fan will remain on for the entire programmed time period if it is set to ON during programming. The PROG modeis not available if the recirculating FAN LOCK was enabled in the Installer Options, or in the non-programmableoperating mode. See Section 4.2 of the Installer Guide.MOAMSET2 PROGRAMMINGUSER SETTINGS2.3 Setting Thermostat System SelectionThe system can be selected by pressing the System button. There are five possible systems to select from –AUTO, COOL, OFF, HEAT and EMERAUTO: Auto can only be selected if it was enabled by the installer, see Section 4.2 of the Installer Guide. If AUTOis selected, the system cycles between heating and cooling as determined by the setpoints. AUTO willbe displayed constantly with either HEAT or COOL depending on the indoor temperature and programmedset temperatures.COOL: Selected for system to run air conditioning, when there is a cooling call COOL will flash.OFF:cont.System is off. The room temperature, day and time will be displayed. Any extended hold or temporaryoverride will remain in affect unless they expire. The HEAT setting can be reviewed using the andarrows, but there is no heat function.HEAT: Selected for system to run heat, when there is a heating call HEAT will flash.EMER: This is only available if a 2 Stage Heat Pump was selected by the installer; see Section 4.2 of the InstallerGuide. If selected EMER will be displayed constantly, when there is a heating call HEAT will flash. Onlythe 2nd stage heat will run.2.4 Setting Thermostat <strong>User</strong> OptionsThe default user options are compatible with most systems and applications. They are normally set at the timeof installation and usually do not require any modification under normal operating conditions. If you desire tochange these settings simply follow the instructions below.NOTE: If at any time while in the <strong>User</strong> Options Mode, you desire not to make any further changes, you can wait30 seconds without pressing any keys to return to the normal operating mode.NOTE: The first and second stage differential settings are the same for both the heating and cooling systems.23
2 PROGRAMMINGUSER SETTINGS cont.2.4.1 Setting the First and Second Stage DifferentialsFirst Stage DifferentialThe default setting is 0.5˚ F (0.25˚ C). The room temperature mustchange 0.5˚ F (0.25˚ C) from the setpoint temperature before thethermostat will initiate the system in heating or cooling.1. In normal mode, press and hold the RETURN button for 4 seconds.The LCD display will show “d1 SET X” where “X” equals theSET˚F / ˚C differential setting. This is the current temperaturedifferential setting.2. Press the or button to set the temperature differential to your desired setting of 0.5˚, 1˚, or2˚ F (0.25˚, 0.5˚, 1˚ C).Second Stage Differential – Only Available on 2 Stage <strong>Systems</strong>The default setting is 2˚ F (1.0˚ C). This means that the room temperature must change 2˚ F (1.0˚ C) in addition tothe first stage differential setting before the thermostat will initiate the system in heating or cooling.3. Press the RETURN button again and the LCD display will show “d2 SET X” where “X” equals the ˚F / ˚Cdifferential setting. This is the current second stage differential setting.4. Press the or button to set the second stage differential to your desired setting of 1˚, 2˚, 3˚, 4˚, 5˚, or 6˚ F(0.5˚, 1.0˚, 1.5˚, 2.0˚, 2.5˚ or 3.0˚ C).2.4.2 Setting the Filter Check Monitor (see also section 3.6)The default setting is 0 days (monitor disabled).5. Press the RETURN button and the display will show “FILTER XXXSET”, where XXX is the Filter Monitor interval.6. Press the or button to change the Filter Monitor Interval to thedesired value of 0 (disabled), 30, 60, 90, 120, 180 or 365 days.4SYSTEMSYSTEMFILTERSETFANFAN2 PROGRAMMINGUSER SETTINGS cont.2.4.3 Setting the Extended Hold (Vacation) Mode (see also section 3.5)The default setting is Long (indefinite) Hold. If the HOLD feature is activated, the current setpoint will be helduntil HOLD is released.NOTE: Extended Hold Mode is not available if the thermostat is in the non-programmable mode.7. Press the RETURN button, the display will show “SET LG HOLD”,where LG is indefinite hold.8. Press the or button to change the Extended Hold time fromindefinite (LG) to 24 hours (SH).2.4.4 Setting the Temporary Override Adjustment LimitThis sets how many degrees the thermostat can be adjusted up or down from the programmed setpoint.The default setting is 0˚ F (temporary override adjustment limit are not available).NOTE: Temporary Override Adjustment Limit is only available in the non-programmable mode if security level 1was selected during installation, see section 4.2 of the Installer Guide and the keypad is locked.9. Press the RETURN button, the display will show “ADJX SET”,where X is the temporary override limits.10. Press the or button to change the Temporary OverrideAdjustment Limit to the desired value of 0, 1˚, 2˚ or 3˚ F.2.4.5 Setting the Multi-Level Keypad Lockout (see also section 3.7)11. Press the RETURN button, the display will show “000 LOCKSET”.12. Press the or button to enter a 3 digit code, using theRETURN button to store each digit and move to the next digit.5SYSTEMSYSTEMSYSTEMSETSETLOCK SETHOLDFANFANFAN
2 PROGRAMMINGUSER SETTINGS cont.2.5 Setting Your Energy Saving Programs cont.MORNDAYEVENIGHT4 EventWeekday WeekendTime: 6:00 amHeat: 70˚ F (21˚ C)Cool: 75˚ F (24˚ C)Time: 8:00 amHeat: 62˚ F (17˚ C)Cool: 83˚ F (28˚ C)Time: 6:00 pmHeat: 70˚ F (21˚ C)Cool: 75˚ F (24˚ C)Time: 10:00 pmHeat: 62˚ F (17˚ C)Cool: 78˚ F (26˚ C)Time: 6:00 amHeat: 70˚ F (21˚ C)Cool: 75˚ F (24˚ C)Time: 8:00 amHeat: 70˚ F (21˚ C)Cool: 75˚ F (24˚ C)Time: 6:00 pmHeat: 70˚ F (21˚ C)Cool: 75˚ F (24˚ C)Time: 10:00 pmHeat: 62˚ F (17˚ C)Cool: 78˚ F (26˚ C)NOTE: If the 5-2 day programming mode was selected during the Installer Setup (Installer Guide section 4.2),the default program will use the weekday and weekend times and temperatures shown above.2 PROGRAMMINGUSER SETTINGS cont.2.5 Setting Your Energy Saving Programs cont.• Make sure you select either HEAT or COOL by pressing the system button as appropriate. You should notenter a program in the OFF position.• If Auto Changeover was enabled during installation the user must select either the HEAT or COOL mode.The thermostat cannot be programmed in the AUTO mode.NOTE: Once the thermostat has been programmed the user can return to the AUTO mode if desired.• Independent program times and programmable fan settings for heating and cooling are not available ifAuto Changeover is enabled.• When you place the system in the HEAT or COOL modes of operation, the appropriate indicator will appear inthe LCD display when the system is running.• When you place the system in the OFF mode the display will indicate OFF.NOTE: If the PROG button is pressed while AUTO is selected,the thermostat will switch from the AUTO mode to the modecurrently in the display.NOTE: If Auto Changeover is enabled in the Installer Options, anda setting is made in either heating or cooling which violates thedead band, the opposite mode will adjust up or down automaticallyto maintain the dead band spacing, see section 3.2.SYSTEM MOAUTO MORNHEATAMSYSTEM MO TU WE TH FR SA SUMORN AMHEATSETFANAUTOFANAUTO8 9
2 PROGRAMMINGUSER SETTINGS cont.2.5.1 Entering Your Program–7 Day ModeThe 7 Day mode has separate Whole Week or Individual Day programming to allow you to change the dailysetpoint times and temperatures to meet your individual schedule needs. The Whole Week programming canbe used to set the main portion of your schedule, allowing you to later modify specific days of the week asrequired using the Individual Day programming capabilities.Whole Week – allows you to program all seven days (MO, TU, WE, TH, FR, SA, SU will show in display) at thesame time. Then you can use the individual day programming to fine tune your program for the few setpointtimes or temperatures that you may wish to change.Individual Days – allows you to program each day of the week individually to give you the greatest scheduleflexibility. Often used to fine tune programming after initial programming.IMPORTANT NOTE! When in Whole Week programming, the thermostat will check if all of the days ofthat group have the same program setpoint times and temperatures. If so, the setpoint time and temperatureof the individual setpoint will be displayed.Otherwise, the individual setpoint time and temperature will be blanked. The user is allowed to change the dailyprograms for this setpoint time and temperature by pressing the or button. This will reset all the dailyprograms of the group for that specific individual setpoint time and temperature to the startup default for thatsetpoint. Continued pressing of the or button by the user will change setpoint time and temperaturesettings as desired.Residential1. Press the PROG button to enter the Program setting mode.Press the SYSTEM button to select HEAT (not AUTO HEAT) to setheating times and temperatures. MORN setpoint of the “WholeWeek” will be displayed. The display will show MO, TU, WE, TH,FR, SA, SU to indicate the whole week is being programmed.The hour portion of the setpoint time and the AM/PM indicatorwill be flashing.SYSTEM MO TU WE TH FR SA SUAMHEATSET OCCUPIEDFANAUTO2 PROGRAMMINGUSER SETTINGS cont.NOTE: If Auto Changeover is enabled in the installer options, the heating and cooling programs share time andfan settings. If a setting is made in either heating or cooling which violates the dead band, the opposite modewill adjust up or down automatically to maintain the dead band spacing, see section 3.2.2. If you wish to program each day individually press the DAY/TIME button to select each day.3. Press the or button to change the time to the desired hour in one hour increments. Press the PROGbutton, the minute portion of the setpoint time will begin flashing.4. Press the or button to change the time to the desired minute in 10-minute increments. Press thePROG button, the SET temperature will begin flashing.5. Press the or button to change the setpoint temperature to the desired setting in 1˚ F increments(0.5˚ C). Press the PROG button, the FAN mode will begin flashing.NOTE: The fan option is not available or displayed if the Fan LOCK was enabled during Installer Setup, seesection 4.2 of the Installer Guide.6. Press the or button to select AUTO or ON. Changing the FAN mode to ON will cause the fan to runduring the entire programmed time period. Press the PROG button, the thermostat will now display the DAYsetpoint time and temperature. Again, you will see the hour portion of the setpoint time and the AM/PMindicator will be flashing.7. Follow steps 3 through 6 to set the setpoint times and temperatures and fan mode for the DAY, EVE andNIGHT for the HEAT mode.8. Press the SYSTEM button to select COOL to set cooling times and temperatures. The display will show COOL.Follow steps 3 through 7 to set the setpoint times and temperatures and fan mode for the COOL mode.NOTE: Press the SYSTEM button to select COOL (NOT AUTO COOL) to set program.9. Press the RETURN button to return to the normal mode, or wait 30 seconds for the thermostat toreturn automatically.10 11
2 PROGRAMMINGUSER SETTINGS cont.Commercial1. Press the PROG button to enter the Program setting mode.SYSTEM MO TU WE TH FR SA SUPress the SYSTEM button to select HEAT to set heating times andAMtemperatures. OCCUPIED setpoint of the “Whole Week” will bedisplayed. The display will show MO, TU, WE, TH, FR, SA, SU to HEATindicate the whole week is being programmed. The hour portionSET OCCUPIEDof the setpoint time and the AM/PM indicator will be flashing.2. If you wish to program each day individually press the DAY/TIME button to select each day.3. Press the or button to change the time to the desired hour in one hour increments. Press the PROGbutton, the minute portion of the setpoint time will begin flashing.4. Press the or button to change the time to the desired minute in 10-minute increments. Press thePROG button, the SET temperature will begin flashing.5. Press the or button to change the setpoint temperature to the desired setting in 1º F increments(0.5º C). Press the PROG button, the FAN mode will begin flashing.NOTE: The fan option is not available or displayed if the Fan LOCK was enabled during Installer Setup, see theInstaller Guide.6. Press the or button to select AUTO or ON. Press the PROG button, the thermostat will now displaythe DAY setpoint time and temperature. Again, you will see the hour portion of the setpoint time and the AM/PMindicator will be flashing.7. Follow steps 3 through 6 to set the setpoint times and temperatures and fan mode for UNOCCUPIED for theHEAT mode.8. Press the SYSTEM button to select COOL to set cooling times and temperatures. The display will show COOL.Follow steps 3 through 7 to set the setpoint times and temperatures and fan mode for the COOL mode.9. Press the RETURN button to return to the normal mode, or wait 30 seconds for the thermostat toreturn automatically.FANAUTO2 PROGRAMMINGUSER SETTINGS cont.2.5.2 Entering Your Program – 5-2 Day Mode (Residential)The 5-2 Day mode has separate Weekday and Weekend Program Groups that allow you to change the dailysetpoint times and temperatures to meet your individual schedule needs.Weekday – allows you to program all the weekdays (MO, TU, WE, TH, FR will show in display) at the same time.Allows programming times and temperature settings for four setpoints (MORN, DAY, EVE & NIGHT) to meet yourweekday schedule needs.Weekend – allows you to program all the weekend days (SA, SU will show in display) at the same time. Againallows programming times and temperature settings for four setpoints (MORN, DAY, EVE & NIGHT) to meet yourweekend schedule needs.1. Press the PROG button to enter the Program setting mode.SYSTEM MO TU WE TH FRPress the SYSTEM button to select HEAT to set heating timesMORN AMand temperatures. MORN setpoint of the Weekday Program Groupwill be displayed. The display will show MO, TU, WE, TH, FR to HEATindicate the Weekday group is being programmed. The hourportion of the setpoint time and the AM/PM indicator willSETbe flashing.2. Press the or button to change the time to the desired hour in one hour increments. Press the PROGbutton, the minute portion of the setpoint time will begin flashing.3. Press the or button to change the time to the desired minute in 10-minute increments. Press thePROG button, the SET temperature will begin flashing.4. Press the or button to change the setpoint temperature to the desired setting in 1º F increments(0.5º C). Press the PROG button, the FAN mode will begin flashing.NOTE: The fan option is not available or displayed if the Fan LOCK was enabled during Installer Setup, see theInstaller Guide.FANAUTO1213
2 PROGRAMMINGUSER SETTINGS cont.5. Press the or button to select AUTO or ON. Press the PROG button, the thermostat will now displaythe DAY setpoint time and temperature. Again, you will see the hour portion of the setpoint time and theAM/PM indicator will be flashing.6. Follow steps 3 through 5 to set the setpoint times and temperatures and fan mode for the DAY, EVE and NIGHTfor the HEAT mode.7. After pressing the PROG button, you will enter the Weekend Program Group. The display will show SA, SU toindicate the Weekend Group is being programmed. The hour portion of the MORN setpoint time and the AM/PMindicator will be flashing.8. Follow steps 3 through 6 to set the setpoint time and temperatures and fan mode for the DAY, EVE and NIGHTfor the HEAT mode.9. Press the SYSTEM button to select COOL to set cooling times and temperatures. The display will show COOL.Follow steps 3 through 6 to set the setpoint times and temperatures and fan mode for the COOL mode.10. Press the RETURN button to return to the normal mode, or wait 30 seconds for the thermostat toreturn automatically.NOTE: To erase all entered programs, current time of day, day of week and other user settings, gently press theRESET button using a paper clip or a small pencil tip. This will return all thermostat settings to their default values.See the Installer Guide.3 ADDITIONALOPERATION FEATURES3.1 Review/Change Set Temperature, Non-Programmable Mode1. Press and hold the or button. The current setpoint temperaturewill be displayed in the place of the current room temperature,and the indicator SET will be displayed.2. The display will return to normal operating mode when the orbutton is released. Continuing to hold the or button for 1second or longer will allow the user to change the currentsetpoint temperature.SYSTEMHEATMOAMSETFANAUTO3 ADDITIONALOPERATION FEATURES3. Press and hold the or button for 1 second. The entire display will flash once and the SET indicatorwill be flashing. Release the or button and press the or button again to adjust thesetpoint temperature.4. The display will return to normal mode after 15 seconds or by pressing the RETURN button.5. By selecting the opposite system mode (HEAT or COOL) with the system button you can review or changethe set temperature for that mode.NOTE: If Auto Changeover is enabled in the Installer Options, and a setting is made in either heating or coolingwhich violates the dead band, the opposite mode will adjust up or down automatically to maintain the dead bandspacing. Any change made to the setpoint temperature only applies to the current mode. To review or makechanges to the opposite mode that mode must be selected and the above procedure followed. AUTO can then beselected after the heating and cooling setpoints are set.3.2 Auto Changeover ModeWhen Auto Changeover mode is enabled and selected, the system automatically switches between heating andcooling when the room temperature meets the programmed heating or cooling setpoints. While in AUTO mode,the thermostat will constantly monitor the room temperature to determine whether to run the HEAT or COOL modeto maintain a comfortable temperature. To operate properly, the thermostat requires a “dead band” setting toeliminate program conflicts. The dead band is set in the Installer Options (see section 4.2 of the Installer Guide).The default is 3º F (1.5º C). Therefore, there is 3º F between the highest HEAT setpoint and the lowest COOLsetpoint. For example, if the highest HEAT setpoint was 72º F, the lowest COOL setpoint would be 75º F. If a settingis made in either heating or cooling which violates the dead band, the opposite mode will adjust up or downautomatically to maintain the programmed dead band spacing.3.3 Remote Indoor SensorThe 5390 Remote Indoor Sensor senses the air temperature at a remote location and sends the information tothe <strong>5300</strong> thermostat. If installed at setup, the display temperature is either the temperature at the sensor or anaverage of the temperature at the sensor and the temperature at the thermostat.14 15cont.
3 ADDITIONALOPERATION FEATURES cont.3.4 Temporary Program OverrideTemporary Program Override is the temporary change of the program set temperature. This feature is notavailable when the thermostat is in the non-programmable mode.1. Press and hold the or button for 1 second. The entire display will flash once and the SET indicatorwill be flashing. The current setpoint temperature will be displayed in the place of the current room temperature.Release the or button and press the or button again to adjust the setpoint temperature.2. The display will return to normal mode after 15 seconds or you can press the RETURN button.3. The Program indicator (MORN, DAY, EVE, NIGHT for Residential) SYSTEM MOor (OCCUPIED, UNOCCUPIED for Commercial) will be flashing inDAYAMthe display, indicating that a Temporary Program Override is ineffect. The Temporary Program Override will reset when the next HEATFANAUTOsetpoint time occurs, or after 4 hours, whichever comes first.NOTE: If Auto Changeover is enabled in the Installer Options, and a setting is made in either heating or coolingwhich violates the dead band, the opposite mode will adjust up or down automatically to maintain the dead bandspacing. Any change made to the setpoint temperature only applies to the current mode. To review or makechanges to the opposite mode that mode must be selected and the above procedure followed. AUTO can then beselected after the heating and cooling setpoints are set.3.5 Extended Hold (Vacation) Mode1. Press the HOLD button to bypass the program schedule. The current setpoint temperature will be held untilHOLD is released. HOLD will show in the display.2. Press the HOLD button again to return the thermostat to normal program operation.3. The hold period lasts until the hold is released as in step #2SYSTEM MOHOLD FANabove, or is limited to 24 hours if the default was changed duringprogramming of user settings (section 2.4.3)AMNOTE: Extended Hold Mode is not available if the thermostat is inthe non-programmable mode.HEATAUTO3 ADDITIONALOPERATION FEATURES cont.3.6 Filter Check Monitor (see section 2.4.2 for setting)The Filter Check Monitor displays a reminder for required filterreplacement or cleaning, by flashing the FILTER segment in thedisplay. See instructions on your filter or heating/cooling unit forrecommendations for interval setting. When the selected intervalhas been reached, and required cleaning or replacement has beenSYSTEMCOOLTUEVEFILTERPMperformed, press the RETURN button in any normal mode to reset the timer and turn off the warning.3.7 Multi-Level Keypad LockoutTo prevent accidental or undesired adjustment of the thermostat, the Keypad Lock feature has two levels of security.Level one locks all buttons (including the reset button) except the , and backlight buttons. Level two locks theentire keypad except the backlight button, and the ability to enter the security code ( and buttons can bepressed together to enter the lock code). The lock level is set in the Installer Options, and the lock code is set inthe <strong>User</strong> Options.To lock or unlock the keypad press and hold both the and buttonsat the same time for 5 seconds. The LOCK segment in the displaywill flash as the program and temperature segments are cleared.The time segments will turn to zeros as shown below. The user isthen prompted to enter a 3 digit code which must be either 555, ormatch the code entered in section 2.4.5 of this manual. After settingthe last digit the user must press the RETURN key for 1 second, andthe display returns to the normal mode, with the LOCK segmentdisplayed. If an incorrect code is entered, the display will flash “no”.LOCKSYSTEM WEMORN AMHEATSYSTEMLOCKLOCKFANAUTOFANAUTOFAN16 17
3 ADDITIONALOPERATION FEATURES cont.3.8 Adaptive Recovery Mode (ARM)In order to maximize comfort and energy efficiency, this thermostat is equipped with Adaptive Recovery Mode(ARM). This feature minimizes the amount of time required by the heating or cooling system to reach the newsetpoint after a setback period is completed, and assures your desired temperature is achieved near your setprogram times.This feature activates when recovering room temperature from setback programs to comfort programs, so it willonly take place when the current (heating) program setpoint temperature is lower than the upcoming programsetpoint temperature, or the current (cooling) program setpoint temperature is higher than the upcoming programsetpoint temperature. This feature can be turned off during Installer Setup see section 4.2 of the Installer Guide.During ARM, room temperature is recovered gradually by turning on the heating or cooling before the end of theset back period. In a multi-stage configuration room temperature is recovered gradually by using only the first stageheating or cooling until the last 20 minutes, to minimize the use of the 2nd stage heating or cooling. The setpointtemperature is changed to that of the upcoming comfort program temperature. The start time of recovery is basedon the difference between the current room temperature and the upcoming comfort program setpoint temperature.The recovery to the upcoming heating setpoint starts 10 minutes before the upcoming setpoint time for eachdegree of temperature change required, up to a maximum of 2 hours. The recovery to the upcoming coolingsetpoint starts 15 minutes before the upcoming setpoint time for each degree of temperature change required, upto a maximum of 3 hours.ARM does not operate when the unit is in the temporary or extended HOLD mode, if the program is temporarilyoverridden or if emergency heat is selected for multi-stage heat pumps. It also does not operate unless it wasenabled during the Installer Setup, see section 4.2 of the Installer Guide.3 ADDITIONALOPERATION FEATURES cont.3.9 Recirculating Fan Feature (see section 2.4.6)The Recirculating Fan Mode provides more even temperaturedistribution and improves indoor air quality by circulating air throughthe furnace filtration system more often. The thermostat is put intothe Recirculating Fan Mode by pressing the FAN button until theSYSTEMFANCIRC icon is displayed. If no call for heating or cooling occurs withinSETthe fan off cycle set in section 2.4.6, the fan will run for 12 minutes.The highest setting, 120 minutes, will run the fan least often – 9% minimum running time. The lowest setting, 24minutes (factory default), will run the fan most often – 33% minimum running time. During any call for heating orcooling, fan control operates in the AUTO mode. The Recirculating Fan feature is available in the COOL, OFF, HEAT,or EMER mode. The Recirculating Fan can be “locked on” in the Installer Options, so that the only fan selectionsavailable to the user are CIRC and ON.3.10 Programmable Independent Fan ControlThe Programmable Independent Fan Control allows the user to run the fan continuously during a selected timeperiod, such as MORN, if PROG fan mode is selected with the fan button, (section 2.2 of this manual) and the fanwas set to ON when that time period was programmed. The PROG mode is not available if the recirculating FANLOCK was enabled in the Installer Setup or in the non-programmable operating mode. See section 4.2 of theInstaller Guide.3.11 Auxiliary Heat Fossil Fuel SwitchThis thermostat is equipped with an auxiliary heat option switch which is set at installation for either an electric orfossil fuel (gas, oil or propane) auxiliary heat source. For heat pump units with an electric auxiliary stage, both thefirst and second stages of heating will run when a call for second stage heat is made. For heat pump units with afossil fuel auxiliary stage, the first stage will be locked out one minute after a second stage heat call, and thesecond stage will only be used.1819
3 ADDITIONALOPERATION FEATURES cont.3.12 Compressor Protection and AC Power MonitorThis thermostat includes an automatic compressor protection feature to avoid potential damage to the coolingsystem from short cycling. This thermostat automatically provides a delay, set during Installer Setup, see section4.2 of the Installer Guide, after turning off the cooling system output to protect the compressor. This protection isalso present in the heat mode of operation on single stage heat pump systems to protect the compressor.NOTE: The installer can reset the thermostat and bypass the compressor protection features by pressingthe RESET button. This will erase all entered programs, current time of day, day of week and other user settingsand should only be used during installation for testing purposes or to reset a thermostat to regain normaloperation. This will return all thermostat settings to their default values. The user will have to reprogram all ofthe erased settings.If enabled during Installer Setup, see section 4.2 of the Installer Guide, this thermostat also provides cold weathercompressor protection by locking out the compressor stage (1st Stage) of heating for a period of time after a poweroutage greater than 60 minutes. The lockout period is one hour less than the outage time, up to a maximum of 12hours. During that period of time, the auxiliary heat stage will still be available to maintain the setpoint temperature.The compressor lockout can be manually overridden at any time by changing the system mode to OFF momentarily,then back to HEAT.3 ADDITIONALOPERATION FEATURES cont.3.13 Low Battery Detection and ReplacementThis thermostat requires two (2) properly installed “AA” Alkaline batteries to maintain the system clock and toprovide power for the thermostat if 24 volt AC power is not connected to the terminal block.This thermostat is equipped with a low battery detection feature that constantly monitors the batteries duringnormal operating mode to determine whether they have sufficient power to provide proper operation.When this feature determines that the battery status is low, a low battery indicator will appear in the display.It is recommended that the batteries be replaced immediately to maintain system operation and / or clock settings.Replacing the Batteries1. Open the front cover and locate the battery compartment door. SYSTEM MO2. Gently remove the two “AA” Alkaline batteries located in theMORN AMbattery compartment.COOL3. Install two new “AA” Alkaline batteries into battery compartment.Make sure to match the positive (+) ends of the batteries withthe positive (+) terminals located in the battery compartment.4. Close battery compartment and verify that the low battery indicator does not appear in the display.FANAUTONOTE: This feature only applies to 2 Stage Heat Pump <strong>Systems</strong>.During a power loss, the thermostat will display an outage warning,if enabled during Installer Setup, see section 4.2 of the InstallerGuide. The system clock will continue to run, and all settings will bemaintained until the outage period is over.SYSTEM MODAYHEATFANAUTO4 TROUBLESHOOTINGSYMPTOMFan continues to runin cooling modewhen the system hasturned off.POTENTIAL SOLUTIONThe Residual Cooling Fan Control Feature can allow up to a 90 second fan delay aftercooling system shutdown for energy efficiency gains. The default setting is 60 seconds.This can be changed to disable this feature or shorten the time period if desired. Seesection 4.2 of the Installer Guide.20 21
4 TROUBLESHOOTINGcont.4 TROUBLESHOOTINGcont.SYMPTOMThermostat does notturn on heating orcooling system.POTENTIAL SOLUTIONCheck to see if OFF is shown in display. This indicates that the system is turned off atthe thermostat. Press the system button to select HEAT or COOL mode. After thecompressor short cycle protection period expires the system should start within aminutes time.Compressor protection features may be in effect due to compressor short cycleconditions, power outages or rolling blackouts. See section 3.12 for full explanationof this feature.SYMPTOMThermostat will notfollow programsetpoints.POTENTIAL SOLUTIONCheck current time of day, day of week program settings. Make sure to verify AM/PMindicator is accurately displaying desired time settings. See Setting Current Time of Dayand Day of Week section of this manual.Check to see if OFF is shown in display. This indicates that the system is turned offat the thermostat. Press system button to select HEAT or COOL mode. After thecompressor short cycle protection period expires the system should start withinseveral seconds.Thermostat turns onheating instead ofcooling, or coolinginstead of heating.Fan runsintermittently orwhen system is off.System turns on priorto the end of asetback period.Heat pump may be malfunctioning. Review the CHECK status segment to see if it is. Ifthere is a CHECK status segment, call a professional service technician to confirm heatpump operation and provide necessary service. If heating is required, you can press thesystem button to EMER setting, which will start the Emergency Heat source to provideheating until the heat pump can be serviced.Check thermostat wiring to make sure that the heating and cooling stages are connectedto the correct terminals on the wiring terminal block. See Installer Guide, Section 6.Fan switch is in recirculate () mode.Thermostat is in Adaptive Recovery Mode – see section 3.8.Thermostat turnsheating or coolingsystem on too oftenor not often enough.System does notswitch from Heatingto Cooling.Verify your program setpoint time entries.Thermostat program has been temporarily overridden. Wait till next setpoint and thetemporary override will expire or change setpoint temperature to desired comfort level.Thermostat program is in Extended Hold (Vacation) Mode and HOLD is shown indisplay. Press HOLD button to release hold and return the thermostat to normalprogram operation.Increase or decrease first stage temperature differential setting as appropriate to providethe desired performance level. See Setting the First and Second Stage Differentialssection of this manual.Auto Changeover was not selected or enabled during installer set-up. See section 4.2 ofInstallation Guide and section 3.2 of this manual.Program temperature was changed due to dead band violation.22 23
4 TROUBLESHOOTINGcont.4 TROUBLESHOOTINGcont.SYMPTOMThermostat turns onsecond (auxiliary)stage of heating orcooling too quickly ornot quickly enough.Low battery indicatoris shown inthermostat display.POTENTIAL SOLUTIONIncrease or decrease second (auxiliary) stage temperature differential setting asappropriate to provide the desired performance level. See Setting the First and SecondStage Differentials section of this manual.Replace back-up batteries as soon as possible. See Low Battery Detection andReplacement section of this manual.SYMPTOMThe room is toowarm or too cold.Thermostat displayis blank.POTENTIAL SOLUTIONSee Review Set Temperature section of this manual to verify the current setpoint andmake any modifications that are necessary.It is possible that AC power is not present at the thermostat and the batteries are fullydischarged. Check fuse, circuit breaker and thermostat wiring as appropriate to verify ACpower is available. Replace batteries before reprogramming thermostat. See Low BatteryDetection and Replacement and Setting Your Energy Saving Program sections ofthis manual.If AC Power is present, call a professional service technician to verify thermostat andsystem performance.HI is shown in thethermostat displaywhere the roomtemperature isnormally displayed.Fan runs constantlyor for long periodsof time.The temperature sensed by the thermostat is higher than the 99˚ F (37˚ C) upper limit ofthe thermostats display range. The display will return to normal after the sensedtemperature lowers within the 40˚ to 99˚ F (5˚ to 37˚ C) display range. Turn on the coolingsystem or use other methods to lower the temperature accordingly.This condition could occur from the system being turned off during an exceptionally warmperiod, or upon installation when the thermostat has been stored for a long period of timein a warm vehicle or location prior to being installed. The thermostat is equipped with amechanical high temperature safety switch that will turn off the system should thetemperature exceed 99˚ F (37˚ C).Fan control is set to ON.Fan control is set to PROG and is programmed to be on.Thermostat will notallow me to programa setpointtemperature higherthan 90˚ F (32˚ C).Thermostat will notallow me to programa setpointtemperature lowerthan 45˚ F (7˚ C).Keypad doesnot function.This is above the normal thermostat temperature setting range of 45˚ to 90˚ F (7˚ to 32˚ C).This is below the normal thermostat temperature setting range of 45˚ to 90˚ F (7˚ to 32˚ C).Keypad is locked (check for LOCK segment in display).24 25
4 TROUBLESHOOTINGcont.SYMPTOMLO is shown in thethermostat displaywhere the roomtemperature isnormally displayed.Thermostat will notallow me to changethe setpoint.Fan continues to runall the time whetherthe system is onor off.Unit will not enterprogram mode.POTENTIAL SOLUTIONThe temperature sensed by the thermostat is lower than the 40˚ F (5˚ C) lower limit ofthe thermostats display range. The display will return to normal after the sensedtemperature rises within the 40˚ to 99˚ F (5˚ to 37˚ C) display range. If the temperaturein the controlled space seems to be normal, wait for the thermostat to acclimate to thecorrect room temperature. If the room seems to be colder than usual, turn on the heatingsystem to raise the temperature as needed for comfort within the room.This condition could occur from the system being turned off during a cold weather periodor upon installation when the thermostat has been stored for a long period of time in acold vehicle or location prior to being installed. The thermostat should be allowed towarm up prior to installation to allow proper heating control once installed.The Keypad is locked. To lock or unlock the keypad, press and hold both the andbuttons at the same time for 5 seconds. The LOCK segment in the display will flashas the program and temperature segments are cleared (see section 3.7). The timesegments will turn to zeros. Enter the 3 digit code programmed in section 2.4.5 ofthis manual. After setting the last digit, press the RETURN key for 1 second. Thedisplay will return to the normal mode. If an incorrect code is entered, the displaywill flash “no”.Check that the fan is in the AUTO mode. This will allow the fan to run only when theheating or cooling system is turned on and running.Check thermostat wiring to make sure that the fan control wiring is connected to thecorrect terminals on the wiring terminal block. See section 6 of the Installer Guide.Non-Programmable mode selected during Installer Setup. See section 4.2 of theInstaller Guide.26Store thisbooklet forfuture reference<strong>Braeburn</strong> <strong>Systems</strong> LLC2215 Cornell Avenue • Montgomery, IL 60538Technical Assistance: www.braeburnonline.comCall us toll-free: 866-268-5599 (U.S. Only)630-844-1968 (Outside the U.S.)<strong>Braeburn</strong> <strong>Systems</strong> LLC warrants each new <strong>Braeburn</strong> thermostat against any defects that aredue to faulty material or workmanship for a period of five years after the original date ofpurchase by a professional service technician. This warranty and our liability does not apply tobatteries, nor does it include damage to merchandise or the thermostat resulting fromaccident, alteration, neglect, misuse, improper installation or any other failure to follow<strong>Braeburn</strong> installation and operating instructions.<strong>Braeburn</strong> <strong>Systems</strong> LLC agrees to repair or replace at its option any <strong>Braeburn</strong> thermostatunder warranty provided it is returned postage prepaid to our warranty facility in a paddedcarton within the warranty period, with proof of the original date of purchase and a briefdescription of the malfunction. This limited warranty does not include the cost of removal orre-installation.This warranty gives you specific legal rights and you may also have other rights that vary fromstate to state or province to province. Answers to any questions regarding our limited warrantymay be obtained by writing our corporate offices.WARRANTY FACILITY: <strong>Braeburn</strong> <strong>Systems</strong> LLCAttn: Warranty Department2215 Cornell AvenueMontgomery, IL 60538© 2006 <strong>Braeburn</strong> <strong>Systems</strong> LLC • Patents Pending • All Rights Reserved. Pub. No. <strong>5300</strong>-110-002