Installation Instructions - Blue Ox Towing Products
Installation Instructions - Blue Ox Towing Products
Installation Instructions - Blue Ox Towing Products

You also want an ePaper? Increase the reach of your titles
YUMPU automatically turns print PDFs into web optimized ePapers that Google loves.
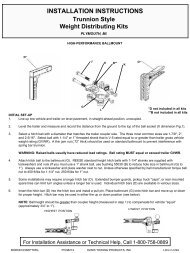
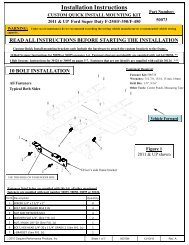
BX3321 <strong>Installation</strong> <strong>Instructions</strong>2004-05 Saturn Vue Red LineThe headlight assembly, blinker assembly, front fascia, metal bumper and air baffl e on passenger’s sideare removed for baseplate installation. Drilling is required. Trimming of air dam is required. The BX8869is available for the vehicle. Attachment Tabs are 22 inches center to center and a height of 22 inches.1. Remove the two push pins from top edge offascia.2. Remove the metric bolt and one push pinfrom blinker assembly with the 10MM socket,both sides, pull forward, unplug electrical andset aside.3. Just forward of front tires are four push pins toremove from edge of wheel well and fascia,on both sides.Page 1 of 6 292-2606 7/31/08
4. Pull wheel well plastic back and remove onemetric bolt from fascia’s corner with the10MM socket, both sides.5. Remove the two push pins that attach to thebottom of metal bumper from lower fasciatabs. Pull fascia forward and set aside.6. Using the 6MM socket, remove two metricbolts from headlight assemblies, pullforward, unplug electrical connections andset aside, on both sides.7. Remove the two push pins from styrofoamon metal bumper, pull forward and set aside.8. Disconnect wire loom and temperaturesensor from the top of metal bumper.Remove two metric bolts from metal bumperopenings using the 13MM socket, on bothsides.Page 2 of 6 292-2606 7/31/089. Using the 13MM wrench, remove the twometric bolts from open ends of metal bumperand set bumper aside.
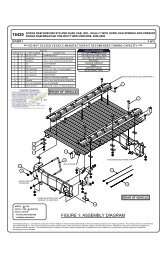
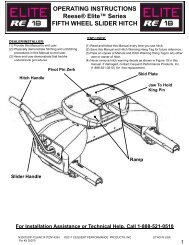
10. Remove push pin from air dam, on bothsides and set air dam aside.11. Remove the two metric bolts from air baffl eon the passenger’s side with the 6MMsocket, pull air baffl e forward and set aside.12. Using the 1 1/2” hole saw, cut a hole intobumper bracket to gain access to the insideof frame rail, both sides (passenger’s sideshown).13. Pull clips of radiator to the front to release onboth sides. This will allow the radiator toslide up for easier baseplate installation.14. Rotate baseplate behind bumper bracketsand slide onto frame rails, both sides.Page 3 of 6 292-2606 7/31/08
15. Align baseplate with the existing holes onframe, insert bolt plates into cut 1 1/2” hole onbumper bracket, through to the existing holesand baseplate. Tighten 3/8” lock washersand hex nuts, both sides. Be sure and useloctite on all bolts/ hex nuts before tightening.Torque all bolts/ hex nuts according to torquechart in General Instruction sheet.16. Using the baseplate as a template, drill thetwo holes with the 13/32” drill bit, on bothsides. Insert the bolt plate through 1 1/2” holeand into drilled hole, tighten 3/8” lock washerand hex nut, both sides. Be sure and useloctite on all bolts before tightening. Torqueall bolts according to torque chart in General<strong>Instructions</strong>.17. Insert hex bolt into the top of baseplate anddrilled hole on frame webbing, tighten the3/8” lock washer and hex nut, on both sides.Be sure to use loctite on all bolts beforetightening. Tighten all bolts according toTorque Chart in General Instruction Sheet.18. Snap radiator to it’s original position. Hold airdam as close to it’s original position aspossible, mark, trim as needed and reinstall.Reinstall air baffl e, metal bumper, wireloom, temperature sensor, headlightsand blinker assemblies. Be sure all electricalcomponents are plugged in properly.Page 4 of 6 292-2606 7/31/08
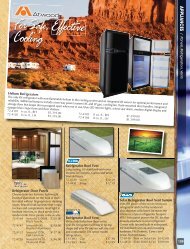
19. Hold fascia to it’s original position and trimlower mesh grille opening with the diagonalcutters or remove the twelve retainer clipsfrom the back of fascia and completelyremove mesh grille. Reinstall fascia.20. The dimensional variations between otherwise identical cars can be considerable. While thelocation and size of the holes in the baseplate were designed to allow for easy installation, it maybe necessary to fi le a hole slightly to allow a bolt to clear.21. Install the tow bar and safety cables according to the instructions included in their packages.22. Do not substitute other devices if the tow bar pin and clip are lost.23. DEALER OR INSTALLER: BE CERTAIN THE USER RECEIVES THE INSTRUCTION SHEET.Using the 15 torx, remove two bolts and pull taillight assembly straight back, both sides (left photo).The bulb hole can be drilled in either location (right photo).Page 5 of 6 292-2606 7/31/08
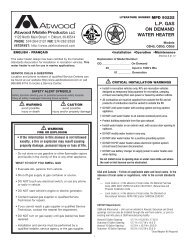
Tools Required6MM Socket 10MM Socket 13MM Socket13MM Wrench Loctite 13/32” Drill Bit9/32” Drill Bit Vise Grips 9/16” SocketUtility Knife 1 1/2” Hole Saw Diagonal CuttersParts ListRef. No. Qty. Part No. Description1 1 61-6010 Weldment, Base Plate, BX33212 6 61-5383 3/8” Bolt Plate, with Wire3 2 201-0443 3/8-16 x 1 Bolt, Grd. 5, ZP4 8 203-0010 3/8 Lock Washer, ZP5 8 202-0003 3/8-16 Hex Nut6 1 101-6135 Electrical, Bracket, BX21607 2 201-0569 1/4-20 x 3/4 Bolt, Grd. 5, ZP8 2 203-0001 1/4 Flat Washer, ZP9 2 203-0008 1/4 Lock Washer, ZP10 2 202-0069 1/4-20 Hex Whiz Nut, Loc, ZP11 2 201-0192 #10-32 x 1/2 Slot, Rd. Hd. Screw12 2 203-0054 #10 Lock Washer13 2 202-0047 #10-32 Hex Nut14 2 62-3468 Attachment, Assembly, SF/ SB (R)15 2 101-5822 Adapter, 4 Way Connector (Not Shown)2 226-0046 Baseplate Safety Cable, 36” CL III (N S)2 229-0359 Quicklink, 3/8, ZP (Not Shown)2 290-0437 Receiver, Cap Plug (BLK) (Not Shown)Location for the electrical bracket(101-6135). Clamp with vise gripand drill holes with the 9/32” drillbit.IMPORTANT: Use only genuine factory replacement parts on your Base Plate. Do not substitutehomemade or nontypical parts. If a bolt is lost or in need of replacement, for your safetyand the preservation of your Base Plate, be sure to use a replacement bolt of the same grade(Usually Grade 5, refer to parts list). Repair parts may be ordered through your nearest <strong>Blue</strong><strong>Ox</strong> dealer or distributor.Page 6 of 6 292-2606 7/31/08