FTXG Quaternity Operation Manual.pdf - Daikin AC
FTXG Quaternity Operation Manual.pdf - Daikin AC
FTXG Quaternity Operation Manual.pdf - Daikin AC

Create successful ePaper yourself
Turn your PDF publications into a flip-book with our unique Google optimized e-Paper software.
CONTENTSREAD BEFORE OPERATIONSafety Precautions ....................................................................2Name of Parts ...........................................................................4Preparation Before <strong>Operation</strong> ...................................................8OPERATIONCOOLING · “SARARA” DRYING <strong>Operation</strong> ...........................10HEATING <strong>Operation</strong> ...............................................................11AUTO <strong>Operation</strong> .....................................................................12FLASH STREAMER AIR PURIFYING ·POWERFUL <strong>Operation</strong> ...........................................................13ADJUSTING AIRFLOW DIRECTION · AIRFLOW RATE ........14COMFORT AIRFLOW · COOLING BREEZE <strong>Operation</strong> .........15TIMER <strong>Operation</strong> ....................................................................16COMFORT SLEEP <strong>Operation</strong> ................................................17SET UP · CHILD PROOF LOCK ............................................18INFORMATION DISPLAY .......................................................19CARECare and Cleaning ..................................................................20TROUBLE SHOOTINGTrouble Shooting ....................................................................291
Safety Precautions• Keep this manual where the operator can easily fi nd it.• Read this manual carefully before starting the unit.• For safety reason, the operator must read the following cautions carefully.• This manual classifi es precautions into DANGER, WARNING and CAUTION. Be sure to follow all precautions below: they are allimportant for ensuring safety.DANGER WARNING CAUTIONIndicates an imminently hazardoussituation which, if not avoided, will resultin death or serious injury.If you do not follow these instructionsexactly, the unit may cause propertydamage, personal injury or loss of life.If you do not follow these instructions exactly,the unit may cause minor or moderateproperty damage or personal injury.Never do.Be sure to follow the instructions.Be sure to ground the air conditioner.Never touch the air conditioner (including the remotecontroller) with a wet hand.Never cause the air conditioner (including the remotecontroller) to get wet.DANGER• For refrigerant leakage, consult your dealer.Refrigerant gas is heavier than air and replaces oxygen. A massive leak could lead to oxygen depletion, especially inbasements, and an asphyxiation hazard could occur leading to serious injury or death.• Refrigerant gas may produce a toxic gas if it comes in contact with fi re such as from a fan heater, stove or cookingdevice. Exposure to this gas could cause severe injury or death.• Any abnormalities in the operation of the air conditioner such as smoke or fi re could result in severe injury or death.Turn off the power and contact your dealer immediately for instructions.• Do not install the unit in an area where fl ammable materials are present due to risk of explosion resulting in serious injury or death.• If equipment utilizing a burner is used in the same room as the air conditioner, there is the danger of oxygen defi ciencywhich could lead to an asphyxiation hazard resulting in serious injury or death.Be sure to ventilate the room suffi ciently to avoid this hazard.• Safely dispose of the packing materials.Packing materials, such as nails and other metal or wooden parts, may cause stabs or other injuries. Tear apart andthrow away plastic packaging bags so that children will not play with them. Children playing with plastic bags face thedanger of death by suffocation.WARNING• It is not good for health to expose your body to the air fl ow for a long time.• Do not put your fi nger, a rod or other objects into the air outlet or inlet. As the fan is rotating at a high speed and could,cause injury. Always keep small children away from the unit during operation.• Do not attempt to repair, relocate, modify or reinstall the air conditioner by yourself. Incorrect work or modifi cations couldcause electric shocks, fi re or other damage.For repairs and reinstallation, consult your <strong>Daikin</strong> dealer for advice and information.• If the air conditioner is not cooling (heating) properly, the refrigerant may be leaking, contact your authorized dealer orqualified service repairman.When making repairs which requires adding refrigerant, consult with your authorized dealer or qualified service repairman.• Do not attempt to install the air conditioner by yourself. Improper installation could result in water leakage, electric shocksor fi re. For installation, consult your authorized dealer or a qualifi ed technician.2
CAUTION• The air conditioner must be grounded to the earth. Improper grounding may result in electric shocks. Do not connect the earthgrounding wire to a gas pipe, water pipe, lightning rod, or a telephone ground line. Follow all local and state electrical codes.• Do not use this unit for cooling precision instruments, food, plants, animals or works of art.• Never expose little children, plants or animals directly to the air fl ow.• Do not block air inlets nor outlets. Impaired air fl ow may result in poor performance or equipment problems.• Do not stand, sit, or place objects on the outdoor unit. To avoid injury, do not remove the fan guard.• Do not place anything under the indoor or outdoor unit that must be kept away from moisture , such as electrical orelectronic equipment. In certain conditions, moisture in the air may condense and drip.• Check the unit stand and fi ttings for damage annually.• Do not touch the air inlet and aluminum fins of outdoor unit. It may cause injury and/or damage the heat transfer surface.• This appliance is NOT intended for use by young children or impaired persons without proper supervision.• Young children should be supervised to ensure that they DO NOT play with or near the air fl ow of this appliance.• Do not pull at the conduit or hang anything on it. Otherwise it will cause fi re or electric shock.• Do not touch the heat exchanger fi ns. Improper handling may result in injury.• Do not turn off the power immediately after stopping operation. Always wait at least fi ve minutes before turning off thepower. Otherwise, water leakage and trouble may occur.• To avoid personal injury or equipment damage be sure to stop the operation, turn the breaker off or pull out the supplycord before cleaning or servicing the unit. NOTE: More than one disconnect may be required to shut off all power.• Do not connect the air conditioner to a power supply different from the one specified. It may cause improper operation or fire.• Depending on the environment, state and local electrical codes, a ground fault circuit interrupter may be required.Improper grounding or lack of a ground fault circuit interrupter may result in electrical shock, injuries, or death.• Arrange the drain hose to ensure smooth drainage. Improper drainage may cause water damage to the building, or it’s furnishing.• Depending on the usage environment, water may leak from the air conditioner. If this happens, contact your <strong>Daikin</strong> Dealer.• The remote controller should be installed in such away that children cannot play with it.• Do not place objects in direct proximity of the outdoor unit and do not let leaves and other debris accumulate around the unit.Leaves are a hotbed for small animals which can enter the unit. Once in the unit, such animals can cause malfunctions,smoke or fire when making contact with electrical parts.• Do not operate the air conditioner with wet hands.• Do not wash the indoor unit with excessive water, only use a slightly wet cloth.• Do not place things such as vessels containing water or anything else on top of the unit. Water may penetrate into theunit and degrade electrical insulations, resulting in an electric shock.Installation site.• To install the air conditioner in the following types of environments, consult the dealer.• Places with an oily ambient or where steam or soot occurs.• Salty environment such as coastal areas.• Places where sulfi de gas occurs such as hot springs.• Places where snow may block the outdoor unit.The drain from the outdoor unit must be discharged to a place of good drainage.Consider nuisance to your neighbours from noises.• For installation, choose a place as described below.• A place solid enough to bear the weight of the unit which does not amplify the operation noise or vibration.• A place from where the air discharged from the outdoor unit or the operation noise will not annoy your neighbours.Electrical work.• For power supply, be sure to use a separate power circuit dedicated to the air conditioner.System relocation.• Relocating the air conditioner requires specialized knowledge and skills. Please consult the dealer if relocation is necessary formoving or remodeling.3
Name of PartsIndoor UnitAir inletFront panelUpper panelAir outletVertical louver• In the air outlet. Page 14Horizontal louverPage 14Room temperaturesensor• It senses the air temperaturearound the indoor unit.Room humidity sensor• It senses the air humidityaround the indoor unit.Indoor unitON/OFF switch• Push this switch once tostart operation.Push once again to stop it.Control panelTIMER lamp (Orange)Page 16Multi-monitor lamp• The lamp color changes according to the operation.• HEATING ............................................................... RED• COOLING ......................................................... GREEN• “SARARA” DRYING / DRY COOLING............YELLOW• The lamp color also changes according to the optionalfunction.• FLASH STREAMER AIR PURIFYING ................WHITE(Only for the fi rst 2 seconds during operation of the airconditioner.)Signal receiver• Receives / sends signals from/to theremote controller.• The multi-monitor lamp blinks with beepsound to indicate signal reception.• <strong>Operation</strong> start ................. two beeps• Settings changed ............. one beep• <strong>Operation</strong> stop ................. long beep4
Name of PartsRemote Controller: ARC447A3Transmitter / Receiver• To use the remote controller, aim thetransmitter at the indoor unit. If thereis anything to block signals betweenthe unit and the remote controller,such as a curtain, the unit will notoperate.• The maximum distance forcommunication is about 23ft.DISPLAY (LCD)• It displays the current settings.(In this illustration, each section isshown with all its displays ON for thepurpose of explanation.)* The protection sheet is on the displayto protect against scratch. Remove itbefore use.COUNTDOWN OFF TIMERbutton• Sets time to stop. Page 16ON/OFF button• Stops operation selected with thedirect operation button. Anotherpress will restart the same operation.INFORMATION button• Displays the indoor temperature andhumidity and the outdoortemperature. Page 19DIRECT operation button• AUTO button Page 12• HEATING button Page 11• “SARARA” DRYING button Page 10• COOLING button Page 10TEMPERATUREadjustment buttons• It changes the temperature setting.HUMIDITY buttons• It changes the humidity setting.POWERFUL button• Makes cooling or heating morepowerful. (Canceled in 20 minutes.)Page 13FLASH STREAMER AIR PURIFYINGbutton• Cleans the room air. Page 136
Open the lidCOOLING BREEZE button• COOLING BREEZE operation.Page 15FAN setting button• It selects the airfl ow rate setting.Page 14, 15SWING button• Adjusts air direction. Page 14SELECT button• It changes the TIMER andCOMFORT SLEEP operationand SET UP.COMFORT AIRFLOWbutton• COMFORT AIRFLOWoperation. Page 15SET UP button• Sets the unit operation andremote controller displayaccording to your preference.Page 18CHILD LOCK buttonCOMFORT SLEEPbutton• Controls the roomtemperature to supportcomfort sleep and pleasantwakeup. Page 17CLOCK button• Sets the present time.Page 9RESET button• Cleaning indicator reset.Page 20TIMER Setting button• Sets the time for timer-on ortimer-off. Page 16CANCEL button7
Preparation Before <strong>Operation</strong>2Position + and– correctly!13Remotecontrollerholder• To set the batteries1. Press with a finger and slide the cover to take it off.2. Set two dry batteries AAA.LR03 (alkaline).3. Set the cover as before.• Characters on the display will blink. Set the present time. Page 94. Change the temperature display. See SET UP. Page 18• To fix the remote controller holder on the wall1. Choose a place from where the signals reach the unit.2. Fix the remote controller holder to a wall or pillar using theincluded screws.3. Hook the holes on back of the remote controller to theprotruding tabs on the remote controller holder.• Attach the Titanium apatite photocatalytic air-purifying filter,deodorizing filter for streamer Page 25• Turn on the power breaker• Turning on the power breaker will cause the front panel and horizontal louver to open onceand then close again. (This is a normal procedure.)8ATTENTIONCAUTION• During operation (i.e. when the panel is open or being opened or closed), do not touch the panel with yourhands.• Wrap the terminals with tape to insulate them before discarding batteries. Mixing with other metals or batteries may cause heat, explosion or fire.PRECAUTION• About batteries• When replacing the batteries, use batteries of the same type, and replace the two old batteries together.• When the system is not used for a long time, take the batteries out.• The batteries will last for approximately one year. If the remote controller display begins to fade and the degradation of reception performanceoccurs within a year, however, replace both two batteries with new size AAA.LR03 (alkaline).• The attached batteries are provided for the initial use of the system.The usable period of the batteries may be short depending on the manufactured date of the air conditioner.• About remote controller• Never expose the remote controller to direct sunlight.• Dust on the signal transmitter or receiver will reduce the sensitivity. Wipe off dust with soft cloth.• Signal communication may be disabled if an electronic-starter-type fl uorescent lamp (such as inverter-type lamps) is in the room. Consult theservice shop if that is the case.• If the remote controller signals happen to operate another appliance, move that appliance to somewhere else, or consult the service shop.• Celsius/Fahrenheit display change function of remote controller• The set temperature may increase when the display is changed to Celsius from Fahrenheit, because a fraction of 0.5°C is rounded up.Example: A set temperature of 65°F (equivalent to 18.5°C) will be converted into 19°C.When the display is changed to Fahrenheit again, the set temperature will be converted into 66°F (equivalent to 19°C) instead of theoriginal set temperature (65°F) but a set temperature of 66°F (equivalent to 19°C) will be converted into 19°C with no temperature change.• A reception sound will go off for the transmission of set temperature to the indoor unit at the time of setting the Celsius/Fahrenheit display change function.
• To set the clock* Time cannot be set during unit operation.1. Press .Do not hold the button.is displayed.blinks.2. Press .• Holding the button changes the time faster.3. Press .blinks.is displayed.• Setting is complete.ATTENTIONIf other messages than time appear on the display with the step 1 operation, do not operate the button for about 60 seconds. The display will return to normal.• Tips for saving energy• Be careful not to cool (heat) the room too much.Keeping the temperature setting at a moderate level helps saveenergy.• Cover windows with a blind or a curtain.Blocking sunlight and air from outdoors increases the cooling(heating) effect.• Clogged air fi lters cause ineffi cient operation and waste energy.Periodically clean the fi lter.Recommended temperature settingFor cooling : 79°F – 82°F (26°C – 28°C)For heating : 68°F – 72°F (20°C – 22°C)• Please note• The air conditioner consumes power even when it is not operating.• If you are not going to use the air conditioner for a long period, forexample in spring or autumn, turn the breaker OFF.• When the outdoor temperature is below 5°F (–15°C), turn on thebreaker more than 1 hour before starting the operation.(This is to warm up the compressor.)• Operating conditions• Running the unit under conditions not listed below may cause thesafety device to activate, stopping the unit. Also, condensation mayform on the indoor unit and drip. (DRY / COOLING operation)COOLINGHEATINGDRYOutdoor temperature : 14 to 109°F (–10 to 43°C)Indoor temperature : 64 to 90°F (18 to 32°C)Indoor humidity : 80% max.Outdoor temperature : –4 to 75°F (–20 to 24°C)Indoor temperature : 50 to 86°F (10 to 30°C)Indoor humidity : 70% max.Outdoor temperature : 50 to 108°F (10 to 42°C)Indoor temperature : 64 to 86°F (18 to 30°C)Indoor humidity : 80% max.9
COOLING · “SARARA” DRYING <strong>Operation</strong>COOLING operationTo lower temperturePress .• The multi-monitor lamp of the unit will turn on GREEN.To lower temperture and humidityPress .• The multi-monitor lamp of the unit will turn on YELLOW.* It is recommended to switch to COOLING operation if you want to lowertemperature preferentially during DRY COOLING operation.“SARARA” DRYING operationTo lower humidityPress .• The multi-monitor lamp of the unit will turn on YELLOW.• To stop operationPress .• The multi-monitor lamp of the unit will go off.• To change the temperature or humidity settingCOOLING DRY COOLING DRY64°F – 90°F (18°C – 32°C) –5°F (–3°C) – STDOFF HIGH STD LOW CONT HIGH STD LOW CONTGREENYELLOWNOTE• Note on ON / OFF buttonPressing • will start the same operation as the last time.• Note on COOLING operation• This air conditioner cools the room by blowing the hot air in the room outside, so if the outside temperature is high, performance drops.• Note on DRY COOLING• Pressing the humidity button down in COOLING mode set the unit to DRY COOLING.• Removes more humidity than the normal COOLING operation. It is recommended, however, to set temperature slightly lower than the roomtemperature to lower humidity because this operation mode does not heat air supplementary.• Note on “SARARA” DRYING operation• Removes humidity with less lowering of the room temperature by heating air supplementary.• The operation mode change from COOLING to “SARARA” DRYING may raise humidity temporarily.10
HEATING <strong>Operation</strong>HEATING operationTo raise temperaturePress .• The multi-monitor lamp of the unit will turn on RED.• To stop operationPress .• The multi-monitor lamp of the unit will go off.• To change the temperatureHEATING50°F – 86°F (10°C – 30°C)REDNOTE• Note on HEATING operation• Since this air conditioner heats the room by taking heat from outdoor air to indoors, the HEATING capacity becomes smaller in lower outdoortemperatures. If the HEATING effect is insuffi cient, it is recommended to use another HEATING appliance in combination with the air conditioner.• The heat pump system heats the room by circulating hot air around all parts of the room. After the start of HEATING operation, it takes some timebefore the room gets warmer.• In HEATING operation, frost may occur on the outdoor unit and lower the HEATING capacity. In that case, the system switches into defrostingoperation to take away the frost.• During defrosting operation, hot air does not fl ow out of indoor unit.11
AUTO <strong>Operation</strong>After pressing the AUTO button, the air conditioner will operate according to roomconditions in an automatic mode.Press .• HEATING: The multi-monitor lamp of the unit will turn on RED.• COOLING: The multi-monitor lamp of the unit will turn on GREEN.• The color of the multi-monitor lamp changes according to the actual operations.• When the AUTO button is pressed, the color according to the operation selectedby the air conditioner will light up.• To change the temperature setting64°F – 86°F (18°C – 30°C)• To stop operationPress .• The multi-monitor lamp of the unit will go off.NOTE• Note on AUTO operation• In AUTO operation, the system selects an appropriate operation mode (COOLING or HEATING) based on the room temperature at the start of theoperation.• The system automatically reselects setting at a regular interval to bring the room temperature to user setting level.• If you do not like AUTO operation, you can manually select the operation mode and setting you like.12
FLASH STREAMER AIR PURIFYING ·POWERFUL <strong>Operation</strong>The absorption power of the Titanium apatite photocatalytic air-purifying fi lter and airsupply fi lter and the resolving power of the streamer discharge reduce bad odorsand viruses, cleaning the room air.Press .(Can be used together with heating or cooling, or on its own.)• Changes every time the button is pressed. (Use instead of FAN operation.)• The multi-monitor lamp of the unit will turn on WHITE.(This will illuminate whitely for the fi rst 2 seconds of operation of the air conditioner.)ATTENTION• Temperature and humidity cannot be changed during FLASH STREAMER AIR PURIFYING operation only.POWERFUL operation quickly maximizes the cooling (heating) effect in anyoperation mode.Pressduring operation.• POWERFUL operation ends in 20 minutes.• POWREFUL COOLING: The multi-monitor lamp of the unit will turn on GREEN.• POWREFUL HEATING: The multi-monitor lamp of the unit will turn on RED.NOTE• To cancel POWERFUL operationPressagain.• The operation mode goes back to the previous one. The multi-monitor lamp on the unit also goesback to the previous color.• Note on FLASH STREAMER AIR PURIFYING operation• The streamer discharge energy and Titanium apatite photocatalytic air-purifying fi lter clean the air in the room.• What is streamer discharge?• It generates high-speed electron with high oxidizing power in the unit to resolve odor and harmful gas.(It is safe because the high-speed electron is generated and goes away inside the unit.)* The streamer discharge fi zzes, but this is not a malfunction.• Note on POWERFUL operation• Can be used for COOLING, DRY COOLING and HEATING. (Cannot be used while the unit is not running.)Pressing during COOLING, DRY COOLING changes the operation mode to POWERFUL COOLING.Pressing during HEATING, change the operation mode to POWERFUL HEATING.• The operation noise is slightly louder during POWERFUL operation.13
ADJUSTING AIRFLOW DIRECTION ·AIRFLOW RATEMore comfortable airfl ow is provided with airfl ow direction and airfl ow rateadjustment.• To change vertical and horizontal airflow directionsPress or during operation.(In case of vertical direction)• The airfl ow direction indication will display.• The horizontal and vertical louvers respectively move vertically and horizontally automatically.• If you want to fix airflow directionPress or again.• To use 3-D AIRFLOWPress and then during operation.• The vertical and horizontal airfl ow direction indications will display.• The horizontal and vertical louvers move alternately.• To cancel 3-D AIRFLOWPress or again.• To change the airflow ratePressduring operation. (Refer to table.)• COOLING or HEATING with “ ” or other weak airfl ow rate may not cool orheat the room suffi ciently.• Indoor unit quiet operationWhen the air fl ow is set to “ ”, the noise from the indoor unit will become quieter.Operating mode“SARARA” DRYINGDRY COOLINGAUTO / COOLINGAirfl ow rate settingHEATINGFLASH STREAMER AIR PURIFYINGFive levels of air fl ow rate setting from “ ” to “ ” plus “ ” “ ” are available.NOTE• If the unit is operated with the horizontal louvers pointed down and stopped in COOLING, “SARARA” DRYING, or DRY COOLING operation, thelouvers will move automatically after about one hour. (This it to prevent condensation from forming on them.)• ATTENTION• Be sure to use the remote controller to adjust the airfl ow direction. <strong>Manual</strong> operation of the louvers maycause it to work improperly.• Note on Adjusting the vertical airflow direction• The movable area for the horizontal louver is different depending on the operation mode.• Note on 3-D AIRFLOW• Using 3-D AIRFLOW circulates cold air, which tends to be collected at the bottom of the room, and hotair, which tends to be collected near the ceiling, throughout the room, preventing areas of cold and hotfrom developing.14A) 15°– 70°B) 20°– 60°C) 30°– 70°STOPA) 15°– 55° C) 25°– 55°B) 45°– 55°A) FLASH STREAMER AIR PURIFYINGIndividual operationB) “SARARA” DRYING · COOLINGC) HEATING
COMFORT AIRFLOW ·COOLING BREEZE <strong>Operation</strong>• COMFORT AIRFLOW operationPress .• COMFORT AIRFLOW MODE operation• The airfl ow direction and airfl ow rate are adjusted so that the air from theunit does not blow directly on the occupants of the room.• < COOLING/DRYING > The fl ap will go up.• < HEATING > The fl ap will go down.• The airfl ow rate is set to “AUTO”.• COOLING BREEZE operationPress .• COOLING BREEZE operation• COOLING BREEZE operation is for COOLING, “SARARA” DRYING and FLASH STREAMERAIR PURIFYING operation.• To change the airflow ratePress during operation. (Refer to table.)• COOLING or HEATING with “ ” or other weak airfl ow rate may not cool orheat the room suffi ciently.• Indoor unit quiet operationWhen the air fl ow is set to “ ”, the noise from the indoor unit will become quieter.Operating modeAirfl ow rate setting“SARARA” DRYING h hDRY COOLING h hAUTO / COOLING h hHEATINGhFLASH STREAMER AIR PURIFYINGh: COMFORT AIRFLOW MODE operation is possible.: COOLING BREEZE operation is possible.Five levels of air fl ow rate setting from “ ” to “ ” plus “ ” “ ” are available.NOTE• Note on COMFORT AIRFLOW MODE operation• The airfl ow direction is as fi gure.• Note on COOLING BREEZE operation• The vertical movement of the horizontal louvers with “1/ f breeze” rhythm provides comfort air like naturalbreeze. The room temperature is felt cooler with cooling breeze.COMFORTAIRFLOWCOOLING 15°COMFORT AIRFLOWHEATING 75°COMFORT AIRFLOWCOOLING 15°COMFORT AIRFLOWHEATING 65°15
TIMER <strong>Operation</strong>NOTE16Timer functions are useful for automatically switching the air conditioner on or off atnight or in the morning.The timer operates only one time. Set the timer for each use.• COUNTDOWN OFF TIMER operationSet the time to stop.Press .• The displayed time, which changes in 0.5 hour increments every time thebutton is pressed, is set. The time from 0.5 to 9.5 hours can be set.• TIMER lamp will light up.• ON/OFF TIMER operationSet time for ON TIMER or OFF TIMER.• Check that the clock is correct. If not, set the clock to the present time. Page 9• The present time display disappears when the time ON/OFF TIMER is reserved.1. Press for OFF TIMER and press for ON TIMER.* OFF TIMERis displayed.blinks.2. Press to set the time to be reserved.• Pressing the button changes the time in 10 minutes. Holding the button makes the time change faster.3. Press for OFF TIMER and press for ON TIMER.* OFF TIMER• TIMER lamp will light up.• To cancel the TIMER operationPress .• The TIMER lamp will go off and the TIMER will be canceled.• In the following cases, set the timer again.• After a breaker has turned OFF.• After a power failure.• After replacing batteries in the remote controller.• Note on TIMER operation• Starting COUNTDOWN OFF TIMER and OFF TIMER causes theunit to automatically change the set temperature 1 hour later toprevent the room from becoming too cold or too hot. (Turns up 1°F(0.5°C) during COOLING or DRY COOLING and turns down 3.6°F(2°C) during HEATING.)• Reserving the ON TIMER will cause the unit to start running up to 1hour before, in order to make sure the temperature reaches thetemperature set on the remote controller by the set time.• When operating the unit via the COUNTDOWN OFF TIMER or OFFTIMER, the actual length of operation may vary from the timeentered by the user.• Once you set ON/OFF TIMER, the time setting is kept in thememory. However, the COUNTDOWN OFF TIMER does not havethis memory function.(The memory is canceled when remote controller batteries arereplaced.)• Cannot operate with POWERFUL or COMFORT SLEEP operation.• To combine ON TIMER and OFF TIMER• See the right example for reserving in combination ofCOUNTDOWN OFF TIMER and ON TIMER as well as OFF TIMERand ON TIMER.• To cancel combined reservation• Press and then to cancel the ON TIMER only.• Press and then to cancel the OFF TIMER only.• Press several times to reach 9.5 hours and then press it onemore time to cancel the COUNTDOWN OFF TIMER only.(Example)Present time: 23:00 (air conditioner is running).You want to have the unit run for 1 more hour and then turn back onat 7:00 am.Setting the COUNTDOWN OFF TIMER toSetting the ON TIMER to at 7:00Setting the OFF TIMER to at 0:00Setting the ON TIMER to at 14:001 hour later
COMFORT SLEEP <strong>Operation</strong>Controlling the room temperature supports comfort sleep and pleasant wake-up.• Check that the clock is correct. If not, set the clock to the present time. Page 9• The present time display disappears when the COMFORT SLEEP operation is set.1. Press during operation.blinks.is displayed.2. Press to set the time to wake up.• Pressing the button changes the time in 10 minutes. Holding the button makes the timechange faster.3. Press .is displayed.is displayed.• When settings are made while the unit is not running, press to start the operation.• To cancel the comfort sleep operationPress .ATTENTION• Make the room temperature comfortable to some extent before sleep. COOLING .....................79°F – 84°F (26°C – 29°C)HEATING ......................68°F – 77°F (20°C – 25°C)* Too low set temperature may cause you to get chilled while asleep.NOTE• Note on COMFORT SLEEP operation• Can be used for COOLING, DRY COOLING and HEATING.• Cannot be used with TIMER operation.• How to use COMFORT SLEEP operation effectively• Starting COMFORT SLEEP operation lowers the set temperature by 3.6°F (2°C) in 3 hours and starts raisingit by 1.8°F (1°C) 1 hour before the set time, offering V-curve temperature control. (See the right fi gure.)• Set the airfl ow direction so that the air from the unit does not directly blow on the occupants of the room.(For 6 hours of sleep)Settemper-ONSet wakeup timeature–1°C–2°CSleeping time 0Wakeup3hours2hours1hour1 2 3 4 5 617
SET UP · CHILD PROOF LOCK• SET UPSets the unit operation and remote controller display according to your preference.1. Press .• The setup mode will be activated.2. The item will change every time is pressed.3. The settings will change every time ispressed respectively.• Direct the remote controller toward the main unit to make settings.Item Setting Descriptionis default.CELSIUS/FAHRENHEITchange°F °C• Switches the temperature between Celsiusand Fahrenheit.MONITOR BRIGHTNESS HIGH LOW OFF• Changes the brightness of the indoor unitdisplay.BEEP volume LOW HIGH OFF • Sets the receiving tone volume.CONTRAST setting 1 6 16• Sets the grayscale for the remote controllerLCD.• Selectable from contrast 1 to 16.Setting complete: The display on the remote control goes back to normal if no setting is madefor 10 seconds.• CHILD PROOF LOCKRestrict the remote controller operates to avoid misuse by children.Press for about 2 seconds.• “” is displayed.• To cancel CHILD PROOF LOCKPress for about 2 seconds again.18
INFORMATION DISPLAYDisplays the room temperature and humidity and outdoor temperature.Press .• After pressing , point the remote controller at the air conditioner unit for 2 seconds.Return tonormaldisplaySet temperatureIndoor temperatureIndoor humidityOutdoortemperature• The display changes every time is pressed.NOTE• Note on INFORMATION DISPLAY• The signal from the air conditioner is not being received properly if “” is displayed when you press . Repeat, aiming the remotecontroller at the air conditioner.• During operation, the outdoor temperature may sometimes be displayed higher than it actually is in COOLING or “SARARA” DRYING mode orlower in HEATING mode (especially if frost has accumulated on the outdoor unit), due to the effects of the air blown from the outdoor unit or thetemperature of the heat exchanger.• The lowest indoor and outdoor temperature which can be displayed is 16°F (−9°C). This will be displayed even if the actual temperature is lower.The highest temperature is 99°F (37°C). This will be displayed even if the actual temperature is higher.• The indoor and outdoor temperatures and the humidity which are displayed are those near the sensors attached to the main air conditioner unit.• The displayed temperature and humidity should only be taken as approximations, as they may be affected if there are objects around the sensorsor due to direct sunlight, depending on where the air conditioner is installed.19
Care and CleaningQuick reference for cleaningCAUTION• Before cleaning, be sure to stop the operation and turn the breaker OFF.• Do not touch the metal parts in the indoor unit. Doing so may cause injury.Titanium apatitephotocatalytic airpurifyingfilter (Black)Soakif “CLEAN STREAMER” displays.• Replace once in about 3 years.Page 26Front panelWipe offif it gets dirty. Page 21Upper panelWipe offif it gets dirty. Page 22Streamer unitSoakif “CLEAN STREAMER” displays.• Replace once in about 3 years.Page 26Deodorizing filter forstreamer (Black)Soakif “CLEAN FILTER” display.• Replace once in about 3 years.Page 26Air filterVacuum Rinseif “CLEAN FILTER” displays.Page 23To reset the filter cleaning indicatorWhile the unit is not operating, the fi lter cleaning indicator may be displayed on the remotecontroller depending the amount of time the unit had been operating. This sign indicates thecleaning timing for the air fi lter, Titanium apatite photocatalytic air-purifying fi lter, deodorizing fi lterfor streamer or streamer unit.After cleaning, press for about 2 seconds directing the remotecontroller toward the main unit with powered off.• Indication disappears.NOTE• “CLEAN FILTER” sign will appear after about 340 hours of operation.• “CLEAN STREAMER” sign will appear after about 1800 hours of operation.• Operating the unit without cleaning with the “CLEAN STREAMER” sign displayed will lower the deodorizing capability.• Periodical cleaning leads to energy saving.20
CAUTION• Only open the front panel after turning the unit off.Opening the panel during operation may cause the panel to fall off.Attaching and removing the front pane1. Open the front panel.• Placing a fi nger on the panel tab on either side of the front panel.Front panel2. Remove the front panel.• Spread out the shaft hole and remove the rotating shaft. (Both left and right sides.)Rotating shaftShaft hole3. Attach the front panel.• Place the revolving axes on either side of the front panel into the holes and slowly close.(Press either side of the front panel.)Rotating shaftShaft hole21
Care and CleaningAttaching and removing the upper pane1. Remove the front panel and pull out the air filter. Page 232. Remove the upper panel.1) Hold the 2 tabs on either side of the upper panel and pull forward to remove.2) Remove the tab in the center and lift.Tab (Center)Tabs (One on each side)3. Attach the upper panel.• Insert the 3 tabs on back of the upper panel and then push it down.• Push the upper panel down until it clicks.Tabs (3 locations)22Cleaning for each case• Wipe it with a soft cloth soaked in water. (Only neutral detergent may be used.)• In case of washing the front panel with water, dry it with cloth, dry it up in the shade after washing.CAUTION• When removing or attaching the front panel, use a robust and stable stool and watch your steps carefully.• When removing or attaching the front panel, support the front panel securely with hand to prevent it from falling.• For cleaning, do not use hot water above 104°F (40°C), benzine, gasoline, thinner, nor other volatile oils, polishing compound, scrubbing brushes,nor other hand stuff.• After cleaning, make sure that the front panel is securely fi xed.• Wipe the front panel with a soft cloth. Wiping with a hard cloth may scratch it.
Cleaning the air filter(Ifis displayed on the remote controller)1. Open the front panel.• Open the front panel by placing a fi nger on the panel tab on either side of the front panel and then secure it using thesupporting plate on the right.Supportingplate2. Pull out the air filters.Air filter• Push a little upwards the air fi lter.• Pull the air fi lter down.3. Clean the air filter.• Wash the air fi lters with water or clean them with vacuum cleaner.• If the dust does not come off easily, wash them with neutral detergent thinned with lukewarm water,then dry them up in the shade.4. Set the air filter as it was and close the front panel.• Insert the air fi lter with the “FRONT” marking to thefront.• Be sure to insert the two tabs below.• Return the supporting plate to its previous position.• Press either side of the front panel.TabsTabs5. Reset the filter cleaningindicator. Page 20ATTENTION• Using without cleaning will lower the COOLING or HEATING capability, wasting electricity.23
Care and CleaningAttaching and removing the deodorizing filter for streamer, Titanium apatitephotocatalytic air-purifying filter, streamer unitTitanium apatite photocatalyticair-purifying filterRemoving1. Open the front panel and pull out the air filter. Page 232. Remove the deodorizing filter for streamer.• Discharge the tab and pull out the knob in a downward direction.TabKnobDeodorizing filterfor streamer3. Pull out the streamer unit.• Hold the center of the handle and pull out in a downward direction.Streamer unit4. Remove the Titanium apatite photocatalytic airpurifyingfilter.• Pull up the fi lter frame, discharge the tabs on both sides of the Titanium apatite photocatalytic air-purifying fi lter from thehooks, and pull down the fi lter in a downward direction.Titanium apatitephotocatalyticair-purifying filterTabHook24
unitDeodorizing filter for streamerAttaching1. Replace the streamer unit to its originalposition.2. Attach the deodorizing filter for streamer.• Insert the deodorizing fi lter for streamer until it clicks.3. Attach the Titanium apatite photocatalytic air-purifying filter.• Insert the 2 upper tabs on the Titanium apatite photocatalytic air-purifying fi lter into the guides on the main unit and thenhook up the 2 lower tabs.GuideUpper tabs(2 locations)Lower tabs(2 locations)Streamer4. Replace the air filter to its original position and close the frontpanel. Page 2025
Care and CleaningCleaning the deodorizing filter for streamer, Titanium apatite photocatalyticair-purifying filter and streamer unit(Ifis displayed on the remote controller)• Attaching and removing each part Page 25Deodorizing filter for streamer / Titanium apatite photocatalytic air-purifying filterVacuum dusts, and soak inwarm water or water for about10 to 15 minutes if dirt is heavy.Soak for about 10 to 15 minutes.• Do not use cleaning agents. This may lower deodorizingcapability.• Do not scrub the fi lter while cleaning.• Do not take the fi lter out of the frame while soaking.• After soaking, drain water away and dry well in a shade.• Do not squeeze the fi lter to drain away water.Warm water or waterDeodorizing filter for streamer / Titanium apatite photocatalytic air-purifying filter1)Soak in warm water withmild liquid detergent forabout 1 hour.Soak for about 1 hour.With detergent• Observe the volume of mild liquid detergent specifi ed in theinstruction.• Do not use powder or alkaline detergent.• If very dirty, disassemble the streamer unit and clean with cottonswabs, etc.(Disassembly instructions: Page 27 )DisassemblySoak for about 30 minutes.2)Rinse with running water andsoak in warm water or wateragain.Warm water or waterDischarge platePlastic cover3)Rinse with running water.Discharge plateAbout 1 day4)Drain water away and dry ina breezy shade.Do not touch the needleon the discharge plate.Do not touch the needle on the discharge plate (2 locations).Bending the needle will affect the unit’s ability to deodorize.• Resetting the fi lter cleaning indicator Page 20ATTENTION• Using without cleaning lowers the deodorizing capability.26
How to replace• Deodorizing filter for streamer(Once in about 3 years)• Remove from the fi lter frame and replace the fi lter with anew one.• Titanium apatite photocatalyticairpurifying filter(Once in about 3 years)• Discharge the 4 tabs of the fi lter frame and replace thefi lter with a new one.Holes (4 locations)Filter frameFilter frameTitanium apatitephotocatalyticair-purifying filter• The deodorizing fi lter for stream and the titanium apatitephotocatalytic air-purifying fi lter do not have front and back sides.• Dispose a used fi lter as burnable waste. (material: paper)Tabs (4 locations)How to disassemble and assemble the streamer unit• Before disposing the streamer unit, disassemble it.How to disassemble• Use gloves for safety.• Apply one hand to part and push the plastic part with another hand.• Disassemble the streamer unit into the plastic cover and the discharge plate.• Match up the securing parts of the various parts of the streamer unit and assemble as it was.Streamer unit• DisassemblySecuring partOPENApply a finger topart.Push theplastic part.Discharge platePlastic coverCAUTION• Be careful not to cut yourself when disassembling and assembling the streamer unit.Cleaning the indoor unit and the remote controller• Wipe with a soft dry cloth.For cleaning, do not use hot water above 104°F(40°C), benzine, gasoline, thinner, nor other volatile oils, polishing compound,scrubbing brushes, nor other hand stuff.27
NOTE• The deodorizing fi lter for stream and the titanium apatite photocatalytic air-purifying fi lter should be cleaned regularly.We recommend replacing the fi lter in the following situations.• If it is damaged during cleaning because it is made of paper.• If it is very dirty after long use.Air purifying fi lter setItemPart No.KAF974B42S• To order Titanium apatite photocatalytic air-purifying fi lter, deodorizing fi lter for streamer and streamer unit contact to the serviceshop there you bought the air conditioner.• Using the dirty parts will:• Prevent proper air purifi cation.• Prevent proper deodorizing.• Reduce COOLING and HEATING capacity.• Cause the unit to produce foul odors.Check• Check that the base, stand and other fi ttings of the outdoor unit are not decayed or corroded.• Check that nothing blocks the air inlets and the outlets of the indoor unit and the outdoor unit.• Check that the drain comes smoothly out of the drain hose during COOLING or DRY operation.• If no drain water is seen, water may be leaking from the indoor unit.Stop operation and consult the service shop if this is the case.• Is the earth wire out or disconnected in the middle?• An incomplete ground wire may cause electrical shock. Contact the service shop.Before a long idle period1. Operate the “FAN only” for several hours on a fine day to dry out the inside.• Press28Press • and start operation2. After operation stops, turn off the breaker for the room air conditioner.3. Clean the air filters and set them again.4. Take out batteries from the remote controller.
Trouble ShootingThese cases are not troubles.The following cases are not air conditioner troubles but have some reasons. You may just continue using it.CaseExplanation<strong>Operation</strong> does not start soon.• When ON/OFF button was pressed soonafter operation was stopped.• When the mode was reselected.Hot air does not flow out soon afterthe start of heating operation.Makes a noise.Units stops during HEATING and thesound of running water can be heard.The outdoor unit emits water orsteam.Mist comes out of the indoor unit.The indoor unit gives out odor.Cold air blows at the start of“SARARA” DRYING operation.The outdoor fan rotates while theair conditioner is not in operation.The operation stopped suddenly.(Multi-monitor lamp is on.)Unit stops suddenly (when in ONTIMER mode).Unit operates even though themulti-monitor lamp is off.• This is to protect the air conditioner.You should wait for about 3 minutes.• The air conditioner is warming up.You should wait for 1 to 4 minutes.• Clicking sound can be heard either when the unit is running or stopped• This is either the sound of the valves regulating the refrigerant or the electrical parts working.• Sound of running water• Refrigerant is fl owing through the air conditioner.• Blowing sound• The fl ow of refrigerant through the air conditioner is switching.• Creaking sound• The air conditioner itself is expanding or shrinking due to a change in the humidity.• Clopping sound• Can be heard coming from inside the air conditioner when the ventilator is on and the room isshut. Open a window or turn off the ventilator.• Clicking sound can be heard either when the unit is running or stopped• This is the sound of the electrical parts working when the front panel opens or closes.• Blowing, cracky or burning sound• This is the sound of streamer discharging.• The frost on the outdoor unit is being removed. You should wait for about 3 to 10 minutes.• In HEATING operation• The frost on the outdoor unit melts into water or steam when the air conditioner is in defrost operation.• In COOLING operation• Moisture in the air condenses into water on the cool surface of outdoor unit piping and drips.• This happens when the air in the room is cooled into mist by the cold air flow during COOLING operation.• This is because moisture on the heat exchanger evaporates when “SARARA” DRYING operationis run after COOLING or DRY COOLING operation.• This happens when smells of the room, furniture, or cigarettes are absorbed into the unit anddischarged with the air fl ow. (If this happens, we recommend you to have the indoor unit washedby a technician. Consult the service shop where you bought the air conditioner.)• This is because the air conditioner is not warmed up.• After operation is stopped:• The outdoor fan continues rotating for another 60 seconds for system protection.• While the air conditioner is not in operation:• When the outdoor temperature is very high, the outdoor fan starts rotating for systemprotection.• For system protection, the air conditioner may stop operating on a sudden large voltagefl uctuation. It automatically resumes operation in about 3 minutes.• Reserving the on timer will cause the unit to start running up 1 hour before, in order to make surethe temperature reaches the temperature set on the remote controller by the set time. Using theremote controller during this time (other than the operation/stop button) will stop the unit. Restartthe unit with the remote controller.• The multi-monitor lamp will go off if “Monitor OFF” is set using the remote controller.29
Check again.Please check again before calling a repair person.CaseCheckThe air conditioner does notoperate.(Multi-monitor lamp is off.)The air conditioner does notoperate.(Multi-monitor lamp flashes.)<strong>Operation</strong> stops suddenly.(Multi-monitor lamp flashes.)Cooling (Heating) effect is poor.An abnormal functioning happensduring operation.Front panel does not open.(Multi-monitor lamp flashes.)The multi-monitor lamp flashes fora certain amount of time (about 2minutes) at the start of or duringFLASH STREAMER AIR PURIFYINGoperation.• Hasn’t a breaker turned OFF or a fuse blown?• Isn’t it a power failure?• Are batteries set in the remote controller?• Is the timer setting correct?• Turn off the breaker and then start the unit using the remote controller.• If the lamp still flashes, consult the service shop where you bought the air conditioner.Turn off the breaker.• Are the air fi lters clean?• Is there anything to block the air inlet or the outlet of the indoor and the outdoor units?Clean the air fi lters or take all obstacles away and turn the breaker OFF. Then turn it ON againand try operating the air conditioner with the remote controller. If the lamp still flashes, consultthe service shop where you bought the air conditioner.Turn off the breaker.• Are the air fi lters clean?• Is there anything to block the air inlet or the outlet of the indoor and the outdoor units?• Is the temperature setting appropriate?• Are the windows and doors closed?• Are the air fl ow rate and the air direction set appropriately?• Is the ventilator fan spinning?• Do you put your hand in the main unit while it is operating? (Do you touch inside the unit?)• Putting your hand (or touching) inside the unit may cause malfunctions due to static discharge.Do not put your hand in the main unit.• The air conditioner may malfunction with lightning or radio waves. Turn the breaker OFF, turn itON again and try operating the air conditioner with the remote controller.• Is there something caught in the front panel?Remove the object and attempt operation again using the remote controller.If the panel still does not open, contact your dealer if the operation lamp is still fl ashing.• Is the streamer unit installed securely?• Turn off the breaker, check to see if the streamer unit is installed securely, turn the power on, andthen operate the unit again using the remote controller.• If the lamp still fl ashes, consult the service shop where you bought the air conditioner.30
Trouble Shooting• Call the service shop immediately.CAUTION• When an abnormality (such as a burning smell) occurs, stop operation and turn the breaker OFF.Continued operation in an abnormal condition may result in troubles, electric shocks or fi re.Consult the service shop where you bought the air conditioner.• Do not attempt to repair or modify the air conditioner by yourself.Incorrect work may result in electric shocks or fi re.Consult the service shop where you bought the air conditioner.• If the air conditioner does not cool (or heat), leaking refrigerant is a possible cause, so please contact your dealer. Pleasetalk to a service repairman about any repairs needed when adding refrigerant.Refrigerant used for the air conditioner is safe. Refrigerant does not leak usually, but if it leaks into the room and comes in contactwith any kind of fl ame, including those in fan heaters, gas stoves, gas heaters, etc., toxic gas may be generated.If one of the following symptoms takes place, call the service shop immediately.• The power cord is abnormally hot or damaged.• An abnormal sound is heard during operation.• An object or water got into the unit.• The safety breaker, a fuse, or the earth leakagebreaker cuts off the operation frequently.• A switch or a button often fails to work properly.• There is a burning smell.• Water leaks from the indoor unit.Turn the breaker OFF and call the service shop.• Cool or warm air comes from the unit but the multimonitorlamp blinks for a certain amount of time(about 2 minutes) at the start of or during operation.This indicates the malfunction or initial failure of thehumidifying unit or some sensors. The unit isoperating in COOLING / HEATING mode as atemporary operation. Contact your dealer.• After a power failureThe air conditioner automatically resumes operation in about 3 minutes. You should just wait for a while.• COMFORT SLEEP mode will be canceled. Re-set.• LightningIf lightning may strike the neighbouring area, stop operation and turn the breaker OFF for system protection.We recommend periodical maintenance.In certain operating conditions, the inside of the air conditioner may get foul after several seasons of use, resulting in poorperformance. It is recommended to have periodical maintenance by a specialist aside from regular cleaning by the user. For specialistmaintenance, contact the service shop where you bought the air conditioner.The maintenance cost must be born by the user.Precautions for Interior Cleaning of Air ConditionerCommercially available detergent for air conditioners can degrade the sterile effect of the air conditioner and exert a bad infl uence on theinterior resin and heat exchanger of the air conditioner. Moreover, in the worst case, it may result in serious problems such as water leakage.Consult your service shop for the cleaning of the heat exchanger.31
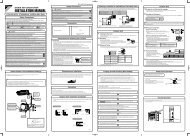
Trouble Shooting• FAULT DIAGNOSIS BY REMOTE CONTROLLERIn the ARC447A3, the temperature display sections on the main unit indicate corresponding codes.1. Hold the timer cancel button down for 5 seconds, with the remote controller set toward the indoor unit.CANCEL buttonIt cancels the timer setting.2. The temperature display on the remote controller changes to the error code display anda long beet notifies this indication change.CODEMEANING00 NORMALUAINDOOR-OUTDOOR UNIT COMBINATION FAULTSYSTEMU0REFRIGERANT SHORTAGEU2DROP VOLTAGE OR MAIN CIRCUIT OVERVOLTAGEU4FAILURE OF TRANSMISSION (BETWEEN INDOOR UNIT AND OUTDOOR UNIT)U7CIRCUIT BOARD TRANSMISSION FAULTAHSTREAMER FAULTA1INDOOR PCB DEFECTIVENESSA5HIGH PRESSURE CONTROL OR FREEZE-UP PROTECTORINDOOR UNIT A6FAN MOTOR FAULTC4FAULTY HEAT EXCHANGER TEMPERATURE SENSORC7FRONT PANEL OPEN/CLOSE FAULTC9FAULTY SUCTION AIR TEMPERATURE SENSORE<strong>AC</strong>OOLING-HEATING SWITCHING FAULTE1CIRCUIT BOARD FAULTE5OL STARTEDE6FAULTY COMPRESSOR START UPE7DC FAN MOTOR FAULTE8OVERCURRENT INPUTFAEJECTION PRESSURE FAULTF3HIGH TEMPERATURE DISCHARGE PIPE CONTROLF6HIGH PRESSURE CONTROL (IN COOLING)OUTDOOR UNIT H0SENSOR FAULTH6OPERATION HALT DUE TO FAULTY POSITION DETECTION SENSORH8CT ABNORMALITYH9FAULTY SUCTION AIR TEMPERATURE SENSORJ3FAULTY DISCHARGE PIPE TEMPERATURE SENSORJ6FAULTY HEAT EXCHANGER TEMPERATURE SENSORL3ELECTRICAL PARTS HEAT FAULTL4HIGH TEMPERATURE AT INVERTER CIRCUIT HEATSINKL5OUTPUT OVERCURRENTP4FAULTY INVERTER CIRCUIT HEATSINK TEMPERATURE SENSORNOTETo cancel indication of error code, hold the timer cancel button down for 5 seconds.The code display also cancels itself if the button is not pressed for 1 minute.32
Two-dimensional bar code is a codefor manufacturing.3P226009-1 M07B240 (0810) HT