The Review Package: The Rave 90 ENV Kit The Build - RC World
The Review Package: The Rave 90 ENV Kit The Build - RC World
The Review Package: The Rave 90 ENV Kit The Build - RC World

You also want an ePaper? Increase the reach of your titles
YUMPU automatically turns print PDFs into web optimized ePapers that Google loves.
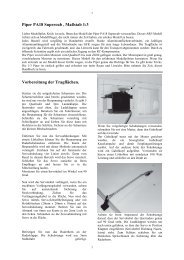
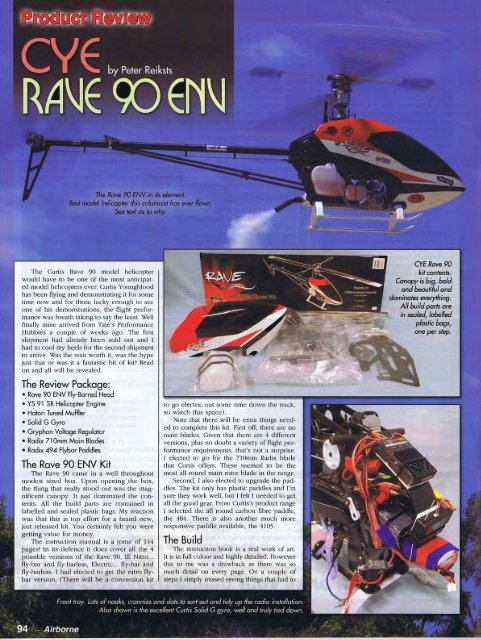
<strong>The</strong> Curtis <strong>Rave</strong> <strong>90</strong> model helicopterwould have to be one of the most anticipatedmodel helicopters ever. Curtis Youngbloodhas been flyin g and demonstrating it for sometime now and for those lucky enough to seeone of his demonstrations, the flight perfo rmance was breath taking to say the least. WellfinaUy mine arrived from Tate's PerformanceHobbies a couple of weeks ago. <strong>The</strong> firstshi pment had already been sold out and Ihad to cool my heels fo r the second shi pmentto arri ve. Was the wait worth it, was the hypejust th at or was it a fan tastic b it of kit? Readon and all will be revealed.<strong>The</strong> <strong>Review</strong> <strong>Package</strong>:• <strong>Rave</strong> <strong>90</strong> <strong>ENV</strong> Fly-Barred Head• YS 91 SR Helicopter Engine• Hatori Tuned MufAer• Solid G Gyro• Gryphon Voltage Regulator• Radix 71 Omm Main Blades• Radix 494 Flybar Paddles<strong>The</strong> <strong>Rave</strong> <strong>90</strong> <strong>ENV</strong> <strong>Kit</strong><strong>The</strong> <strong>Rave</strong> <strong>90</strong> came in a well throughoutmodest sized box. Upo n opening the box,the thing that reall y stood out was the magnificent cano py. It just dominated the contents.All the build parts are cont ained inlabelled and sealed plastic bags. My reactionwas that this is top effo rt for a brand new,just released kit. You certainly felt you weregetting value fo r money.<strong>The</strong> instruction manual is a tome of 144pages! In its defence it does cover all the 4possible versions of the <strong>Rave</strong> <strong>90</strong>, IE Nitro .. .fl y-bar and fly-barl ess, Electric .. . fly-bar andfly- ba rl es.~. I had e lected to get the nitro fl ybar version. (<strong>The</strong>re will be a conversion kitto go electric out some time down th e track,so watch this space).Note that there will be extra things neededto complete this kit. First off, there are nomain blades. Given that there are 4 differentversions, plus no doubt a variety of flight pe rforma nce requirements, that's not a surprise.I elected to go for the 710mm Radix bladethat Curtis offers. <strong>The</strong>se seemed to be themost all round main rotor blade in the range.Second, I also elected to upgrade the paddies.<strong>The</strong> kit only has plastic paddles and I'msure they work well, but I felt I needed to getall the good gear. From Curtis's product rangeI selected the all round carbon fibre paddle,the 484 . <strong>The</strong>re is also another much moreresponsive paddle available , the 4105.<strong>The</strong> <strong>Build</strong><strong>The</strong> instruClion book is a real work of art.It is in full colour and highly detailed. Howeverthis to me was a drawback as there \V ~ s somuch detail on eve ry page. On a couple ofsteps I simply missed seeing things that had tokit contents.Canopy is big, boldand beautiful anddominates everything.All build parts arein sealed, labelledplastic bogs,one per step.
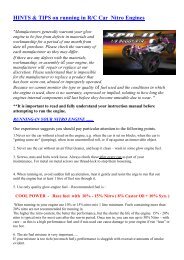
Right side of rnechc:u: ' :3.Front looks crowdea, bueverythingfits. Note the redribbon, it's port of the Foilsofeswitch on the Gryphonvoltage regulotor:Left side of the mechanics, showingthe excellent Hatori tuned muffler:At the rear of the mechanics isshown one of the 3 receivers used- nothing left to chance here.be done. Probably a good idea would be to set thekit aside and read the manual a couple of timesbefore even starting to proceed with the build!Also, it looked like the instructions had beenprinted some time ago, as there were parts incertain steps that were different to what wasoriginally shown. This is always an issue withprinted instruction books as they can get out ofdate quickly. However on Curtis's web site theupdated version will always be available. All itmeant was that on some steps you have to keepyour wits about you.On the first step I ran into a problem. <strong>The</strong>rewas a wrong part. Fortunately it didn't hold thebuild up, and a quick call to Tate's had the correctpart to me the next day. With any new(ish)manufacturer, this can be an issue 'til they getthe necessalY experience in putting it all together. So really I'm not hold ing this against them.<strong>The</strong> rest of the build proceeded exactly aspe r normal. I will however highlight some<strong>The</strong> rotor head et al. Superbly engineered and it works brilliantly. Shown is the standard 140 degree CCPM, but 120 degree CCPM is also catered for: tricky areas. With the fuel tank, when you installthe rubber liner, start at the notch. I started in acorner and it didn't finish correctly as there wasan excess of material left. It was at this pointthat I also omitted to install the rubber fuel tankmount screws. Guess I just lost it in all thedetail. Not long after I picked it up as [ had 2screws left over.[ had elected to use the powerful YS 91 SRHelicopter engine. It has a smaller than normalheat sink, and the kit takes this into account. Aspecial deflector plate is inserted in the coolingshroud to ensure cooling air flows over thehead of the engine. <strong>The</strong> fan has a universalmounting arrangement that will fit any <strong>90</strong> sizedengine. It relies on a split collar that clampsonto the end of the crankshaft. You then tightenthe engine nut as supplied.One thing I had real troubles with wasinstalling the short ball link into the fl ybar link. Ithreaded the push rod first into d1e ball link andthen screwed it into the fl ybar link. What happenedwas that the push rod screwed into the flybarlink OK for a while, but then friction took overand the pushrod screwed further into the ball link.This resulted in the quick link being damaged.FOltunately there is a spares bag so the loss of theball link was no big deal. So what I suggest for thisstep is to use a 2111 m thread tap to ensure that thepush rod threads easily into the fl ybar link and nodamage can be done to the ball link.Setting UpOf all the model helicopters I've built, andthe instructions I've read, the set up detail isnothing short of brilliant. Absolutely nothing isleft to chance, glossed over or eve n not mentionedat all. It's all the re so the re is no reasonthe <strong>Rave</strong> <strong>90</strong> won't fly as expected.In the build, 140 degree CCPM is the norm,but parts are included to set up for 120 degreeCCPM if your radio only supports the 120degree version. So in the instructio ns each variantis carefully cove red to get it right. I simplyfollowed each step precisely as my JR llX supported140 degree CCPM.Initially I felt that the front radio tray was abit on the small side , however it didn't take longto figure o ut just whe re eve rything would fit. Ireally liked the provision for Velcro straps inthat the re were these neat slots all over theplace . In the kit, Ve lcro strip and Velcro doublesided tape is libe ra lly supplied. Nice touch!I also e lected to use Curtis's Solid G gyro. Iwa nted the <strong>Rave</strong> <strong>90</strong> as close as possible to whatCurtis was fl ying a nd this was an easy option todo. I again followed the excellent instructionsusing the G View to set the required parameters.What I really liked was that when [ got the<strong>Rave</strong> <strong>90</strong> into the air, the recommended valuesflew perfecrly.So that was it. <strong>The</strong> build was successfullycompleted, albeit wirh a couple of minor hassles.<strong>The</strong> radio was set up precisely as per dleinstnrcrions. It was now off to the flying field tosee just how good the Rowe <strong>90</strong> really flew andwould it suit my flying style,Flying<strong>The</strong> moment of truth had arrived. I was quiteexcited. <strong>The</strong> <strong>Rave</strong> <strong>90</strong> had this presence... it wasbig, bold and beautiful. Evelyone who saw the<strong>Rave</strong> during the build or saw the model at thefield for the test flight commented on this.I've been a happy user of YS engines for awhile now, having tried bod1 the YS 50 and 60helicopter versions successfully. I had evelY confidelKein the YS 91 SR Helicopter engine and itd idn't let me down. It only took a couple of goesto start the engine, d1en sort out the needle valves.Very powerful andcompletely slop freetailrotor. Utilisestorque tube drive.
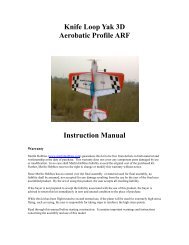
<strong>The</strong> Hatori tuned muffler was an excellentmatch, plus it was very quiet. <strong>The</strong> muffler bodyis separated from the exhaust flange by rubbero rings, deadening any potential "ringing". Italso has a very complete set of accessories withthe right type of Allen key to get at the exhaustflange bolts, exhaust deflector and cable ties.Upon spooling up, the sensa tion of powerthat emanated from the <strong>Rave</strong> <strong>90</strong> was awesome!I've flown many top end machines before, butnothing came close to this. It quickly rose to ahead high hover, and well, just sat there. Wow,it is super stable in the hover.With a brand new engine, I was still runningit in by being on the rich side. You willnotice this in the accompanying photo's. <strong>The</strong>exhaust plume looked magnificent. Even so,the collective response was immediate but notat the expense of controllability. This machinehas been engineered to perform, and quitebrilliantly, I must say!F3C hovering manoeuvres were tried as astarring point. <strong>The</strong> <strong>Rave</strong> <strong>90</strong> made me look a prettygood pilar. (Oops, maybe I shouldn't havesa id thar!). <strong>The</strong>n I transitioned to some circuits.<strong>The</strong> <strong>Rave</strong> <strong>90</strong> tracked perfectl y. It's a machine thatgives you the confidence thar not only is it capableof doing anything, you can now have a go atdoing everything you haven't been game enoughto tly before. My wife w ho does most of the flyingshots even commented on how good itlooked and sounded. Now that's something'ConclusionI'm very happy to put this in print, anddefend it if necessary. <strong>The</strong> R