Little- Endian - MontaVista
Little- Endian - MontaVista
Little- Endian - MontaVista
- No tags were found...

You also want an ePaper? Increase the reach of your titles
YUMPU automatically turns print PDFs into web optimized ePapers that Google loves.
Chapter 5 Preview Kit for Pro 2.1 Demo Page ......................................................23Running the Preview Kit for Pro 2.1 Demo Page.......................................... 23Appendix AUsage Notes.............................................................................................25Names, Paths, and Versions ........................................................................... 25ii <strong>MontaVista</strong> Linux® Preview Kit for Professional Edition 2.1
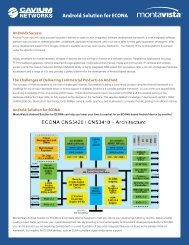
Chapter 1:Overview<strong>MontaVista</strong> Linux® Preview Kit for Professional Edition 2.1Welcome to <strong>MontaVista</strong> Linux® Preview Kit for Professional Edition 2.1 (PreviewKit for Pro 2.1) for the Hitachi SH4 MS7751SE01 (<strong>Little</strong>-<strong>Endian</strong>)!What is PreviewKit for Pro?The Preview Kit for Pro 2.1 includes kernel packages, user space packages, and crossdevelopmentpackages for evaluation purposes. The Preview Kit for Pro provides aneasy to use evaluation for all types of developers. Designed to showcase the featuresand performance of <strong>MontaVista</strong> Linux Professional Edition 2.1, the kit:• exhibits <strong>MontaVista</strong> Linux on a wide variety of hardwarearchitectures providing a complete Linux runtime environment• assists in quick target bring-up• provides a demonstration of an embedded solution comprised ofselected Linux applications (busybox, tinylogin, thttpd, telnetd,inetd, glibc shared library, and Preview Kit config/init scripts) from<strong>MontaVista</strong> Linux Professional Edition• enables a user with the means to evaluate and benchmarkperformance of target hardware platform as powered by <strong>MontaVista</strong>Linux• demonstrates a sampling of <strong>MontaVista</strong> Linux’s capabilities• provides two kernel images: a default kernel image and apreemptible kernel image – the preemptible kernel image haskernel preemption enabled, the default image does notNote: Additional information about the Preemptible Kernel and<strong>MontaVista</strong> Linux Real-Time performance can be found athttp://www.mvista.com/dswp/realtime.pdf<strong>MontaVista</strong> Linux® Preview Kit for Professional Edition 2.1 1
Chapter 1: OverviewRequirementsRequirementsBefore you begin, make sure your host and target machines meet the requirementslisted below.TargetThis manual provides instruction for the following target:• Hitachi SH4 MS7751SE01 (<strong>Little</strong>-<strong>Endian</strong>)HostYour host machine must meet the following requirements:You also need to have:• It must be an x86 machine running Red Hat® 7.2.• If you are using a standard Workstation install (all versions of RedHat) with X windows and NFS server package groups or Gnome orKDE and Software Development package groups installed, youneed to install the following individual package from the Red Hatinstallation CD-ROMs: dhcp• For a basic installation, a single architecture, and a single LSP, itmust have a minimum of 300 MB available.• It must have a supported Ethernet interface.• It must have a serial port.• It must have an Internet connection.• The firewall on your host must be configured to allow NFSmounting. For Red Hat 7.2, for a default installation, the firewall isconfigured to prevent NFS mounting (i.e. set to “High”). Removingthe firewall (i.e. setting the firewall to “None”) will allow NFSmounting; however, because of the numerous security issuesinvolved in changing firewall configurations, please contact yoursystems administrator for information about how to configure yourhost’s firewall at your site.• Root access on your host machine<strong>MontaVista</strong> Linux® Preview Kit for Professional Edition 2.1 3
Chapter 2:InstallationOverviewTo use Preview Kit for Pro 2.1 for cross-hosted development, you first need to installPreview Kit for Pro 2.1 on your host machine. Before you begin, make sure your hostmachine meets the requirements listed in “Requirements” on page 3.To install Preview Kit for Pro 2.1 on your host machine, see:• “Installation” on page 6Note: These instructions assume that you have root access on your host machine.Please contact your system administrator if you do not have these permissions.<strong>MontaVista</strong> Linux® Preview Kit for Professional Edition 2.1 5
Chapter 2: InstallationInstallationInstallationInstallation is performed by the script install_previewkit. To install PreviewKit for Pro 2.1 on your Linux host machine, complete the following steps:1. Installation of Preview Kit for Pro 2.1 requires a password. Obtain therequired password from the following Web site:• http://www.mvista.com/previewkit/index.html2. Insert the Preview Kit for Pro 2.1 CD into your host machine’s CD-ROM drive.3. If the CD does not automount, mount the CD-ROM. Use the command:mount /mnt/cdromNote: If this command fails to mount the CD-ROM, you must specifyall of the parameters to the mount command. See your systemadministrator if you need assistance.4. Change to the directory on the CD where the installer is located:cd /mnt/cdrom5. Install Preview Kit for Pro 2.1. Installation of Preview Kit for Pro 2.1 isperformed by the script install_previewkit. Enter thecommand:./install_previewkitWelcome to the <strong>MontaVista</strong> Linux Preview Kit Install!Where should the Preview Kit be installed? [ /opt ]Note: To view a list of the script’s options, enter the command:./install_previewkit --help6. To install Preview Kit for Pro 2.1 in the default location (/opt), pressthe Enter key.To install Preview Kit for Pro 2.1 in an alternate location, enter the nameof the alternate path, for example:Where should the Preview Kit be installed? [ /opt ] /group16 <strong>MontaVista</strong> Linux® Preview Kit for Professional Edition 2.1
Chapter 3: Target Configuration and BootHitachi SH4 Solution Engine MS7751SE01Configure theTargetTo configure the target to download the kernel via NFS, complete the following steps:1. Download SH-IPL/Ethboot to flash. To do this, see “Download SH-IPL/Ethboot to Flash” below. If the board already has the SH-IPL/Ethbootfirmware in flash, you can proceed to “Step 2” below.2. Configure the Ethernet address using DIP switches.The boot firmware will construct an Ethernet address based in part onthe DIP switches. The first byte is “02,” the second through fifth arezero, and the sixth is read from SW9. Change the address by settingSW9 as desired. A switch that is ON represents a 0 bit, and OFFrepresents a 1 bit. (You will need this address to configure DHCPcorrectly.)The kernel will use the address in the Hitachi SH4 Solution EngineMS7751SE01 address PROM. If the PROM is empty (default case), itconstructs an address the same way as the boot firmware (above). Thismethod may change in future versions of Preview Kit for Pro 2.1.If required, you may override this addressing method by modifying andrebuilding the boot firmware and LSP kernel. Contact Hitachi to obtaina unique MAC address for your board.3. Configure the target to boot from flash (now containing the SH-IPL/Ethboot firmware) by setting SW5-3 to OFF.You may now proceed to configuring the host.Download SH-IPL/Ethboot to FlashThe Hitachi PROM only provides a serial kernel download. For faster developmenttime, the recommended boot method for the Hitachi SH4 Solution EngineMS7751SE01 (<strong>Little</strong>-<strong>Endian</strong>) target is via NFS using SH-IPL/Ethboot firmware (anEthernet kernel download). The Hitachi SH4 Solution Engine MS7751SE01 (<strong>Little</strong>-<strong>Endian</strong>) LSP includes the SH-IPL/Ethboot firmware.The SH-IPL/Ethboot firmware is open-source powerup code for SuperH boards. Theopen-source boot code for the Super Hitachi boards (sh-ipl+g), combined with anetherboot client (sh-ethboot), is intended to be placed in flash.The etherboot downloads a compressed kernel using BOOTP/DHCP and NFS. Thesh-ipl+g source includes options for booting from IDE on some platforms (thisoption is NOT supported by <strong>MontaVista</strong> Software). The sh-ipl+g also includes agdb stub (can load a binary kernel with the gdb load command). sh-ipl+g andsh-ethboot source (developed by Niibe Yutaka, et al) can be found atftp.m17n.org:/pub/linuxsh.14 <strong>MontaVista</strong> Linux® Preview Kit for Professional Edition 2.1
Chapter 3: Target Configuration and BootHitachi SH4 Solution Engine MS7751SE01This source, with some patches for the LSP, is also included in the LSP as acompressed tarball in /opt/hardhat/previewkit/lsp/hitachims7751se01-sh_sh4_le-previewkit/netbootfw.tar.gz.If the SH-IPL/Ethboot firmware is not already in flash, you must use the HitachiPROM monitor to download it. To download SH-IPL/Ethboot to flash, complete thefollowing steps:1. Make sure the endian switch and installed PROM are consistent with theLSP being used (set SW4-6 to OFF for little-endian).2. Make sure SW5-3 is ON to boot from PROM.3. Set the serial speed to 38400 by setting SW5-1 to OFF and SW5-2 toON.4. To start minicom on your host, enter the command:minicom5. Power on the target and press the reset switch.You should see a Ready > prompt.6. At the Ready > prompt, enter the command:fl 80000000Wait for the message “Please Send A S-format Record.”7. On the host, suspend Minicom. Use the ctrl-A J sequence.8. Send the file out the serial port.cat /opt/hardhat/previewkit/sh/sh4_le/target/boot/netbootfw.srec-hitachi-ms7751se01-sh_sh4_le-previewkit >/dev/ttyS0(ENTER THE ABOVE COMMAND AS A SINGLE LINE.)Note: Depending on how your permissions are set up on your host, youmay need to run the above command as root.9. Resume Minicom. (Use the fg command.)You should see the remaining output from the PROM indicating thetransfer is completed and flash has been programmed, and then anotherReady > prompt. (Programming flash takes a short while after thetransfer has completed, so you may need to wait a few minutes.)10. Proceed to “Step 2” under the heading “Configure the Target” onpage 14.<strong>MontaVista</strong> Linux® Preview Kit for Professional Edition 2.1 15
Chapter 3: Target Configuration and BootHitachi SH4 Solution Engine MS7751SE01Note: Occasionally, the PROM may suffer from overflow when downloading S-records, and you may see the continuous message, “InDev0Buff was fulled,”or similar output. Reset the target and begin again from “Step 6.” If the problempersists, you may need to download at a slower speed by changing SW5-1/SW5-2 andMinicom.Configure the HostThis board uses a network-based file system. To configure a host, perform thefollowing tasks:• Configure DHCP.• Configure NFS.For more information, see “Host Configuration” on page 19.Boot the TargetOnce the target and host are properly set up, you can boot the target. To boot thetarget, complete the following steps:1. If you have not already done so, you must configure the target to bootfrom flash (containing the SH-IPL/Ethboot firmware) by setting SW5-3to OFF. Then press the reset switch on the target, so the firmwareprompt (>) appears.2. Type 1 to start the sh-ethboot loader.The sh-ethboot loader will send a DHCP boot request. The DHCPresponse information and the download will be displayed, and the kernelwill start. The LSP kernel is configured with a command line whichspecifies ttySC1 (CN2) as the console, so kernel console messages and alogin prompt should be displayed.Note: If you set SW7 to the value “0xDE,” sh-ipl+g will start shethbooton powerup without prompting or waiting for a command.3. Once Linux boots, you are placed at a login prompt: login:4. At this point, you can login as root with no password. You are placed ata bash shell prompt.Note: We recommend that you change this password as soon aspossible. To change your password, use the passwd command.To build and load a new compressed kernel image, use the make zImage commandin the kernel source directory and copy the zImage file from the arch/sh/bootdirectory of the kernel source tree to the target/boot directory. Remember to16 <strong>MontaVista</strong> Linux® Preview Kit for Professional Edition 2.1
Chapter 3: Target Configuration and BootHitachi SH4 Solution Engine MS7751SE01update your DHCP configuration to point to the new file if you use a different name inthe target/boot directory.Note: The boot firmware cannot load from a symbolic link. The boot firmwarerequires the full path name to a regular file in the dhcpd.conf file.Now that you have successfully booted your target, you can proceed to “Running thePreview Kit for Pro 2.1 Demo Page” on page 23.<strong>MontaVista</strong> Linux® Preview Kit for Professional Edition 2.1 17
Chapter 4:Host ConfigurationOverviewThese instructions are for the following Linux host: Red Hat 7.2. The followingsections provide instructions on how to configure the different components of the hostsystem:• “Configure DHCP” on page 20• “Configure NFS” on page 22Before you begin, make sure your host machine meets the requirements listed in“Requirements” on page 3.<strong>MontaVista</strong> Linux® Preview Kit for Professional Edition 2.1 19
Chapter 4: Host ConfigurationConfigure DHCPConfigure DHCPWarning! If the DHCP server is configured incorrectly, it may cause problems forother machines on your network. If you have questions about how to install andconfigure the DHCP server on your machine, see your systems administrator forassistance.To configure DHCP, as root, complete the following steps:1. Make sure a DHCP server is installed and that the following file exists:• For Red Hat 7.2, the file is:/var/lib/dhcp/dhcpd.leasesIf the file does not exist, create an empty one using the touchcommand.• On Red Hat 7.2, use the command:touch /var/lib/dhcp/dhcpd.leases2. Edit the DHCP daemon configuration file. To do so, add the followingconfiguration into your /etc/dhcpd.conf file:allow bootp;subnet a.b.c.d netmask e.f.g.h {default-lease-time 1209600; # two weeksmax-lease-time 31557600; # one yearoption routers i.j.k.l;group {host name.your.domain {hardware ethernet xx:xx:xx:xx:xx:xx;fixed-address m.n.o.p;filename "/opt/hardhat/previewkit/sh/sh4_le/target/boot/vmlinuz-hitachi-ms7751se01-sh_sh4_le-previewkit";option root-path"/opt/hardhat/previewkit/sh/sh4_le/target,wsize=1024";}}}3. Make the following changes:• Replace a.b.c.d with your subnet address.• Replace e.f.g.h with your netmask address.• Replace i.j.k.l with your router or gateway address.20 <strong>MontaVista</strong> Linux® Preview Kit for Professional Edition 2.1
Chapter 4: Host ConfigurationConfigure DHCP• Replace name.your.domain with your target name (forexample test1.mvista.com). This name must be consistent with thehost name used for DNS or host file look-up.• Replace xx:xx:xx:xx:xx:xx with your target Ethernet (MAC)address.• Replace m.n.o.p with your target’s IP address.• For filename, you must enter the full path name to a regular file,as shown in the /etc/dhcpd.conf example above, NOT asymbolic link.• For option root-path, you should add the option to setwsize to 1024. If you do this, it will help to avoid NFS problemsdue to large packets, which may become fragmented.Note: There is a size limit to the request. If you add options other thanthose listed above, your root file system may fail to mount.4. Restart dhcpd. Use the command:/etc/rc.d/init.d/dhcpd restartThe DHCP daemon is required at boot-up to run BOOTP. BOOTP usesDHCP to obtain IP addresses. To run the DHCP daemon on every boot,use the command:DHCP is now set up./sbin/chkconfig dhcpd on<strong>MontaVista</strong> Linux® Preview Kit for Professional Edition 2.1 21
Chapter 4: Host ConfigurationConfigure NFSConfigure NFSTo configure NFS, as root, complete the following steps:1. Add the following line in /etc/exports:/opt/hardhat/previewkit/sh/sh4_le/target*(rw,no_root_squash,no_all_squash)(ENTER THE PRECEDING STRING AS A SINGLE LINE.)2. Restart the NFS daemon. Use the command:/etc/rc.d/init.d/nfs restartNote: If restart fails, you may need to stop and then start NFS.3. Set the NFS daemon to run on every boot. Use the command:/sbin/chkconfig nfs on4. Sync the NFS daemon. Use the command:NFS is now set up./usr/sbin/exportfs -ra22 <strong>MontaVista</strong> Linux® Preview Kit for Professional Edition 2.1
Chapter 5:Preview Kit for Pro 2.1 DemoPageRunning the Preview Kit for Pro 2.1 Demo PageNow that you have installed Preview Kit for Pro 2.1 and booted your target, you canrun the Preview Kit for Pro 2.1 demo page. To run the Preview Kit for Pro 2.1 demopage on your target, complete the following steps:1. Launch an Internet browser on your host machine.2. Enter the IP address of your target as the URL in the browser window.The Preview Kit for Pro 2.1 demo page displays.Congratulations! You have successfully booted your target and launched the PreviewKit for Pro 2.1 demo page. Navigate this page for more information about PreviewKit for Pro 2.1.<strong>MontaVista</strong> Linux® Preview Kit for Professional Edition 2.1 23
Appendix A: Usage NotesNames, Paths, and VersionsPreview Kit for Pro 2.1 is an embedded Linux development kit containing Linuxkernel source for the supported target CPU. The charts below provide informationabout names, paths, and versions used for the Hitachi SH4 MS7751SE01 (<strong>Little</strong>-<strong>Endian</strong>) LSP.Installation paths and namesLSP NameInstallation Pathshitachi-ms7751se01-sh_sh4_le-previewkitLSP/opt/hardhat/previewkit/lsp/hitachi-ms7751se01-sh_sh4_lepreviewkitToolchains/opt/hardhat/previewkit/sh/sh4_le/Kernel Sources/opt/hardhat/previewkit/sh/sh4_le/target/boot/Kernel version and default imageKernel Version 2.4.17Default KernelImage Name(Preemption NOTenabled)Preemptible KernelImage Name(Preemption enabled)/opt/hardhat/previewkit/sh/sh4_le/target/boot/vmlinuz-hitachi-ms7751se01-sh_sh4_le-previewkit/opt/hardhat/previewkit/sh/sh4_le/target/boot/vmlinuz-hitachi-ms7751se01-sh_sh4_le-previewkit-prek<strong>MontaVista</strong> Linux® Preview Kit for Professional Edition 2.1 25
Names, Paths, and VersionsBoot FirmwareDefault SRecordNamePremeptible SRecordNamenetbootfw.srec-hitachi-ms7751se01-sh_sh4_lepreviewkitnetbootfw.srec-hitachi-ms7751se01-sh_sh4_lepreviewkit-prek26 <strong>MontaVista</strong> Linux® Preview Kit for Professional Edition 2.1