Troubleshooting Hot-Spark Electronic Ignition Conversion Installation
Troubleshooting Hot-Spark Electronic Ignition Conversion Installation
Troubleshooting Hot-Spark Electronic Ignition Conversion Installation

You also want an ePaper? Increase the reach of your titles
YUMPU automatically turns print PDFs into web optimized ePapers that Google loves.
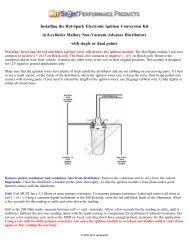
Check the voltage reading at the coil's + terminal, engine running, at 2,500+ RPM. If the voltage measures more than +14<br />
volts, you'll need to replace the voltage regulator, install a coil with 3.0 Ohms or more internal primary resistance or install a<br />
1.4 Ohm external ballast resistor between the ignition switch and the coil's + terminal. Charging voltage of 13.8 volts or so<br />
is plenty.<br />
For best performance, the coil should also have a 7,000 Ohms or more secondary resistance (measured from coil’s + or –<br />
terminal to center high tension terminal, in the 20K Ω mode of the Ohmmeter).<br />
Vacuum-advance Distributors: Check to see if the vacuum advance is working properly by sucking on the vacuum canister<br />
port. The breaker plate should move smoothly and freely.<br />
Magnet sleeve positioned too high: Situation: The fit between the distributor shaft and the magnet sleeve is especially tight<br />
and you can't slide the magnet sleeve down onto the distributor shaft all the way. The rotor rides too high, causing the<br />
distributor cap to wobble when you rotate the distributor shaft by hand. Fix: Rotate the magnet sleeve so that it lines up with<br />
the lobes of the distributor shaft cam and the magnet sleeve can slide down a bit. Install the rotor and tap, with a small<br />
plastic mallet, very gently, on the center of the rotor, until the magnet sleeve seats firmly onto the distributor shaft, over the<br />
distributor cam lobes. With the rotor and distributor cap installed, you should be able to rotate the distributor shaft without the<br />
distributor cap wobbling. The shaft should turn freely, without any feeling of drag. If the distributor cap still wobbles, you<br />
may need to adjust the number or thickness of the distributor shaft shims, inside the distributor.<br />
With some Chinese-made, knockoff 009 distributors, once the magnet sleeve and rotor have been installed and tapped down<br />
as far as they'll go, the rotor rides too high, causing the distributor shaft to turn stiffly and/or the distributor cap to wobble. In<br />
this case, the distributor needs to be disassembled, a distributor shaft shim removed from inside and a shim added to the<br />
outside of the distributor, onto the shaft, between the distributor body and the distributor shaft drive gear. Or a simpler<br />
solution would be to, using a belt sander or a piece of coarse sandpaper on a perfectly flat surface, sand off about 1 mm from<br />
the bottom of the rotor. You should use a micrometer to measure the before and after shortening rotor height.<br />
Magnet sleeve fit too loose: If the fit between the distributor shaft lobes and the magnet sleeve is too loose, the distributor<br />
shaft may be worn down from years of the points block rubbing on the distributor cam lobes, with accumulated dirt and grit,<br />
and/or insufficient lubrication. If the fit is especially loose, the best solution, short of replacing the distributor, may be to wrap<br />
the distributor shaft lobes, several times, with Teflon thread tape, before pressing the magnet sleeve down over the lobes. Too<br />
loose a fit between magnet sleeve and distributor cam lobes may result in erratic timing.<br />
Testing the <strong>Hot</strong>-<strong>Spark</strong> Red <strong>Ignition</strong> Module with an Ohmmeter<br />
To test the <strong>Hot</strong>-<strong>Spark</strong> red ignition module, you'll need a digital multi meter capable of measuring 20K Ohms. Almost any<br />
inexpensive digital multi meter should work. Harbor Freight sells them for US $5 to $20.<br />
Disconnect the two ignition module wires from the coil. Remove the magnet sleeve from the distributor and away from the<br />
ignition module.<br />
Set the multi meter to the 20K Ohms setting (not in the "auto" setting). Connect the red Ohmmeter lead to the red ignition<br />
module wire. Connect the black Ohmmeter lead to the black ignition module wire. The Ohmmeter should not register a<br />
connection (no change in reading, usually a reading of "1").<br />
Leaving the Ohmmeter in the 20K Ohm mode, and the red Ohmmeter lead connected to the red ignition module wire, touch<br />
the the black Ohmmeter lead to the ignition module's base plate (press firmly to ensure a good connection). The readout<br />
should be somewhere between 9.25K (9,250 Ohms) and 9.70K (9,700 Ohms).<br />
If there is any resistance between the red ignition module wire and the black ignition module wire, the ignition is likely<br />
defective or has been "fried" from reversed polarity or excess voltage or amperage. The digital Ohmmeter should read "1."<br />
Probable causes for ignition module failure include too much charging system voltage (more than 14 volts at 3,500+ RPM),<br />
using a coil with too little primary resistance (less than 3.0 Ohms for 4-cylinder, or less than 1.5 Ohms for 6- and 8-cylinder<br />
engines), reversing the red and black ignition wires on the coil, touching a +12 volt wire to the coil's - terminal while the<br />
ignition kit is connected to the coil or leaving the ignition switch in the ON position for more than a minute or so, without the<br />
engine running.<br />
© 2005-2012 <strong>Hot</strong><strong>Spark</strong>