
You also want an ePaper? Increase the reach of your titles
YUMPU automatically turns print PDFs into web optimized ePapers that Google loves.
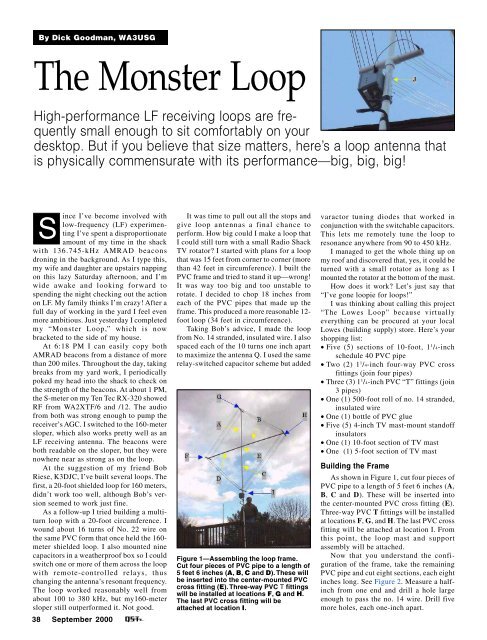
By Dick Goodman, WA3USGThe Monster LoopHigh-performance LF receiving loops are frequentlysmall enough to sit comfortably on yourdesktop. But if you believe that size matters, here’s a loop antenna thatis physically commensurate with its performance—big, big, big!ince I’ve become involved withSlow-frequency (LF) experimentingI’ve spent a disproportionateamount of my time in the shackwith 136.745-kHz AMRAD beaconsdroning in the background. As I type this,my wife and daughter are upstairs nappingon this lazy Saturday afternoon, and I’mwide awake and looking forward tospending the night checking out the actionon LF. My family thinks I’m crazy! After afull day of working in the yard I feel evenmore ambitious. Just yesterday I completedmy “Monster Loop,” which is nowbracketed to the side of my house.At 6:18 PM I can easily copy bothAMRAD beacons from a distance of morethan 200 miles. Throughout the day, takingbreaks from my yard work, I periodicallypoked my head into the shack to check onthe strength of the beacons. At about 1 PM,the S-meter on my Ten Tec RX-320 showedRF from WA2XTF/6 and /12. The audiofrom both was strong enough to pump thereceiver’s AGC. I switched to the 160-metersloper, which also works pretty well as anLF receiving antenna. The beacons wereboth readable on the sloper, but they werenowhere near as strong as on the loop.At the suggestion of my friend BobRiese, K3DJC, I’ve built several loops. Thefirst, a 20-foot shielded loop for 160 meters,didn’t work too well, although Bob’s versionseemed to work just fine.As a follow-up I tried building a multiturnloop with a 20-foot circumference. Iwound about 16 turns of No. 22 wire onthe same PVC form that once held the 160-meter shielded loop. I also mounted ninecapacitors in a weatherproof box so I couldswitch one or more of them across the loopwith remote-controlled relays, thuschanging the antenna’s resonant frequency.The loop worked reasonably well fromabout 100 to 380 kHz, but my160-metersloper still outperformed it. Not good.38 <strong>September</strong> <strong>2000</strong>It was time to pull out all the stops andgive loop antennas a final chance toperform. How big could I make a loop thatI could still turn with a small Radio ShackTV rotator? I started with plans for a loopthat was 15 feet from corner to corner (morethan 42 feet in circumference). I built thePVC frame and tried to stand it up—wrong!It was way too big and too unstable torotate. I decided to chop 18 inches fromeach of the PVC pipes that made up theframe. This produced a more reasonable 12-foot loop (34 feet in circumference).Taking Bob’s advice, I made the loopfrom No. 14 stranded, insulated wire. I alsospaced each of the 10 turns one inch apartto maximize the antenna Q. I used the samerelay-switched capacitor scheme but addedFigure 1—Assembling the loop frame.Cut four pieces of PVC pipe to a length of5 feet 6 inches (A, B, C and D). These willbe inserted into the center-mounted PVCcross fitting (E). Three-way PVC T fittingswill be installed at locations F, G and H.The last PVC cross fitting will beattached at location I.varactor tuning diodes that worked inconjunction with the switchable capacitors.This lets me remotely tune the loop toresonance anywhere from 90 to 450 kHz.I managed to get the whole thing up onmy roof and discovered that, yes, it could beturned with a small rotator as long as Imounted the rotator at the bottom of the mast.How does it work? Let’s just say that“I’ve gone loopie for loops!”I was thinking about calling this project“The Lowes Loop” because virtuallyeverything can be procured at your localLowes (building supply) store. Here’s yourshopping list:• Five (5) sections of 10-foot, 1 1 /4-inchschedule 40 PVC pipe• Two (2) 1 1 /4-inch four-way PVC crossfittings (join four pipes)• Three (3) 1 1 /4-inch PVC “T” fittings (join3 pipes)• One (1) 500-foot roll of no. 14 stranded,insulated wire• One (1) bottle of PVC glue• Five (5) 4-inch TV mast-mount standoffinsulators• One (1) 10-foot section of TV mast• One (1) 5-foot section of TV mastBuilding the FrameAs shown in Figure 1, cut four pieces ofPVC pipe to a length of 5 feet 6 inches (A,B, C and D). These will be inserted intothe center-mounted PVC cross fitting (E).Three-way PVC T fittings will be installedat locations F, G, and H. The last PVC crossfitting will be attached at location I. Fromthis point, the loop mast and supportassembly will be attached.Now that you understand the configurationof the frame, take the remainingPVC pipe and cut eight sections, each eightinches long. See Figure 2. Measure a halfinchfrom one end and drill a hole largeenough to pass the no. 14 wire. Drill fivemore holes, each one-inch apart.