TUTORIAL - Locations and Mapping - ESdat
TUTORIAL - Locations and Mapping - ESdat
TUTORIAL - Locations and Mapping - ESdat
- No tags were found...

You also want an ePaper? Increase the reach of your titles
YUMPU automatically turns print PDFs into web optimized ePapers that Google loves.
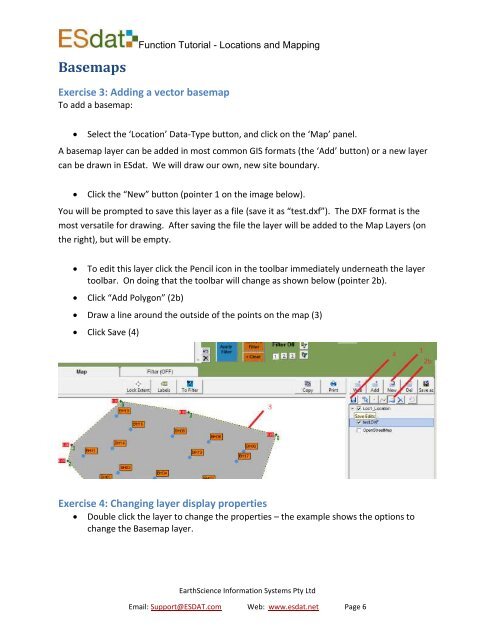
BasemapsFunction Tutorial - <strong>Locations</strong> <strong>and</strong> <strong>Mapping</strong>Exercise 3: Adding a vector basemapTo add a basemap: Select the ‘Location’ Data-Type button, <strong>and</strong> click on the ‘Map’ panel.A basemap layer can be added in most common GIS formats (the ‘Add’ button) or a new layercan be drawn in <strong>ESdat</strong>. We will draw our own, new site boundary. Click the “New” button (pointer 1 on the image below).You will be prompted to save this layer as a file (save it as “test.dxf”). The DXF format is themost versatile for drawing. After saving the file the layer will be added to the Map Layers (onthe right), but will be empty.To edit this layer click the Pencil icon in the toolbar immediately underneath the layertoolbar. On doing that the toolbar will change as shown below (pointer 2b).Click “Add Polygon” (2b) Draw a line around the outside of the points on the map (3) Click Save (4)Exercise 4: Changing layer display propertiesDouble click the layer to change the properties – the example shows the options tochange the Basemap layer.EarthScience Information Systems Pty LtdEmail: Support@ESDAT.com Web: www.esdat.net Page 6