ShadeVision Software Installation - X-Rite
ShadeVision Software Installation - X-Rite
ShadeVision Software Installation - X-Rite

Create successful ePaper yourself
Turn your PDF publications into a flip-book with our unique Google optimized e-Paper software.
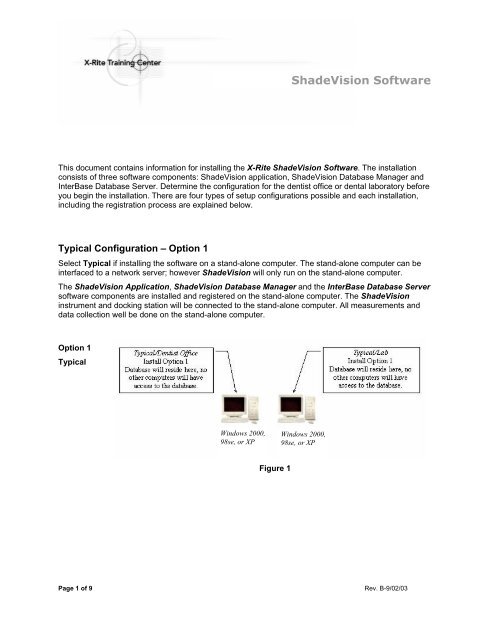
<strong>ShadeVision</strong> <strong>Software</strong> <strong>Installation</strong>Network Client / Server Configuration – Option 2 and Option 3Client and Server computing is a common networking model which enables many users to accessinformation in an efficient manner. Generally, the user's computer is called the Client and the machinethat contains the information being accessed is called the Server. In Client and Server computing,processes are divided between the Client and the Server. This relationship is based on a series ofrequests and responses. Here is an example of the interaction between the Client and Server.The Client requestsservices orinformation from theServer computer.The Serverresponds to theClient's request bysending the results ofthe request back tothe Client computer.Figure 2Option 2Network – ClientIf the Client computer is interfaced to a network, select the Network - Clientoption. It's recommended to install the Network Server first, then install on theClient computers.During installation the <strong>ShadeVision</strong> application is installed on the Clientcomputer. The instrument and docking station will be connected to the Client.All <strong>ShadeVision</strong> tasks, including viewing and editing existing work orders canbe performed, providing the Client computer is connected to the Server.Option 3Network – ServerIf all <strong>ShadeVision</strong> data will be centrally located, for one or several Clients toaccess on the Server computer, select Network - Server. The <strong>ShadeVision</strong>Database Manager and InterBase Database Server components will beinstalled on the Server.No docking station will be connected on the server.The server stores information or serves up the information at the Clientsrequest.It is highly recommended to periodically backup the <strong>ShadeVision</strong> database.Page 2 of 9Rev. B-9/02/03
<strong>ShadeVision</strong> <strong>Software</strong> <strong>Installation</strong>Network Client / Server Configuration – Option 4Option 4 is similar to Option 2 and Option 3 with one exception, the <strong>ShadeVision</strong> instrument is connectedto the Server to take measurements.Select Network-Client and Server if the Client computers are interfaced to the Server computer, and theServer computer is also used to run the <strong>ShadeVision</strong> instrument. All software components will beinstalled on the Server and the database will be registered on the server computer.Option 4Network – Clientand ServerWindows 2000,98se, XP, 2003ServerFigure 3Page 3 of 9Rev. B-9/02/03
<strong>ShadeVision</strong> <strong>Software</strong> <strong>Installation</strong>Typical <strong>Installation</strong>1. Close any open software programs.2. Log into the computer as the Administrator or as a user with administrator rights.3. Insert the <strong>ShadeVision</strong> CD into the CD drive, it will automatically start the setup or use Add/Removeprograms in the computer Control Panel.4. Click Next when the <strong>ShadeVision</strong> Welcome screen appears.5. Read the license agreement and clickYes to accept it. You must select yes tocontinue the installation.Figure 46. The Select Components screenappears. Select Typical and click next.Figure 5Page 4 of 9Rev. B-9/02/03
<strong>ShadeVision</strong> <strong>Software</strong> <strong>Installation</strong>7. Click Next to accept the default installfolder location or click Browse to changethe folder.Figure 68. Select mode of operation, Dentist Officeor Dental Laboratory, and select next.Figure 79. Accept the default program folder name<strong>ShadeVision</strong> or click in the ProgramFolders field and edit the name andselect next.10. The software installs and when completeyou will be asked to restart the computer.11. After the computer is restarted, registerthe software.12. Refer to the Product Registrationsection of this document.Figure 8Page 5 of 9Rev. B-9/02/03
<strong>ShadeVision</strong> <strong>Software</strong> <strong>Installation</strong>Network – Client <strong>Installation</strong>1. Close any open software programs.2. Log into the computer as the administrator or as a user with administrator rights.3. Insert the <strong>ShadeVision</strong> CD into the CD drive, it will automatically start the setup.4. Click Next on the <strong>ShadeVision</strong> Welcome screen.5. Read the license agreement and click Yes to accept it. You must select yes to continue theinstallation.6. The Select Components screen appears. Select Network – Client and click next.7. Click Next to accept the default installation folder location or click Browse to change the folder.8. The Edit Database Location screenappears requesting a Server Name andDatabase Path.9. This information is found on the Serverwhen the <strong>ShadeVision</strong> DatabaseManager application is launched. SeeFigure 10 for naming example.Figure 910. Go to the Server computer and open the<strong>ShadeVision</strong> Database Manager. TheServer Name and Database Path aredisplayed in the lower left corner of thescreen.11. In our example the Server Name isNLOWELL112. Database Path is c:\program files\xrite\shadevision\Data\Figure 10Page 6 of 9Rev. B-9/02/03
<strong>ShadeVision</strong> <strong>Software</strong> <strong>Installation</strong>13. IMPORTANT: Your Server Name andPath will be different than our exampleshown in Figure 11.14. Check your Network - Sever computer forthe appropriate Name and Path to typeinto the text boxes. Click Next to continue.15. Once your server name and path havebeen entered click Next. The SelectProgram window appears. Click Next toaccept the default install folder location orclick Browse to change the folder.16. Select mode of operation, Dentist Officeor Dental Laboratory, and select next.17. Accept the default program folder name<strong>ShadeVision</strong> or click in the ProgramFolders field and edit the name andselect next.18. The software installs and when completeyou will be asked to restart the computer.19. After the computer is restarted, registerthe software.20. Refer to the Product Registrationsection of this document.Figure 11Figure 12Page 7 of 9Rev. B-9/02/03
<strong>ShadeVision</strong> <strong>Software</strong> <strong>Installation</strong>Network – Server <strong>Installation</strong>1. Close any open software programs.2. Log into the Server computer as the administrator or as a user with administrator rights.3. Insert the <strong>ShadeVision</strong> CD into the CD drive, it will automatically start the setup.4. Click Next on the <strong>ShadeVision</strong> Welcome screen.5. Read the license agreement and click Yes to accept it. You must select yes to continue theinstallation.6. The Select Components screen appears. Select Network – Server and click next.7. Click Next to accept the default installation folder location or click Browse to change the folder.8. Accept the default program folder name <strong>ShadeVision</strong> or click in the Program Folders field and editthe name and select next.9. The software installs and when complete will you will be asked to restart the server computer.10. After the server computer is restarted, register the software.11. Refer to the Product Registration section of this document.Page 8 of 9Rev. B-9/02/03
<strong>ShadeVision</strong> <strong>Software</strong> <strong>Installation</strong>Network – Client and Server <strong>Installation</strong>On the Server Computer:1. Close any open software programs.2. Log into the Server computer as an administrator or as a user with an administrator rights.3. Insert the <strong>ShadeVision</strong> CD into the CD drive, it will automatically start the setup or use Add/Removeprograms in the computer Control Panel.4. Follow all steps as written in the Typical <strong>Installation</strong> except, select Network – Client and Server atStep 6. This is to designate the type of installation.5. Once the software installs on the server, restart the server computer.6. After the server computer is restarted, register the software.7. Refer to the Product Registration section of this document.On the Client Computer:8. The Client computer setup is the same process as specified earlier in this document. Follow Steps 1thru 19 as listed earlier in the Network - Client <strong>Installation</strong>.Product Registration1. Run the <strong>ShadeVision</strong> application or the<strong>ShadeVision</strong> Database Manager and theregistration screen appears. You mayregister On-Line.2. Write down the 8-digit registrationcode located on the registration screen.See Figure 13.3. At Step 1, enter the Application UniqueIdentifier, the 20-digit number located onthe <strong>ShadeVision</strong> CD sleeve. Type in thecode, complete with dashes.4. At Step 2, click on the Register Onlinebutton. This will launch to the X-<strong>Rite</strong>website to license the product.5. Complete the On-Line registration processto obtain your license key.6. At Step 3, enter the License Key, incapital letters, and click the License Keybutton to complete the registrationprocess.Figure 13Page 9 of 9Rev. B-9/02/03