tow bars - Roadmaster Inc.
tow bars - Roadmaster Inc.
tow bars - Roadmaster Inc.

You also want an ePaper? Increase the reach of your titles
YUMPU automatically turns print PDFs into web optimized ePapers that Google loves.
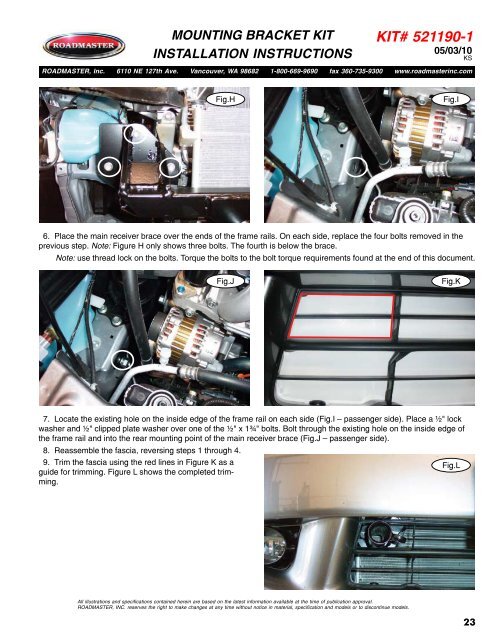
MOUNTING BRACKET KIT<br />
INSTALLATION INSTRUCTIONS<br />
KIT# 521190-1<br />
05/03/10<br />
KS<br />
ROADMASTER, <strong>Inc</strong>. 6110 NE 127th Ave. Vancouver, WA 98682 1-800-669-9690 fax 360-735-9300 www.roadmasterinc.com<br />
Fig.H Fig.I<br />
6. Place the main receiver brace over the ends of the frame rails. On each side, replace the four bolts removed in the<br />
previous step. Note: Figure H only shows three bolts. The fourth is below the brace.<br />
Note: use thread lock on the bolts. Torque the bolts to the bolt torque requirements found at the end of this document.<br />
Fig.J Fig.K<br />
7. Locate the existing hole on the inside edge of the frame rail on each side (Fig.I — passenger side). Place a ½" lock<br />
washer and ½" clipped plate washer over one of the ½" x 1¾" bolts. Bolt through the existing hole on the inside edge of<br />
the frame rail and into the rear mounting point of the main receiver brace (Fig.J — passenger side).<br />
8. Reassemble the fascia, reversing steps 1 through 4.<br />
9. Trim the fascia using the red lines in Figure K as a<br />
guide for trimming. Figure L shows the completed trimming.<br />
All illustrations and specifications contained herein are based on the latest information available at the time of publication approval.<br />
ROADMASTER, INC. reserves the right to make changes at any time without notice in material, specification and models or to discontinue models.<br />
Fig.L<br />
23