youngAmericababy⢠- Stanley Furniture
youngAmericababy⢠- Stanley Furniture
youngAmericababy⢠- Stanley Furniture

You also want an ePaper? Increase the reach of your titles
YUMPU automatically turns print PDFs into web optimized ePapers that Google loves.
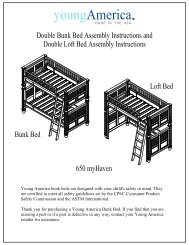
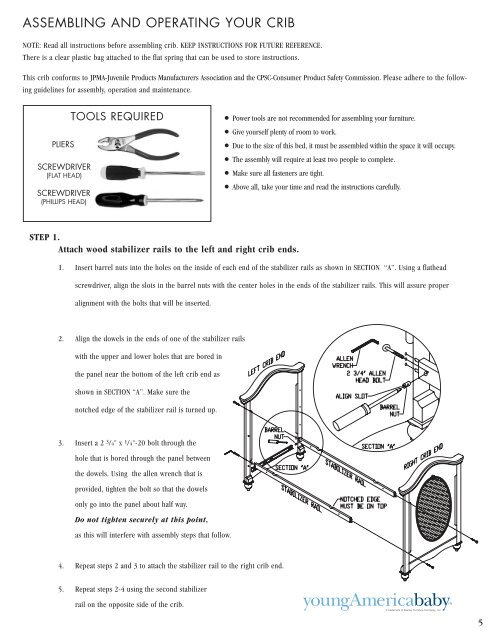
ASSEMBLING AND OPERATING YOUR CRIBNOTE: Read all instructions before assembling crib. KEEP INSTRUCTIONS FOR FUTURE REFERENCE.There is a clear plastic bag attached to the flat spring that can be used to store instructions.This crib conforms to JPMA-Juvenile Products Manufacturers Association and the CPSC-Consumer Product Safety Commission. Please adhere to the followingguidelines for assembly, operation and maintenance.PLIERSSCREWDRIVER(FLAT HEAD)SCREWDRIVER(PHILLIPS HEAD)TOOLS REQUIRED• Power tools are not recommended for assembling your furniture.• Give yourself plenty of room to work.• Due to the size of this bed, it must be assembled within the space it will occupy.• The assembly will require at least two people to complete.• Make sure all fasteners are tight.• Above all, take your time and read the instructions carefully.STEP 1.Attach wood stabilizer rails to the left and right crib ends.1. Insert barrel nuts into the holes on the inside of each end of the stabilizer rails as shown in SECTION “A”. Using a flatheadscrewdriver, align the slots in the barrel nuts with the center holes in the ends of the stabilizer rails. This will assure properalignment with the bolts that will be inserted.2. Align the dowels in the ends of one of the stabilizer railswith the upper and lower holes that are bored inthe panel near the bottom of the left crib end asshown in SECTION “A”. Make sure thenotched edge of the stabilizer rail is turned up.3. Insert a 2 3 /4" x 1 /4"-20 bolt through thehole that is bored through the panel betweenthe dowels. Using the allen wrench that isprovided, tighten the bolt so that the dowelsonly go into the panel about half way.Do not tighten securely at this point,as this will interfere with assembly steps that follow.4. Repeat steps 2 and 3 to attach the stabilizer rail to the right crib end.5. Repeat steps 2-4 using the second stabilizerrail on the opposite side of the crib.youngAmericababyA trademark of <strong>Stanley</strong> <strong>Furniture</strong> Company, Inc.5