SUPER STAR-CLEAR SPECIFICATIONS - Pool Plaza
SUPER STAR-CLEAR SPECIFICATIONS - Pool Plaza
SUPER STAR-CLEAR SPECIFICATIONS - Pool Plaza

Create successful ePaper yourself
Turn your PDF publications into a flip-book with our unique Google optimized e-Paper software.
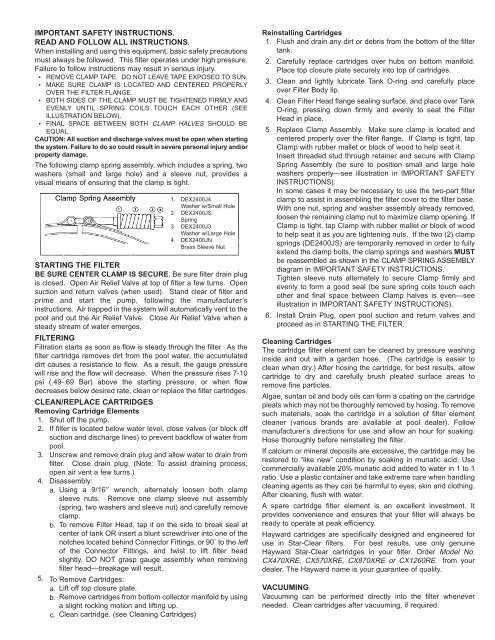
IMPORTANT SAFETY INSTRUCTIONS.READ AND FOLLOW ALL INSTRUCTIONS.When installing and using this equipment, basic safety precautionsmust always be followed. This filter operates under high pressure.Failure to follow instructions may result in serious injury.••••REMOVE CLAMP TAPE. DO NOT LEAVE TAPE EXPOSED TO SUN.MAKE SURE CLAMP IS LOCATED AND CENTERED PROPERLYOVER THE FILTER FLANGE.BOTH SIDES OF THE CLAMP MUST BE TIGHTENED FIRMLY ANDEVENLY UNTIL SPRING COILS TOUCH EACH OTHER (SEEILLUSTRATION BELOW).FINAL SPACE BETWEEN BOTH CLAMP HALVES SHOULD BEEQUAL.CAUTION: All suction and discharge valves must be open when startingthe system. Failure to do so could result in severe personal injury and/orproperty damage.The following clamp spring assembly, which includes a spring, twowashers (small and large hole) and a sleeve nut, provides avisual means of ensuring that the clamp is tight.<strong>STAR</strong>TING THE FILTERBE SURE CENTER CLAMP IS SECURE. Be sure filter drain plugis closed. Open Air Relief Valve at top of filter a few turns. Opensuction and return valves (when used). Stand clear of filter andprime and start the pump, following the manufacturer’sinstructions. Air trapped in the system will automatically vent to thepool and out the Air Relief Valve. Close Air Relief Valve when asteady stream of water emerges.FILTERINGFiltration starts as soon as flow is steady through the filter. As thefilter cartridge removes dirt from the pool water, the accumulateddirt causes a resistance to flow. As a result, the gauge pressurewill rise and the flow will decrease. When the pressure rises 7-10psi (.49-.69 Bar) above the starting pressure, or when flowdecreases below desired rate, clean or replace the filter cartridges.CLEAN/REPLACE CARTRIDGESRemoving Cartridge Elements1. Shut off the pump.2. If filter is located below water level, close valves (or block offsuction and discharge lines) to prevent backflow of water frompool.3. Unscrew and remove drain plug and allow water to drain fromfilter. Close drain plug. (Note: To assist draining process,open air vent a few turns.)4. Disassembly:5.a.b.Using a 9/16” wrench, alternately loosen both clampsleeve nuts. Remove one clamp sleeve nut assembly(spring, two washers and sleeve nut) and carefully removeclamp.To remove Filter Head, tap it on the side to break seal atcenter of tank OR insert a blunt screwdriver into one of thenotches located behind Connector Fittings, or 90˚ to the leftof the Connector Fittings, and twist to lift filter headslightly. DO NOT grasp gauge assembly when removingfilter head—breakage will result.To Remove Cartridges:a. Lift off top closure plate.b. Remove cartridges from bottom collector manifold by usinga slight rocking motion and lifting up.c. Clean cartridge. (see Cleaning Cartridges)1.2.3.4.DEX2400J4Washer w/Small HoleDEX2400JSSpringDEX2400J3Washer w/Large HoleDEX2400JNBrass Sleeve NutReinstalling Cartridges1. Flush and drain any dirt or debris from the bottom of the filtertank.2. Carefully replace cartridges over hubs on bottom manifold.Place top closure plate securely into top of cartridges.3. Clean and lightly lubricate Tank O-ring and carefully placeover Filter Body lip.4. Clean Filter Head flange sealing surface, and place over TankO-ring, pressing down firmly and evenly to seat the FilterHead in place.5. Replace Clamp Assembly. Make sure clamp is located andcentered properly over the filter flange. If Clamp is tight, tapClamp with rubber mallet or block of wood to help seat it.Insert threaded stud through retainer and secure with ClampSpring Assembly (be sure to position small and large holewashers properly—see illustration in IMPORTANT SAFETYINSTRUCTIONS).In some cases it may be necessary to use the two-part filterclamp to assist in assembling the filter cover to the filter base.With one nut, spring and washer assembly already removed,loosen the remaining clamp nut to maximize clamp opening. IfClamp is tight, tap Clamp with rubber mallet or block of woodto help seat it as you are tightening nuts. If the two (2) clampsprings (DE2400JS) are temporarily removed in order to fullyextend the clamp bolts, the clamp springs and washers MUSTbe reassembled as shown in the CLAMP SPRING ASSEMBLYdiagram in IMPORTANT SAFETY INSTRUCTIONS.Tighten sleeve nuts alternately to secure Clamp firmly andevenly to form a good seal (be sure spring coils touch eachother and final space between Clamp halves is even—seeillustration in IMPORTANT SAFETY INSTRUCTIONS).6. Install Drain Plug, open pool suction and return valves andproceed as in <strong>STAR</strong>TING THE FILTER.Cleaning CartridgesThe cartridge filter element can be cleaned by pressure washinginside and out with a garden hose. (The cartridge is easier toclean when dry.) After hosing the cartridge, for best results, allowcartridge to dry and carefully brush pleated surface areas toremove fine particles.Algae, suntan oil and body oils can form a coating on the cartridgepleats which may not be thoroughly removed by hosing. To removesuch materials, soak the cartridge in a solution of filter elementcleaner (various brands are available at pool dealer). Followmanufacturer’s directions for use and allow an hour for soaking.Hose thoroughly before reinstalling the filter.If calcium or mineral deposits are excessive, the cartridge may berestored to “like new” condition by soaking in muriatic acid. Usecommercially available 20% muriatic acid added to water in 1 to 1ratio. Use a plastic container and take extreme care when handlingcleaning agents as they can be harmful to eyes, skin and clothing.After cleaning, flush with water.A spare cartridge filter element is an excellent investment. Itprovides convenience and ensures that your filter will always beready to operate at peak efficiency.Hayward cartridges are specifically designed and engineered foruse in Star-Clear filters. For best results, use only genuineHayward Star-Clear cartridges in your filter. Order Model No.CX470XRE, CX570XRE, CX870XRE or CX1260RE from yourdealer. The Hayward name is your guarantee of quality.VACUUMINGVacuuming can be performed directly into the filter wheneverneeded. Clean cartridges after vacuuming, if required.