M-360 / V-460 - Engraving Systems Support
M-360 / V-460 - Engraving Systems Support
M-360 / V-460 - Engraving Systems Support
- No tags were found...

Create successful ePaper yourself
Turn your PDF publications into a flip-book with our unique Google optimized e-Paper software.
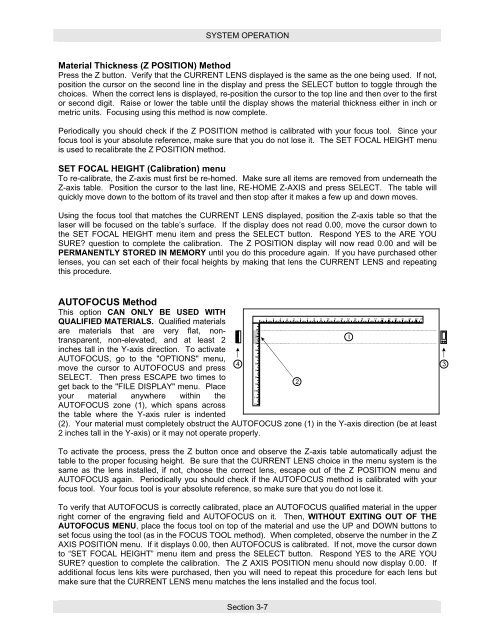
SYSTEM OPERATIONMaterial Thickness (Z POSITION) MethodPress the Z button. Verify that the CURRENT LENS displayed is the same as the one being used. If not,position the cursor on the second line in the display and press the SELECT button to toggle through thechoices. When the correct lens is displayed, re-position the cursor to the top line and then over to the firstor second digit. Raise or lower the table until the display shows the material thickness either in inch ormetric units. Focusing using this method is now complete.Periodically you should check if the Z POSITION method is calibrated with your focus tool. Since yourfocus tool is your absolute reference, make sure that you do not lose it. The SET FOCAL HEIGHT menuis used to recalibrate the Z POSITION method.SET FOCAL HEIGHT (Calibration) menuTo re-calibrate, the Z-axis must first be re-homed. Make sure all items are removed from underneath theZ-axis table. Position the cursor to the last line, RE-HOME Z-AXIS and press SELECT. The table willquickly move down to the bottom of its travel and then stop after it makes a few up and down moves.Using the focus tool that matches the CURRENT LENS displayed, position the Z-axis table so that thelaser will be focused on the table’s surface. If the display does not read 0.00, move the cursor down tothe SET FOCAL HEIGHT menu item and press the SELECT button. Respond YES to the ARE YOUSURE? question to complete the calibration. The Z POSITION display will now read 0.00 and will bePERMANENTLY STORED IN MEMORY until you do this procedure again. If you have purchased otherlenses, you can set each of their focal heights by making that lens the CURRENT LENS and repeatingthis procedure.AUTOFOCUS MethodThis option CAN ONLY BE USED WITH1 2 3 4 5 6 7 8 9 10 11 12 13 14 15 16 17 18 19 20 21 22 23 24QUALIFIED MATERIALS. Qualified materials1are materials that are very flat, nontransparent,non-elevated, and at least 22I3inches tall in the Y-axis direction. To activate45AUTOFOCUS, go to the "OPTIONS" menu,64move the cursor to AUTOFOCUS and press78SELECT. Then press ESCAPE two times to92get back to the "FILE DISPLAY" menu. Place10your material anywhere within the1112AUTOFOCUS zone (1), which spans acrossthe table where the Y-axis ruler is indented(2). Your material must completely obstruct the AUTOFOCUS zone (1) in the Y-axis direction (be at least2 inches tall in the Y-axis) or it may not operate properly.3To activate the process, press the Z button once and observe the Z-axis table automatically adjust thetable to the proper focusing height. Be sure that the CURRENT LENS choice in the menu system is thesame as the lens installed, if not, choose the correct lens, escape out of the Z POSITION menu andAUTOFOCUS again. Periodically you should check if the AUTOFOCUS method is calibrated with yourfocus tool. Your focus tool is your absolute reference, so make sure that you do not lose it.To verify that AUTOFOCUS is correctly calibrated, place an AUTOFOCUS qualified material in the upperright corner of the engraving field and AUTOFOCUS on it. Then, WITHOUT EXITING OUT OF THEAUTOFOCUS MENU, place the focus tool on top of the material and use the UP and DOWN buttons toset focus using the tool (as in the FOCUS TOOL method). When completed, observe the number in the ZAXIS POSITION menu. If it displays 0.00, then AUTOFOCUS is calibrated. If not, move the cursor downto “SET FOCAL HEIGHT” menu item and press the SELECT button. Respond YES to the ARE YOUSURE? question to complete the calibration. The Z AXIS POSITION menu should now display 0.00. Ifadditional focus lens kits were purchased, then you will need to repeat this procedure for each lens butmake sure that the CURRENT LENS menu matches the lens installed and the focus tool.Section 3-7