ABS Digimatic Indicator ID-C - Mitutoyo America Corporation
ABS Digimatic Indicator ID-C - Mitutoyo America Corporation
ABS Digimatic Indicator ID-C - Mitutoyo America Corporation
- No tags were found...
Create successful ePaper yourself
Turn your PDF publications into a flip-book with our unique Google optimized e-Paper software.
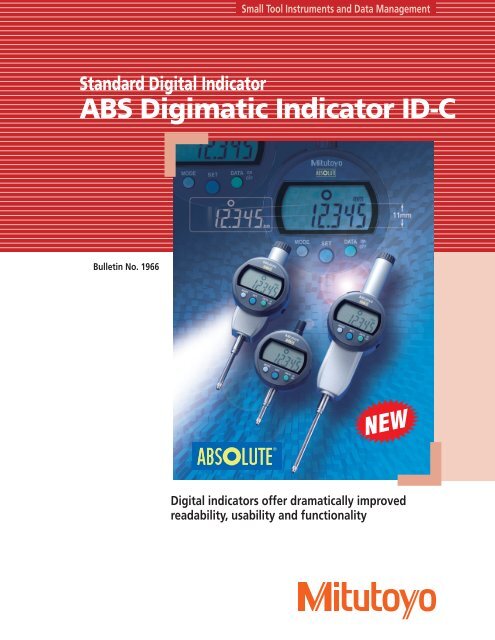
eading measurement values, usability and functionality1.The large LCD incorporates11mm characters giving 1.5times the character area ofexisting products (which display8.5mm characters) makingmeasurement values mucheasier to read.2.Large LCDThree large buttonsActual size11mmThe popular three-large-button design, which is used in products such as the <strong>ABS</strong>coolant proof <strong>Digimatic</strong> indicator <strong>ID</strong>-N/<strong>ID</strong>-B, makes buttons easier to press andoperations easier to perform.4.Functions that support measurementThe <strong>ID</strong>-C has various functions,including the ability to hold data,output data, switch the measuringdirection, judge tolerance, changethe scale factor, and a lock to preventmisoperation.(For details, see page 6.)5. 330°330° rotary displayThe display can be rotated 330°,allowing use at a position where youcan easily read the measurementvalue.Measurement value and tolerance judgmentEnlarged display of the tolerance judgment result330°• Parameter setting modeCount direction switching, tolerance judgmentsetting, resolution switching, scale factorsetting, and function lock setting<strong>ABS</strong> measurement modePreset using a reference gage to measure theabsolute value from a measurement reference• Power switch• Data output (when connected to anexternal device)• Data hold (when no external device isconnected)• Switches between the <strong>ABS</strong> (preset) andINC (zeroset) measurement modesINC measurement modeZeroset using a reference gage to performa comparison measurement of the differencebetween the reference gage and measuredworkpiece6.Application products for one-touch quickmeasurementVarious application products are available that enable you to perform one-touchquick measurement of the thickness of small parts, papers, felt, lenses, andpipes, as well as the depth of narrow grooves on cylindrical workpieces, groovedepth, and steps.(For details, see pages 8-11.)<strong>ABS</strong> <strong>Digimatic</strong>upright gageMeasured workpiece54.26750 mmreferencegageOperation in <strong>ABS</strong> (preset) measurement modeSwitches the measurementmode between <strong>ABS</strong> and INC.Press and hold the SET button(for at least two seconds) toswitch the mode.50 mmreferencegageThe lifting function that moves the spindle up and down has been expanded toimprove work efficiency when using the <strong>ID</strong>-C mounted on a stand.For models that have a 12.7mm measuring range,a lifting lever (special accessory) can be mountedon the left or right side, improving work efficiencyand smoothness of movement.A lifting cable (special accessory) provides a maximumof approximately 25.4mm of spindle movement (twicethat of existing models). So for models that have a12.7mm or 25.4mm measuring range, the spindle canbe moved through the entire measuring range. (Appliedto models that have a 50.8mm measuring range, thespindle can be retracted by approximately 25.4mm fromthe extended position.)Lifting knob (special accessory)By using a lifting knob (special accessory) fitted tothe the top of the spindle, you can perform fullstrokeoperation without directly touching thespindle.Lifting lever (finger hook)Standard accessory (only for models that have a measuring range of25.4mm or 50.8mm)If dust or coolant gets into the gap between the spindle and main unit while using thelifting knob, the spindle travel may become rough or the indicator may fail altogether.Therefore avoid using the <strong>ID</strong>-C in environments containing dust or coolant mist.4.267Measured workpiece54.267Operation in INC (zeroset) measurement mode<strong>ABS</strong> <strong>Digimatic</strong>thickness gage<strong>ABS</strong> <strong>Digimatic</strong>depth gage3. Expanded lifting capabilityThe <strong>ABS</strong> (<strong>ABS</strong>OLUTE) sensor7.The original <strong>Mitutoyo</strong> <strong>ABS</strong> (<strong>ABS</strong>OLUTE) sensor, which is capable of relocatingthe origin even after turning the power off, enables you to quickly start multipointmeasurement. Also, the <strong>ABS</strong> measurement mode can be restored evenafter measurement in the INC mode, where zerosettingis possible at any position, improving work efficiency.8.Inspection certificate provided as standard<strong>Mitutoyo</strong> provides an inspection certificate that includes inspection data asstandard to guarantee that every product shipped is of high quality and safeto use. Upon request, we can also calibrate purchased measuring instrumentsand issue a calibration certificate that proves traceability to national (orinternational) standards for a fee. To minimize calibration uncertainty as muchas possible, both the inspection certificate and calibration certificate are issuedafter measurement using dedicated testers developed with advanced <strong>Mitutoyo</strong>measurement technologies. Note that the inspection certificate cannot be usedto obtain a calibration certificate because the former does not indicate the dateof purchase. 3
<strong>ABS</strong> <strong>Digimatic</strong> <strong>Indicator</strong> <strong>ID</strong>-CSPECIFICATIONSInch/MetricMetricISO/JIS TypeISO/JIS Type and ANSI/AGD TypeOrder No. Measuring range Accuracy* [1 Hysteresis* Repeatability* Measuring force Mass RemarksResolution .00005"/.0001"/.0005"/0.001mm/0.01mm543-391 543-391B .5" ±.00010"/0.003mm .00010"/0.002mm .00010"/0.002mm 1.5N or less 170g —543-392 543-392B .5" ±.00010"/0.003mm .00010"/0.002mm .00010"/0.002mm 1.5N or less 170g —543-395 543-395B .5" ±.00010"/0.003mm .00010"/0.002mm .00010"/0.002mm 0.7, 0.6, 0.4N or less 170g Low measuring force543-396 543-396B .5" ±.00010"/0.003mm .00010"/0.002mm .00010"/0.002mm 0.7, 0.6, 0.4N or less 170g Low measuring force— 543-471B 1" ±.00010"/0.003mm .00010"/0.002mm .00010"/0.002mm 1.8N or less 190g —— 543-472B 1" ±.00010"/0.003mm .00010"/0.002mm .00010"/0.002mm 1.8N or less 190g —— 543-491B 2" ±.00020"/0.005mm .00010"/0.002mm .00010"/0.002mm 2.3N or less 260g —— 543-492B 2" ±.00020"/0.005mm .00010"/0.002mm .00010"/0.002mm 2.3N or less 260g —Resolution .0005"/0.01mm543-401 543-401B .5" ±.0010"/0.02mm .0010"/0.02mm .0005"/0.01mm 0.9N or less 170g —543-402 543-402B .5" ±.0010"/0.02mm .0010"/0.02mm .0005"/0.01mm 0.9N or less 170g —543-405 543-405B .5" ±.0010"/0.02mm .0010"/0.02mm .0005"/0.01mm 0.5, 0.4, 0.3, 0.2N or less 170g Low measuring force543-406 543-406B .5" ±.0010"/0.02mm .0010"/0.02mm .0005"/0.01mm 0.5, 0.4, 0.3, 0.2N or less 170g Low measuring force— 543-475B 1" ±.0010"/0.02mm .0010"/0.02mm .0005"/0.01mm 1.8N or less 190g —— 543-476B 1" ±.0010"/0.02mm .0010"/0.02mm .0005"/0.01mm 1.8N or less 190g —— 543-495B 2" ±.0015"/0.04mm .0010"/0.02mm .0005"/0.01mm 2.3N or less 260g —— 543-496B 2" ±.0015"/0.04mm .0010"/0.02mm .0005"/0.01mm 2.3N or less 260g —Order No. Measuring range Accuracy* [1 Hysteresis* Repeatability* Measuring force Mass RemarksResolution 0.001mm/0.01mm543-390 543-390B 12.7mm 0.003mm 0.002mm 0.002mm 1.5N or less 170g —543-394 543-394B 12.7mm 0.003mm 0.002mm 0.002mm 0.7, 0.6, 0.4N or less 170g Low measuring force— 543-470B 25.4mm 0.003mm 0.002mm 0.002mm 1.8N or less 190g —— 543-490B 50.8mm 0.005mm 0.002mm 0.002mm 2.3N or less 260g —Resolution 0.01mm543-400 543-400B 12.7mm 0.02mm 0.02mm 0.01mm 0.9N or less 170g —543-404 543-404B 12.7mm 0.02mm 0.02mm 0.01mm 0.5, 0.4, 0.3, 0.2N or less 170g Low measuring force— 543-474B 25.4mm 0.02mm 0.02mm 0.01mm 1.8N or less 190g —— 543-494B 50.8mm 0.04mm 0.02mm 0.01mm 2.3N or less 260g —: ANS/AGD TypeNote) Products with an Order No. suffixed “B” have a flat back, and other models have a back with a lug.* Overall hysteresis and repeatability specifications are valid for normal measurement at 20°C, and the quantizing error of ±1 count is excluded.COMMON SPECIFICATIONS• Display: 6-digit LCD, sign• Contact point: Spherical tip SR = 1.5mm (carbide tipped),part No. 901312 (for ISO/JIS Type)part No. 21BZB005 (for ANSI/AGD Type)• Spindle orientation for measurement:- Standard model that has a 12.7mm measuring range: No restrictions- Standard model that has a 25.4mm or 50.8mm measuring range: Normallyat any position between the spindle pointing vertically downward to thespindle horizontal. To perform measurement with the spindle pointing abovethe horizontal requires a reverse-position coil spring (special accessory).- Low measuring force models: See 'Setting measuring force on lowmeasuring force models' on page 5.• Position detection method: Capacitance type absolute linear encoder• Battery: SR44 (silver oxide button cell) × 1, part No. 938882• Battery life: Approximately 7,000 hours of continuous use• Maximum response speed: Not restricted (except for scanning measurement)• Service temperature range: 0 to 40°C• Storage temperature range: 0 to 60°C4
Setting measuring force on low measuring force models•543-404/404B/405/405B/406/406BSpindle orientationSpringWeight(approximately 0.1 N) Maximummeasuring forceYes Yes 0.5NPointing vertically downwardYes No 0.4NNo Yes 0.3NNo No 0.2NHorizontal Yes No 0.2NNote) Operation using configurations other than shown above is not guaranteed.•543-394/394B/395/395B/396/396BSpindle orientation SpringWeightMaximum(approximately 0.1 N) measuring forceYes Yes 0.8N (0.3+0.4+0.1=0.8)Yes No 0.6NPointing vertically downwardNo Yes 0.4NNo No Not guaranteedHorizontalNot guaranteedNote) Operation using configurations other than shown above is not guaranteed.DIMENSIONSISO/JIS Typeø10.928.8 2019.231.51119.2 31.51150.154.446.517ø8 0-0.009ø59M2.5X0.45ø6.55ø5484.8 57.770ø5985.2ø5921.27.312.7mm range models7.62619.540.87.3ø8 0-0.009M2.5X0.45110.697.325.4mm range models19.5ø8 0-0.0095265.37.3M2.5X0.4550.8mm range modelsANSI/AGD Typeø10.928.8.43"1.13"193/4"19.2.76"31.51.24"11.43"19.2.76"31.5 111.24" .43"50.11.97"6.351/4"57.72.27"50.82"44.21.74"øø592.32"592.32"542.13"14.7.58"85.23.35"20.79"ø6.351/4"ø9.52-0.030.375"· Contact pointNo.4-48 thread12.7mm range models7.6.3"* is the symbol denoting <strong>America</strong>n Gage Design (AGD).It shows conformance to certain dimensions for Dial <strong>Indicator</strong>s,as specified in ASME / AGD 2, intended to promote interchangeability.Only applicable to models with an "E" suffix.1/4"6.583.853.30"67.72.67"261.02"17.2.68"42.151.66"6.351/4"ø0ø9.52 -0.03.375"· Contact pointNo.4-48 thread25.4mm range models109.654.32"953.74"17.2.68"9.52 -0.030.375"592.32"ø522.05"66.652.62"6.351/4"· Contact pointNo.4-48 thread50.8mm range models5
Functions and accessoriesFunctions• Zero-setting function(INC measurement mode)• Preset function (<strong>ABS</strong> scale origin setting)The preset value can be changed easily by using theSET (digit movement) and MODE (value change)buttons.• 330° rotary display330° 330°• Resolution switching(For 0.001mm or .00005" resolution models)Models with 0.001mm resolution are capable ofdisplaying in 0.01mm resolution. Models with.00005" resolution are capable of displaying in.0001" and .0005" resolution. Select the resolutionaccording to the application.• Data output(when connected to an external device)From the output terminal, measurement data canbe output to a PC via a compact printer, <strong>Digimatic</strong>mini processor DP-1VR, or input tool by pressingthe button below the display. Wireless transmissionof measurement data to a PC can also be performedusing the measurement data wireless communicationsystem U-WAVE.• Switching the directionThe measuring direction can be reversed.• Judging the tolerancePerforms judgment (OK, +NG, -NG) according tothe set upper and lower limit values and displaysthe result as a symbol. Enlarged display of the OKand NG symbols is possible.• Display value holding(when no external device is connected)Connecting cables for data output (special accessory)1m: No.9053382m: No.905409No.264-504DP-1VR(special accessory)Input toolNo.264-012-10 IT-012U (special accessory)• Calculation: f(x) = AxMounting the <strong>ID</strong>-C on a measuring jig and settingthe calculation factor (to any value) allows directmeasurement without using a conversion table andimproves measurement efficiency.• Function lockingEnsures reliability of measurement by locking thesettings to prevent preset function settings frombeing changed by mistake.Measurement value andtolerance judgmentEnlarged display of thetolerance judgment result• Low battery voltage alarm• Error alarm6
Standard accessories• Operation manual• Inspection certificate1 Lifting lever (finger hook)(Only for models that have a 25.4mm or 50.8mm measuring range)• Silver oxide button cell for the monitor: SR44 × 1Part No. 938882• Weight (only for low measuring force models)Special accessories234Lifting leverPart No. 21EZA198(for models that have a 12.7mm measuring range ISO/JIS Type)Part No. 21EZA199(for models that have a 12.7mm measuring range ANSI/ADG Type)Lifting cable, part No. 540774Lifting knobPart No. 21EZA105(for models that have a 12.7mm measuring range ISO/JIS Type)Part No. 21EZA150(for models that have a 12.7mm measuring range ANSI/ADG Type)Part No. 21EZA197(for models that have a 25.4mm measuring range)Part No. 21EZA200(for models that have a 50.8mm measuring range)• Interchangeable contact points for <strong>Mitutoyo</strong> dial gagesShell Flat NeedleVarious types of contact points are available.• Various backs for standard <strong>Mitutoyo</strong> (2 series) dial gages• Reverse-position coil springPart No. 02ACA571(for models that have a 25.4mm measuring range)Part No. 02ACA773(for models that have a 50.8mm measuring range)• Connecting cable (1m), part No. 905338• Connecting cable (2m), part No. 9054091243• U-WAVE(measurement data wireless communication system)• <strong>Digimatic</strong> mini processor DP-1VR No. 264-504• Multiplexer MUX-10F, No. 264-002• Display unit EC-101D, No. 542-007• Input tool (USB keyboard signal conversion type)IT-012U, No. 264-012-1065 No.7007• Recommended stands5 Dial gage stand, No. 7001 7002 70076 Granite comparator stand BSG-30, No. 215-1547 Comparator stand BSC-30, No. 215-5048 Comparator stand BSG-20, No. 215-15187Various <strong>Digimatic</strong> <strong>Indicator</strong>s2738541612345678<strong>ID</strong>-C: Standard Digital <strong>Indicator</strong><strong>ID</strong>-N/B: waterproof, 35mm slim bodywith various functions<strong>ID</strong>-H: infrared remote controller, highaccuracy, and various functions<strong>ID</strong>-S: cost-effective type that has basicfunctions<strong>ID</strong>-U1025: general-purpose type thathas a 25.4mm measuring range<strong>ID</strong>-C112RB: has a built-in calculationfunction<strong>ID</strong>-C112A: has a peak hold function<strong>ID</strong>-C112GB: internal diameter measuringinstrument dedicated to cylinder gages7
Application ProductsApplication Products<strong>ABS</strong> <strong>Digimatic</strong> Thickness Gage547-300S547-320S 547-400SUnit: mm• For one-touch quick measurement of the thickness of small parts,papers, and felt• Rust-free ceramic contact point and anvil (except No. 547-401)ø103085120ø10175547-301 547-321Inch/MetricANSI/AGD TypeOrder No. Resolution Measuring range Throat depth Contact point and anvilParallelism of contact pointand anvilAccuracy Measuring force547-300S .0005"/0.01mm 0~.4"/0~10mm 30mm ø10mm flat .0005" or less ±.001" 1.5N or less547-320S .0005"/0.01mm 0~.4"/0~10mm 120mm ø10mm flat .0005" or less ±.001" 1.5N or less547-400S .00005"/0.001mm 0~.47"/0~12mm 21mm ø6.3mm flat (carbide tipped) .0001" or less ±.0001" 3.5N or lessMetricISO/JIS TypeOrder No. Resolution Measuring range Throat depth Contact point and anvilParallelism of contact pointand anvilAccuracy Measuring force547-301 0.01mm 0~10mm 30mm ø10mm flat 10µm or less ±20µm 1.5N or less547-321 0.01mm 0~10mm 120mm ø10mm flat 10µm or less ±20µm 1.5N or less547-401 0.001mm 0~12mm 21mm ø6.3mm flat (carbide tipped) 3µm or less ± 3µm 3.5N or lessNote) 1. Changing the contact point requires total adjustment, including the main display unit. Contact <strong>Mitutoyo</strong> for advice.2. The accuracy specification does not include the quantizing error of ±1 count.3. Left-handed models can be supplied to special order.8
<strong>ABS</strong> <strong>Digimatic</strong> Lens MeterSR3AnvilConcave lensSpherical contactpointSR2Convex lensFlat contactpointAnvilMoon lensFlat contactpointAnvil9.3Contactpoint9.3Sø4 sphericalcontact pointStandard accessoryAnvil adjustment:12 mm SR330ø6ø4.830.3 (Throat depth)85Unit: mm547-312S• Designed for measuring the thickness of concavo-convex lenses and flat objects• The thickness of flat objects can be measured by replacing the anvil.• Includes a spherical contact point.30ø6Inch/Metric ANSI/AGD Typeø4.8SR2Order No. Resolution Measuring range Throat depth Anvil adjustment Accuracy Measuring forceAnvil displacement: 12 mm547-312S .0005"/0.01mm 0~.4"/0~10mm 30mm 12mm SR3 ±.001" or less 85 1.5N or less9.330Metric ISO/JIS TypeOrder No. Resolution Measuring range Throat depth Anvil adjustment Accuracy Measuring force547-313 0.01mm 0~10mm 30mm 12mm ±20µm or less 1.5N or lessNote) The accuracy specification does not include the quantizing error of ±1 count. Left-handed models can be supplied to special order.<strong>ABS</strong> <strong>Digimatic</strong> Pipe GageContactpointUnit: mm• Designed for measuring the thickness of pipes and curved boardsø3ø3Tip: ø3.5Effectivethroatdepth202185Anvil547-361SInch/Metric ANSI/AGD TypeOrder No. Resolution Measuring range Throat depthMinimum insidediameter of pipeAccuracy Measuring force547-361S .0005"/0.01mm 0~.4"/0~10mm 20mm ø3.5mm ±.001" or less 1.5N or lessø3MetricISO/JIS Type ø3.5 Order No. Resolution Measuring range Throat depthMinimum inside21diameter of pipeAccuracy Measuring force547-360 0.01mm 0~10mm 20mm ø3.5mm ±20µm or less 1.5N or lessNote) 1. Changing the contact point requires total adjustment, including the main display unit. Contact <strong>Mitutoyo</strong> for advice.2. The accuracy specification does not include the quantizing error of ±1 count.3. Left-handed models can be supplied to special order.9
Application Products<strong>ABS</strong> <strong>Digimatic</strong> Groove GageUnit: mm547-316SContactpoint• Best suited for measuring the depth of narrow grooves on1Anvilcylindrical workpieces• The contact point and measuring face of the anvil are1mm thick blades.30.3 (Throat depth)85Inch/Metric ANSI/AGD TypeOrder No. Resolution Measuring range ThroatdepthContact point and anvildimensions (W × D)Accuracy Measuring force547-316S .0005"/0.01mm 0~4"/0~10mm 30mm 6.5mm x 1mm ±.001" or less 1.5N or less30Metric ISO/JIS TypeOrder No. Resolution Measuring range Throat Contact point and anvildepth dimensions (W × D) 1 Accuracy Measuring force85547-315 0.01mm 0~10mm 30mm 6.5mm x 1mm ±20µm or less 1.5N or lessNote) 1. Changing the contact point requires total adjustment, including the main display unit. Contact <strong>Mitutoyo</strong> for advice.2. The accuracy specification does not include the quantizing error of ±1 count.3. Left-handed models can be supplied to special order.665ø6.5ø59ø16(35)(11)5Unit: mm<strong>ABS</strong> <strong>Digimatic</strong> Depth Gage• Suitable for measuring the depth of holes, narrow grooves, and steps.• The lifting lever can be used either on the left or right sides.(105)(67)Inch/MetricANSI/AGD Type547-218SOrder No.ResolutionMeasuringMeasuring BaserangeStroke AccuracyContact point: CarbldetippedballExtension rodsforce Length Width Flatness547-217S .0005"/0.01mm 0~8" .5" ±.001" or less 1.5N or less 2.5" .63" .0002" or less 4 pcs. (.5",1",2",4")547-218S .0005"/0.01mm 0~8" .5" ±.001" or less 1.5N or less 4" .63" .0002" or less4 pcs. (.5",1",2",4")21JAZA242547-257S .00005"/0.001mm 0~8" .5" ±.0002" or less 1.5N or less 2.5" .63" .00008" or less 4 pcs. (.5",1",2",4")547-258S .00005"/0.001mm 0~8" .5" ±.0002" or less 1.5N or less 4" .63" .00008" or less 4 pcs. (.5",1",2",4")(10)17ø5ø6ASR1.5Metric ISO/JIS TypeOrder No.ResolutionMeasuringMeasuring BaserangeStroke Accuracyforce Length Width Flatness547-21163.5mm0.01mm±20µm 1.5N or less5µm or less547-212 101.6mm0~200mm 12mm16mm547-25163.5mm0.001mm ±5µm 1.5N or less2µm or less547-252 101.6mmNote) The accuracy specification does not include the quantizing error of ±1 count.Contact point: Carbldetippedball21JAA224Extension rods5 pcs.(10, 20, 30, 30, 100mm)10
<strong>ABS</strong> <strong>Digimatic</strong> Bench Gage40Unit: mm• The support plate allows easy reading by tilting the anvil.• Carbide measuring faces (for the contact point and anvil)• The lifting lever can be used either on the left or right sides.ø59109260ø6.3ø8Effective throat depth54555Inch/MetricANSI/AGD Type547-066SSupport plateOrder No. <strong>Indicator</strong> stroke Resolution Remarks (contact point) Effective throat depth Workpiece height Accuracy Measuring force547-066S .5" .0005"/0.01mm .248" DIA flat type .59" 1" ±.001" or less 1.5N or lessø20Flat anvilMetricISO/JIS TypeOrder No. <strong>Indicator</strong> stroke Resolution Workpiece height Effective throat depth Anvil adjustment Accuracy Measuring force547-064 12mm 0.01mm ø20mm 15mm 13mm ±20µm or less 1.5N or lessNote) The accuracy specification does not include the quantizing error of ±1 count.Unit: mm<strong>ABS</strong> <strong>Digimatic</strong> Upright Gage• Best suited for inspection of small parts at a site• Carbide ball contact point• The lifting lever that is a standard accessory for No. 547-054,547-034S can be used either on the left or right sides.Anvil(hardenedsteel)Effective measuring range115ø40SR1.5Inch/MetricANSI/AGD Type547-035SCenter of anvilMeasuring depth 459512035 12Center ofcontact pointOrder No. Resolution Measuring range Anvil Workpiece height Accuracy Measuring force547-034S .0005"/0.01mm .5" 1.57" DIA steel type 1.2" ±.001" or less547-033S .00005"/0.001mm .5" 1.97" DIA ceramic type 1.2" ±.0001" or less 1.5N or less547-035S .00005"/0.001mm .5" 1.57" DIA steel type 1.2" ±.0001" or less60MetricISO/JIS TypeOrder No. Resolution Measuring range Anvil Workpiece height Accuracy Measuring force547-054 0.01mm 12.7mm ø40mm (steel type)±20µm or less547-053 0.001mm 12.7mm ø50mm (ceramic type) 30mm± 3µm or less 1.5N or less547-055 0.001mm 12.7mm ø40mm (steel type) ± 3µm or lessNote) 1. The lifting lever (part No. 21EZA198) is a standard accessory for 547-054.2. The lifting lever (part No. 21EZA199) is a standard accessory for 547-034S.3. The lifting cable (part No. 540774) is a standard accessory for 547-055, 547-033S, 547-035S.4. The accuracy specification does not include the quantizing error of ±1 count.• The <strong>ABS</strong> (<strong>ABS</strong>OLUTE) scale used in these products is a capacitance type absolute encoder. Its patent has been registered in Japan, the U.S., the U.K., Germany, and China.11
Export permission by the Japanese government maybe required for exporting our products according tothe Foreign Exchange and Foreign Trade Law. Pleaseconsult our sales office near you before you exportour products or you offer technical information to anonresident.One Number to Serve You Better1-888-MITUTOYO (1-888-648-8869)Note: All information regarding our products, and in particular the illustrations, drawings, dimensional and performance data contained in this printed matter aswell as other technical data are to be regarded as approximate average values. We therefore reserve the right to make changes to the corresponding designs. Thestated standards, similar technical regulations, descriptions and illustrations of the products were valid at the time of printing. In addition, the latest applicableversion of our General Trading Conditions will apply. Only quotations submitted by ourselves may be regarded as definitive.<strong>Mitutoyo</strong> products are subject to US Export Administration Regulations (EAR). Re-export or relocation of <strong>Mitutoyo</strong> products may require prior approval by anappropriate governing authority.Trademarks and RegistrationsDesignations used by companies to distinguish their products are often claimed as trademarks. In all instances where <strong>Mitutoyo</strong> <strong>America</strong> <strong>Corporation</strong> is awareof a claim, the product names appear in initial capital or all capital letters. The appropriate companies should be contacted for more complete trademark andregistration information.We reserve the right to change specifications and prices without notice.© 2009 <strong>Mitutoyo</strong> <strong>America</strong> <strong>Corporation</strong>, Aurora IL 0409-09 Printed in USA, June 2009Aurora, Illinois(Corporate Headquarters)Westford, MassachusettsHuntersville, North CarolinaMason, OhioPlymouth, Michigan<strong>Mitutoyo</strong> City of Industry, <strong>Corporation</strong>California20-1, Sakado 1-chome,Takatsu-ku, Kawasaki-shi,Kanagawa 213-8533, JapanT +81 (0) 44 813-8230F +81 (0) 44 813-8231http://www.mitutoyo.co.jpNote: All information regarding our products, and in particular the illustrations, drawings, dimensional and performance data contained in this pamphlet, as well as othertechnical data are to be regarded as approximate average values. We therefore reserve the right to make changes to the corresponding designs, dimensions and weights.


