TPR III E Electronic Panel Heaters - Creda Heating
TPR III E Electronic Panel Heaters - Creda Heating
TPR III E Electronic Panel Heaters - Creda Heating
- No tags were found...

You also want an ePaper? Increase the reach of your titles
YUMPU automatically turns print PDFs into web optimized ePapers that Google loves.
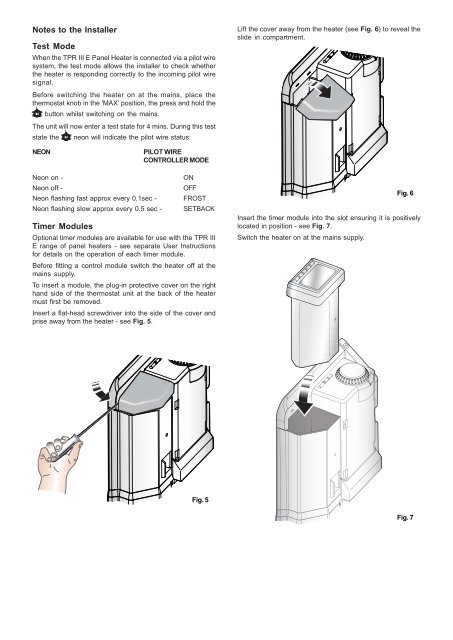
Notes to the InstallerTest ModeWhen the <strong>TPR</strong> <strong>III</strong> E <strong>Panel</strong> Heater is connected via a pilot wiresystem, the test mode allows the installer to check whetherthe heater is responding correctly to the incoming pilot wiresignal.Before switching the heater on at the mains, place thethermostat knob in the 'MAX' position, the press and hold the‘ ’ button whilst switching on the mains.The unit will now enter a test state for 4 mins. During this teststate the ‘ ’ neon will indicate the pilot wire status:Lift the cover away from the heater (see Fig. 6) to reveal theslide in compartment.NEONPILOT WIRECONTROLLER MODENeon on -Neon off -Neon flashing fast approx every 0.1sec -Neon flashing slow approx every 0.5 sec -Timer ModulesONOFFFROSTSETBACKOptional timer modules are available for use with the <strong>TPR</strong> <strong>III</strong>E range of panel heaters - see separate User Instructionsfor details on the operation of each timer module.Before fitting a control module switch the heater off at themains supply.To insert a module, the plug-in protective cover on the righthand side of the thermostat unit at the back of the heatermust first be removed.Insert a flat-head screwdriver into the side of the cover andprise away from the heater - see Fig. 5.Fig. 6Insert the timer module into the slot ensuring it is positivelylocated in position - see Fig. 7.Switch the heater on at the mains supply.Fig. 5Fig. 7