®BATTERYBefore using battery pack, please read carefully all instructionsand cautionary markings on battery pack, battery chargerand product using battery.Do not incinerate the battery pack even if it is severely damagedor is completely worn out. The battery pack can explode.Do not carry battery packs in aprons, pockets, or tool boxes, product kitboxes, drawers, etc. with loose metal objects. Battery pack terminals couldbe short circuited causing damage to the battery pack, severe burns or fire.The battery pack is Nickel-Cadmium (Ni-Cad) and is considered to be a toxicmaterial by the Environmental Protection Agency. Before disposing of damagedor worn out Ni-Cad battery packs, check with your State EnvironmentalProtection Agency to find out about special restrictions on the disposal of thesebattery packs, take them to your local recycling center for proper disposal, orcall 1-800-822-8837.REMOVING / ATTACHING BATTERY PACKREMOVE BATTERY PACK:1. Press both release buttons on either side ofthe <strong>Cordless</strong> Worklight to release the batterypack.2. Pull battery pack free of <strong>Cordless</strong> Worklight.ATTACH BATTERY PACK:1. Align the raised portion of the battery packwith the groove in the battery compartmentof the <strong>Cordless</strong> Worklight.2. Press the battery pack into place. Makesure the latches are securely fastened.Do not use the <strong>Cordless</strong> Worklight if thebattery pack is not seated properly.CHARGERRELEASEBUTTONThe battery is not fully charged. Before first use, the battery pack requires8-10 hours charge time to be fully charged. Subsequent recharging needs 3hours for the battery to be fully charged.Always switch to a fresh battery when tool performance begins to diminish.Severe heat is most destructive to a battery; the more heat generated, the fasterthe battery loses power. A battery that gets too hot can have a shortened life.Never over-discharge a battery by using the tool even after tool performancehas decreased. Do not attempt to discharge a tool’s battery by continuing topull on the tool trigger. When tool performance begins to diminish, stop the tooland recharge the battery for optimal performance.Charge battery pack at ambient temperatures between 50° F – 104° F.Store tool and battery pack in locations where temperatures will not exceed120°F. This is important to prevent serious damage to the battery cells.The battery pack should always be recharged when the <strong>Cordless</strong> Worklightbegins to dim.When battery pack is not in use, keep it away from other metal objects such aspaper clips, coins, keys, nails, screws or other small metal objects that canmake a connection from one terminal to another. Shorting the battery terminalstogether may cause sparks, burns, or fire.Before using battery charger, please read carefully allinstructions and cautionary markings on battery charger, battery pack andproduct using battery.The charger will not automatically turn “OFF” when thebattery pack is fully charged. The charging indicator light will remain “ON”until the charger is disconnected from the electrical outlet.Use only the charger which accompanied your product or direct replacement aslisted in this manual. Do not substitute any other charger. Use only <strong>Alltrade</strong>approved chargers with your product.Do not disassemble charger.Do not use charger if it has been damaged, left outdoors in the rain, snow, wetor damp environments, or immersed in liquid.The battery pack and charger heat during charging. Place the charger on a flat,non-flammable surface away from flammable materials with at least four inches ofclearance to allow proper air circulation around the charger and battery pack.When the battery pack requires recharging, a 3 hour charge allows the tool tooperate at full power. A charging indicator light on the charger will illuminate toshow that charging is taking place.7 8
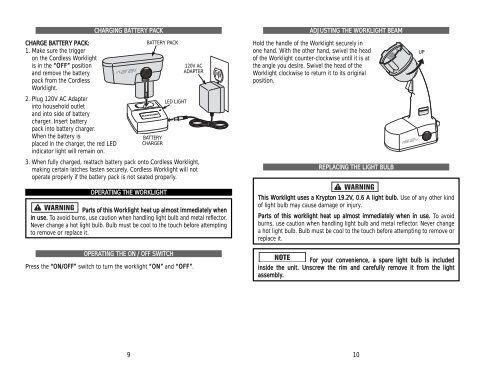
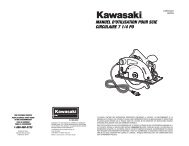
CHARGE BATTERY PACK:1. Make sure the triggeron the <strong>Cordless</strong> Worklightis in the “OFF” positionand remove the batterypack from the <strong>Cordless</strong>Worklight.2. Plug 120V AC Adapterinto household outletand into side of batterycharger. Insert batterypack into battery charger.When the battery isplaced in the charger, the red LEDindicator light will remain on.CHARGING BATTERY PACKBATTERY PACKBATTERYCHARGERLED LIGHT120V ACADAPTER3. When fully charged, reattach battery pack onto <strong>Cordless</strong> Worklight,making certain latches fasten securely. <strong>Cordless</strong> Worklight will notoperate properly if the battery pack is not seated properly.ADJUSTING THE WORKLIGHT BEAMHold the handle of the Worklight securely inone hand. With the other hand, swivel the headof the Worklight counter-clockwise until it is atthe angle you desire. Swivel the head of theWorklight clockwise to return it to its originalposition.REPLACING THE LIGHT BULBUPOPERATING THE WORKLIGHTParts of this Worklight heat up almost immediately whenin use. To avoid burns, use caution when handling light bulb and metal reflector.Never change a hot light bulb. Bulb must be cool to the touch before attemptingto remove or replace it.OPERATING THE ON / OFF SWITCHPress the “ON/OFF” switch to turn the worklight “ON” and “OFF”.This Worklight uses a Krypton <strong>19.2V</strong>, 0.6 A light bulb. Use of any other kindof light bulb may cause damage or injury.Parts of this worklight heat up almost immediately when in use. To avoidburns, use caution when handling light bulb and metal reflector. Never changea hot light bulb. Bulb must be cool to the touch before attempting to remove orreplace it.For your convenience, a spare light bulb is includedinside the unit. Unscrew the rim and carefully remove it from the lightassembly.910