Flow!Works Quick Guide V2.8.0 (443 KB) - Qomo
Flow!Works Quick Guide V2.8.0 (443 KB) - Qomo
Flow!Works Quick Guide V2.8.0 (443 KB) - Qomo
- No tags were found...

You also want an ePaper? Increase the reach of your titles
YUMPU automatically turns print PDFs into web optimized ePapers that Google loves.
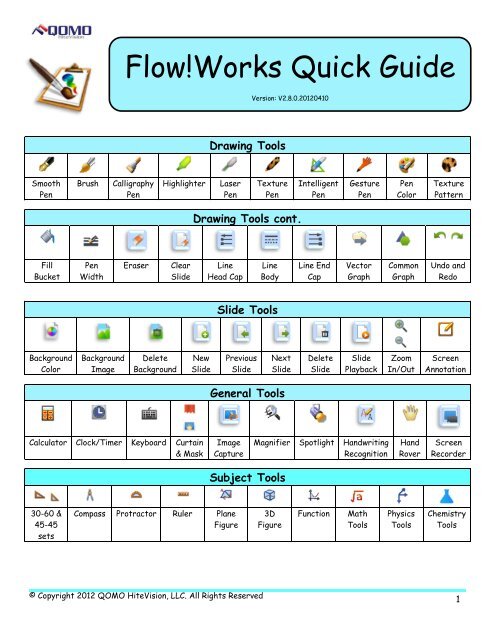
<strong>Flow</strong>!<strong>Works</strong> <strong>Quick</strong> <strong>Guide</strong>Version: <strong>V2.8.0</strong>.20120410Drawing ToolsSmoothPenBrushCalligraphyPenHighlighterLaserPenTexturePenIntelligentPenGesturePenPenColorTexturePatternDrawing Tools cont.FillBucketPenWidthEraserClearSlideLineHead CapLineBodyLine EndCapVectorGraphCommonGraphUndo andRedoSlide ToolsBackgroundColorBackgroundImageDeleteBackgroundNewSlidePreviousSlideNextSlideDeleteSlideSlidePlaybackZoomIn/OutScreenAnnotationGeneral ToolsCalculator Clock/Timer Keyboard Curtain& MaskImageCaptureMagnifier Spotlight HandwritingRecognitionHandRoverScreenRecorderSubject Tools30-60 &45-45setsCompass Protractor Ruler PlaneFigure3DFigureFunctionMathToolsPhysicsToolsChemistryTools© Copyright 2012 QOMO HiteVision, LLC. All Rights Reserved1
Parts of the BoardActive AreaHot KeysUSB connectionPen TrayHow to Calibrate the BoardThe board needs to be calibrated to assure proper functioning. When the board is disconnected fromthe computer, it will need to be recalibrated when it is reconnected.1. Right click on the board icon in the taskbar.2. Click on Calibrate.3. Follow the calibration points around the board asindicated in the calibration setup.Note: If the board icon is red , the board is notconnected to the computer and the calibration menuwon’t appear. Simply unplug and plug the USB backinto the board.Board FunctionsLeft Mouse Click: Use your finger, a pen, or the wand and tap the board. Tap twice for a double click.Right Mouse Click: Use your finger, a pen, or the wand, touch the board and hold it for 3 seconds.Pen Tray: The pens and eraser can be used instead of your finger to draw or erase on the board. Thepen color is determined by which pen slot is vacant on the pen tray.© Copyright 2012 QOMO HiteVision, LLC. All Rights Reserved2
Create a LessonThe software makes it easy to design eye catching and fun lessons. The background can be customizedand various forms of media can be added to the lesson.1. Click on the New Slide button to add a slide to the presentation.2. To add an image as the background, click on the Background Settings button. To changethe background color, click on the background colorbutton.3. To insert a textbox, image, audio, video, or flash file, click on the Insert Media tab in themain toolbar.a. Select the media that you would like to insert into your presentation.b. The cursor will become a plus sign. Choose the location where you want the media andclick and drag the media file into your presentation.Write, Draw, and EraseTo write or draw, select the Pen or Paint Brush tool. The Highlighter creates a semitransparentmark and the Texture Pen creates a colorful mark. The Laser Pen creates a linethat flashes to draw attention to a certain area. The mark also disappears when a new mark is drawn.To create a perfect line, circle, or square, use the Intelligent Pen .Marks can be deleted with a pixel eraser or region erasertool. To clear the entire slide, click onthe Clear Slidebutton.Customize the ToolbarThe toolbar buttons can be added or removed to fit your style ofteaching.1. Go to or .2. Go to Configuration and select Configuration Interface.3. To remove tools, click on them in the menu bar and dragthem into the Commands window.4. To add tools, find the desired tool in the Categories andCommands list, then click and drag the tool to the desired location on the menu bar.© Copyright 2012 QOMO HiteVision, LLC. All Rights Reserved3
Annotate Over Programs and DocumentsSwitch Mode makes it easy to toggle between a presentation and other programs or documents.Annotations can be made over these and saved into the <strong>Flow</strong>! <strong>Works</strong> presentation.1. Click on the Switch button. <strong>Flow</strong>!<strong>Works</strong> and your other program will run together.2. To annotate on this document or program select your desired writing utensil and beginannotating. If you are annotating over an Office application you will get an embedding toolbaron the screen. This toolbar will allow you to embed your annotations on yourOffice document and navigate through PowerPoint presentations.3. To capture your screen’s image so that it becomes part of your <strong>Flow</strong>!<strong>Works</strong> presentation clickon the New Screen Slidein the main toolbar and select Add Screen Slide from the menu.Capture ImagesImages can be captured from the computer and inserted into the presentation.1. Use the Switch Mode function to switch to your computer and find the image or documentthat you would like to capture. Once you found it switch back to <strong>Flow</strong>!<strong>Works</strong> .2. Click on the Image Capture button.3. Choose to capture the screen, region, or irregular shape.4. Select Import.5. Capture the image. Your cursor will become a plus sign.6. Choose the location where you would like the capturedimage and click and drag the image into yourpresentation.Manipulate an ObjectObjects can easily be moved, rotated, stretched, cloned, and grouped as well as many other things.1. Click on the Select button in the main tool bar.2. Swipe through the object to select it.3. Four boxes with different functions will appeararound the object.4. Click on each box to manipulate the picture.5. The bottom left box opens up a properties menulisting additional functions that can be done with theobject.© Copyright 2012 QOMO HiteVision, LLC. All Rights Reserved4
Record Your PresentationThe presentation can be recorded to show your screen, all annotations, and audio.To record and save for future presentations:1. During the presentation, click on the Record button in the main toolbarand select Recording.2. Click the Record button again and select Stop to end the recording session.3. To play back the video, select Broadcasting from the menu.4. To save this for future <strong>Flow</strong>! <strong>Works</strong> presentations, select Save from the menu.Note: This saves as a .dpb file and can only be played through the <strong>Flow</strong>! <strong>Works</strong> program.To record and save as an .avi file for sharing:1. Go to the Start menu, select Tools, and select the Screen Recorder .2. A Record Screen menu bar will appear. Click on the Record buttonwhich will begin recording your presentation.3. Click the Stop button to end recording. A Save As window will pop up.4. To playback the video, select the Play button.Save the PresentationFiles can be saved as a <strong>Flow</strong>!<strong>Works</strong> presentation.1. Go to or .2. Select Save or Save As.3. Give the presentation a name and click on the save button.Note: This saves in the .hht format. This format is only recognized by the <strong>Flow</strong>!<strong>Works</strong> software.Export the FileFiles can be saved as an image file, PowerPoint, HTML, PDF, and DOC to make it easy to share yourpresentation with other people who don’t have the <strong>Flow</strong>!<strong>Works</strong> software.1. Go to or .2. Select Export from the menu.3. Choose the desired format.© Copyright 2012 QOMO HiteVision, LLC. All Rights Reserved5