FV-Benz-172 installation manual_ver.1107020 - TradeKey
FV-Benz-172 installation manual_ver.1107020 - TradeKey
FV-Benz-172 installation manual_ver.1107020 - TradeKey
- No tags were found...

You also want an ePaper? Increase the reach of your titles
YUMPU automatically turns print PDFs into web optimized ePapers that Google loves.
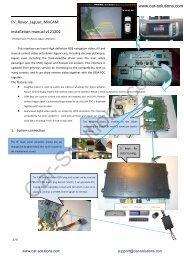
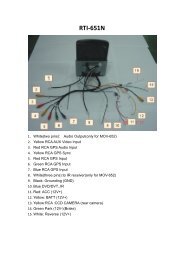
The audio has 2 ways of output, one is by the small speaker, which gives the sound independently, the other is use the stereo audio output, and usethe car’s AUX input, the second way is good when there is a USB disk connected to the navi module, the ARM CPU inside can play MP3/MP4/MP5 fileswith 8G USB reading capability.Operations• When the interface box is firstly installed inside a car, it needs to be touch calibrated: pull the SD card out of themodule, and power on the interface box and goes to the RGB input, then we see a cross on the screen.‐‐>Click on the cross till it disappears, then the computer knows the physical property of coordinates, and all useroperations can go on smoothly.• After the calibration, the installer needs go to the “Setup” of the navi‐computer:The installer needs go tothe “Setup”Inside the Settings, we can:• “ Navigation set ”, we can set the route of thenavigation file。• “General Settings”,we can se the language to beEnglish or other 10.• “Touch Screen” we can calibrate the touch screenagain.• “Screen”,we can adjust the brightness/ Contrast ofthe RGB output.• When customer’s dedicated navigation software is used, it should be set in the“Navigation Setup” menu. Like this picture is showing here.• Then the installer can go back to the main screen, and click on the Navigation icon to start thatfunction.User can also click on “Entertainment”, to play themultimedia files inside the SD/USB card.。Note: the navigation GPS uses Com2, baud rate at 9600bps。Firmware update of the navigation computer.The navigation computer already been tuned before shipped, the installer can update the firmware. Most installer change the resolution of the totalcomputer module. From normally 480X234 of NTSC. to be HD of 800X480.The installer can contact Fosp’s resellers for a zip file(480234.rar or 800480.rar)unzipone of them into the empty SD card, and power on the module, then the software can be flashed4 / 6
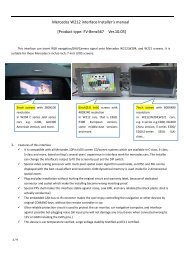
like the steps below.1、Copy the unzipped file onto the Root directory of the SD card like the picture here,do not modify any file name.2、insert this SD card onto the navigation module, and power on it. Then the flashing process starts automatically.3、when flash is over, the touch calibration cross will be shown, then the installer can take outthe SD card, and insert the map SD card, and starts the calibration and normal functions.6. CTRL portThere is a 8‐pin extra CTRL port on the interface, which the installer does not need to use in normal situation. For experienced users, this portmay be used to get extra functions.Pin 1,2 +5V output voltage for sound‐switch‐relay, when AV1 is selected=5V, 0V when AV2 selected. Max 3A.3: Constant +5V Max .2A4,8 Ground5: Dedicated control bus for camera。 Should not be connected to GND, otherwise CPU will halt.6:7 +5V output when in interface mode, 0V when in Car mode.Note2:There is a gray wire between the can box and interface box, which is used to deliver control data, so that multimedia icons will pop out and beexecuted. This wire can also deliver terminal‐mode control data. So a 3 rd party computer can control this interface.[ terminal mode like: to directly go toRGB input, to AV1 input, AV2 input,reverse camera input], to get the full implementation of fosp interface terminal mode operations, please contactfosp sales people.4. ParametersNo. name parameter1 RGB video amplitude 0.7Vpp with 75 ohm impedance2 sync amplitude in RGB‐navi port 3~5Vpp with 5K ohm impedance,Sync should be NTSC composite with negative polarity.When VGA is in, put Hsync and Vsync together by XOR(74HC86).3 Av1,Av2, cam video amplitude 0.7Vpp with 75 ohm impedance4 Av1,Av2, cam standard NTSC/PAL/SECAM automatic switch56 Normal work Power consumption 2.4W [0.2A @12V]7 Standby current < 5mA8 Standby start 10 seconds after the users switch off the CD unit.9 Reverse trigger threshold >5V trigger10 Work temperature ‐40 ~ +85C11 dimensions 15.6 X 9.2 X 2.2 Cm5 / 6
7. other related products.(1) the interfaces<strong>FV</strong>‐<strong>Benz</strong>5672011year before C,GLK,E,Sand many other benz models,use this connector for video.The <strong>Benz</strong>567 fits them all.<strong>FV</strong>‐<strong>Benz</strong>‐221:The 2011 year <strong>Benz</strong> S classstarts with 4P video like A<strong>172</strong>but with different data format.The <strong>FV</strong>‐<strong>Benz</strong>‐221 fits it.(2) <strong>Benz</strong> C180,C200 replacing monitor:FOSP has a specific monitor for the Mercedes C class, it uses 6‐inchhigh definition LCD(with navigation, reverse video and DVD inside) to replace the original 5inch LCD(it hasonly display of the car air con data and radio data. ), while keeping all mechanical dimension and sizes to bethe same, and <strong>installation</strong> connectors the same.The replacing monitor keeps all the original data the same, and displayed on the big monitor althoughit is replaced.(3) The FOSP’s GLK replacing monitor has the same feature as above.(3)Mercedes RSE monitor.Fosp’s RSE monitor can convert the car original LVDS signal into RSE signal, one extra video can also be displayed.6 / 6