Dension audio video router installation guide - GSM Server.com
Dension audio video router installation guide - GSM Server.com
Dension audio video router installation guide - GSM Server.com

Create successful ePaper yourself
Turn your PDF publications into a flip-book with our unique Google optimized e-Paper software.
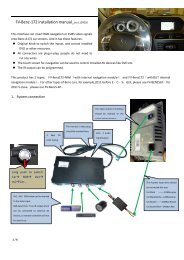
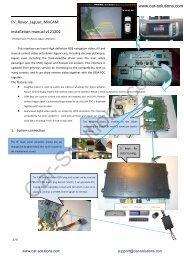
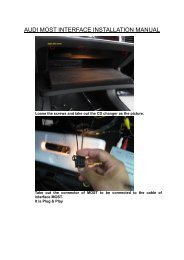
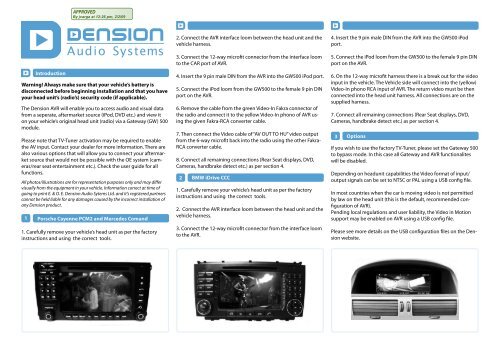
1IntroductionWarning! Always make sure that your vehicle’s battery isdisconnected before beginning <strong>installation</strong> and that you haveyour head unit’s (radio’s) security code (if applicable).The <strong>Dension</strong> AVR will enable you to access <strong>audio</strong> and visual datafrom a seperate, aftermarket source (iPod, DVD etc.) and view iton your vehicle’s original head unit (radio) via a Gateway (GW) 500module.Please note that TV-Tuner activation may be required to enablethe AV input. Contact your dealer for more information. There arealso various options that will allow you to connect your aftermarketsource that would not be possible with the OE system (cameras/rearseat entertainment etc.). Check the user <strong>guide</strong> for allfunctions.All photos/illustrations are for representation purposes only and may differvisually from the equipment in your vehicle. Information correct at time ofgoing to print E. & O. E. <strong>Dension</strong> Audio Sytems Ltd. and it’s registered partnerscannot be held liable for any damages caused by the incorrect <strong>installation</strong> ofany <strong>Dension</strong> product.Porsche Cayenne PCM2 and Mercedes Comand1. Carefully remove your vehicle’s head unit as per the factoryinstructions and using the correct tools.2. Connect the AVR interface loom between the head unit and thevehicle harness.3. Connect the 12-way microfit connector from the interface loomto the CAR port of AVR.4. Insert the 9 pin male DIN from the AVR into the GW500 iPod port.5. Connect the iPod loom from the GW500 to the female 9 pin DINport on the AVR.6. Remove the cable from the green Video-In Fakra connector ofthe radio and connect it to the yellow Video-In phono of AVR usingthe given Fakra-RCA converter cable.7. Then connect the Video cable of “AV OUT TO HU” <strong>video</strong> outputfrom the 6-way microfit back into the radio using the other Fakra-RCA converter cable.8. Connect all remaining connections (Rear Seat displays, DVD,Cameras, handbrake detect etc.) as per section 4.2BMW iDrive CCC1. Carefully remove your vehicle’s head unit as per the factoryinstructions and using the correct tools.2. Connect the AVR interface loom between the head unit and thevehicle harness.3. Connect the 12-way microfit connector from the interface loomto the AVR.4. Insert the 9 pin male DIN from the AVR into the GW500 iPodport.5. Connect the iPod loom from the GW500 to the female 9 pin DINport on the AVR.6. On the 12-way microfit harness there is a break out for the <strong>video</strong>input in the vehicle. The Vehicle side will connect into the (yellow)Video-In phono RCA input of AVR. The return <strong>video</strong> must be thenconnected into the head unit harness. All connections are on thesupplied harness.7. Connect all remaining connections (Rear Seat displays, DVD,Cameras, handbrake detect etc.) as per section 4.3 OptionsIf you wish to use the factory TV-Tuner, please set the Gateway 500to bypass mode. In this case all Gateway and AVR functionaliteswill be disabled.Depending on headunit capabilities the Video format of input/output signals can be set to NTSC or PAL using a USB config file.In most countries when the car is moving <strong>video</strong> is not permittedby law on the head unit (this is the default, re<strong>com</strong>mended configurationof AVR).Pending local regulations and user liability, the Video in Motionsupport may be enabled on AVR using a USB config file.Please see more details on the USB configuration files on the <strong>Dension</strong>website.
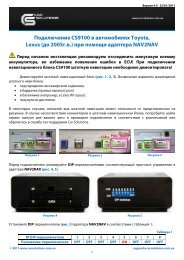
4Aftermarket connectionsMOSTringGateway 500USB<strong>Dension</strong> AVR <strong>installation</strong> <strong>guide</strong>GWVIDEO INREVERSECAMERARight (Red)Centre (White)Left (Yellow)+12V switched poweroutput for camerasRSEScreen & AudioAV OUTTO RSEAV IN 2MOSTringHead UnitRadioAV OUTTO HUAVRIROptional IR eyeiPodiPod+12V Power inAV IN 1DVD PlayerOptinal Externalremote(White, Yellow)Reverse Geardetect (Green)Handbraketrigger(Red/White)CAROptional remote control to DVD(Yellow, Blue)Optional +12V switchedpower output for DVDAV out to HU: Connects to the Video input on the OE head unit.Audio outputs are left unconnected in case of Gateway 500.Video In: The original <strong>video</strong> signal from factory TV-Tuner or factoryrear view camera is connected here. This signal is routed to thehead unit when the Gateway is in Bypass mode.AV out to RSE: This is an output for rear seat entertainment, i.e.an extra screen. This is to be connected as per the manufacturer’s<strong>guide</strong>lines. The input can alternate between DVD, iPod and AUXinputs.Handbrake trigger: This must be connected to the control switchof the handbrake (a relay may be required if the switch has apositive trigger).Reverse Camera: This camera <strong>video</strong> input allows three aftermarketcameras to be connected to your OEM system. If one camera isused, the connector labelled as Center is used. In case of BMW onlyone camera is supported.Need more help? Visit www.dension.<strong>com</strong>/supportReverse Gear detect: If rear view cameras are connected usuallythe AVR can detect reverse gear through CAN bus. In this case thiswire is left unconnected.If for some reason the reverse gear cannot be detected this wireshould be connected to the reverse gear switch (positive trigger).AV IN 1 input: Allows you to connect an aftermarket DVD sourceto the OEM system. The connections consist of an Audio Left /Right with a Video input. An IR remote output is available if youraftermarket equipment supports this.Optional IR eye: Enables you to control a DVD player via theoriginal remote control (model specific).AV IN 2 input: Allows you to connect any media source with<strong>com</strong>posite <strong>video</strong> output to your vehicle’s OEM system, for examplea digital camera or a gaming console. Connections: Female phonoAudio Left / Right with a Video input.AVR-9202-2