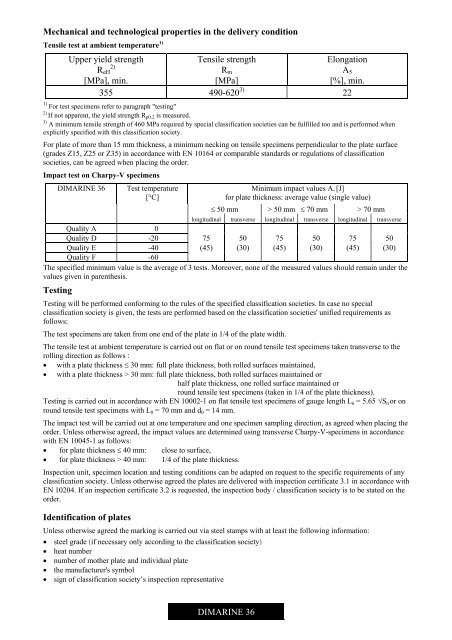
Mechanical and technological properties in the delivery conditionTensile test at ambient temperature 1)Upper yield strength2)R eH[MPa], min.Tensile strengthR m[MPa]ElongationA 5[%], min.355 490-620 3) 221) For test specimens refer to paragraph "testing"2)If not apparent, the yield strength R p0.2 is measured.3) A minimum tensile strength of 460 MPa required by special classification societies can be fulfilled too and is performed whenexplicitly specified with this classification society.For plate of more than 15 mm thickness, a minimum necking on tensile specimens perpendicular to the plate surface(grades Z15, Z25 or Z35) in accordance with EN 10164 or comparable standards or regulations of classificationsocieties, can be agreed when placing the order.Impact test on Charpy-V specimensDIMARINE <strong>36</strong>Test temperature[°C]Minimum impact values A v [J]for plate thickness: average value (single value)≤ 50 mm > 50 mm ≤ 70 mm > 70 mmlongitudinal transverse longitudinal transverse longitudinal transverseQuality A 0Quality D -20 75 50 75 50 75 50Quality E -40 (45) (30) (45) (30) (45) (30)Quality F -60The specified minimum value is the average of 3 tests. Moreover, none of the measured values should remain under thevalues given in parenthesis.TestingTesting will be performed conforming to the rules of the specified classification societies. In case no specialclassification society is given, the tests are performed based on the classification societies' unified requirements asfollows:The test specimens are taken from one end of the plate in 1/4 of the plate width.The tensile test at ambient temperature is carried out on flat or on round tensile test specimens taken transverse to therolling direction as follows :• with a plate thickness ≤ 30 mm: full plate thickness, both rolled surfaces maintained,• with a plate thickness > 30 mm: full plate thickness, both rolled surfaces maintained orhalf plate thickness, one rolled surface maintained orround tensile test specimens (taken in 1/4 of the plate thickness).Testing is carried out in accordance with EN 10002-1 on flat tensile test specimens of gauge length L 0 = 5.65 √S 0 or onround tensile test specimens with L 0 = 70 mm and d 0 = 14 mm.The impact test will be carried out at one temperature and one specimen sampling direction, as agreed when placing theorder. Unless otherwise agreed, the impact values are determined using transverse Charpy-V-specimens in accordancewith EN 10045-1 as follows:• for plate thickness ≤ 40 mm: close to surface,• for plate thickness > 40 mm: 1/4 of the plate thickness.Inspection unit, specimen location and testing conditions can be adapted on request to the specific requirements of anyclassification society. Unless otherwise agreed the plates are delivered with inspection certificate 3.1 in accordance withEN 10204. If an inspection certificate 3.2 is requested, the inspection body / classification society is to be stated on theorder.Identification of platesUnless otherwise agreed the marking is carried out via steel stamps with at least the following information:• steel grade (if necessary only according to the classification society)• heat number• number of mother plate and individual plate• the manufacturer's symbol• sign of classification society’s inspection representativeDIMARINE <strong>36</strong>
Fabrication propertiesThe entire fabrication and application techniques are of fundamental importance to the reliability of the products madefrom this steel. The fabricator should ensure that his calculation, design and fabricating methods are aligned with thematerial, correspond to the state-of-the-art that the fabricator has to comply with and are suitable for the intended use.The customer is responsible for the selection of the material. The recommendations in accordance with EN 1011 shouldbe followed accordingly. For more precise information see also the latest version of DIMARINE Technical Informationof Dillinger Hütte GTS.FormabilityCold formingAs a rule, but depending on the actual processing type, DIMARINE <strong>36</strong> has excellent cold forming properties, i.e.forming at temperatures below 580 °C, because of the high toughness. It should be noted that cold forming raises theyield stress and decreases the toughness. Normally, these changes in mechanical properties can be partially recoveredby a subsequent stress-relieving heat treatment. In case of higher cold forming ratios it is advisable to consult the steelmanufacturer prior to placing the order.Hot formingHot forming, that means forming at temperatures above A C3 , leads to essential changes in the original microstructure. Itis impossible to re-establish the same material properties that had been achieved during the original manufacturethrough a further heat treatment. Therefore a heat treatment above 580 °C is not allowed.Weldability and flame cutting aptitudeDIMARINE <strong>36</strong> has excellent weldability and flame cutting aptitude if the general technical rules are observed (see EN1011). The risks of cold cracking and HAZ hardenability are low. Therefore, generally regardless of plate thickness,preheating is not necessary for flame cutting and welding. The low content of carbon and other alloy elements leads tofavourable toughness properties in the heat-affected-zone, even for welding with high heat inputs. For special flamecutting requirements as i.g. long parallel cuts inner of the plate (cutting of lamellae), DIMARINE <strong>36</strong> can be delivered inan optimized condition in order to minimize the cambering deformations.Heat treatmentNormalizing is not permitted for TM-steels.A stress-relieving should be carried out between 530 and 580 °C followed by cooling in still air. The total holding timeshould not exceed 150 minutes (even if multiple operations are carried out). For a holding time of more than 90minutes, the lower limit of the temperature range should be aimed at. A heat treatment at higher temperatures mayaffect the mechanical properties.Flame straighteningFlame straightening is possible but should be carried out taking into account special working procedures (seeDIMARINE Technical Information 1/92 of Dillinger Hütte GTS). Generally, a working temperature of 950 °C in thecase of purely superficial heating (line heating) and 700 °C in the case of heating of the full plate thickness shall not beexceeded.General technical delivery requirementsUnless otherwise agreed, the general technical delivery requirements in accordance with EN 10021 apply.TolerancesUnless otherwise agreed, tolerances are in accordance with EN 10029, with class B for thickness (lower tolerance:-0.3 mm).Surfaces qualityUnless otherwise agreed, the provisions in accordance with EN 10163, class A2 are applicable. Stricter surfacerequirements can be arranged when placing the order.General noteIf particular requirements are demanded and not covered in this material data sheet, please contact us with thespecifications for our review and agreement prior to ordering.The indications in this data sheet are product descriptions. This data sheet is updatedif necessary. The latest version isavailable from the mill or as download at www.dillinger.de.DIMARINE <strong>36</strong>


