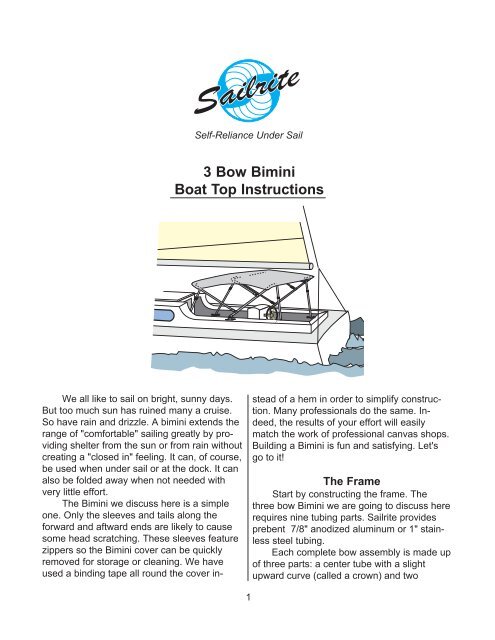
3 Bow Bimini Boat Top Instructions - Boat Design Net
3 Bow Bimini Boat Top Instructions - Boat Design Net
3 Bow Bimini Boat Top Instructions - Boat Design Net

Create successful ePaper yourself
Turn your PDF publications into a flip-book with our unique Google optimized e-Paper software.
3 <strong>Bow</strong> <strong>Bimini</strong><strong>Boat</strong> <strong>Top</strong> <strong>Instructions</strong>We all like to sail on bright, sunny days.But too much sun has ruined many a cruise.So have rain and drizzle. A bimini extends therange of "comfortable" sailing greatly by providingshelter from the sun or from rain withoutcreating a "closed in" feeling. It can, of course,be used when under sail or at the dock. It canalso be folded away when not needed withvery little effort.The <strong>Bimini</strong> we discuss here is a simpleone. Only the sleeves and tails along theforward and aftward ends are likely to causesome head scratching. These sleeves featurezippers so the <strong>Bimini</strong> cover can be quicklyremoved for storage or cleaning. We haveused a binding tape all round the cover in-stead of a hem in order to simplify construction.Many professionals do the same. Indeed,the results of your effort will easilymatch the work of professional canvas shops.Building a <strong>Bimini</strong> is fun and satisfying. Let'sgo to it!The FrameStart by constructing the frame. Thethree bow <strong>Bimini</strong> we are going to discuss hererequires nine tubing parts. Sailrite providesprebent 7/8" anodized aluminum or 1" stainlesssteel tubing.Each complete bow assembly is made upof three parts: a center tube with a slightupward curve (called a crown) and two1
"hockey stick" shaped pieces of tubing (calledlegs). These three tubing sections are joinedtogether with short tubing "splines" that slideinto the sections. (More about this latter.)Two of these bows will have long legsand one will have somewhat shorter legs.The bows should be assembled as shown inFigure 1. The short bow should be secured tothe aft long bow. This keeps the jaw up whenfolded aft. It should be mounted on two slidingjaws so that it supports the center of the<strong>Bimini</strong>. And it should be designed so that itfolds neatly in between the other two bows sothat the frame can be compactly stowed whennot in use.All fittings are illustrated in Figure 2. Theyare secured in place with set screws. Thismakes the assembly of the frame quitestraightforward.Before cutting any of the frame pieces,make a trip to the boat and determine howhigh and how wide and how long the finished<strong>Bimini</strong> should be. This is also when youshould decided where the mounting points ofthe support straps will be. I like to take theframe with me and tape it in place on the boatwhile making these measurements. You maywant to wait to actually cut the frame in amore comfortable environment, but it helps totemporarily support the full size frame in placeon the boat to approximate how it will lookand feel when it is finally fitted. Ideally, the<strong>Bimini</strong> will permit one to stand in the cockpitand look out under the edge of the fabricwithout having to stoop. But be sure that the<strong>Bimini</strong> is not so tall that the free movement ofthe boom across the boat is inhibited. Alsomake sure the placement of the pivot pointwill not interfere with winch handles, fairleadsetc.When you are finished, you should havea measurement for the proper width of theframe at the base of the legs, for its heightfrom the plane of the leg base to the plane ofthe fabric cover, and for the length of thecover from the front bow to the back bowmeasured at the center of these two bows.Armed with these measurements, preparea frame using two by fours. Place theframe side boards on center just the desiredwidth of the bimini frame at its base. Theyshould be about two feet longer than theoverall length of the <strong>Bimini</strong>. Such a boardframe is illustrated in Figure 3. If the <strong>Bimini</strong>uses side mounts instead of flat, mount ablock of wood centered along each length ofthe wood frame or put the side rails on edge.Screw the mounting plates in place on theframe at the proper width (see Figure 4).The prebent frames that Sailrite provideswith bimini kits can be reduced in height andin width. Height changes are very easy tomake — simply cut away any excess heightfrom the base legs of the longest bow. Then2
make sure that the shorter bows nest properlyagainst the long one. This usually meanscutting a similar length from their legs.Changes in width are a bit more complicated.The crowned center bows on all legsshould be cut an appropriate amount fromeach end in order to keep the crown properlycentered. Follow the procedure below todetermine the amount to cut:1. Put the assembled bows flat on the floor andmeasure across their (uncut) base.2. Add 6 inches to the desired width of the finishedbimini bows if they are aluminum. Add 2 inches tothis width if the bows are stainless. This meansthat the bows will be compressed (more or lessdepending upon whether aluminum or stainless isused). This compression will keep the framesfrom rattling in their mounts when under way withpower.3. Subtract the desired width (plus the 6 inch or 2inch compression allowance above) from theactual width measured in step one.4. Divide this result by 2 and cut that length fromeach end of the "crowned" tubing. When youreassemble the bows, they should measureeither 6 or 2 inches wider than the desired widthat the bottom of the legs.When your frame is the desired widthcheck to make sure that the center piececurve is "up". With each bow lying on a flatsurface, lock the assemblies in place.If the tubing is aluminum, self tappingscrews are normal for this task. Use a 5/32nds inch drill bit to make pilot holes oneinch or so from the joints where the framepieces meet. Drill through both the framepiece and the spline tubing. Drill up from thebottom of the frame so that, when the #10self-tapping screw is inserted, its head willnot abrade the fabric cover on the top surfaceof the frame (Figure 5). A center punchcan be used to create a "dimple" to makedrilling more accurate.With stainless bows, self taping screwssometimes break. We recommend that a#21 drill bit be used to open the hole andthat the tubing be tapped. Use a 10-32 tapand, of course, a 10-32 stainless machinescrew.Install the fittings on the legs and assembleyour frame to the mounting plates onthe wooden frame. Use tape (filament strappingtape works very well) to support theframe at the proper spread and height (Figure4). Tape the frame carefully so it is quiteridged. Double check your measurementsmaking sure the fore and aft bow are at theappropriate height and that the center bow isslightly higher (3" or so) than the other two.When the frame is installed, you maywant to use blue Loctite ® to keep the screwsfrom working loose.Making a PatternWith your frame securely anchored andtaped, the fabric cover can be patterned. Welike to make patterns with basting tape and alight weight clear plastic material. Begin byapplying filament tape to the surfaces of thebows that define the flat planes of the fabriccover (this means the top of the middle bowand the surfaces opposite the legs on the foreand aft bows). Now put basting tape on top ofthe filament tape. DO NOT put the bastingtape directly on the frame since it is very hardto remove — the filament tape, on the otherhand, can be peeled right away removing thebasting tape at the same time.Put a mark at the center of each bow.Now drape your pattern material over the4
a forward and an aft pattern.Mark the patterns at the bows on oneside where the bimini cover should stop (See"Side marking" in Figure 6 ). It is important tokeep the cover beyond the bend in the frameto prevent it from riding up over the curve.Measure up from the floor or the frame andtransfer these marks to the other side of eachbow. Do this for both patterns.We like to raise the side marking at themiddle bow about 3 inches. This gives the topa more graceful appearance. But it is normalto make the bottom edge of the cover straightfrom bow to bow. If there is a curve it shouldbe an upward hollow to prevent flapping.Before removing the pattern make sureeach panel is labeled outside, inside, fore,aft, and center line.Remove the pattern material. Add a 1/2-inch seam allowance to the forward and aftedges of each pattern. Connect your sidemarks with a straight line (or with a slighthollow as discussed above). Cut out thepatterns. They should look somewhat asshown in Figure 8.exposed basting tape on two bows, i.e., overthe forward and center bows or the aft andcenter bows. Then, starting at the center ofeach bow, smooth the pattern material downonto the basting tape working toward theouter edges.Once you have the material as smooth aspossible put a line on top of the middle bow andalong the surface opposite the legs of the foreand aft bows. This line will define each pattern(Figure 7). With a three bow frame there will beThe Fabric CoverNow lay the patterns on the bimini fabric.They should be oriented on the thread line ofthe fabric down its length.With the fabric under your pattern (Figure9 ) mark all the edges with chalk or pen orpencil. Cut the panels with a "hotknife" ifpossible (a soldering iron or gun works quitewell) to prevent raveling. A scissors may alsobe used since all edges will be covered.Label the cut fabric panels, fore, aft, inside,outside and center line as was done on thepattern material.Should any portion of the pattern extend beyondthe width of the 46 inch fabric (this may happenif the spread between any two bows is greaterthan 40 inches), fabric will need to be added tothose areas. Cut this fabric from the scrap5
aft endFigure 8Cut lines for front and rear are dashed.Cut lines for sides are solid.fore end½" seamallowanceforward patternaft patterncenterlinefore endFigure 9<strong>Bimini</strong> Panels marked onfabric blankcenterlineaft end46”forward patternaft patternunused fabricfor sleevesto the edge. Also place 6 match up marks onboth the bimini panels and the sleeves—3 toeach side of the center line (see Figure 10).Space these marks at equal intervals from thecenter line so they will be useful even thoughsome sleeve layers will be turned end for endbefore attachment. These will insure that thesleeves can be sewn in place accurately alongtheir length.Create the forward sleeve in the samemanner but use the forward end of this panelinstead of the aft end to pattern this sleeve.Cut out the sleeves with a hotknife orscissors. Mark the sleeves “inside” and “fore” or“aft” to guide work in subsequent steps.Webbing straps will be used to pull forwardand aft on the frame. These straps are runaround the tubing usually just inside the curveson the bows. Mark 2 1/2-inch semicircles on thesleeves at each of these strap locations. Cutout these semicircles in the sleeves and covertheir raw edges with binding tape to preventraveling.“Tails” are placed at the forward and aftends of the cover. These are narrow strips offabric that serve two functions. First, they tendto keep rain or spray from wicking back alongthe underside of the top to drip on those undercreatedabove and sew it to the appropriateareas. A simple overlap of 1/2-inch with two rowsof stitching is all that is needed to join thesepieces since they will be on the sides of thebimini. Use the longest straight stitch yourmachine will make since that reduces the naturaltendency for the acrylic material to pucker as it issewn.Next cut the sleeves that are used tosecure the cover to the frame. There will betwo long sleeves along the forward and aftedges of the top. These sleeves should be cutfrom the unused portion of the cloth blank.They will be 5 inches wide and reproduce thecurves found along the aft end of the aftbimini panel and the forward end of the forwardbimini panel.Place the aft end of the aft bimini panelover one of the long edges of the unusedfabric so that its curve can be marked on thefabric and then move it up 5 inches and markthe curve onto the fabric again as shown inFigure 10. Now mark the corners of the sleevesso they will be about 1 1/2-inches short of theedges of the bimini panels on each side. Thismakes binding the outer edge of the biminieasier and it tends to give the finished side ofthe bimini a less constrained appearance thanwould be the case if the sleeves ran all the way6
Figure 10Patterning the Aft Sleeve5" Mark cornersFigure 11Patterning the Tail(Make 2)3"Mark corners1 1/2” from sidecenterline6 Match-up marksMark edge of top coveron cloth blankWrite "inside/rear" on the5" sleevecenterlineTransfer same match-up marksfrom cover to cloth blankMark edge of top coveron cloth blank6"RadiusMark corners(Make 2)Mark cornersWrite "inside/rear"on the 3" tailEdge of top coverFigure 12Cover Pieces Shownwebbing straplocationsTailsSleeve Sleeve Tailsneath it. Second, they provide a handy flap towhich additional covers or curtains can be attached.Proceed just as you did when cutting thefore and aft sleeves except make the tails 3inches wide (Figure 11). Be sure to transfer thesame match up marks to the tails. And also markthe tails with the “inside” and “fore" or "aft" legend.When cutting the tails, make sure that theyare long enough to reach the side edges of yourtop (unlike the sleeves which are intentionallyshort).The inside corners of the tails should berounded with a radius of about 6 inches (Figure11). This radiused edge is for appearance only— it is the edge that will be outermost on thefinished cover.Figure 13Semi-Flat Felled Seam7
Duplicate each tail. The tails will be doubledto stiffen them. Figure 12 shows all the piecesyou should have at this stage.Sewing the <strong>Bimini</strong>Join the panels that will make up thecover together with a blind or "semi-flat feld"seam (Figure 13). This seam is not so waterproofas a flat feld one, but these seams willrun right over the bows so there will be notendency for water to pool over them. Do yoursewing with a row of the longest possiblestraight stitches.The semi-flat feld seam is formed bylaying the fabric "topside" to "topside" withtheir edges flush and running a straight stitchjust 1/2-inch inside those flush edges. Thenthe top panel is folded out and the 1/2-inchseam allowance is folded back against one orthe other side where it is secured in place witha "topstitch" a row of straight stitches 1/4-inchor so from the fold in the joined pieces.Joining these pieces will often requireforcing a curve that goes one way back over acurve that goes the other way. Accuracy isvery important so we suggest that doublesided basting tape be used whenever possible.It may also be helpful to have a staplerhandy to provide extra strength at crucialplaces — just be sure to remove the stapleswhen sewing is complete. Just in case thebasting does not hold, it is a good idea to startall sewing from the center of seams and workout to the edge of the assembly first one waythen the other. If there is any inaccuracy withthis procedure it will be limited to just half ofthe seam.First sew together the "primary panels"that make up the bimini. After sewing thesepanels together they will no longer lay flat onthe floor because of the shape imparted bythe seam (or seams in the case of 4 bowbiminis).Next turn to the sleeves. Place a 1/2-inchhem along the inner edges of both sleeves.Fold the hem toward the inside surface of thesleeves so they will be underneath when thesleeves are attached. These hems willtraverse curves which may make relief cuts inthose curved sections necessary to keepthem flat. After the hem is sewn, cover theshort length across the ends of the sleeveswith binding tape to prevent raveling.Secure two finished zippers to eachsleeve along their inner and "inside" edges(Figure 14) so the zipper tapes will be insidethe sleeve when it is secured to the undersideof the top We like to use two zippers so thecover can be zipped in place starting from thecenter and working outward toward each side.If they are too long simply cut the excess fromthe end that is last to close. Cut three or fourteeth from the waste. Insert this short segmentbetween the final few teeth. Then meltthese teeth together to form an effective stopfor the slider. Do this for both sides of the8
zipper.Separate each zipper before beginningthe work. Either side, that is the one with thezipper tab or the one without, can be installedalong the sleeve but be consistent withall four zippers (although this is a minorconcern). Sew the zippers to the hem on theinside of the sleeve with the teeth flush to thehem on the edge so that the zipper teeth willbe covered by the edge of the sleeve. Thezippers should close last at the cover's outeredge. This puts the slight bump that thesliders create on the edge where it does notmar the smooth shape of the rest of thecover. Sew the zipper tapes to the sleeveswith a row or two of straight stitches.Staple or use basting tape to secure thetwo parts of the tails together. Make sure thatthe match up marks show on the inside (underside)of the tail assemblies.One row of stitches will be used at thefront and the back of the cover to attach thetail assemblies and the sleeve assembliestogether with the primary fabric panels. Stackthese pieces in preparation for this stitchingas follows:1. Start with the primary panels flat on the floortop side up.2. Add the tails with their underside up (notethat this will show the matchup marks). Thecurves along the edge of the tails should bequite similar to the curve on the primarypanels.3. Then place the sleeves on top of the tailswith the "inside" surface up (this is the sideof the sleeves with the zipper tapes) and thefore and aft edges flush. Once again, thecurves should match nicely and match upmarks should be visible (Figure 15).Baste or staple (or both) everything inplace carefully. Sew along the fore and aftedges of the bimini securing all four layerstogether with a 1/2-inch seam allowance.Remove staples if there are any since theywill rust badly if left in place. Open the sleeveand tail sections. With these sections held outof the way, topstitch the seam allowance toTailZippertapeOutsidetopsurfaceFigure 15ZippertapesupFigure 16(Underside of cover)RearCenterLineTail4" 18" 18" 4"Do not sew thesesections of thezipper tape downSew the 3assemblies togethermaking sure thematch up marksare alignedZippertapethe primary panels in the cover. In otherwords, run a row of straight stitches about 1/4-inch or so from the initial stitch on the sideof that stitch that is toward the center of thecover.Return to the fore and aft sleeves. Firstjoin the zipper halves together if they are notalready complete. Turn the sleeves under therest of the cover so their inside surface isfacing the underside of the cover. Mark theedge of the zipper tape on the cover with apencil. It is enough to place a mark everythree or four inches. Then duplicate those9
marks one-half inch closer to the edge of thebimini. Use these new marks to position thezipper before sewing it. The slight "bubble" inthe sleeve that results allows for the insertionof the frame tubing. Use basting tape to holdthe free edge of the zipper tape flat againstthe cover. Then sew that edge of the zipper tothe top with a single row of stitches. Keep thestitch as straight as possible since it will bevisible on the top of the cover.The sleeve on the bow that supports anintermediate bow (this would include both thesleeves in a four bow frame) should be sewnwith two gaps in the stitching 2 to 4 incheswide 18 inches or so from the center line oneach side. These gaps will be used as exitpoints for the two "thin" 1 inch webbingstraps that run from the aft bow to the centerbow to hold it in place (Figure 16 ). Reverseover the stitches next to these access slits tokeep them from raveling.Run a binding tape all round the coverincluding the tails. Binding tape is prefoldedwith a crease in its center so it can be sandwichedover the edge that is to be protected.Either a straight or a zigzag stitch can beused to hold it in place. When finished, all rawedges should be covered.All that remains is the webbing straps.Four straps are used to support the <strong>Bimini</strong>.Two more are used from the "support" bow tothe intermediate bow (plus 2 more in the caseof a 4 bow frame) to hold them in position.These latter straps should be cut from 1 inch"thin" webbing 10 inches longer than twice thedistance from the rear sleeve to the centerbow. On one end of each strap, sew a 1 inchcam buckle into a small loop. Heat seal theother end so that it can be looped over thecenter bow and taken through the cam bucklefor proper adjustment (Figure 17 ).PHOTO 1PHOTO 2Fore & Aft Support StrapsThere will be two forward and two aft10
support straps. Build each one as follows. Cuttwo pieces (one 18 inches and the other 6inches long) from the 1 inch "thick" nylonwebbing. Use a hotknife or seal the ends witha soldering iron after cutting.With the webbing slider facing up (seePHOTO 1), thread approximately 1 1/2" ofone end of the 18 inch piece through theslider's larger opening. Permanently attachthe 18" piece to the slider by sewing thewebbing loop just created down against itself.(Straight stitches are suggested for all of themachine stitching on these straps.)Take the free end of the webbing and putone twist in it so that it does not lie flat (seePHOTO 2). When this is done the webbing willappear to have an open collar on the endopposite the slider. (This twist is done in orderto make the webbing lie flat when it is loopedaround the dodger frame.)Bring the free end of the 18" webbingunder the looped end and sew them together.There will be 3 thicknesses of webbing and theyshould be carefully secured using mediumsized stitches and sewing a Box "X". Be surewhen doing this to maintain the twist. (If yourmachine will not handle 3 layers of tubularwebbing, pull the free end back to where thewebbing is a single thickness and sew it inplace.)Now take the 6 inch piece of webbing andthread it through the small opening in the webbingslider. Secure it in place using the sameBox “X” stitch described above except in thiscase a twist in the webbing is not needed. Itshould be approximately 2 inches in lengthwhen finished (PHOTO 3). This loop of webbingserves as a release pull only.Cut another piece of the webbing to runthrough the webbing slider and down to thestrap eye on the boat. Use the measurementfrom where the strap will attach around theframe to where it will snap to the strap eye forits length (add from 6 to 12 inches). Perma-PHOTO 3PHOTO 4PHOTO 511
nently attach a snap hook to one end of thiswebbing by looping the webbing through thehook's rectangular opening and sewing thewebbing down against itself using a “Box X”straight stitch (PHOTO 4).Slide the square plastic loop-loc over theother "free" end and, then, loop the free end upfrom the bottom of the webbing slider throughthe large opening, over the slider's center dividerand down through the slider's smalleropening (PHOTO 5).This leaves the free end of the webbing ontop of the strap (between the frame and strapeye) where it can be used to tighten the strap.To keep the strap from flapping sew the looseend to the loop-loc (PHOTO 6).All that is left is to attach this webbingassembly to the frame. This is easily accomplishedby holding the open collar of the twistedloop on the 18" piece slightly above the outerside of the frame. Now bring the snap end of thewebbing strap up from behind the frame andpassing it through the collar. Pull the snap endto snug it in place. The resulting knot will looksomething like the knot on a man's tie (PHOTO7).Tightening this webbing strap is simply amatter of pulling on the long tail of webbing helddown by the small plastic loop-loc. Looseningthe webbing strap is simply a matter of pullingup on the short loop created from the 6" pieceof webbing. It works great!Congratulations—your <strong>Bimini</strong> is finished!PHOTO 6PHOTO 7If attaching the aft end of the bimini to the stern railinstead of to strap eyes on the deck, you canmake attachment loops with a 12” piece of webbingand a D ring. To do so pass one end of thestrap through the D ring, place a twist in it like inPHOTO 2 and sew it down to itself. Loop the straparound the stern rail and snap the snap hook tothe D ring. (Materials for this method are notincluded in the kit.)©2000Sailrite Enterprises, Inc.4506 S. State Rd. 9-57Churubusco, IN 46723Phone (260)693-2242Fax (260)693-2246800-348-2769email: sailrite@sailrite.comwww.sailrite.comAll rights reserved.Revised 8/1/02Y:\Page Maker Files\<strong>Instructions</strong>\<strong>Bimini</strong>3<strong>Bow</strong>.pmd12
Creating an Openingfor a BackstayOn some boats an opening is needed to accommodatea backstay that is very far forward. If anopening is needed in the aft edge, make a slit in thefabric after the aft sleeve and tail are complete. Coverthe edges of the slit with a length of binding tape orleather being sure to maintain the sleeve opening (ripstitches locally if necessary in order to keep thebinding continuous as much as possible).If leaks are likely to be a problem, the slit can beclosed off in one of two ways. A flap may be sewn toone side of the slit and a Velcro closure used tosecure its other side. And, if necessary, a twist lockfastener and a tab can be added to securely link theends of the slit together. See Figure 1.Or the slit can be closed off with a zipper. Sincethere is no extra material to provide for the zipperinstallation, we recommend cutting two 2-inch widelengths of tape (any piece of fabric which is slit iscalled a tape) from the scrap bimini fabric. Make themthree or four inches longer than the slits. This lengthcan include the sleeve or not depending upon personalpreference, but stitches in the sleeve assemblywill have to be ripped for a few inches in order tosecure the zipper tapes.Attach a zipper half to one edge of one tape so theteeth face in and the zipper tape is flush with one longedge of the fabric tape (see step 1). Then fold theassembly over so the zipper teeth are even with thefolded edge of the tape and sew this hem in place(see step 2). Do the same with the other zipper half.These tape assemblies, when complete, are attachedto each side of the slit with the zipper teeth up andaway from the slit edge — in other words, the tapesare sewn with their raw edges flush with the slit edgesand the zipper teeth up (see step 3). Now, fold thetapes over and under so the zipper teeth are matchedup opposite one another under the cover (see step 4).Before sewing, zip up the zipper and press the assemblyflat . Place a topstitch through the final hems tohold them in place. At the apex of the slit a triangle ofleather or vinyl or acrylic can be used to finish the cutand to provide a useful pull tab as well (see step 5).In some cases (especially with widely spaceddouble backstays), it may be better to cut openingsinto the sides of the finished <strong>Bimini</strong> top (parallel to theaft sleeve assembly). Because side openings areunder stress they should be closed off with zippers notflaps. Start the zipper at the edge so that it closes lastat the opening for the backstay.ADDENDUMS131. 2.3.4.Figure 9Detail of a Split Awning5.velcro tapeiiiiiiiiiiiiiiShould roughly be equalto enable proper match up<strong>Top</strong> stitchFigure 1opening for backstayopening for topping liftUsing Tapes to Cover Zipper SlitsSlitOther zipperhalf would gohereCut to allow foldPull tab
Installing a Window in a <strong>Bimini</strong> <strong>Top</strong>Plasti-Panewindow materialSecond row ofstitchesThere are no hard and fast rules regardingeither the proper size or the properplacement of windows in biminis. Use thewindow to check the trim of the main but keepit small enough so that the primary function ofthe bimini—the provision of shade is notimpaired.No attention need be given seamlocation when placing windows. Windows canbe placed squarely over seams but, if theycome in contact with the bimini frame, theywill be subject to scorching and cracking andsome form of protection will be necessary toinsulate the window material from the hotmetal.Start your work by cutting the vinylwindow material to whatever shape youdesire. Now place strips of seamstik bastingtape around the edges of the vinyl. Smooththe vinyl in place over the bimini fabric. It is agood idea to use staples at the four cornersof the window to make sure that it will notbreak free when you start your sewing.Sew all around the vinyl with a zigzagstitch between 1/8-inch to 3/16-inch long andwide. A zigzag stitch is desirable since itdistributes stress over a broader area, but astraight stitch can be used. As you approachthe staples at the corners, remove them.14When sewing around a window it is agood idea to break the task up. That is, don'tsew all the way around in one pass. Rathersew down one side at a time and try to sewparallel sides consecutively. For example, rollthe bimini from one edge and sew all alongthe closest window side. Finish the stitchingwith a short reverse stitch at the beginningand at the end. Then continue rolling thebimini to the other parallel window side andsew it. Now pull the bimini out from under themachine and roll it the other way sewing thelast two parallel window sides. This techniquemakes it easier to keep the window frombreaking loose from its basted position.Now cut out the acrylic bimini fabricunderneath the sewn window. To finish theraw edges simply sew acrylic binding tapearound the edges with two rows of zigzagstitches (use the binding tape like a trim, i.e.,sew it on flat verses sandwiching the edge).The lengthwise edges of this tape have beenturned under providing a finished look that willnot fray. If the window is rounded, it may benecessary to cut radius slits along therounded edges so that they will fold underproperly. Use seamstik basting tape to holdthe binding tape in place until it is sewn.Now flip the bimini over and sew thebinding tape around the edges of theplastipane under the bimini and your biminiwindow is complete!