K9-Eclipse Manual.p65 - car alarm
K9-Eclipse Manual.p65 - car alarm
K9-Eclipse Manual.p65 - car alarm

Create successful ePaper yourself
Turn your PDF publications into a flip-book with our unique Google optimized e-Paper software.
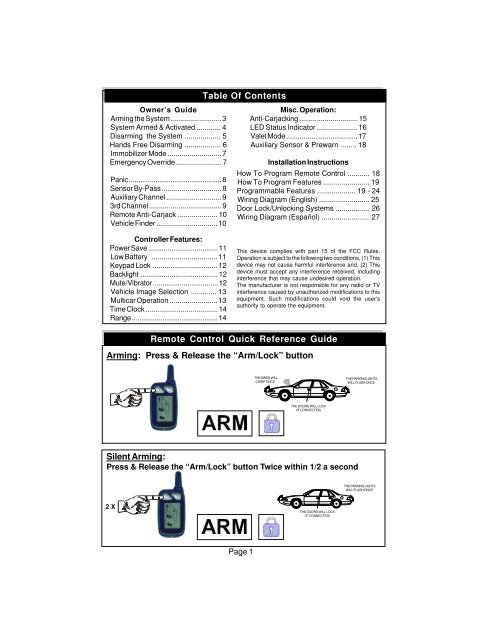
3) To Passively Arm: Turn ignition “Off”, Then close all doors.Automatic “Last Door Arming” is a programmable feature which allows the <strong>alarm</strong>to arm itself and, if desired, lock the doors upon arming.If on, anytime the ignition is turned off, and then a door is opened and closed:• The Siren will chirp once to confirm arming countdown has begun.• The LED Status Indicator will begin to flash rapidly.Thirty seconds later:• The siren will chirp & the lights will flash once.• The LED Status Indicator will begin to flash slowly.• The starter interrupt will engage.- The <strong>alarm</strong> is now fully armed. The doors will lock at this time, if programmed todo so, and if the vehicle is equipped.- The <strong>alarm</strong> can not Last Door Arm if a protected zone is open. Should a vehicledoor be opened during the arming countdown, the countdown will stop and startover again when the door is closed.AUTO REARM (programmable): Allows the Alarm to Rearm itself, 90 secondsafter it is Disarmed and a vehicle door is not opened.Regardless of method used to Arm the <strong>alarm</strong>, once Armed, the <strong>alarm</strong> will monitorall protected zones, and if an intrusion attempt is detected it will activate, or“trigger”.A trigger consists of the following:System Armed & Activated• The electronic siren, or optionally the vehicle’s horn, will start sounding.• The exterior parking lights will flash on and off repeatedly.An activation has a 30/60 second duration unless the <strong>alarm</strong> is disarmed using thecontroller or the Valet /Override switch. If all protected zones are secure at the endof the trigger, the system will stop and rearm itself to detect further entry attempts.If a protected zone is still open at the end of the trigger cycle, the <strong>alarm</strong> willcontinue to re-trigger itself for up to six activated cycles before it resets itself andignores the violated zone.Page 4
3) “Hands-Free” Disarming: This programmable feature allows thecontroller to automatically “Disarm” the unit whenever the controllercomes into close proximity to the vehicle.To Operate “Hands-Free” disarm:- This feature must be programmed “On” at the <strong>alarm</strong> unit.- The “Auto Transmit” feature must be enabled at the controller.The “AUTO” icon means that the “Hands-Free” feature is turned “On”at the controller.Enabling the “Hands Free”:Press the “Arm/Lock” button & “Button-5” at the same time.- The Controller will emit one beep- The “AUTO” icon will begin to flash, then stays on, once the <strong>alarm</strong> replys tothe controller.- The “ON” icon will appear until the <strong>alarm</strong> replys to the controller.Disabling the “Hands Free”:Press the “Disarm/Unlock” button & “Button-5” at the same time.- The Controller will emit 3 beeps- The “AUTO” icon will begin to flash, then turnsoff, once the <strong>alarm</strong> replys to the controller.- The “OFF” icon will appear until the <strong>alarm</strong>replys to the controller.Controller Activation Alert: If the <strong>alarm</strong> is disarmed, after it was triggered,using the controller, the controller will display the zone that last triggered it.The controller displays the “Trigger Zone” til the vehicle’s ignition is turned “On”.PrewarnSensorPage 6
Immobilizer ModeIf this mode is programmed “On”, the starter interrupt will remain engaged after the<strong>alarm</strong> is Disarmed, until the ignition is turned “On” and you enter your “Pin-Code”(1-12) using the Valet button. (Refer to programmable features)To Start Vehicle: .1. Disarm the <strong>alarm</strong>,2. Turn “On” the vehicle’s ignition3. Enter your “Pin-Code” by Pressing & Releasing the Valet Button a number oftime equal to your “Pin-Code”. (Pin-Code can be 1-12)4. The siren will chirp twice to confirm that you may now start the vehicle.(1-12)Step 1:Step 2:Step 3:Emergency OverrideWith the <strong>alarm</strong> in the armed condition, enter the vehicle via the driver'sdoor (be aware that the <strong>alarm</strong> will trigger when the door is opened).Using your key, turn the vehicle’s ignition to the "On" position.Within 20 seconds, enter your PIN code (1-12) by Pressing theValet/Override Switch.THEN WITHIN10 SECONDSFor Example: If your “Pin-Code” is 8, press valet switch 8 times. The triggered<strong>alarm</strong> will disarm one second after code is entered.IMPORTANT NOTE: If wrong code is entered, you must turn ignition “Off”,then “ON” again, to enter the Pin-Code again.Page 7
Remote Panic OperationShould it be needed in a threatening situation, or you feel the need to attractattention, the <strong>alarm</strong> can be triggered using the remote control. Your <strong>alarm</strong> features“Panic Mode”, which allows you to activate “Panic” from the “Arm/Lock”button.To Activate Remote Panic: Press & Hold the “Arm/Lock” Button,for 2 seconds, with the ignition “Off”.THE SIREN WILL SOUNDTHE PARKING LIGHTSWILL FLASHHold 2 secondsSensor By-passThe shock sensor & Prewarn zone can be bypassed using the remotecontrol. This may be useful in stormy weather.1) Arm the <strong>alarm</strong> by, Pressing & Releasing the “Arm/Lock” button.2) Press & Release “Button-3” twice within a 1/2 second.1. 2.Then2 X- The siren will chirp once to confirm sensor has been by-passed.- Upon Disarming the <strong>alarm</strong>, the sensor zone will reset.Page 8
The Auxiliary ChannelThe Auxiliary Channel may be used to operate an optional function. Possibilitiesinclude remote trunk release, remote <strong>car</strong> starting, or an on-demand remotewindow roll-up interface. Please see your Omega dealer for details onavailable options.To Activate the Auxiliary Channel:Press & Hold “Button-3” for Two seconds.Opperate Remote Start UnitOpperate WindowRoll-Up UnitOpen Electric TrunkHold 2 secondsNOTE: Depending on programing, activating the Auxiliary output will:- Disarm the <strong>alarm</strong> upon activating the Auxiliary channel.- Keep the <strong>alarm</strong> “Armed”, but bypass the trunk & sensor zones, until thevehicle’s trunk is closed again.- The Auxiliary Channel cannot be activated if the vehicle's ignition is "On".The 3rd Channel Auxiliary OutputThe programmable 3rd Channel may be used to operate an optional function,such as a remote start unit or an on-demand remote window roll-up interface.Please see your Omega dealer for details on available options.To Activate the 3rd Channel:Press & Hold “Button-4” for Two seconds.Opperate Remote Start UnitOpperate WindowRoll-Up UnitHold 2 seconds- The 3rd Channel can be programmed for “Remote Start” mode. This mode isfor use in conjuction with an optional “Starter” unit. It allows the vehicle to be“remote started” without triggering the unit, while still protecting the perimeter.- The 3rd Channel can also be programmed to Supply a (-) output when the unitis Armed to operate a Window Roll-Up module.- The Auxiliary Channel cannot be activated if the vehicle's ignition is "On".Page 9
Remote Anti-CarjackThe Anti-Carjacking mode can be activated using the controller.- Refer to “Anti-Carjacking” section of this manual for details.To Activate Remote Anti-Carjack:Press & Hold “Button-4”, For Two seconds, With the ignition “On”.Hold 2 secondsVehicle FinderThe “Vehicle Finder” feature allows the user to try to locate a “lost”vehicle in a parking lot.To Activate Remote Vehicle Finder:Press & Release “Button-4”, With the ignition “Off”.- The siren will emit a long chirp.- The vehicle’s parking lights will flash 8 times.NOTE: If the <strong>alarm</strong> was “Silently Armed”, the Vehicle Finder feature will onlyflash the parking lights, there will be no siren chirp.Page 10
Turning “On” Power Save:Controller Power Save:Press & Release “Button-5” & “Button-3” at the same time.- The controller will “beep” once.- The “On” icon will flash.NOTE: In the Power Save mode, the controller will “Go to Sleep” 2 minutesafter it is used to disarm the <strong>alarm</strong>, to conserve battery life.- The controller will emit 3 low beeps.- All icons will turn Off, only the “Off” icon will remain.-Once the controller “Goes to Sleep”, it can’t monitor the <strong>alarm</strong>’s functions,unless you press a button on the controller to temporarily “wake it up”.- The power Save mode can not operate if the <strong>alarm</strong> is set for “Hands-Free”operation.Turning “Off” Power Save:Press & Release “Button-5” & “Button-4” at the same time.- The controller will “beep” once.- The “Off” icon will flash.Controller Low Battery Indicator:When the battery level is low, the controller will emit 3 low chirps and the“BATT LOW” icon will appear. Please install a new battery at this time.To change the battery:1) Slide off the battery cover.2) Replace Battery. (“AAA” Alkaline battery is recommended)3) Replace batter cover.- The controller will beep once when the new battery is inserted.- If there is no “beep”, remove the new battery, wait 5 seconds, then reinstall it.Page 11
Keypad Lock:To avoid accidental pressing of the Controller’s buttons, the buttons can be“Locked”.Enable Keypad Lock:Press “Button-3” & the “Arm/Lock” button at the same time.- The controller will emit one beep, and the KEY LOCK icon will appear.Disable Keypad Lock:Press “Button-3” & the “Disarm/Unlock” button at the same time.- The controller will emit one long beep & the KEY LOCK icon will disappear.Controller Backlight:To Turn on the Controller Backlight:Press “Button-5”- The backlight will turn on for 3 seconds.Controller Mute (Vibrator):To Enable the Mute function:Press “Button-4” & the “Arm/Lock” button at the same time.- The Controller will vibrate 3 times & the MUTE icon will appear.To Disable the Mute functionPress “Button-4” & the “Disarm/Unlock” button at the same time.- The Controller will emit 1 beep & the MUTE icon will disappear.Page 12
Vehicle Image Selection & Multi<strong>car</strong> Function:The controller allows you to select which type of vehicle is operated anddisplayed on the LCD screen. This can be selected when powering up thecontroller or using the icon selection routine. Each “vehicle type” serves as a“code bank” which is particular to the vehicle in which the <strong>alarm</strong> is installed.For example, the controller comes factory standard with the “Car” icon displayedon its LCD screen. If the “SUV” or the “Pick-Up Truck” icon is desiredinstead, the controller needs to be reprogrammed to operate the <strong>alarm</strong>.Since each “vehicle type icon” is its own “code-bank”, then a single controllercan operate <strong>alarm</strong>s in up to 3 different vehicles. The controller will only operatethe <strong>alarm</strong> in the vehicle for which the “vehicle type icon” is displayed.IMPORTANT: If the “vehicle type icon” is changed at the controllerduring operation or by accident, then the controller will only operate the<strong>alarm</strong> in the vehicle displayed.Example: If you own 2 vehicles, a <strong>car</strong> and an SUV. When the controller’s LCDscreen displays a “Car”, it will operate the <strong>alarm</strong> in the <strong>car</strong>. If you want tooperate the <strong>alarm</strong> installed in your SUV, you must change the LCD screenicon to show the SUV.To Enter “Vehicle Type Icon” Selection mode:1) Power up the controller by replacing the battery, or2) Press & Hold “Button-5” on the controller until the controller emits a longbeep followed by a short beep.3) Once in selection mode:- Press the “Arm/lock” button to select a “Car”, the controller beeps once.- Press the “Disarm/Unlock” button to select an “SUV”, the controller beepstwice.- Press “Button-3” to select a “Pick-Up”, the controller beeps three times.To Exit the selection mode:Press “Button-5” again, or wait for 5 seconds for the controller to exit selectionmode.Page 13
Time Clock:How to set the clock:Press & Hold “Button-5” on the controller until the controller emits a longbeep, followed by a short beep, followed by two short beeps.- The “Time” icon will start blinking.- Use “Button-3” to select hour or minute.- Use “Button-1” to increase the hours or minutes.- Use “Button-2” to decrease the hours or minutes.To exit time clock mode, press “Button-5” or wait 8 seconds.Range:The “Transmitting Tower” icon will be present if the <strong>alarm</strong> responded to thelast command from the controller. If there is no reply from the <strong>alarm</strong>, the iconwill turn off.Page 14
Programmable Anti-Carjacking ProtectionThe Anti-Carjacking sequence may be activated by any of 4 methods:1) Using the controller, by holding down “Button-4” for 2 seconds while the ignitionis “On”. (Programmable feature)2) When a door is Opened while the ignition is “On” (programmable feature)3) Every time the ignition is turned “On”. (Programmable feature)1) Anti-Carjacking activated using the controller: (Programmable feature)The Anti Car-Jacking operation may be activated by pressing and holding“Button-4” on the controller for 2 seconds while the ignition is “On”.2) Anti-Carjacking activated by an Open door: (Programmable feature)If this programmable feature is “On”, the system will initiate the Anti-Carjackingsequence every time a vehicle door is opened while the ignition is “On”.3) Anti-Carjacking activated by the Ignition: (Programmable feature)If this programmable feature is “On”, the system will initiate the Anti-Carjackingsequence every time the vehicle’s ignition is turned “On”.IMMOBILIZER MODE: If the “Immobilizer mode” is programmed “On”, theignition activated anti-<strong>car</strong>jacking sequence will be cancelled and the “Immobilizermode” disarmed by: first turning “On” the vehicle’s ignition, then enter your “Pin-Code” (1-12) using the valet button. (Refer to programmable features)4) “Hands-Free” Anti-Carjacking: (Programmable feature)This feature adds a “Layer” of additional security and convenience to both the“Open door” and “Ignition” activated Anti-Carjacking sequences.If this programmable feature is “On”, the <strong>alarm</strong> will start to search for the controllerevery time the system’s “Open door” or “Ignition” activated Anti-Carjackingsequences are initiated. The <strong>alarm</strong> is looking for a confirmation from yourcontroller that you are still in or near the vehicle.- If the <strong>alarm</strong> does not receive a “confirmation” from your controller within 20seconds, the <strong>alarm</strong> will initiate the Anti-Carjacking sequence.– If the controller’s signal is found before full Anti-Carjacking Trigger, thecountdown is stopped. The <strong>alarm</strong> will continue to search for 5 minutes.IMPORTANT NOTE (Please Read):For this Anti-Carjacking system to be effective, the driver MUST keep thecontroller hidden on their body, NOT hanging with the keys at the ignition. Thisway, in the unfortunate event that you are <strong>car</strong>jacked, simply follow these steps:- Surrender the vehicle to the attacker while keeping your controller.- When the attacker drives away with your vehicle, the communication linkbetween the controller, which you still have, is broken with the vehicle. Once thislink is broken, the Anti-Carjacking sequence will initiate.Page 15
Once the Anti-Carjacking sequence has begun, the user has 59 seconds topress the Valet/Override Switch in order to cancel the sequence.ORDER OF ANTI-CARJACKING SEQUENCE:- For first 20 seconds after the sequence has begun there are no signs.- From 21-30 seconds, the LED will blink slowly.- From 31-45 seconds, the LED will blink fast and the siren/horn will chirponce every 2 seconds.- From 46-60 seconds, the LED will blink fast and the siren/horn will chirponce per second.- If not cancelled yet, at 61 seconds the <strong>alarm</strong> will trigger.In the triggered condition:- The siren/horn will sound & The parking lights will flash.- The starter interrupt will engage.NOTE: Once the Anti-Carjack mode is triggered, the controller will NOT stop theoperation, nor will the system reset automatically. Once it is triggered, theAnti-Carjacking operation can only be deactivated by:1) Turning the vehicle’s ignition “Off”.2) Turning the vehicle’s ignition back “On”.3) Within 20 seconds, enter your “Pin-Code” (1-12) using the Valet button.The LED Status IndicatorThe LED Status Indicator visually shows the status of the <strong>alarm</strong> and also providesa high level of visual deterrence. The LED Status Indicator Light is normallymounted where it can be seen by the driver, as well as from outside.Security System Status: The primary function of the LED Status Indicator Lightis to indicate the normal operating status of the security system:Off = The system is disarmed and not performing any automatic functions.On Constant = The system is in the Valet Mode.Flashing Slow = The system is fully Armed.Flashing Fast (while Disarmed) = Last Door Arming or Automatic Rearming.Zone Violation: Once <strong>alarm</strong> is Disarmed, LED will show which zone triggered<strong>alarm</strong> until the ignition is turned “On” (this clears unit’s memory).1 flash & pause = Hood-Switch zone triggered <strong>alarm</strong>.2 flashes & pause = Pin-Switch zone triggered <strong>alarm</strong>.3 flashes & pause = Door zone triggered <strong>alarm</strong>.4 flashes & pause = Sensor zone triggered <strong>alarm</strong>.5 flashes & pause = Vehicle’s Ignition zone triggered <strong>alarm</strong>.Automatic Transmitter Verification: For the first 10 seconds after the vehicle’signition is turned "On", the LED Status Indicator will flash a number of times equalto the number of controllers which are programmed to operate the <strong>alarm</strong>.Page 16
Valet ModeValet Mode can only be entered into while the <strong>alarm</strong> is Disarmed.Valet Mode turns off all of the <strong>alarm</strong>’s security features, (including Anti-Carjack).Valet Mode is designed for situations in which it is not convenient for the securityportion of the <strong>alarm</strong> to be operational; for example during extended stopovers forvehicle servicing, loaning others your vehicle, maintenance, valet parking,washing, etc. The convenience features such as keyless entry will still operate.To Enter Valet Mode (Alarm MUST be Disarmed):Press & Hold the Valet Switch for 3 Seconds.- The LED Status Indicator will light solid Red and the siren will emit a long chirpto confirm entry into “Valet” Mode. Now the <strong>alarm</strong> cannot become Armed.- The vehicle's ignition may be "On" or "Off" when entering Valet Mode.- To remind you its in Valet Mode ,The siren will chirp every time the vehicle’signition is turned “Off”Controller Valet Entry Confirmation:- The Controller will lay a tone to confirm entry into “Valet” Mode.- The status icons on the LCD display will be replaced withTo Exit Valet Mode: Simply Press & Release the Valet Switch.- The LED will turn off and the siren will emit a long chirp to confirm that the<strong>alarm</strong> has exited Valet Mode. Normal arming operations may be resumed.- The vehicle's ignition may be "On" or "Off" when exiting Valet Mode.Controller Valet Exit Confirmation:- The Controller will lay a tone to confirm exit from “Valet” Mode.- The “VALET” status icon on the LCD display will be replaced withPage 17
Auxiliary Sensor & PrewarningAuxiliary Sensor: This security system is equipped with a plug-in port for anoptional sensor to increase the effectiveness of the system. The comprehensiveline of optional sensors offered is comprised of impact sensors, glass tamperingsensors, and microwave/radar sensors which can detect motion inside andoutside the vehicle.Prewarning Detection: This circuit requires connection to a dual zone sensoror detection device. When the sensor’s prewarn zone is triggered the siren willemit a series of chirps.How to Program Controllers to the AlarmTo program remote controls to operate the <strong>alarm</strong>:Step 1: With the <strong>alarm</strong> “Disarmed”, Turn "On" the vehicle's ignition.Step 2: Within 7 seconds press the Valet/Override Switch 5 times. The <strong>alarm</strong>will chirp the siren once to confirm entry into Remote Control Programming Mode.Step 3: Within 10 seconds, press any Button on each controller to be programmed.The siren will chirp to confirm each time a controller has been programed.MAKE SURE THE “VEHICLE TYPE ICON” DESIRED IS DISPLAYED!!!If 10 seconds expire without any programming activity, or if the vehicle’s ignitionis turned “Off”, the <strong>alarm</strong> will automatically exit Remote Control ProgrammingMode. The siren will emit 2 long chirps to confirm exit.NOTE: Up to 4 controllers can be programed to operate the <strong>alarm</strong>. Whenever aremote control, new or existing, is programmed to the <strong>alarm</strong>, all existing codesare erased for security. So all remote controls which are to operate the <strong>alarm</strong>,must be programmed in at the same time.Immobilizer Mode: The Immobilizer mode must be disarmed before entering“controller programming” mode. (Refer to programmable features)1. Turn “On” the vehicle’s ignition2. Enter your “Pin-Code” (1-12) using the Valet/Override button.- The siren will chirp twice to confirm Immobilizer mode is disarmed.3. Press Valet/override button 5 times to enter remote control programming mode.ATV: The LED Status Indicator will show the number of controllers programmedto operate the <strong>alarm</strong>, for 10 seconds after the vehicle’s ignition is turned On.As the instructions above show, programming extra controllers to any vehiclesecurity system is easy; the exclusive patented ATV feature protects againstsomeone programming their own controller to operate your system.Page 18
To access Features Programming Mode:Step 1: Turn the vehicle's ignition "On" then "Off".Step 2: Within 7 seconds of turning the ignition "Off", press the Valet Switch 5times. The siren will wolf once confirming entry to Features Programming Mode.Step 3: Within 10 seconds of entering Features Programming Mode, press theValet Switch the number of times equal to the number of the feature to beprogrammed. The siren will repeat the feature number with chirps to confirm.Step 4: After the system acknowledges the feature to be programmed:- press the “Lock” button on the remote to turn the feature “ON” (the siren willchirp once), or,- press the “Unlock” Button to turn feature “OFF” (siren will chirp twice).Note: Once the feature to be programed is selected, you can toggle thefeature between its settings by pressing the “Lock” & “Unlock” buttons onthe remote control.- To program more features, simply repeat Steps 3 and 4.- If 10 seconds expire without any programming activity, or if the vehicle’s ignitionis turned “On”, the <strong>alarm</strong> will automatically exit Features Programming Mode.The siren will confirm exit.The <strong>alarm</strong> has 23 programmable features which allow it to be customized to suitemany individual needs. The following pages provide a brief explanation for eachfeature, and notes its factory default setting.• = Default Factory SettingHow to Program FeaturesProgrammable Features1. Pin-Code: (1-12, • Default code is 1)- This feature allows the user to program a “Pin-code” between 1-12 pressesof the Valet/override button for use in Emergency override situations.A. Enter the Features programming mode and select feature #1.B. Within 10 seconds, slowly press and release the controller’s “Arm/Lock”button a number of times equal to the desired “Pin-code”, up to 12.- The siren will chirp every time the controller’s “Arm/Lock” is pressed toconfirm that its entry was registered, wait for the chirp before pressing the“Arm/Lock” button again.C. 4 seconds after the last press of the controller’s “Arm/Lock”, the siren willchirp the new “Pin-code” to confirm the number that has been entered.- The user can program another feature by pressing the Valet button toselect next feature to be programmed (step 3).Page 19
2. Last Door Arming: (On = 1 siren chirp / •Off =2 chirps)- Configures the <strong>alarm</strong> to automatically arm itself 30 seconds after the lastdoor is closed with the ignition “Off”.Arm/Lock Button (1 Siren Chirp) = Last Door Arming “On”• Disarm/Unlock Button (2 Siren Chirps) = Last Door Arming “Off”3. Doors Lock w/ Last Door Arming: (•On = 1 siren chirp /Off = 2 chirps)- Adds the automatic locking of the vehicle's doors to the previous feature.• Arm/Lock Button (1 Siren Chirp) = Doors Lock “On”Disarm/Unlock Button (2 Siren Chirps) = Doors Lock “Off”4. Auto-Rearm: (On = 1 siren chirp / •Off = 2 chirps)- Allows the Alarm to Rearm itself, if it is Disarmed and a vehicle door is not opened.Arm/Lock Button (1 Siren Chirp) = Auto-Rearm “On”• Disarm/Unlock Button (2 Siren Chirps) = Auto-Rearm “Off”5. Doors Lock w/ Auto-Rearm: (•On = 1 siren chirp /Off = 2 chirps)- Adds the automatic locking of the vehicle's doors to the previous feature.• Arm/Lock Button (1 Siren Chirp) = Doors Lock “On”Disarm/Unlock Button (2 Siren Chirps) = Doors Lock “Off”6. Siren & Horn or Horn: ( •Siren & Horn = 1 siren chirp / Horn = 2 chirps)- This feature configures the <strong>alarm</strong>’s Brown/White Horn-Honk output wire. This wirecan be configured to honk the horn in addition to the Brown wire operating the siren,or take over all of the Siren’s functions SO THAT NO SIREN IS NECESSARY.- If Siren & Horn are selected: The horn will honk in addition to siren soundingonly when the door, pin-switch, or ignition zones are violated. (The horn will nothonk if <strong>alarm</strong> is triggered by the sensor zone, or during confirmation “chirps”)- If Only Horn is selected: The <strong>car</strong> horn will replace the siren and perform all ofits functions. NOTE: Brown Siren wire will still be fully active & operational.• Arm/Lock Button (1 Siren Chirp) = Siren & HornDisarm/Unlock Button (2 Siren Chirps) = Horn OnlyPage 20
7. Ignition Door Lock: (•On = 1 siren chirp / Off = 2 chirps)- Configures the <strong>alarm</strong> to Lock the doors when the ignition is turned “On”• Arm/Lock Button (1 Siren Chirp) = Ignition Door Lock “On”Disarm/Unlock Button (2 Siren Chirps) = Ignition Door Lock “Off”8. Ignition Door Unlock: (•On = 1 siren chirp / Off = 2 chirps)- Configures the <strong>alarm</strong> to Unlock the doors when the ignition is turned “Off”.• Arm/Lock Button (1 Siren Chirp) = Ignition Door Unlock “On”Disarm/Unlock Button (2 Siren Chirps) = Ignition Door Unlock “Off”9. System Trigger Cycle: (•30s = 1 siren chirp / 60s = 2 chirps)- Configures the <strong>alarm</strong> trigger duration to be 30 or 60 seconds.• Arm/Lock Button (1 Siren Chirp) = 30 SecondsDisarm/Unlock Button (2 Siren Chirps) = 60 Seconds10. Double Pulse Unlock: ( 2 pulses = 1 siren chirp / • 1 pulse = 2 chirps)- Sets <strong>alarm</strong> to give 2 unlock pulses upon Disarm for <strong>car</strong>s that require it.Arm/Lock Button (1 Siren Chirp) = 2 Unlock Pulses• Disarm/Unlock Button (2 Siren Chirps) = 1 Unlock Pulse11. Immobilizer Mode: ( On = 1 siren chirp / •Off = 2 chirps)- If this mode is programmed “On”, the starter interrupt will remain engaged afterthe <strong>alarm</strong> is Disarmed, until the vehicle’s ignition is turned “On” and you enteryour “Pin-Code” using the Valet button.- If an incorrect “Pin-Code” is entered, the vehicle’s ignition must be turned “Off”,and then back “On” again, in order to re-input the “Pin-Code”.- Anti-Carjack: Upon disarming the “Immobilizer mode”, ignition activated anti<strong>car</strong>jackingwill be automatically cancelled, (if programmed “On”).- Remote Control Programming Mode: Immobilizer mode must be disarmedbefore entering remote control programming mode.Arm/Lock Button (1 Siren Chirp) = Immobilizer Mode “On”• Disarm/Unlock Button (2 Siren Chirps) = Immobilizer Mode “Off”Page 21
12. Shock Sensor False-Alarm Bypass: (On = 1 siren chirp / •Off = 2 chirps)- This feature will temporarily turn “Off” the shock sensor & pre-warn zone if:a. The pre-warn is triggered 10 times while the <strong>alarm</strong> is Armed.b. The instant trigger zone is triggered 5 times while the <strong>alarm</strong> is Armed.- The by-passed zones will be reinstated the next time the <strong>alarm</strong> is Armed.Arm/Lock Button (1 Siren Chirp) = Sensor Bypass “On”• Disarm/Unlock Button (2 Siren Chirps) = Sensor Bypass “Off”13. Dome-Light Delay Bypass: (On = 1 siren chirp / •Off = 2 chirps)- This feature will turn “Off” the 3-chirp open zone warning when Arming the <strong>alarm</strong>with the remote control. This is for use in vehicles that keep the dome-lightilluminated after the doors have been closed.Arm/Lock Button (1 Siren Chirp) = Dome-Light Bypass “On”• Disarm/Unlock Button (2 Siren Chirps) = Dome-Light Bypass “Off”14. Auxiliary Channel Output: (• 1.5 Sec = 1 siren chirp / 30 Sec = 2 chirps)- Configures the <strong>alarm</strong>’s “Grey” wire to operate the:a. Trunk Release: Supply a 1.5 second (-) output when the “Button-3” on thecontroller is held for 2 seconds, with the vehicle’s ignition “Off”.b. Window Roll-Up or accessory: Supply a (-) output for 30 seconds when “Button-3” on the controller is held for 2 seconds, to operate a Window Roll-Up module orother accessory.• Arm/Lock Button (1 Siren Chirp) = Trunk Release 1.5 Second PulseDisarm/Unlock Button (2 Siren Chirps) = 30 Second Output15. Auxiliary Function: (• Disarm = 1 siren chirp / Maintain Status = 2 chirps)- This feature adds an addition option to feature #14, it configures the <strong>alarm</strong> to eitherDisarm when the Auxiliary channel is activated, or maintain its current status.NOTE: Feature #14 must be programmed to “Trunk Release 1.5 Second Pulse”for this feature to work.• Arm/Lock Button (1 Siren Chirp) = Aux Disarms AlarmDisarm/Unlock Button (2 Siren Chirps) = Alarm Maintains StatusPage 22
16. 3rd Channel Output: (this feature has 3 possible settings)1) Up to a 30 second latched output when ignition is “Off” = 1 siren chirpSupply a latched (-) output, for up to 30 seconds, when ”Button-4” on the controlleris pressed & held for 2 seconds, while the vehicle’s ignition is “Off”.-A second press of “Button-4” will turn “Off” the output.2) 30 second output when <strong>alarm</strong> is Armed = 2 siren chirpsSupply a (-) output for 30 seconds when the <strong>alarm</strong> is Armed to operate a WindowRoll-Up module or other accessory.•3) “Remote Start” mode = 3 siren chirps- The 3rd Channel can be programmed for “Remote Start” mode. This mode is foruse in conjunction with an optional “Starter” unit. It allows the vehicle to be“remote started” without triggering the unit, while still protecting the perimeter.When activated, the <strong>alarm</strong> will bypass the sensor & ignition zones, monitoringthe door zone.Arm/Lock Button (1 Siren Chirp) = 30 Second Latched outputDisarm/Unlock Button (2 Siren Chirps) = 30 Second Output When Armed• “Button-3” (3 Siren Chirps) = Remote Start Mode17. Controller Activated Anti-Carjacking: (On = 1 chirp / •Off = 2 chirps)- This feature turns the <strong>alarm</strong>’s Controller activated Anti-Carjacking feature “On”or “Off”.Arm/Lock Button (1 Siren Chirp) = Controller Anti-Carjacking “On”• Disarm/Unlock Button (2 Siren Chirps) = Controller Anti-Carjacking “Off”18. Open Door Activated Anti-Carjacking: (On = 1 chirp / •Off = 2 chirps)- This feature turns the <strong>alarm</strong>’s Open Door activated Anti-Carjacking feature “On”or “Off”.Arm/Lock Button (1 Siren Chirp) = Door Anti-Carjacking “On”• Disarm/Unlock Button (2 Siren Chirps) = Door Anti-Carjacking “Off”19. Ignition Activated Anti-Carjacking: (On = 1 siren chirp / •Off = 2 chirps)- This feature turns the <strong>alarm</strong>’s Ignition Anti-Carjacking feature “On” or “Off”.Arm/Lock Button (1 Siren Chirp) = Ignition Anti-Carjacking “On”• Disarm/Unlock Button (2 Siren Chirps) = Ignition Anti-Carjacking “Off”Page 23
20. “Hands-Free” Activated Anti-Carjacking: (On = 1 siren chirp / •Off = 2chirps)- This feature turns the <strong>alarm</strong>’s “Hands-Free” Anti-Carjacking feature “On” or “Off”.- This feature adds a “Layer” of additional security and convenience to both the“Open door” and “Ignition” activated Anti-Carjacking sequences.Arm/Lock Button (1 Siren Chirp) = “Hands-Free” Anti-Carjacking “On”• Disarm/Unlock Button (2 Siren Chirps) = “Hands-Free” Carjacking “Off”21. “Hands-Free” Activated Disarming: (On = 1 siren chirp / •Off = 2 chirps)This feature allows the controller to automatically “Disarm” the unit wheneverthe controller comes into close proximity to the vehicle.Arm/Lock Button (1 Siren Chirp) = “Hands-Free” Disarming “On”• Disarm/Unlock Button (2 Siren Chirps) = “Hands-Free” Disarming “Off”22. Lock Pulse Time: ( 4 seconds = 1 siren chirp / • 0.8 seconds = 2 chirps)- Determines the length of the <strong>alarm</strong>’s door lock/unlock pulse output.Arm/Lock Button (1 Siren Chirp) = 4 Second Lock Pulse• Disarm/Unlock Button (2 Siren Chirps) = 0.8 Second Lock Pulse23. Factory Settings Reset- Returns all of the <strong>alarm</strong>’s Programmable features to factory default settings.Arm/Lock Button (1 Siren Chirp) = Resets Alarm To Factory SettingsPage 24
123412341234123412341234123412341234123412341234123412341234123412341234UnitTransceiverAU-SOCKET& relay forstarter interruptPink: (-) 3rdChannel Output1234Brown: (+)Siren Output(2)White:(+)ParkingLightOutputParking LightsBlue: (-)Instant TriggerInputViolet:(+) DoorTriggerK-9<strong>Eclipse</strong>Black/White:(-) Dome LightOutputOrange: Armed (-) OutputRed/White:(+/-) LightPolarityWhite: To StarterRed: ToIgnitionSwitchRelayDual ZoneShockSensorIgnitionSwitchLED Status LightValet SwitchGreen: (-) Door TriggerRed: (+) 12 Volt PowerBlack:(-)Ground12341234StarterViolet: Unlock Relay Input Pin #87 (N/O)DOOR LOCKS:15 Amp1234Yellow: 12Volt Ignition(+)Gray: AuxillaryChannel+Brown/Black: (-)Hood SwitchBrown/White: (-)Horn HonkBlue: Unlock Relay Output pin #30 (Common)Brown: Unlock Relay Input Pin #87A (N/C)Violet/Blk: (Lock Relay Input Pin #87 (N/O)Battery Green/Blk: (Lock Relay Output pin #30 (Common)White/Blk: Lock Relay Input Pin #87A (N/C)Page 25
Door Locking Systems / Sistemas De CierreNegative Trigger System / Sistema Negativo:White/Black (not used) Blanco/Negro (No se usa)Green/Black / Verde/NegroViolet/Black / Violeta/NegroBrown (not used) Blanco/Negro (No se usa)Blue / Azul+DoorlockActuatorsViolet / VioletaGround/TierraGround/TierraUnlock wire/Cable de AperturaLock wire / Cable de cierreUnlockGround/TierraDoorlock SwitchLockVehicle's DoorlockRelay Control UnitPositive Trigger System / Sistema Positivo:White/Black (not used) Blanco/Negro (No se usa)Green/Black / Verde/NegroViolet/Black / Violeta/NegroBrown (not used) Blanco/Negro (No se usa)Blue / Azul+Fuse(+)12 VoltsViolet / VioletaDoorlock SwitchUnlock wire/Cable de AperturaFuse(+)12 VoltsLock wire / Cable de cierreUnlockLockVehicle's DoorlockRelay Control Unit5 Wire Reversal (Rest at ground): Cambio de Polaridad:White/Black / Blanco/Negro (lock pin # 87A)Green/Black / Verde/Negro (lock pin # 30)Violet/Black / Violeta/Negro (lock pin # 87)Brown / Blanco/Negro (unlock pin # 87A)Blue / Azul (unlock pin #30)Violet / Violeta (unlock pin #87)Fuse(+)12Driver Doorlock SwitchUnlockFuse(+)12Cut both Lock andUnlock wires in <strong>car</strong>-Lock wire "Motor" side.-cable de Cierre, lado MotorPassengerDoorlock SwitchUnlock- Lock wire "Switch" side.-cable de Cierre, lado del switch- GroundLock- Unlock wire "Switch" side.-cable de Apertura, lado del switch- Unlock wire "Motor" side.-cable de Apertura, lado MotorLockPage 26
1234512345123451234512345123451234512345123451234512345123451234512345123451234512345123451234512345SEGUROSAntennaNarajanja: Salida (-) para el corteCorteMotor dearranqueSensorDeDobleZonaRojo: Lado de ignicionhBlanco:Motor de arranqueLEDIgnicionValetAzul: (-) Disparo Am,arillo:Rosado: (-) Violeta: (+)Ignicion (+)Tercer Canal AuxPuertasVerde: (-) PuertasK-9<strong>Eclipse</strong>Gris: (-) Canal Auxiliarl(2)Blanco:(+/-)Salida paraluces deestancionamientoCafe/Negro: (-)CapoRojo: (+) 12 VoltiosNegro: (-)TierraCafe: (+) SirenaVioleta: Unlock Relay Entrada Pin #87 (N/O)Azul: Unlock Relay Salida pin #30 (Common)15 AmpRojo/Blanco: (+/-)Entrada para lucesde estancionamientoCafe/Blanco: (-)ClaxonCafe: Unlock Relay Entrada Pin #87A (N/C)Violeta/Negro: (Lock Relay Entrada Pin #87 (N/O)+Verde/Negro: (Lock Relay Salida pin #30 (Common)BaterriaNegro/Blanco: (-) Salidapara la ;uz de la cabinaBlanco/Negro: Lock Relay Entrada Pin #87A (N/C)luces de estancionamiento12345Page 27