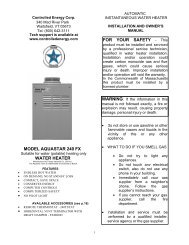
installation and operating instructions for aq-1 and aq-2 power vent ...
installation and operating instructions for aq-1 and aq-2 power vent ...
installation and operating instructions for aq-1 and aq-2 power vent ...

You also want an ePaper? Increase the reach of your titles
YUMPU automatically turns print PDFs into web optimized ePapers that Google loves.
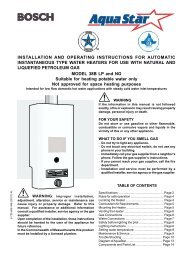
Be<strong>for</strong>e beginning <strong>installation</strong> reviewrequired clearances <strong>for</strong> Aquastar,Power Vent Motor <strong>and</strong> Vent HoodPower Vent KitCAUTION1. Failure to install, maintain <strong>and</strong>/or operate thePower Venter in accordance withmanufacturer's instruction may result inconditions which can produce bodily injury <strong>and</strong>property damage.2. The Power Venter must be installed by <strong>aq</strong>ualified installer in accordance with all localcodes or, in their absence, in accordance withthe National Fuel Gas Code (ANSIZ223.1NFPA #54), the National Electric Code<strong>and</strong> The Occupational Health <strong>and</strong> Safety Act(OSHA) as applicable.3. The Power <strong>vent</strong>er motor shaft must bemounted horizontally to pre<strong>vent</strong> motor bearingwear.4. Disconnect <strong>power</strong> supply when making wiringconnections or when working around the fanblade <strong>and</strong> motor. Failure to do so may resultin severe personal injury <strong>and</strong> equipmentdamage.5. Make certain the <strong>power</strong> source is adequate <strong>for</strong>the fan motor requirements. Do not add the<strong>power</strong> <strong>vent</strong>er to a circuit where the total loadis unknown.Aquastar1. Follow <strong>installation</strong> <strong>and</strong> <strong>operating</strong> <strong>instructions</strong>manual supplied with the Aquastar.2. Be<strong>for</strong>e mounting water heater to wall, checkits minimum clearance requirements.3. When using an AQ-1 or AQ-2 the maximumhorizontal distance from Aquastar to dischargeis 100 feet. Subtract 10 feet <strong>for</strong> each addedelbow. Install <strong>power</strong> <strong>vent</strong>er motor as closeto the termination as possible to maintainthe Aquastar's optimal efficiency.FREEZING CONCERNS TO AQUASTAR:The <strong>vent</strong> hood <strong>and</strong> <strong>power</strong> <strong>vent</strong> will not pre<strong>vent</strong> infiltrationof cold air to the Aquastar when not in use.Be sure to correct any causes of negative air pressurein room. If this is difficult add additionalhorizontal lengths of 4" <strong>vent</strong> pipe between <strong>power</strong><strong>vent</strong> <strong>and</strong> the Aquastar to warm any infiltrating air.Gas Pressure SwitchRemove the gas pressure switch from the carton.Also remove the brass fittings (170vp: 1/8" NPT by1/4"compression fitting <strong>and</strong> nut), (125X/B models:manifold pressure tap fitting <strong>and</strong> 1/4" compressionnut). The four self-tapping screws <strong>and</strong> the two sectionsof 1/4" diameter aluminum tubing from themaster carton.The gas pressure switch is to be mounted in such away that the diaphragm is oriented vertically <strong>and</strong> thealuminum tubing pieces can easily reach the manifoldpressure test nipple <strong>and</strong> the burner respectively.It must not be mounted inside the heater. See p.6When mounting to an Aquastar 170vp: We recommendmounting on the lower right side of theAquastar. Both sides of the switch bracket can screwinto the side panel. Installed in this manner allnecessary connections will be well within reach <strong>and</strong>there should be minimal interference when servicing.The four screws provided are self-tapping. Their 1/2"length assure that components inside the Aquastar willnot be damaged upon penetration. You must notmount the switch where the screws could penetratethe heat exchanger tubing inside theAquastar.When mounting to Aquastar 125X/B models: Werecommend mounting the gas pressure switch verticallyagainst a wall on the lower left side of Aquastar125X/B models. Because the cabinet cover is threesided we do not recommend screwing the gas pressureswitch to the left side of it. Instead, mount the gaspressure switch vertically against a wall on the lower leftside of Aquastar 125X/B models. Installed in thismanner all necessary connections will be within reach<strong>and</strong> there will be minimal interference when servicing.See p.62