AL-1630-EDPB Operation Guide - car alarm
AL-1630-EDPB Operation Guide - car alarm
AL-1630-EDPB Operation Guide - car alarm

You also want an ePaper? Increase the reach of your titles
YUMPU automatically turns print PDFs into web optimized ePapers that Google loves.
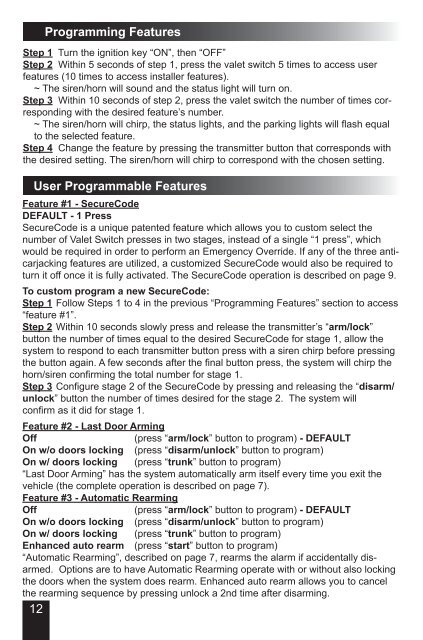
Programming FeaturesStep 1 Turn the ignition key “ON”, then “OFF”Step 2 Within 5 seconds of step 1, press the valet switch 5 times to access userfeatures (10 times to access installer features).~ The siren/horn will sound and the status light will turn on.Step 3 Within 10 seconds of step 2, press the valet switch the number of times correspondingwith the desired feature’s number.~ The siren/horn will chirp, the status lights, and the parking lights will flash equalto the selected feature.Step 4 Change the feature by pressing the transmitter button that corresponds withthe desired setting. The siren/horn will chirp to correspond with the chosen setting.User Programmable FeaturesFeature #1 - SecureCodeDEFAULT - 1 PressSecureCode is a unique patented feature which allows you to custom select thenumber of Valet Switch presses in two stages, instead of a single “1 press”, whichwould be required in order to perform an Emergency Override. If any of the three anti<strong>car</strong>jackingfeatures are utilized, a customized SecureCode would also be required toturn it off once it is fully activated. The SecureCode operation is described on page 9.To custom program a new SecureCode:Step 1 Follow Steps 1 to 4 in the previous “Programming Features” section to access“feature #1”.Step 2 Within 10 seconds slowly press and release the transmitter’s “arm/lock”button the number of times equal to the desired SecureCode for stage 1, allow thesystem to respond to each transmitter button press with a siren chirp before pressingthe button again. A few seconds after the final button press, the system will chirp thehorn/siren confirming the total number for stage 1.Step 3 Configure stage 2 of the SecureCode by pressing and releasing the “disarm/unlock” button the number of times desired for the stage 2. The system willconfirm as it did for stage 1.Feature #2 - Last Door ArmingOff(press “arm/lock” button to program) - DEFAULTOn w/o doors locking (press “disarm/unlock” button to program)On w/ doors locking (press “trunk” button to program)“Last Door Arming” has the system automatically arm itself every time you exit thevehicle (the complete operation is described on page 7).Feature #3 - Automatic RearmingOff(press “arm/lock” button to program) - DEFAULTOn w/o doors locking (press “disarm/unlock” button to program)On w/ doors locking (press “trunk” button to program)Enhanced auto rearm (press “start” button to program)“Automatic Rearming”, described on page 7, rearms the <strong>alarm</strong> if accidentally disarmed.Options are to have Automatic Rearming operate with or without also lockingthe doors when the system does rearm. Enhanced auto rearm allows you to cancelthe rearming sequence by pressing unlock a 2nd time after disarming.12