Hancock 1500, 2500 and 4500 Pound Forged ... - Industrial Controls
Hancock 1500, 2500 and 4500 Pound Forged ... - Industrial Controls
Hancock 1500, 2500 and 4500 Pound Forged ... - Industrial Controls

You also want an ePaper? Increase the reach of your titles
YUMPU automatically turns print PDFs into web optimized ePapers that Google loves.
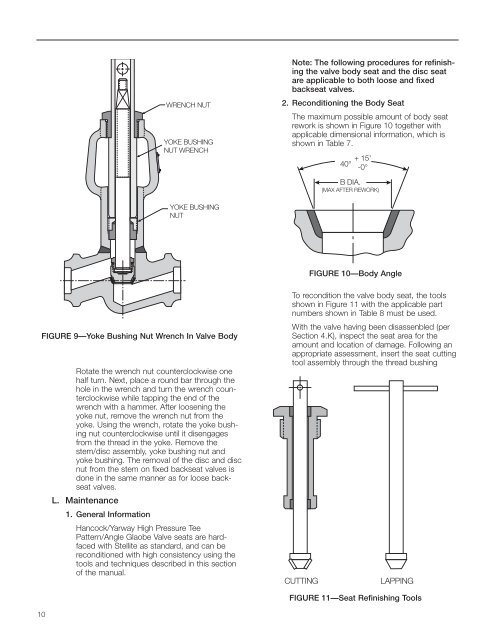
Note: The following procedures for refinishingthe valve body seat <strong>and</strong> the disc seatare applicable to both loose <strong>and</strong> fixedbackseat valves.2. Reconditioning the Body SeatThe maximum possible amount of body seatrework is shown in Figure 10 together withapplicable dimensional information, which isshown in Table 7.FIGURE 10—Body AngleFIGURE 9—Yoke Bushing Nut Wrench In Valve BodyRotate the wrench nut counterclockwise onehalf turn. Next, place a round bar through thehole in the wrench <strong>and</strong> turn the wrench counterclockwisewhile tapping the end of thewrench with a hammer. After loosening theyoke nut, remove the wrench nut from theyoke. Using the wrench, rotate the yoke bushingnut counterclockwise until it disengagesfrom the thread in the yoke. Remove thestem/disc assembly, yoke bushing nut <strong>and</strong>yoke bushing. The removal of the disc <strong>and</strong> discnut from the stem on fixed backseat valves isdone in the same manner as for loose backseatvalves.L. Maintenance1. General Information<strong>Hancock</strong>/Yarway High Pressure TeePattern/Angle Glaobe Valve seats are hardfacedwith Stellite as st<strong>and</strong>ard, <strong>and</strong> can bereconditioned with high consistency using thetools <strong>and</strong> techniques described in this sectionof the manual.To recondition the valve body seat, the toolsshown in Figure 11 with the applicable partnumbers shown in Table 8 must be used.With the valve having been disassenbled (perSection 4.K), inspect the seat area for theamount <strong>and</strong> location of damage. Following anappropriate assessment, insert the seat cuttingtool assembly through the thread bushingFIGURE 11—Seat Refinishing Tools10